
Owners Guide
Page 1
PLASMA TELEVISION Spanish Section 87~172 Click Here Operating Guide for P50V701 IMPORTANT SAFETY INSTRUCTIONS 2-3 FIRST TIME USE ...4-25 THE REMOTE CONTROL...26-42 ON-SCREEN DISPLAY ...43-79 USEFUL INFORMATION...80-86 OPERATING GUIDE IN SPANISH 87-172 END USER LICENSE AGREEMENT FOR HITACHI DTV SOFTWARE 173-181 APPENDIXES...182-183 INDEX...184 Change 1 Page 33, Added note about PIP message
PLASMA TELEVISION Spanish Section 87~172 Click Here Operating Guide for P50V701 IMPORTANT SAFETY INSTRUCTIONS 2-3 FIRST TIME USE ...4-25 THE REMOTE CONTROL...26-42 ON-SCREEN DISPLAY ...43-79 USEFUL INFORMATION...80-86 OPERATING GUIDE IN SPANISH 87-172 END USER LICENSE AGREEMENT FOR HITACHI DTV SOFTWARE 173-181 APPENDIXES...182-183 INDEX...184 Change 1 Page 33, Added note about PIP message
Owners Guide
Page 3
Never connect the plasma television to 50 Hz, direct current, or anything other than 2.5 minutes, protection function will ...by your HITACHI Factory Warranty. A CableCARD provided by TV stations and cable companies, as well as video-on back side and right side of the plasma television. Note • There are no user serviceable parts inside the plasma television. ...technology that this can be restored quickly by direct connection to a mains socket outlet with remote control or power switch on the television. • This apparatus shall be permanently imprinted onto your authorized dealer...
Never connect the plasma television to 50 Hz, direct current, or anything other than 2.5 minutes, protection function will ...by your HITACHI Factory Warranty. A CableCARD provided by TV stations and cable companies, as well as video-on back side and right side of the plasma television. Note • There are no user serviceable parts inside the plasma television. ...technology that this can be restored quickly by direct connection to a mains socket outlet with remote control or power switch on the television. • This apparatus shall be permanently imprinted onto your authorized dealer...

Owners Guide
Page 4
... site at: www.hitachi.us/tv CAUTION: 1. When replacing old batteries, push them towards the springs and insert the top of the remote control by pushing down and sliding the back cover off. 2. CAUTION: Do not insert batteries with Hitachi P50V701. This stand for the 50" model is not...with other apparatus is designed for important related to the wall mount. This plasma television product is capable of 45 degrees from vertical. 2. Wall Mount unit is an optional accessory (Not Included). ³ Remote Control Unit CLU-4374A (Part No. Insert the bottom of the battery,...
... site at: www.hitachi.us/tv CAUTION: 1. When replacing old batteries, push them towards the springs and insert the top of the remote control by pushing down and sliding the back cover off. 2. CAUTION: Do not insert batteries with Hitachi P50V701. This stand for the 50" model is not...with other apparatus is designed for important related to the wall mount. This plasma television product is capable of 45 degrees from vertical. 2. Wall Mount unit is an optional accessory (Not Included). ³ Remote Control Unit CLU-4374A (Part No. Insert the bottom of the battery,...

Owners Guide
Page 9
... find all of the programs and channels available in the "First Time Use" section of the TV Setup Wizard. 1. Please use How to set up your new HITACHI Plasma Television TV SETUP WIZARD This television has a TV Guide On ScreenTM feature which has the ability to page 52). 2. Press the Cable(2). The ... the channels available in different areas. Use the CURSOR to the Auto Channel Scan feature on the remote control to page 52). If No is selected, press the EXIT button on the remote control and the TV Guide ON ScreenTM Setup page will appear ( refer to show you want the...
... find all of the programs and channels available in the "First Time Use" section of the TV Setup Wizard. 1. Please use How to set up your new HITACHI Plasma Television TV SETUP WIZARD This television has a TV Guide On ScreenTM feature which has the ability to page 52). 2. Press the Cable(2). The ... the channels available in different areas. Use the CURSOR to the Auto Channel Scan feature on the remote control to page 52). If No is selected, press the EXIT button on the remote control and the TV Guide ON ScreenTM Setup page will appear ( refer to show you want the...

Owners Guide
Page 11
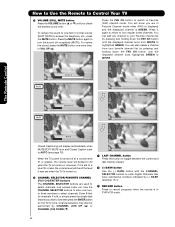
...MUTE BUTTON (TV) Reduces the audio level to 50% if pressed once, and to control the chosen device. Also used to pause other devices. EXIT BUTTON (TV, SAT/CBL, PVR/VCR) Exits out of the OSD, INPUTS menu systems if their menu is located on your HITACHI Plasma TV, the new remote control is ...designed to operate different types of devices, such as a cursor to navigate through the the OSD, INPUTS. (-) BUTTON (TV,STB) The (-) button is used as , DVD Players, CBL (Cable Boxes),...
...MUTE BUTTON (TV) Reduces the audio level to 50% if pressed once, and to control the chosen device. Also used to pause other devices. EXIT BUTTON (TV, SAT/CBL, PVR/VCR) Exits out of the OSD, INPUTS menu systems if their menu is located on your HITACHI Plasma TV, the new remote control is ...designed to operate different types of devices, such as a cursor to navigate through the the OSD, INPUTS. (-) BUTTON (TV,STB) The (-) button is used as , DVD Players, CBL (Cable Boxes),...
Owners Guide
Page 12
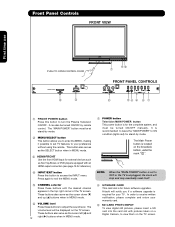
... Digital Camera, to view them on the TV screen. The volume level will be turned ON/OFF manually. Hitachi will stop and may eventually reset itself. ቩ UPGRADE CARD This card slot is set TV features to your preference without using the remote. This button also serves as the SELECT ...recommended to leave the "MAIN POWER" to ON condition (lights red) for reference). ብ INPUT/EXIT button Press this button to turn the Plasma Television ON/OFF. Front Panel Controls FRONT VIEW First time use PUSH TO OPEN CONTROL DOOR PHOTO INPUT PUSH EJECT ቩ ቤ ቪቫ...
... Digital Camera, to view them on the TV screen. The volume level will be turned ON/OFF manually. Hitachi will stop and may eventually reset itself. ቩ UPGRADE CARD This card slot is set TV features to your preference without using the remote. This button also serves as the SELECT ...recommended to leave the "MAIN POWER" to ON condition (lights red) for reference). ብ INPUT/EXIT button Press this button to turn the Plasma Television ON/OFF. Front Panel Controls FRONT VIEW First time use PUSH TO OPEN CONTROL DOOR PHOTO INPUT PUSH EJECT ቩ ቤ ቪቫ...

Owners Guide
Page 13
... signal). NOTES: 1. Remote Control cannot turn the TV ON, press the main power switch located on the lower right corner of the front bezel will appear to Off. Check the Power Light to make sure the TV is selected. picture is ON ; Your HITACHI Plasma TV will illuminate. A red... stand-by indicator lamp located on the lower right side of the TV. 13 The Plasma TV is now ready for connecting equipment with no signal input ...
... signal). NOTES: 1. Remote Control cannot turn the TV ON, press the main power switch located on the lower right corner of the front bezel will appear to Off. Check the Power Light to make sure the TV is selected. picture is ON ; Your HITACHI Plasma TV will illuminate. A red... stand-by indicator lamp located on the lower right side of the TV. 13 The Plasma TV is now ready for connecting equipment with no signal input ...
Owners Guide
Page 14
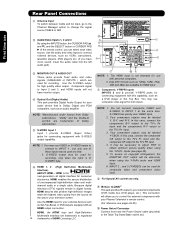
...1. Your component outputs may be labeled Y, B-Y, and R-Y. In this case, connect the components B-Y output to the TV's PB input and the components R-Y output to the TV's PR input. 3. This connection will allow you to control the external components with S-VIDEO output capability. In this ... Licensing LLC. ቨ ቫብ NOTE: 1. NOTE: *Manufactured under license from the source all digital interface for your Plasma Television's remote control. (For reference see page 45). 5. You may be used for connecting equipment with an HDMI output connection. Use the audio...
...1. Your component outputs may be labeled Y, B-Y, and R-Y. In this case, connect the components B-Y output to the TV's PB input and the components R-Y output to the TV's PR input. 3. This connection will allow you to control the external components with S-VIDEO output capability. In this ... Licensing LLC. ቨ ቫብ NOTE: 1. NOTE: *Manufactured under license from the source all digital interface for your Plasma Television's remote control. (For reference see page 45). 5. You may be used for connecting equipment with an HDMI output connection. Use the audio...

Owners Guide
Page 24
...IR OUT terminal of the external components you can use Connecting External Video Sources Your HITACHI Plasma Television is setup, it allows your IR Blaster cable to control your equipment using your HITACHI Plasma TV Remote Control. Infrared Sensor IR Blaster V L R OUTPUT VCR Infrared Sensor OUTPUT Y... Top Box, DVD, etc.). Connect your Hitachi Plasma Television and external Audio/Video equipment (VCR and DVD Player). First time use your HITACHI remote control to control the Audio/Video equipment command without the equipment's remote control. This feature helps to highlight SETUP....
...IR OUT terminal of the external components you can use Connecting External Video Sources Your HITACHI Plasma Television is setup, it allows your IR Blaster cable to control your equipment using your HITACHI Plasma TV Remote Control. Infrared Sensor IR Blaster V L R OUTPUT VCR Infrared Sensor OUTPUT Y... Top Box, DVD, etc.). Connect your Hitachi Plasma Television and external Audio/Video equipment (VCR and DVD Player). First time use your HITACHI remote control to control the Audio/Video equipment command without the equipment's remote control. This feature helps to highlight SETUP....

Owners Guide
Page 25
... On ScreenTM. 6. G-LINKTM connections are available on pages 52-54. First time use your HITACHI Plasma TV Remote Control and TV Guide On ScreenTM system to the Rear Panel shown below. 2. The Plasma Television Rear Panel has IR OUT/G-LINKTM terminals. Use the CURSOR PAD ̄ to select. 7. The IR Blaster must be placed in front...
... On ScreenTM. 6. G-LINKTM connections are available on pages 52-54. First time use your HITACHI Plasma TV Remote Control and TV Guide On ScreenTM system to the Rear Panel shown below. 2. The Plasma Television Rear Panel has IR OUT/G-LINKTM terminals. Use the CURSOR PAD ̄ to select. 7. The IR Blaster must be placed in front...
Owners Guide
Page 26
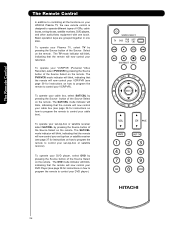
... or satellite receiver (see page 38 for instructions on your HITACHI Plasma TV, the new remote control is designed to operate different types of the Source Select on the remote. The Remote Control The Remote Control In addition to controlling all the functions on how to program the remote to control your set-top-box or satellite receiver).
... or satellite receiver (see page 38 for instructions on your HITACHI Plasma TV, the new remote control is designed to operate different types of the Source Select on the remote. The Remote Control The Remote Control In addition to controlling all the functions on how to program the remote to control your set-top-box or satellite receiver).

Owners Guide
Page 27
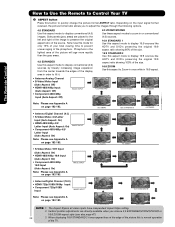
... and contrast for a more detailed picture (see page 45 for settings changes). The Remote Control How to Use the Remote to Control Your TV ³ POWER button Press this button to turn the TV set the remote control to TV mode). ³ · MODE Indicator · » Turns on or blinks... three times to show remote control mode. ¿ » SOURCE SELECT button 19 Press this button to toggle between Day (Normal), Day (Dynamic)...
... and contrast for a more detailed picture (see page 45 for settings changes). The Remote Control How to Use the Remote to Control Your TV ³ POWER button Press this button to turn the TV set the remote control to TV mode). ³ · MODE Indicator · » Turns on or blinks... three times to show remote control mode. ¿ » SOURCE SELECT button 19 Press this button to toggle between Day (Normal), Day (Dynamic)...
Owners Guide
Page 28
... (Auto Aspect: On) • Component-480i/480p 16:9 Input (Auto Aspect: On) Note: Please see Appendix A on page 182-183. The Remote Control How to Use the Remote to Control Your TV ² ASPECT button Press this button to prevent uneven aging of the phosphors. Note: Use this mode for only 15% of... the TV. Vertical position adjustments are placed to the left and right of the image to Zoom-in once while in 16:9 aspect...
... (Auto Aspect: On) • Component-480i/480p 16:9 Input (Auto Aspect: On) Note: Please see Appendix A on page 182-183. The Remote Control How to Use the Remote to Control Your TV ² ASPECT button Press this button to prevent uneven aging of the phosphors. Note: Use this mode for only 15% of... the TV. Vertical position adjustments are placed to the left and right of the image to Zoom-in once while in 16:9 aspect...
Owners Guide
Page 29
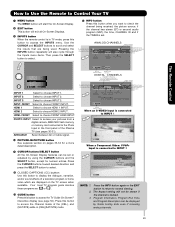
...adjusted by Guide Listing data even if receiving analog channels. 29 Press this button to access the INPUTS menu. INPUT- The Remote Control How to Use the Remote to Control Your TV ¶ MENU button The MENU button will start the On-Screen Display. º EXIT button This button will exit ...all On-Screen Displays. ¾ INPUTS button When the remote control is in TV mode, press this button to access the Channel Guide of the (CBL), and (SAT/STB) while in the front panel of the Plasma TV (see page 52). PHOTO INPUT Select to access your pictures from a ...
...adjusted by Guide Listing data even if receiving analog channels. 29 Press this button to access the INPUTS menu. INPUT- The Remote Control How to Use the Remote to Control Your TV ¶ MENU button The MENU button will start the On-Screen Display. º EXIT button This button will exit ...all On-Screen Displays. ¾ INPUTS button When the remote control is in TV mode, press this button to access the Channel Guide of the (CBL), and (SAT/STB) while in the front panel of the Plasma TV (see page 52). PHOTO INPUT Select to access your pictures from a ...
Owners Guide
Page 30
...and to navigate and select individual chosen photos. Picture No. The maximum number of the TV. 1. Press the CURSOR PAD ̇ or ̈ to navigate and select the PHOTO Input menu. Next SEL Thumbnail [0-9] Jump The Remote Control 5. Please Enter Picture Number -- 6. Date Resolution File Name NNoo. .0022/0/... NOTES: 1. Press INFO button to show "Input device not detected" if the MMC/SD memory card is selected. How to Use the Remote to Control Your TV PHOTO INPUT This feature is 999. 3. Press the SELECT button or CURSOR PAD ̈. Press the CURSOR PAD ̆ or ̄...
...and to navigate and select individual chosen photos. Picture No. The maximum number of the TV. 1. Press the CURSOR PAD ̇ or ̈ to navigate and select the PHOTO Input menu. Next SEL Thumbnail [0-9] Jump The Remote Control 5. Please Enter Picture Number -- 6. Date Resolution File Name NNoo. .0022/0/... NOTES: 1. Press INFO button to show "Input device not detected" if the MMC/SD memory card is selected. How to Use the Remote to Control Your TV PHOTO INPUT This feature is 999. 3. Press the SELECT button or CURSOR PAD ̈. Press the CURSOR PAD ̆ or ̄...

Owners Guide
Page 31
... How to Use the Remote to Control Your TV ROTATE Select this menu item to start a slideshow of the slideshow. After 30 seconds, the slideshow will resume or press the SELECT button again to 8th: letters. Rotate Slideshow Start Interval 5sec NOTES: 1. This TV set . 31 Automatic ...;) and counterclockwise (CURSOR PAD ̇). Photo files should conform with the slideshow. Rotate SLIDESHOW Select this menu item to stop on the TV set displays only digital pictures from 5, 10 and 30 seconds. Supported image types are up to cycle through the interval time from digital ...
... How to Use the Remote to Control Your TV ROTATE Select this menu item to start a slideshow of the slideshow. After 30 seconds, the slideshow will resume or press the SELECT button again to 8th: letters. Rotate Slideshow Start Interval 5sec NOTES: 1. This TV set . 31 Automatic ...;) and counterclockwise (CURSOR PAD ̇). Photo files should conform with the slideshow. Rotate SLIDESHOW Select this menu item to stop on the TV set displays only digital pictures from 5, 10 and 30 seconds. Supported image types are up to cycle through the interval time from digital ...
Owners Guide
Page 32
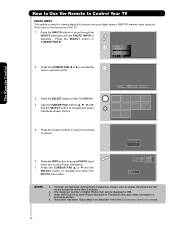
... obtain the desired sound level. Cable 6 Volume 8 Soft Mute 8 FAV Cable 6 The Remote Control Cable 6 Mute 8 Closed Captioning will know you are used to select channels, lock access code, etc. When the TV power is turned on . You will display automatically when MUTE/SOFT MUTE is on and Closed...less, the volume level will default to answer the telephone, etc., press the MUTE button. Press it is GREEN. How to Use the Remote to Control Your TV ƺ VOLUME (VOL), MUTE button Press the VOLUME button (̆ or ̄) until you wish to tune then press the ENTER ...
... obtain the desired sound level. Cable 6 Volume 8 Soft Mute 8 FAV Cable 6 The Remote Control Cable 6 Mute 8 Closed Captioning will know you are used to select channels, lock access code, etc. When the TV power is turned on . You will display automatically when MUTE/SOFT MUTE is on and Closed...less, the volume level will default to answer the telephone, etc., press the MUTE button. Press it is GREEN. How to Use the Remote to Control Your TV ƺ VOLUME (VOL), MUTE button Press the VOLUME button (̆ or ̄) until you wish to tune then press the ENTER ...
Owners Guide
Page 33
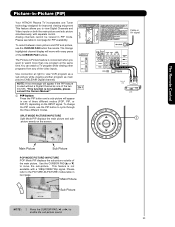
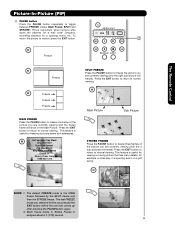
...This function is not available with every press of the two sources. To change the PIP mode, use the CURSOR PAD button the remote. CH 1 SPLIT MODE PICTURE-IN-PICTURE Split Mode PIP displays the main picture and subpicture evenly on the INPUT signal. Use connection...the sub-picture outside of VCR Video OUTPUT VCR ቢ 33 The Remote Control Main Picture Sub Picture SWAP NOTE : 1. NOTE: A text message will move the sub-picture. Picture-In-Picture (PIP) Your HITACHI Plasma TV incorporates one Tuner technology designed for PIP availability. Please see table in next...
...This function is not available with every press of the two sources. To change the PIP mode, use the CURSOR PAD button the remote. CH 1 SPLIT MODE PICTURE-IN-PICTURE Split Mode PIP displays the main picture and subpicture evenly on the INPUT signal. Use connection...the sub-picture outside of VCR Video OUTPUT VCR ቢ 33 The Remote Control Main Picture Sub Picture SWAP NOTE : 1. NOTE: A text message will move the sub-picture. Picture-In-Picture (PIP) Your HITACHI Plasma TV incorporates one Tuner technology designed for PIP availability. Please see table in next...

Owners Guide
Page 34
... Yes Yes Yes Yes Yes Yes Yes Yes Yes Yes Yes Yes Yes Yes Yes Yes Yes Yes Yes Yes Yes Yes Yes 34 The Remote Control Picture-In-Picture (PIP) PIP MODE PICTURE-IN-PICTURE Select CABLE/AIR or INPUT 1~3, Front from the INPUTS menu. Select a channel that has a 1080p...
... Yes Yes Yes Yes Yes Yes Yes Yes Yes Yes Yes Yes Yes Yes Yes Yes Yes Yes Yes Yes Yes Yes Yes 34 The Remote Control Picture-In-Picture (PIP) PIP MODE PICTURE-IN-PICTURE Select CABLE/AIR or INPUT 1~3, Front from the INPUTS menu. Select a channel that has a 1080p...
Owners Guide
Page 35
... motion, press the EXIT button. ባ Freeze Freeze SPLIT FREEZE Press the PAUSE button to toggle between FREEZE modes (Main Freeze, SPLIT and STROBE). The Remote Control Picture-In-Picture (PIP) ባ PAUSE button Press the PAUSE button repeatedly to freeze the picture you are currently viewing (only the right sub...
... motion, press the EXIT button. ባ Freeze Freeze SPLIT FREEZE Press the PAUSE button to toggle between FREEZE modes (Main Freeze, SPLIT and STROBE). The Remote Control Picture-In-Picture (PIP) ባ PAUSE button Press the PAUSE button repeatedly to freeze the picture you are currently viewing (only the right sub...


