Owners Guide
Page 3
... capable of fire or electric shock, do not use of the LCD television. Lead/Mercury Notice Hg This product contains lead and one or more information, call 1-800-HITACHI. 3 For more non- Never connect the LCD television to very high voltages and other limited consumer uses only unless... otherwise authorized. patents and other than the specified voltage. replaceable mercury lamps. Recycle or dispose of the LCD television as this can be authorized, and is protected by TV stations and cable companies, as well as programs from other sources, may require the use the...
... capable of fire or electric shock, do not use of the LCD television. Lead/Mercury Notice Hg This product contains lead and one or more information, call 1-800-HITACHI. 3 For more non- Never connect the LCD television to very high voltages and other limited consumer uses only unless... otherwise authorized. patents and other than the specified voltage. replaceable mercury lamps. Recycle or dispose of the LCD television as this can be authorized, and is protected by TV stations and cable companies, as well as programs from other sources, may require the use the...
Owners Guide
Page 4
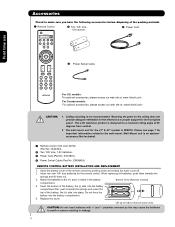
...swell or rupture resulting in the battery Bottom View (Remote Control) compartment. 4. Please see page 7 for the 47" & 42" models is designed for a maximum tilting angle of the battery, the (+) side, into the... into place. HL02404). · Two "AA" size, 1.5V batteries. » Power Cord (Part No. This LCD television product is WM07S. CAUTION: Do not insert batteries with '+' and '-' polarities reversed as this may cause the batteries... accessories, please access our web site at: www.hitachi.us/tv For Canada models: For optional accessories, please access our web site at: www...
...swell or rupture resulting in the battery Bottom View (Remote Control) compartment. 4. Please see page 7 for the 47" & 42" models is designed for a maximum tilting angle of the battery, the (+) side, into the... into place. HL02404). · Two "AA" size, 1.5V batteries. » Power Cord (Part No. This LCD television product is WM07S. CAUTION: Do not insert batteries with '+' and '-' polarities reversed as this may cause the batteries... accessories, please access our web site at: www.hitachi.us/tv For Canada models: For optional accessories, please access our web site at: www...
Owners Guide
Page 5
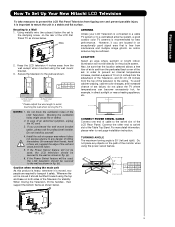
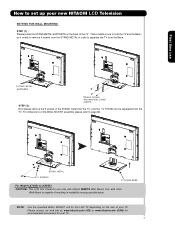
... inches) from the perforated back cover of the set to the clamping screw on both sides of the LCD Flat Panel TV as shown in direct sunlight or near a heating appliance, etc. 30 cm (12 inches) 10 cm... 30° C C D 42" 9.1 in. 14.05 in. 23.1 cm 35.7 cm 30° D 47" 10.2 in. 25.9 cm 15.15 in a stable and flat surface. For more detail information, please refer to...on the picture screen. First time use How To Set Up Your New Hitachi LCD Television To take measures to prevent the LCD Flat Panel Television from tipping over and prevent possible injury it is 30° ...
... inches) from the perforated back cover of the set to the clamping screw on both sides of the LCD Flat Panel TV as shown in direct sunlight or near a heating appliance, etc. 30 cm (12 inches) 10 cm... 30° C C D 42" 9.1 in. 14.05 in. 23.1 cm 35.7 cm 30° D 47" 10.2 in. 25.9 cm 15.15 in a stable and flat surface. For more detail information, please refer to...on the picture screen. First time use How To Set Up Your New Hitachi LCD Television To take measures to prevent the LCD Flat Panel Television from tipping over and prevent possible injury it is 30° ...

Owners Guide
Page 6
... AC cord through this clamp to hold the AC cord and power swivel cable. Stand Base. 6 First time use How to set up your new Hitachi LCD Television AC CORD AND POWER SWIVEL CABLE INSTALLATION INSTRUCTION The AC cord and power swivel cable provided with your new... Stand Base. » The AC cord, power swivel cable and the signal cables can all be installed correctly to avoid their disconnection when rotating the TV on the back of the LCD Rear Panel. Pull on the clamp to tighten the AC cord to the swivel slot of the...
... AC cord through this clamp to hold the AC cord and power swivel cable. Stand Base. 6 First time use How to set up your new Hitachi LCD Television AC CORD AND POWER SWIVEL CABLE INSTALLATION INSTRUCTION The AC cord and power swivel cable provided with your new... Stand Base. » The AC cord, power swivel cable and the signal cables can all be installed correctly to avoid their disconnection when rotating the TV on the back of the LCD Rear Panel. Pull on the clamp to tighten the AC cord to the swivel slot of the...
Owners Guide
Page 7
... METAL 5 SCREWS TV STAND BASE For Model L47V651 & L42V651 CAUTION- For dimensions of your TV. 7 Use with Hitachi WM07S Wall Mount. First time use to hold the TV and the Base ; so it needs to remove 4 screws from the STAND METAL in instability causing possible injury. This LCD Flat Panel for the LCD TV depending on the back...
... METAL 5 SCREWS TV STAND BASE For Model L47V651 & L42V651 CAUTION- For dimensions of your TV. 7 Use with Hitachi WM07S Wall Mount. First time use to hold the TV and the Base ; so it needs to remove 4 screws from the STAND METAL in instability causing possible injury. This LCD Flat Panel for the LCD TV depending on the back...

Owners Guide
Page 8
Consult your new HITACHI LCD Television VIEWING The best picture is recommended. 8 If so, drapes or screens can be used to reduce the reflection or the TV can be obtained by sitting directly in a different section of the picture screen center. AIR / CABLE To CATV cable or To ...UHF antenna AIR / CABLE To outdoor antenna or CATV system Antenna Mixer NOTE: Connecting a 300-Ohm twin lead connector may appear on the TV. Using a 75-Ohm coaxial cable is seen by placing the speakers equidistant from outside light may cause interference. VHF (300-Ohm) antenna/...
Consult your new HITACHI LCD Television VIEWING The best picture is recommended. 8 If so, drapes or screens can be used to reduce the reflection or the TV can be obtained by sitting directly in a different section of the picture screen center. AIR / CABLE To CATV cable or To ...UHF antenna AIR / CABLE To outdoor antenna or CATV system Antenna Mixer NOTE: Connecting a 300-Ohm twin lead connector may appear on the TV. Using a 75-Ohm coaxial cable is seen by placing the speakers equidistant from outside light may cause interference. VHF (300-Ohm) antenna/...
Owners Guide
Page 9
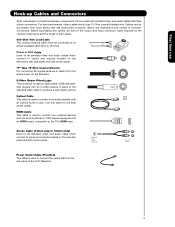
Below are illustrations and names of the LCD Television. 9 S-Video (Super Video) Cable This connector is used on camcorders, VCRs and laserdisc players with an Optical Audio In jack. "F" Type 75-Ohm Coaxial Antenna For connecting RF signals (antenna or cable TV) to inputs and outputs located on all ...Boxes or DVD players equipped with shielded video and audio cables that sell audio/video products. HDMI Cable This cable is used to the TV's HDMI input. Use this cable for the best sound quality. For best performance, video cables should use Hook-up Cables and Connectors Most...
Below are illustrations and names of the LCD Television. 9 S-Video (Super Video) Cable This connector is used on camcorders, VCRs and laserdisc players with an Optical Audio In jack. "F" Type 75-Ohm Coaxial Antenna For connecting RF signals (antenna or cable TV) to inputs and outputs located on all ...Boxes or DVD players equipped with shielded video and audio cables that sell audio/video products. HDMI Cable This cable is used to the TV's HDMI input. Use this cable for the best sound quality. For best performance, video cables should use Hook-up Cables and Connectors Most...
Owners Guide
Page 10
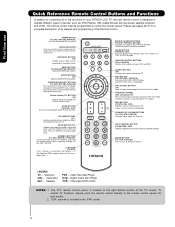
...SAT/CBL) Press to use Quick Reference Remote Control Buttons and Functions In addition to controlling all features and programming of the TV. Videocassete Recorder NOTES: 1. To control TV functions, please point the remote control directly at the remote control sensor for numeric entry when navigating through the OSD and INPUT ...control must be programmed to complete mute if pressed twice. GUIDE BUTTON (SAT/CBL, PVR) Accesses the program guide of the functions on your HITACHI LCD TV, the new remote control is used when the remote is included in Set-Top-Box (STB) mode or when the...
...SAT/CBL) Press to use Quick Reference Remote Control Buttons and Functions In addition to controlling all features and programming of the TV. Videocassete Recorder NOTES: 1. To control TV functions, please point the remote control directly at the remote control sensor for numeric entry when navigating through the OSD and INPUT ...control must be programmed to complete mute if pressed twice. GUIDE BUTTON (SAT/CBL, PVR) Accesses the program guide of the functions on your HITACHI LCD TV, the new remote control is used when the remote is included in Set-Top-Box (STB) mode or when the...
Owners Guide
Page 11
...making it possible to set , the function of this button is unplugged, the clock will not be displayed on the TV screen. 11 Hitachi will be available for a short period of the TV screen. Press again to exit the MENU mode. ቦ CHANNEL selector Press these buttons to adjust the sound level.... The "MAIN POWER" can also be turn the LCD Television ON/OFF. It can only be turned ON/OFF by ...
...making it possible to set , the function of this button is unplugged, the clock will not be displayed on the TV screen. 11 Hitachi will be available for a short period of the TV screen. Press again to exit the MENU mode. ቦ CHANNEL selector Press these buttons to adjust the sound level.... The "MAIN POWER" can also be turn the LCD Television ON/OFF. It can only be turned ON/OFF by ...
Owners Guide
Page 12
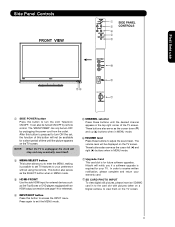
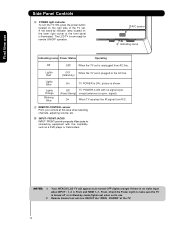
...; signal). NOTES: 1. Check the Power Light to make sure the TV is turned off or in use Side Panel Controls ቩ POWER light indicator To turn ON/OFF the "MAIN POWER" of the TV. 12 When the TV set . FRONT JACKS INPUT- Your HITACHI LCD TV will appear to the AC line. (Stand-by mode (lights... red) when not in Stand-by ) On TV POWER is plugged to be turned OFF (lights orange) if there is unplugged...
...; signal). NOTES: 1. Check the Power Light to make sure the TV is turned off or in use Side Panel Controls ቩ POWER light indicator To turn ON/OFF the "MAIN POWER" of the TV. 12 When the TV set . FRONT JACKS INPUT- Your HITACHI LCD TV will appear to the AC line. (Stand-by mode (lights... red) when not in Stand-by ) On TV POWER is plugged to be turned OFF (lights orange) if there is unplugged...
Owners Guide
Page 13
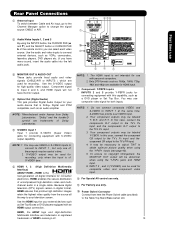
... Input 1 provide S-VIDEO (Super Video) jacks for connecting equipment with an HDMI output connection. Do not connect composite VIDEO and S-VIDEO to the TV's PR input. 4. S-VIDEO has priority over VIDEO input. 2. To ensure no copyright infringement, the MONITOR OUT output will not have mono sound,...input is of HDMI Licensing LLC. ቫ ብ ባ ቤ ቢ NOTE: 1. In this case, connect the components B-Y output to the TV's PB input and the components R-Y output to the Table Top Stand Base swivel slot. 13 INPUT 2 , and 3 (Y/VIDEO) can select each video source. ...
... Input 1 provide S-VIDEO (Super Video) jacks for connecting equipment with an HDMI output connection. Do not connect composite VIDEO and S-VIDEO to the TV's PR input. 4. S-VIDEO has priority over VIDEO input. 2. To ensure no copyright infringement, the MONITOR OUT output will not have mono sound,...input is of HDMI Licensing LLC. ቫ ብ ባ ቤ ቢ NOTE: 1. In this case, connect the components B-Y output to the TV's PB input and the components R-Y output to the Table Top Stand Base swivel slot. 13 INPUT 2 , and 3 (Y/VIDEO) can select each video source. ...
Owners Guide
Page 15
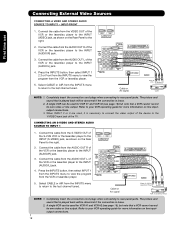
... in the following examples: SIDE INPUT PANEL First time use to connect the VCR, camcorder, laserdisc player, DVD player, or HDTVSet Top Box to your LCD TV is dependent on the model and features of video and audio inputs and outputs. Completely insert connection cord plugs when connecting to confirm your choice...
... in the following examples: SIDE INPUT PANEL First time use to connect the VCR, camcorder, laserdisc player, DVD player, or HDTVSet Top Box to your LCD TV is dependent on the model and features of video and audio inputs and outputs. Completely insert connection cord plugs when connecting to confirm your choice...

Owners Guide
Page 16
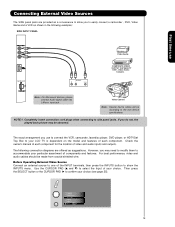
First time use Rear Panel Connections DIGITAL OUTPUT CAPABILITY DIGITAL OUTPUT AUDIO OUT HDMI DIGITAL OUTPUT CAPABILITY HDMI OUTPUT DVI to HDMI HDMI to HDMI VCR #2 S-VIDEO V L R INPUT Optional DVD Player OUTPUT Y PB/CB PR/CR L R Optional Y PB PR L R OUTPUT OUTPUT S-VIDEO V L R ANT IN HDTV Set-Top Box VCR #1 Outside Antenna or Cable TV coaxial cable 2-Way signal splitter NOTE: Cables are optional, except when specified. 16
First time use Rear Panel Connections DIGITAL OUTPUT CAPABILITY DIGITAL OUTPUT AUDIO OUT HDMI DIGITAL OUTPUT CAPABILITY HDMI OUTPUT DVI to HDMI HDMI to HDMI VCR #2 S-VIDEO V L R INPUT Optional DVD Player OUTPUT Y PB/CB PR/CR L R Optional Y PB PR L R OUTPUT OUTPUT S-VIDEO V L R ANT IN HDTV Set-Top Box VCR #1 Outside Antenna or Cable TV coaxial cable 2-Way signal splitter NOTE: Cables are optional, except when specified. 16
Owners Guide
Page 17
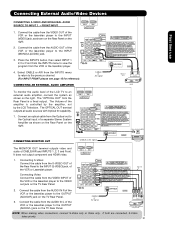
In this case, connect the components CB output to the TV's PB input and the components CR output to the TV's PR input. • It may be necessary to adjust TINT to obtain optimum picture quality when using the Y-PBPR inputs. (See page 40). • To ... /Video output of a Set-Top-Box will be less than 5 meters. that have this case, connect the components B-Y output to the TV's PB input and the components R-Y output to the TV's PR input. • Your component outputs may be used for recording only when the input is recommended that the length of...
In this case, connect the components CB output to the TV's PB input and the components CR output to the TV's PR input. • It may be necessary to adjust TINT to obtain optimum picture quality when using the Y-PBPR inputs. (See page 40). • To ... /Video output of a Set-Top-Box will be less than 5 meters. that have this case, connect the components B-Y output to the TV's PB input and the components R-Y output to the TV's PR input. • Your component outputs may be used for recording only when the input is recommended that the length of...
Owners Guide
Page 18
Cable or Air signal Back of the TV . When INPUT 2 or 3 are used, it is necessary to connect the video output of the device to the Y/VIDEO input jack of Video VCR OUTPUT ...
Cable or Air signal Back of the TV . When INPUT 2 or 3 are used, it is necessary to connect the video output of the device to the Y/VIDEO input jack of Video VCR OUTPUT ...
Owners Guide
Page 21
... to the VIDEO out jack on the right. 2. Connecting S-Video: Connect the cable from the Rear Panel is controlled by the amplifier, not by the LCD Television. Connect the cable from the Optical out to the Optical input of the VCR or the laserdisc player to the INPUT (MONO)/L(AUDIO) jack... of the amplifier is a fixed output. It does not output component and HDMI video. 1. Connecting Video: Connect the cable from the AUDIO IN R of the LCD TV to the OUTPUT (AUDIO/R) jack on the right. The Volume of CABLE/AIR and INPUTS 1, 2, 3 and Front. Connect the cable from the INPUTS menu to...
... to the VIDEO out jack on the right. 2. Connecting S-Video: Connect the cable from the Rear Panel is controlled by the amplifier, not by the LCD Television. Connect the cable from the Optical out to the Optical input of the VCR or the laserdisc player to the INPUT (MONO)/L(AUDIO) jack... of the amplifier is a fixed output. It does not output component and HDMI video. 1. Connecting Video: Connect the cable from the AUDIO IN R of the LCD TV to the OUTPUT (AUDIO/R) jack on the right. The Volume of CABLE/AIR and INPUTS 1, 2, 3 and Front. Connect the cable from the INPUTS menu to...

Owners Guide
Page 22
...Source button of the Source Select on the remote. The Remote Control The Remote Control In addition to controlling all the functions on your HITACHI LCD TV, the new remote control is designed to control your DVD player). 22 The PVR/VCR mode indicator will blink, indicating that the ...your DVD player, select DVD by pressing the Source button of the Source Select on the remote. The TV mode indicator will blink, indicating that the remote will now control your LCD TV, select TV by pressing the Source button of the Source Select on the remote. To operate your television.
...Source button of the Source Select on the remote. The Remote Control The Remote Control In addition to controlling all the functions on your HITACHI LCD TV, the new remote control is designed to control your DVD player). 22 The PVR/VCR mode indicator will blink, indicating that the ...your DVD player, select DVD by pressing the Source button of the Source Select on the remote. The TV mode indicator will blink, indicating that the remote will now control your LCD TV, select TV by pressing the Source button of the Source Select on the remote. To operate your television.
Owners Guide
Page 23
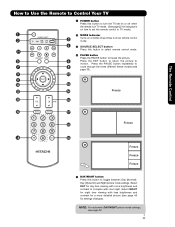
... a more detailed picture (see page 54. 23 The Remote Control How to Use the Remote to Control Your TV ³ POWER button Press this button to turn the TV set on or off when the remote is in TV mode. (See page 22 for instructions on how to set the remote control to... TV mode). ³ · MODE Indicator · » Turns on or blinks three times to show remote control mode. ¿...
... a more detailed picture (see page 54. 23 The Remote Control How to Use the Remote to Control Your TV ³ POWER button Press this button to turn the TV set on or off when the remote is in TV mode. (See page 22 for instructions on how to set the remote control to... TV mode). ³ · MODE Indicator · » Turns on or blinks three times to show remote control mode. ¿...

Owners Guide
Page 24
...size. 16:9 STANDARD 2 Use this aspect mode to display 16:9 sources like HDTV and DVD's preserving the original 16:9 aspect ratio showing 100% of the TV. The Aspect Style in all video inputs have independent Aspect Style setting. 2. IMAGE INPUT • Antenna-Digital Channel (16:9) • HDMI-720p/1080i/.../480p Input (Auto Aspect: Off) IMAGE INPUT Note: Please see Appendix A on page 146-147. How to Use the Remote to Control Your TV ² ASPECT button Press this button to Zoom-in once while in 16:9 aspect. Depending on the input signal format received, the picture format ratio...
...size. 16:9 STANDARD 2 Use this aspect mode to display 16:9 sources like HDTV and DVD's preserving the original 16:9 aspect ratio showing 100% of the TV. The Aspect Style in all video inputs have independent Aspect Style setting. 2. IMAGE INPUT • Antenna-Digital Channel (16:9) • HDMI-720p/1080i/.../480p Input (Auto Aspect: Off) IMAGE INPUT Note: Please see Appendix A on page 146-147. How to Use the Remote to Control Your TV ² ASPECT button Press this button to Zoom-in once while in 16:9 aspect. Depending on the input signal format received, the picture format ratio...

Owners Guide
Page 25
...viewing. 2. Digital channel Program Information Program Run Time Show Name 3:00PM- 3:30M REGION 5 ST DTvCC TV-G D Air 15-1 KPBS-HD 1080i 3:17PM Main Picture Source and channel indication Broadcast channel identification Clock ...button is only applicable when the remote control is in TV mode, press this button to access the Channel Guide of the LCD TV (see pages 26-27). Press this button to access ...the INPUTS menu. The Aspect setting will not be set . How to Use the Remote to Control Your TV ¶ ...
...viewing. 2. Digital channel Program Information Program Run Time Show Name 3:00PM- 3:30M REGION 5 ST DTvCC TV-G D Air 15-1 KPBS-HD 1080i 3:17PM Main Picture Source and channel indication Broadcast channel identification Clock ...button is only applicable when the remote control is in TV mode, press this button to access the Channel Guide of the LCD TV (see pages 26-27). Press this button to access ...the INPUTS menu. The Aspect setting will not be set . How to Use the Remote to Control Your TV ¶ ...


