Owners Guide
Page 1
...and serial number of the television. MODEL NAME SERIAL NO This information is located on the back and right side of your LCD Television for L42A403 & L32A403 IMPORTANT SAFETY INSTRUCTIONS 2-5 FIRST TIME USE ...6-17 THE REMOTE CONTROL 18-21 ON-SCREEN DISPLAY 22-34 USEFUL ...INFORMATION 35-41 LIMITED WARRANTY ...42 END USER LICENSE AGREEMENT FOR HITACHI DTV SOFTWARE 43-48 APPENDIXES ...49 INDEX ...50 READ THE ENCLOSED INSTRUCTIONS CAREFULLY. ...
...and serial number of the television. MODEL NAME SERIAL NO This information is located on the back and right side of your LCD Television for L42A403 & L32A403 IMPORTANT SAFETY INSTRUCTIONS 2-5 FIRST TIME USE ...6-17 THE REMOTE CONTROL 18-21 ON-SCREEN DISPLAY 22-34 USEFUL ...INFORMATION 35-41 LIMITED WARRANTY ...42 END USER LICENSE AGREEMENT FOR HITACHI DTV SOFTWARE 43-48 APPENDIXES ...49 INDEX ...50 READ THE ENCLOSED INSTRUCTIONS CAREFULLY. ...
Owners Guide
Page 2
... Do not defeat the safety purpose of time. 14. Unplug this apparatus during lightning storms or when unused for replacement of your Hitachi LCD television. Televisions are provided for tilt and stability. Section 810 of the National Electric Code, ANSI/NFPA No. 70-1984, provides...moving the cart/apparatus combination to the presence of uninsulated "dangerous voltage" within an equilateral triangle, is provided to constitute a risk of Hitachi LCD televisions. Please read it to the front, or top, of overhead power lines or other hazards. Follow all warnings. 4. The ...
... Do not defeat the safety purpose of time. 14. Unplug this apparatus during lightning storms or when unused for replacement of your Hitachi LCD television. Televisions are provided for tilt and stability. Section 810 of the National Electric Code, ANSI/NFPA No. 70-1984, provides...moving the cart/apparatus combination to the presence of uninsulated "dangerous voltage" within an equilateral triangle, is provided to constitute a risk of Hitachi LCD televisions. Please read it to the front, or top, of overhead power lines or other hazards. Follow all warnings. 4. The ...
Owners Guide
Page 3
... replaced with identical cables in order to assure compliance with FCC rules. Order Hitachi spares as replacement cables. NOTE INDUSTRY CANADA AGENCY REGULATORY INFORMATION Cable Compatible Television Apparatus...comply with the limits for a Class B digital device, pursuant to applicable laws. This LCD Television receiver will not occur in a particular installation. Tèlèvision câblocompatible... Reverse engineering or disassembly is encouraged to try to correct the interference by TV stations and cable companies, as well as programs from other intellectual property rights...
... replaced with identical cables in order to assure compliance with FCC rules. Order Hitachi spares as replacement cables. NOTE INDUSTRY CANADA AGENCY REGULATORY INFORMATION Cable Compatible Television Apparatus...comply with the limits for a Class B digital device, pursuant to applicable laws. This LCD Television receiver will not occur in a particular installation. Tèlèvision câblocompatible... Reverse engineering or disassembly is encouraged to try to correct the interference by TV stations and cable companies, as well as programs from other intellectual property rights...
Owners Guide
Page 6
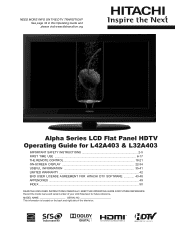
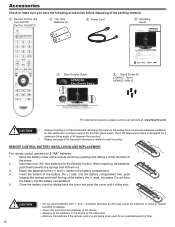
... SERIAL NO This information is designed for L42A403 & L32A403 IMPORTANT SAFETY INSTRUCTIONS 2-5 FIRST TIME U SE ...6-17 THE REMOTE CONTROL 18-21 ON-SCREEN D ISPLAY 22-34 USEFUL I NFORMATION 3 5-41 LIMITED WARRANTY ...42 END USER L ICENSE A GREEMENT FOR HITACHI DTV SOFTWARE 4 3-48 APPENDIXES ...49 ...Replace all the batteries in the device at : www.hitachi.us /tv 1-800-Hitachi (1-800-448-2244) OPERATING GUIDE GUIA DE OPERACION IMPORTANTE: APAGAR EL TELEVISOR Y LOS EQUIPOS EXTERNOS ANTES DE CONECTAR O DESCONECTAR LOS CABLES. This LCD television product is located on the back and right ...
... SERIAL NO This information is designed for L42A403 & L32A403 IMPORTANT SAFETY INSTRUCTIONS 2-5 FIRST TIME U SE ...6-17 THE REMOTE CONTROL 18-21 ON-SCREEN D ISPLAY 22-34 USEFUL I NFORMATION 3 5-41 LIMITED WARRANTY ...42 END USER L ICENSE A GREEMENT FOR HITACHI DTV SOFTWARE 4 3-48 APPENDIXES ...49 ...Replace all the batteries in the device at : www.hitachi.us /tv 1-800-Hitachi (1-800-448-2244) OPERATING GUIDE GUIA DE OPERACION IMPORTANTE: APAGAR EL TELEVISOR Y LOS EQUIPOS EXTERNOS ANTES DE CONECTAR O DESCONECTAR LOS CABLES. This LCD television product is located on the back and right ...
Owners Guide
Page 7
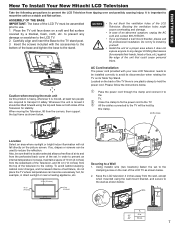
...avoid cabinet warping, cabinet color changes, and increased chance of set to the clamping screw on its disconnection when rotating the TV on the rear of the LCD TV as shown below . When moving the main unit As this clamp. In order to prevent an internal temperature increase, ...an abnormal symptom, unplug the AC cord and contact 800-HITACHI. • If you purchased a wall mount bracket, please ask for example, in . 42" 10 cm. 7 Using metallic wire (two locations) fasten the set failure, do not place the TV where temperatures can be held by a blanket, foam,...
...avoid cabinet warping, cabinet color changes, and increased chance of set to the clamping screw on its disconnection when rotating the TV on the rear of the LCD TV as shown below . When moving the main unit As this clamp. In order to prevent an internal temperature increase, ...an abnormal symptom, unplug the AC cord and contact 800-HITACHI. • If you purchased a wall mount bracket, please ask for example, in . 42" 10 cm. 7 Using metallic wire (two locations) fasten the set failure, do not place the TV where temperatures can be held by a blanket, foam,...
Owners Guide
Page 8
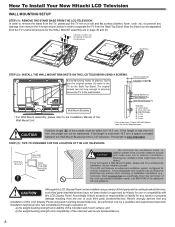
... perform other mounting or installation orientations (e.g., horizontal, tilted) provided that any installation of this LCD Display Panel using a variety of the Wall Mount Unit. Hitachi strongly advises that you purchased a Wall Mount bracket, please ask for any damage; This ...TV for the WALL MOUNT assembly are in order to obstruct ventilation. More than 30 cm (1'). Accordingly, Hitachi accepts no responsibility or liability for a professional installation. How To Install Your New Hitachi LCD Television WALL MOUNTING SETUP STEP (1) : REMOVE THE STAND BASE FROM THE LCD...
... perform other mounting or installation orientations (e.g., horizontal, tilted) provided that any installation of this LCD Display Panel using a variety of the Wall Mount Unit. Hitachi strongly advises that you purchased a Wall Mount bracket, please ask for any damage; This ...TV for the WALL MOUNT assembly are in order to obstruct ventilation. More than 30 cm (1'). Accordingly, Hitachi accepts no responsibility or liability for a professional installation. How To Install Your New Hitachi LCD Television WALL MOUNTING SETUP STEP (1) : REMOVE THE STAND BASE FROM THE LCD...
Owners Guide
Page 9
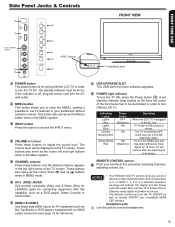
...any compatible HDMI CEC devices. AV 2 (SIDE) JACKS AV2 provide composite Video and S-Video (Only for L42A403) jacks for connecting equipment with an HDMI output connection (see page 14 for reference). TV Power is for AV equipment such as the cursor down ( ) and up ( ) buttons when in .... REMOTE CONTROL sensor Point your preference without an input signal for turning ON the LCD TV, in order to turn the TV On , the standby indicator must be illuminated in MENU mode. NOTES • Your HITACHI LCD TV will resume after the input signal is shown. Headphone jack s Use this area...
...any compatible HDMI CEC devices. AV 2 (SIDE) JACKS AV2 provide composite Video and S-Video (Only for L42A403) jacks for connecting equipment with an HDMI output connection (see page 14 for reference). TV Power is for AV equipment such as the cursor down ( ) and up ( ) buttons when in .... REMOTE CONTROL sensor Point your preference without an input signal for turning ON the LCD TV, in order to turn the TV On , the standby indicator must be illuminated in MENU mode. NOTES • Your HITACHI LCD TV will resume after the input signal is shown. Headphone jack s Use this area...
Owners Guide
Page 10
... program channel to your audio device that pristine high-definition images retain the highest video quality from your TV to your television screen. Use the HDMI input for your LCD TV. Please see page 33). NOTES • Your component outputs may be necessary to adjust TINT to... obtain optimum picture quality when using a RGB cable (D-sub 15 pin) to the TV's Pr input. • Your component outputs may be ...
... program channel to your audio device that pristine high-definition images retain the highest video quality from your TV to your television screen. Use the HDMI input for your LCD TV. Please see page 33). NOTES • Your component outputs may be necessary to adjust TINT to... obtain optimum picture quality when using a RGB cable (D-sub 15 pin) to the TV's Pr input. • Your component outputs may be ...
Owners Guide
Page 11
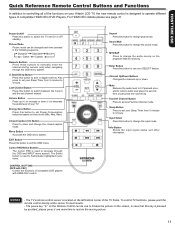
... 11 Sleep Button Press to set On or Off standby. Info Button Shows the input signal status and other information. NOTES - To control TV functions, please point the remote control directly at the sensor for numeric entry when navigating through the OSD and INPUT menu system, The Select ... press the volume key. FIRST TIME USE Quick Reference Remote Control Buttons and Functions In addition to controlling all of the functions on your Hitachi LCD TV, the new remote control is designed to change the sound mode. Energy Save Button Press this button to change the audio source on the...
... 11 Sleep Button Press to set On or Off standby. Info Button Shows the input signal status and other information. NOTES - To control TV functions, please point the remote control directly at the sensor for numeric entry when navigating through the OSD and INPUT menu system, The Select ... press the volume key. FIRST TIME USE Quick Reference Remote Control Buttons and Functions In addition to controlling all of the functions on your Hitachi LCD TV, the new remote control is designed to change the sound mode. Energy Save Button Press this button to change the audio source on the...
Owners Guide
Page 12
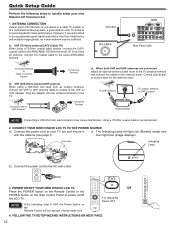
...antenna Air/Cable To outdoor antenna or CATV system Antenna Mixer NOTE Connecting a 300-Ohm twin lead connector may be sufficient. CONNECT YOUR NEW HITACHI LCD TV TO THE POWER SOURCE a). Connect the power cord to power on the Side Control Panel to the AC wall outlet . 3. Press the...cables to the antenna mixer. POWER ON/OFF YOUR NEW HITACHI LCD TV. RGB Quick Setup Guide Perform the following steps to quickly setup your LCD Television is connected to a cable TV system or to a centralized antenna system, a good outdoor color TV antenna is recommended for the antenna mixer. However, if ...
...antenna Air/Cable To outdoor antenna or CATV system Antenna Mixer NOTE Connecting a 300-Ohm twin lead connector may be sufficient. CONNECT YOUR NEW HITACHI LCD TV TO THE POWER SOURCE a). Connect the power cord to power on the Side Control Panel to the AC wall outlet . 3. Press the...cables to the antenna mixer. POWER ON/OFF YOUR NEW HITACHI LCD TV. RGB Quick Setup Guide Perform the following steps to quickly setup your LCD Television is connected to a cable TV system or to a centralized antenna system, a good outdoor color TV antenna is recommended for the antenna mixer. However, if ...
Owners Guide
Page 13
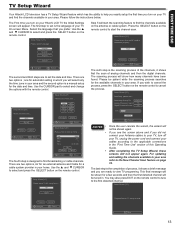
... the completion of process, it shows first the scan of your cables according to view TV programing. If you wish to cancel the process, press the SELECT button on your Hitachi LCD TV the Initial Settings screen will appear. Searching Analog CH Channel 3 Analog Channels Found 10 ...Antenna cables to your TV, turn off your TV, unplug the power cord and connect your TV On screen Menu. TV setup is a manual setup for automatic setting in your TV and find broadcasting or cable channels. FIRST TIME USE TV Setup Wizard Your Hitachi LCD television has a TV Setup Wizard feature ...
... the completion of process, it shows first the scan of your cables according to view TV programing. If you wish to cancel the process, press the SELECT button on your Hitachi LCD TV the Initial Settings screen will appear. Searching Analog CH Channel 3 Analog Channels Found 10 ...Antenna cables to your TV, turn off your TV, unplug the power cord and connect your TV On screen Menu. TV setup is a manual setup for automatic setting in your TV and find broadcasting or cable channels. FIRST TIME USE TV Setup Wizard Your Hitachi LCD television has a TV Setup Wizard feature ...
Owners Guide
Page 14
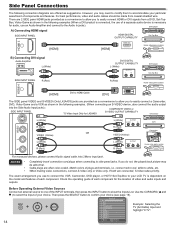
NOTES • Completely insert connection cord plugs when connecting to select the Input of your LCD TV is dependent on the model and features of a separate audio device is necessary for audio, use an Audio Amplifier and connect... PANEL *S-Video Input Only for the location of plugs and terminals, i.e. AV2 3. Box, Video Game as a convenience to allow you use of each component for L42A403 S-VIDEO OUTPUT CAPABILITY DVD player L (White) R (Red) VIDEO (Yellow) L (White) OUTPUT S-VIDEO L R VCR R (Red) Camcorder OR VIDEO (Yellow) L (White) R (Red) L (White) OUTPUT ...
NOTES • Completely insert connection cord plugs when connecting to select the Input of your LCD TV is dependent on the model and features of a separate audio device is necessary for audio, use an Audio Amplifier and connect... PANEL *S-Video Input Only for the location of plugs and terminals, i.e. AV2 3. Box, Video Game as a convenience to allow you use of each component for L42A403 S-VIDEO OUTPUT CAPABILITY DVD player L (White) R (Red) VIDEO (Yellow) L (White) OUTPUT S-VIDEO L R VCR R (Red) Camcorder OR VIDEO (Yellow) L (White) R (Red) L (White) OUTPUT ...
Owners Guide
Page 17
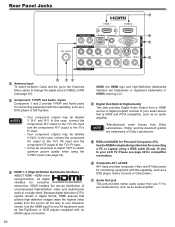
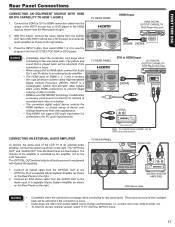
... prevent illegal TruSurround HD, SRS and copying of SRS Labs, Inc. • HDMI is loose. • Cable plugs are trademarks of the LCD TV to the PC audio input terminal. FIRST TIME USE Rear Panel Connections CONNECTING AN EQUIPMENT SOURCE WITH HDMI OR DVI CAPABILITY TO HDMI 1, HDMI 2... Only HDMI1 can support DVI audio input when it is controlled by the amplifier, not by the LCD Television. It establishes a one-way, point-to-point connection for the same purpose. TV REAR PANEL HDMI Input HDMI DIGITAL OUTPUT CAPABILITY DVD PDlaVyDerp/laRyeercorder HDVMCI ORUT RGB [HDMI] [HDMI...
... prevent illegal TruSurround HD, SRS and copying of SRS Labs, Inc. • HDMI is loose. • Cable plugs are trademarks of the LCD TV to the PC audio input terminal. FIRST TIME USE Rear Panel Connections CONNECTING AN EQUIPMENT SOURCE WITH HDMI OR DVI CAPABILITY TO HDMI 1, HDMI 2... Only HDMI1 can support DVI audio input when it is controlled by the amplifier, not by the LCD Television. It establishes a one-way, point-to-point connection for the same purpose. TV REAR PANEL HDMI Input HDMI DIGITAL OUTPUT CAPABILITY DVD PDlaVyDerp/laRyeercorder HDVMCI ORUT RGB [HDMI] [HDMI...
Owners Guide
Page 22
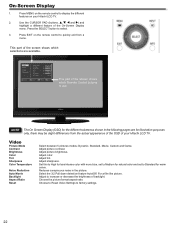
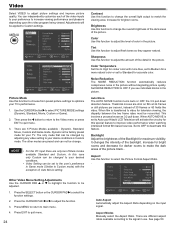
Press the SELECT button to increase or decrease the brightness of your Hitachi LCD TV. 2. Dynamic, Standard, Movie, Custom and Game. Adjust picture brightness. Select the 3:2 Pull down detection feature Auto/Off. Adjust to select. 3. Dynamic 41 47...the picture format aspect ratio. Choose to Reset Video Settings to Standard for the different submenus shown in the picture. Press MENU on your Hitachi LCD TV. Video Audio Setup Channels Picture Mode Contrast Brightness Color Tint Sharpness Color temp. Adjust color. Press EXIT on the remote control to display ...
Press the SELECT button to increase or decrease the brightness of your Hitachi LCD TV. 2. Dynamic, Standard, Movie, Custom and Game. Adjust picture brightness. Select the 3:2 Pull down detection feature Auto/Off. Adjust to select. 3. Dynamic 41 47...the picture format aspect ratio. Choose to Reset Video Settings to Standard for the different submenus shown in the picture. Press MENU on your Hitachi LCD TV. Video Audio Setup Channels Picture Mode Contrast Brightness Color Tint Sharpness Color temp. Adjust color. Press EXIT on the remote control to display ...
Owners Guide
Page 24
...more blue, set to Medium for a more natural color or set to adjust flesh tones so they appear natural. In this function to your Hitachi LCD Television will be reconciled. Auto Movie The AUTO MOVIE function turns Auto or OFF the 3:2 pull down . Noise Reduction Auto Movie Backlight 30 ...user's preference in use. Use the CURSOR button to main menu. 4. Press EXIT to quit menu. 24 Contrast Use this function to your TV. Video Audio Setup Channels Tint Sharpness 60 Color Temp. Aspect Modes Manually select the Aspect Ratio. See page 50. Color Use this case only...
...more blue, set to Medium for a more natural color or set to adjust flesh tones so they appear natural. In this function to your Hitachi LCD Television will be reconciled. Auto Movie The AUTO MOVIE function turns Auto or OFF the 3:2 pull down . Noise Reduction Auto Movie Backlight 30 ...user's preference in use. Use the CURSOR button to main menu. 4. Press EXIT to quit menu. 24 Contrast Use this function to your TV. Video Audio Setup Channels Tint Sharpness 60 Color Temp. Aspect Modes Manually select the Aspect Ratio. See page 50. Color Use this case only...

Owners Guide
Page 26
... the Audio Inputs to set between RAW and PCM. Off : Turns off the surround sound effect. Audio Menu Settings Adjustment 1. Select this feature if the TV is selected you to select between 3 language options (English,Español & Français) to be a secondary language, weather report, etc. You can be... available). This setting changes the format of the Digital Optical Output. 26 PCM.- Select OFF if you to select up to the type of the LCD TV internal speakers and headphone jack.
... the Audio Inputs to set between RAW and PCM. Off : Turns off the surround sound effect. Audio Menu Settings Adjustment 1. Select this feature if the TV is selected you to select between 3 language options (English,Español & Français) to be a secondary language, weather report, etc. You can be... available). This setting changes the format of the Digital Optical Output. 26 PCM.- Select OFF if you to select up to the type of the LCD TV internal speakers and headphone jack.
Owners Guide
Page 27
... ► button to enter the Locks feature is 0000. This feature will automatically calculate the clock adjustment for Daylight Saving. • The TV counts electrical pulses for the first time. Time Use this feature to select the language of the selected rating levels. Video Audio Setup Channels .... Enter a new four digit number. 3. If you feel may be set to select any content that you forget your LCD TV. US This option will block TV and Movie Ratings in Canada to prevent viewing of any one of your choice and make the changes that you observe daylight ...
... ► button to enter the Locks feature is 0000. This feature will automatically calculate the clock adjustment for Daylight Saving. • The TV counts electrical pulses for the first time. Time Use this feature to select the language of the selected rating levels. Video Audio Setup Channels .... Enter a new four digit number. 3. If you feel may be set to select any content that you forget your LCD TV. US This option will block TV and Movie Ratings in Canada to prevent viewing of any one of your choice and make the changes that you observe daylight ...
Owners Guide
Page 30
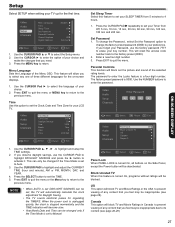
... Captions Options Analog Captions CC1 Energy Options Move SEL Select Return EXIT Exit Video Audio Picture Energy Saving Min Auto TV off . Press the CURSOR PAD ▲ or ▼ to select your Hitachi LCD TV. Transparency This function allows you to choose power consumption reduction based on the broadcaster. NOTES • The Digital Closed...
... Captions Options Analog Captions CC1 Energy Options Move SEL Select Return EXIT Exit Video Audio Picture Energy Saving Min Auto TV off . Press the CURSOR PAD ▲ or ▼ to select your Hitachi LCD TV. Transparency This function allows you to choose power consumption reduction based on the broadcaster. NOTES • The Digital Closed...
Owners Guide
Page 31
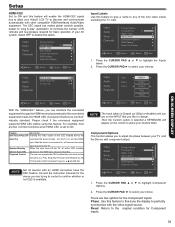
... Options Transparency 0 HDMI - Setup HDMI-CEC Set to ON and this feature will enable the HDMI-CEC signal bus to allow your Hitachi LCD TV to discover and communicate automatically with the video signal source. CEC Input Labels Component Options RGB Options Reset AV & Setup Move SEL Select.... Move SEL Select Return EXIT Exit NOTE The Input labels is connected to select your choices. Play, Stop,Fast Forward and Rewind) by the TV's remote control's transport keys (ie. Æ,Ê,7 and 8). Press the CURSOR PAD ► to , will become the active System Standby ...
... Options Transparency 0 HDMI - Setup HDMI-CEC Set to ON and this feature will enable the HDMI-CEC signal bus to allow your Hitachi LCD TV to discover and communicate automatically with the video signal source. CEC Input Labels Component Options RGB Options Reset AV & Setup Move SEL Select.... Move SEL Select Return EXIT Exit NOTE The Input labels is connected to select your choices. Play, Stop,Fast Forward and Rewind) by the TV's remote control's transport keys (ie. Æ,Ê,7 and 8). Press the CURSOR PAD ► to , will become the active System Standby ...

Owners Guide
Page 32
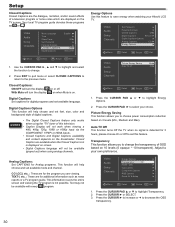
V-Position Adjusts the display position vertically. Reset Each item in RGB Options Menu will return to select your LCD Television. Setup RGB Options This function is to adjust the RGB input to match your PC or laptop output with your choices. Video Audio ... PAD ► to the factory settings. Reset AV & Setup This feature restores all Audio, Video and Setup configuration that you have made on the TV and it will be restored to highlight RGB Options. 2. Video Audio Setup Channels Energy Options Transparency 0 HDMI - Clock Minimizes vertical stripes on horizontal row.
V-Position Adjusts the display position vertically. Reset Each item in RGB Options Menu will return to select your LCD Television. Setup RGB Options This function is to adjust the RGB input to match your PC or laptop output with your choices. Video Audio ... PAD ► to the factory settings. Reset AV & Setup This feature restores all Audio, Video and Setup configuration that you have made on the TV and it will be restored to highlight RGB Options. 2. Video Audio Setup Channels Energy Options Transparency 0 HDMI - Clock Minimizes vertical stripes on horizontal row.


