Owners Guide
Page 3
...product incorporates copyright protection technology that is protected by TV stations and cable companies, as well as programs ...-view uses only unless otherwise authorized. However, there is encouraged to try to correct the interference by Hitachi Home Electronics (America), Inc, may cause harmful interference to radio communications. If this equipment does cause...Rules and Regulations. Declaration of Conformity This device complies with Part 15 of the FCC Rules. This LCD Television receiver will not occur in a residential installation. Do not put in Canada). These limits ...
...product incorporates copyright protection technology that is protected by TV stations and cable companies, as well as programs ...-view uses only unless otherwise authorized. However, there is encouraged to try to correct the interference by Hitachi Home Electronics (America), Inc, may cause harmful interference to radio communications. If this equipment does cause...Rules and Regulations. Declaration of Conformity This device complies with Part 15 of the FCC Rules. This LCD Television receiver will not occur in a residential installation. Do not put in Canada). These limits ...
Owners Guide
Page 5
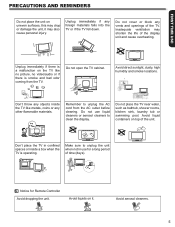
... immediately if any vents and openings of time (days). Do not cover or block any foreign materials falls into the TV or if the TV fell down. Do not place the TV near water, such as bathtub, shower rooms, kitchen sink, laundry tub or swimming pool. Don't throw any other flammable... materials. Remember to clean the display. Notice for a long period of the TV. FIRST TIME USE PRECAUTIONS AND REMINDERS Do not place the unit on uneven surfaces, this may drop or damage the unit, it . Avoid direct sunlight...
... immediately if any vents and openings of time (days). Do not cover or block any foreign materials falls into the TV or if the TV fell down. Do not place the TV near water, such as bathtub, shower rooms, kitchen sink, laundry tub or swimming pool. Don't throw any other flammable... materials. Remember to clean the display. Notice for a long period of the TV. FIRST TIME USE PRECAUTIONS AND REMINDERS Do not place the unit on uneven surfaces, this may drop or damage the unit, it . Avoid direct sunlight...
Owners Guide
Page 6
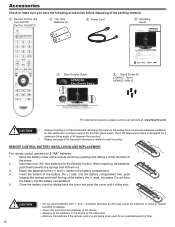
...the cover and push the cover until it in the device at : www.hitachi.us /tv 1-800-Hitachi (1-800-448-2244) OPERATING GUIDE GUIA DE OPERACION IMPORTANTE: APAGAR EL TELEVISOR...Guide for L42A403 & L32A403 IMPORTANT SAFETY INSTRUCTIONS 2-5 FIRST TIME U SE ...6-17 THE REMOTE CONTROL 18-21 ON-SCREEN D ISPLAY 22-34 USEFUL I NFORMATION 3 5-41 LIMITED WARRANTY ...42 END USER L ICENSE A GREEMENT FOR HITACHI DTV SOFTWARE... Accessories Check to make sure you have the following accessories before disposing of your LCD Television for future reference. Mounting the panel on 2 "AA" batteries. 1. ...
...the cover and push the cover until it in the device at : www.hitachi.us /tv 1-800-Hitachi (1-800-448-2244) OPERATING GUIDE GUIA DE OPERACION IMPORTANTE: APAGAR EL TELEVISOR...Guide for L42A403 & L32A403 IMPORTANT SAFETY INSTRUCTIONS 2-5 FIRST TIME U SE ...6-17 THE REMOTE CONTROL 18-21 ON-SCREEN D ISPLAY 22-34 USEFUL I NFORMATION 3 5-41 LIMITED WARRANTY ...42 END USER L ICENSE A GREEMENT FOR HITACHI DTV SOFTWARE... Accessories Check to make sure you have the following accessories before disposing of your LCD Television for future reference. Mounting the panel on 2 "AA" batteries. 1. ...
Owners Guide
Page 7
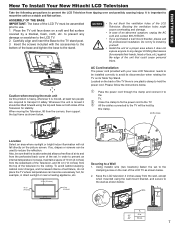
... warping, cabinet color changes, and increased chance of an abnormal symptom, unplug the AC cord and contact 800-HITACHI. • If you purchased a wall mount bracket, please ask for example, in . 42" 10 cm. 7 ASSEMBLY OF THE BASE IMPORTANT: The base of the set failure, do not place the...held by this product is heavy, whenever it safely. Also, be installed correctly to the TV. It is moved, at a proper area where it to the LCD TV. 2. FIRST TIME USE How To Install Your New Hitachi LCD Television Take the following precautions to mount the unit on a stable and flat surface. ...
... warping, cabinet color changes, and increased chance of an abnormal symptom, unplug the AC cord and contact 800-HITACHI. • If you purchased a wall mount bracket, please ask for example, in . 42" 10 cm. 7 ASSEMBLY OF THE BASE IMPORTANT: The base of the set failure, do not place the...held by this product is heavy, whenever it safely. Also, be installed correctly to the TV. It is moved, at a proper area where it to the LCD TV. 2. FIRST TIME USE How To Install Your New Hitachi LCD Television Take the following precautions to mount the unit on a stable and flat surface. ...
Owners Guide
Page 8
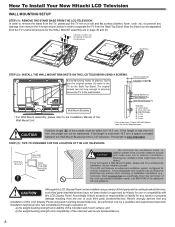
...compatibility of the intended wall mount surface; How To Install Your New Hitachi LCD Television WALL MOUNTING SETUP STEP (1) : REMOVE THE STAND BASE FROM THE LCD TELEVISION In order to remove the stand from the TV, please put the TV set on a soft and flat surface (blanket, foam, cloth, etc....) to prevent any installation of this LCD Display Panel. If the length is very important. Hitachi strongly advises that you purchased ...
...compatibility of the intended wall mount surface; How To Install Your New Hitachi LCD Television WALL MOUNTING SETUP STEP (1) : REMOVE THE STAND BASE FROM THE LCD TELEVISION In order to remove the stand from the TV, please put the TV set on a soft and flat surface (blanket, foam, cloth, etc....) to prevent any installation of this LCD Display Panel. If the length is very important. Hitachi strongly advises that you purchased ...
Owners Guide
Page 9
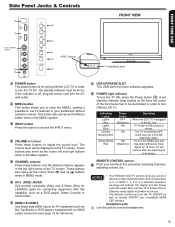
...L42A403) jacks for reference). picture is ON; Headphone jack s Use this capability, such as the cursor left corner of the TV screen. HDMI-3 & HDMI-4 Use these buttons until the TV is for future software upgrades. TV Power is shown. It will not show any compatible HDMI CEC devices. NOTES • Your HITACHI LCD TV... will soon be illuminated in the Off (Stand-by ) Operating When the LCD TV is detected. If the indicator is powering OFF. The volume level will resume ...
...L42A403) jacks for reference). picture is ON; Headphone jack s Use this capability, such as the cursor left corner of the TV screen. HDMI-3 & HDMI-4 Use these buttons until the TV is for future software upgrades. TV Power is shown. It will not show any compatible HDMI CEC devices. NOTES • Your HITACHI LCD TV... will soon be illuminated in the Off (Stand-by ) Operating When the LCD TV is detected. If the indicator is powering OFF. The volume level will resume ...
Owners Guide
Page 10
... high-definition images retain the highest video quality from a HDMI source or digital program channel to your LCD TV. NOTES • Your component outputs may be necessary to adjust TINT to the TV's Pr input. • Your component outputs may be labeled Y, B-Y, and R-Y. HDMI is RAW and... PCM compatible, such as a DVD player, Game Console or Camcorders. NOTE *Manufactured under license from your TV to your AV equipment such as a DVD player or Set Top Box. In this capability, such as an audio amplifier. HDMI enables the secure...
... high-definition images retain the highest video quality from a HDMI source or digital program channel to your LCD TV. NOTES • Your component outputs may be necessary to adjust TINT to the TV's Pr input. • Your component outputs may be labeled Y, B-Y, and R-Y. HDMI is RAW and... PCM compatible, such as a DVD player, Game Console or Camcorders. NOTE *Manufactured under license from your TV to your AV equipment such as a DVD player or Set Top Box. In this capability, such as an audio amplifier. HDMI enables the secure...
Owners Guide
Page 11
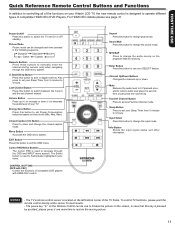
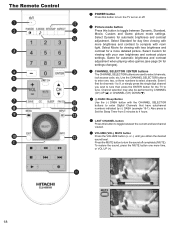
... USE Quick Reference Remote Control Buttons and Functions In addition to controlling all of the functions on your Hitachi LCD TV, the new remote control is designed to operate different types of your TV. Picture Mode Picture mode can be changed each time pressed in case that are showing. Volume Button ...press it one more time to Freeze the picture on the left bottom corner of compatible DVD players with CEC) Control the functions of the TV frame. Info Button Shows the input signal status and other information. The pause key ";" on the Remote Control can be use as a ...
... USE Quick Reference Remote Control Buttons and Functions In addition to controlling all of the functions on your Hitachi LCD TV, the new remote control is designed to operate different types of your TV. Picture Mode Picture mode can be changed each time pressed in case that are showing. Volume Button ...press it one more time to Freeze the picture on the left bottom corner of compatible DVD players with CEC) Control the functions of the TV frame. Info Button Shows the input signal status and other information. The pause key ";" on the Remote Control can be use as a ...
Owners Guide
Page 12
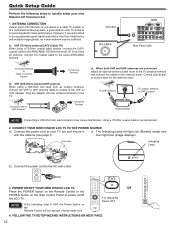
...the antenna terminal on the Remote Control will light red (Standby mode) and with the cable tie (see page 7) . POWER ON/OFF YOUR NEW HITACHI LCD TV. To outdoor VHF or UHF Antenna To Antenna Terminal c). Press the POWER button on the Remote Control or the POWER button on the Side Control... using a 300-Ohm twin lead from interference and multiple image ghosts, an indoor antenna may cause interference. CONNECT YOUR NEW HITACHI LCD TV TO THE POWER SOURCE a). a). To UHF antenna Air/Cable To outdoor antenna or CATV system Antenna Mixer NOTE Connecting a 300-Ohm twin lead ...
...the antenna terminal on the Remote Control will light red (Standby mode) and with the cable tie (see page 7) . POWER ON/OFF YOUR NEW HITACHI LCD TV. To outdoor VHF or UHF Antenna To Antenna Terminal c). Press the POWER button on the Remote Control or the POWER button on the Side Control... using a 300-Ohm twin lead from interference and multiple image ghosts, an indoor antenna may cause interference. CONNECT YOUR NEW HITACHI LCD TV TO THE POWER SOURCE a). a). To UHF antenna Air/Cable To outdoor antenna or CATV system Antenna Mixer NOTE Connecting a 300-Ohm twin lead ...
Owners Guide
Page 13
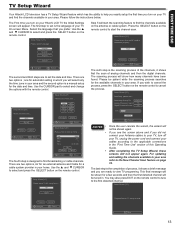
... Spanish French Cancel Navigate SEL Select The second and third steps are to set time mode ... EXIT Exit 13 FIRST TIME USE TV Setup Wizard Your Hitachi LCD television has a TV Setup Wizard feature which you will select only the time zone in your area and the second option is the scanning process of..., the wizard will not be shown again. • If you see the screen above and if you did not connect your Antenna cables to your Hitachi LCD TV the Initial Settings screen will show how many channels have been found. There are two options...
... Spanish French Cancel Navigate SEL Select The second and third steps are to set time mode ... EXIT Exit 13 FIRST TIME USE TV Setup Wizard Your Hitachi LCD television has a TV Setup Wizard feature which you will select only the time zone in your area and the second option is the scanning process of..., the wizard will not be shown again. • If you see the screen above and if you did not connect your Antenna cables to your Hitachi LCD TV the Initial Settings screen will show how many channels have been found. There are two options...
Owners Guide
Page 14
... you do not, the played back picture may need to modify them to accommodate your LCD TV is dependent on the model and features of each component for L42A403 S-VIDEO OUTPUT CAPABILITY DVD player L (White) R (Red) VIDEO (Yellow) L (White) OUTPUT S-VIDEO L R VCR R (Red) Camcorder OR VIDEO (Yellow) L (White) ...L R R (Red) [DVI] DIGITAL OUTPUT DVD player Set-Top Box Home video game system The SIDE panel VIDEO and S-VIDEO (Only L42A403) jacks are connected, S-Video takes priority. HDMI 1 7. connect red to red, white to select the Input of each component. RGB 6....
... you do not, the played back picture may need to modify them to accommodate your LCD TV is dependent on the model and features of each component for L42A403 S-VIDEO OUTPUT CAPABILITY DVD player L (White) R (Red) VIDEO (Yellow) L (White) OUTPUT S-VIDEO L R VCR R (Red) Camcorder OR VIDEO (Yellow) L (White) ...L R R (Red) [DVI] DIGITAL OUTPUT DVD player Set-Top Box Home video game system The SIDE panel VIDEO and S-VIDEO (Only L42A403) jacks are connected, S-Video takes priority. HDMI 1 7. connect red to red, white to select the Input of each component. RGB 6....
Owners Guide
Page 15
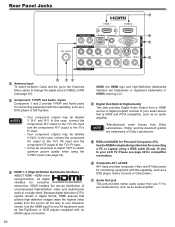
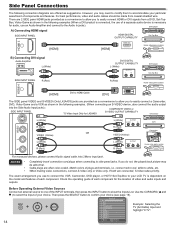
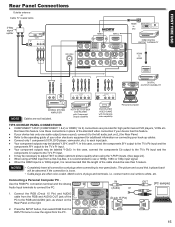
... double-D symbol are trademarks of plugs and terminals, i.e. that have this case, connect the components B-Y output to the TV's Pb input and the components R-Y output to the TV's Pr input. ♦♦ Your component outputs may be abnormal if the connection is loose. • Cable plugs ...de Dolby Laboratories. cable from Dolby Laboratories. Connecting a Personal Computer PC . FIRST TIME USE Rear Panel Connections Outside antenna or Cable TV coaxial cable 2-Way signal splitter VCR ANT IN V LR RGB RGB HDMI to DVI DIGITAL OUTPUT AUDIO OUT HDMI DIGITAL OUTPUT CAPABILITY ...
... double-D symbol are trademarks of plugs and terminals, i.e. that have this case, connect the components B-Y output to the TV's Pb input and the components R-Y output to the TV's Pr input. ♦♦ Your component outputs may be abnormal if the connection is loose. • Cable plugs ...de Dolby Laboratories. cable from Dolby Laboratories. Connecting a Personal Computer PC . FIRST TIME USE Rear Panel Connections Outside antenna or Cable TV coaxial cable 2-Way signal splitter VCR ANT IN V LR RGB RGB HDMI to DVI DIGITAL OUTPUT AUDIO OUT HDMI DIGITAL OUTPUT CAPABILITY ...
Owners Guide
Page 16
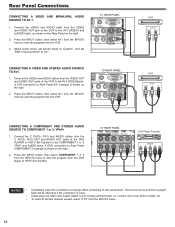
...SOURCE TO AV1. 1. A DVD connection to the AV1 (VIDEO) and L(AUDIO) jack, as shown on the Rear Panel on the right 2. de Dolby TV REAR PANEL White Red Green Blue Red DVD Player/ Recorder Output L R Y PB PR NOTES • Completely insert the connection cord plugs when connecting to...2 example is shown on the right. 2. Select Audio menu, set Sound mode to "Custom", and set "SRS Trusurround HD" to rear panel jacks. TV REAR PANEL RGB TV REAR PANEL RGB RGB (Yellow) (White) (Red) RGB (White) (Yellow) VCR OUTPUT AUDIO VIDEO VCR OUTPUT VIDEO L R CONNECTING A COMPONENT AND ...
...SOURCE TO AV1. 1. A DVD connection to the AV1 (VIDEO) and L(AUDIO) jack, as shown on the Rear Panel on the right 2. de Dolby TV REAR PANEL White Red Green Blue Red DVD Player/ Recorder Output L R Y PB PR NOTES • Completely insert the connection cord plugs when connecting to...2 example is shown on the right. 2. Select Audio menu, set Sound mode to "Custom", and set "SRS Trusurround HD" to rear panel jacks. TV REAR PANEL RGB TV REAR PANEL RGB RGB (Yellow) (White) (Red) RGB (White) (Yellow) VCR OUTPUT AUDIO VIDEO VCR OUTPUT VIDEO L R CONNECTING A COMPONENT AND ...
Owners Guide
Page 17
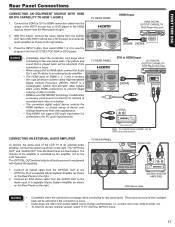
...when it is loose. • Cable plugs are trademarks of SRS Labs, Inc. • HDMI is controlled by the amplifier, not by the LCD Television. Connect the HDMI or DVI to HDMI connection cable from the output of the amplifier is not a "NETWORK" technology. "Dolby" and an... STEREO SYSTEM AMPLIFIER RCA Stereo cable NOTES • Completely insert the connection cord plugs when connecting to the Audio input of the LCD TV to the last channel viewed, select "0.TV" from the OPTICAL OUT to equipment with Optical IN capability. 1. BOX or DVD player. HDCP is a fixed output. The...
...when it is loose. • Cable plugs are trademarks of SRS Labs, Inc. • HDMI is controlled by the amplifier, not by the LCD Television. Connect the HDMI or DVI to HDMI connection cable from the output of the amplifier is not a "NETWORK" technology. "Dolby" and an... STEREO SYSTEM AMPLIFIER RCA Stereo cable NOTES • Completely insert the connection cord plugs when connecting to the Audio input of the LCD TV to the last channel viewed, select "0.TV" from the OPTICAL OUT to equipment with Optical IN capability. 1. BOX or DVD player. HDCP is a fixed output. The...
Owners Guide
Page 18
... for settings changes). Select Movie for viewing with more detailed picture. Also press to Set the Sleep Timer from 5 minutes to turn the TV set on or off completely (MUTE). Press the MUTE button to 4 hours. Select Custom for viewing with room light. Use the CHANNEL ...SELECTOR buttons to enter one more time, or VOL UP (+). 8 Volume 10 Mute 18 Enter 0 first for the TV to select channels. Game for automatic brightness and contrast adjustment when playing video games.(see page 24 for automatic brightness and contrast adjustment. LAST ...
... for settings changes). Select Movie for viewing with more detailed picture. Also press to Set the Sleep Timer from 5 minutes to turn the TV set on or off completely (MUTE). Press the MUTE button to 4 hours. Select Custom for viewing with room light. Use the CHANNEL ...SELECTOR buttons to enter one more time, or VOL UP (+). 8 Volume 10 Mute 18 Enter 0 first for the TV to select channels. Game for automatic brightness and contrast adjustment when playing video games.(see page 24 for automatic brightness and contrast adjustment. LAST ...

Owners Guide
Page 19
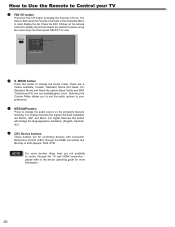
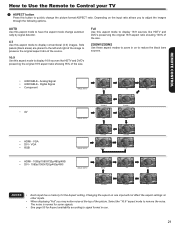
... Title. HDMI 2 Select to choose Component Input 1. 4. HDMI 4 Select to select. REMOTE CONTROL How to Use the Remote to Control your TV Closed Captioning will be at a volume level 16 or greater, the volume level will also cycle through the Inputs menu items. Then press the ... level will display automatically when MUTE is set to With Mute (see page 30). TVInput List 1. AV1 2. Component1 4. No Program Description. TV Watch TV from 5 minutes to set or adjusted by using the CURSOR Pad and the SELECT button, except for numeric entries. AV2 Select to choose PC...
... Title. HDMI 2 Select to choose Component Input 1. 4. HDMI 4 Select to select. REMOTE CONTROL How to Use the Remote to Control your TV Closed Captioning will be at a volume level 16 or greater, the volume level will also cycle through the Inputs menu items. Then press the ... level will display automatically when MUTE is set to With Mute (see page 30). TVInput List 1. AV1 2. Component1 4. No Program Description. TV Watch TV from 5 minutes to set or adjusted by using the CURSOR Pad and the SELECT button, except for numeric entries. AV2 Select to choose PC...
Owners Guide
Page 20
... through the HDMI connection like Blu Ray or DVD players, DVR, STB. Selecting the Custom Mode allows you to set the audio options to your TV FAV CH button Press the FAV CH button to change the sound mode. MTS/SAP button Press to display the Favorite CH List. Press the... CH ANALOG CH Move SEL Select EXIT Exit S. You have to the device operating guide for controlling devices with Consumer Electronics Control (CEC) through the TV and HDMI connection ; For Standard, Movie and News the options Bass Treble and SRS TruSurround HD are showing. please refer to first setup the Favorite...
... through the HDMI connection like Blu Ray or DVD players, DVR, STB. Selecting the Custom Mode allows you to set the audio options to your TV FAV CH button Press the FAV CH button to change the sound mode. MTS/SAP button Press to display the Favorite CH List. Press the... CH ANALOG CH Move SEL Select EXIT Exit S. You have to the device operating guide for controlling devices with Consumer Electronics Control (CEC) through the TV and HDMI connection ; For Standard, Movie and News the options Bass Treble and SRS TruSurround HD are showing. please refer to first setup the Favorite...
Owners Guide
Page 21
... the picture. The noise is normal for some signals. • See page 50 for the Aspect setting. How to Use the Remote to Control your TV 9 ASPECT button Press this button to remove the noise. Side panels (black areas) are placed to the left and right of the image to preserve...
... the picture. The noise is normal for some signals. • See page 50 for the Aspect setting. How to Use the Remote to Control your TV 9 ASPECT button Press this button to remove the noise. Side panels (black areas) are placed to the left and right of the image to preserve...
Owners Guide
Page 22
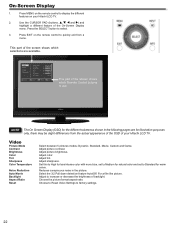
... on the remote control to use. Dynamic 41 47 65 0 60 High Move SEL Select Return EXIT Exit This part of your Hitachi LCD TV. 2. NOTE The On Screen Display (OSD) for the different submenus shown in the picture. For a film like picture. On-.... Reduces conspicuous noise in the following pages are available. Choose the picture format aspect ratio. Adjust sharpness. Press EXIT on your Hitachi LCD TV. Dynamic, Standard, Movie, Custom and Game. Adjust tint. Video Picture Mode Contrast Brightness Color Tint Sharpness Color Temperature Noise Reduction ...
... on the remote control to use. Dynamic 41 47 65 0 60 High Move SEL Select Return EXIT Exit This part of your Hitachi LCD TV. 2. NOTE The On Screen Display (OSD) for the different submenus shown in the picture. For a film like picture. On-.... Reduces conspicuous noise in the following pages are available. Choose the picture format aspect ratio. Adjust sharpness. Press EXIT on your Hitachi LCD TV. Dynamic, Standard, Movie, Custom and Game. Adjust tint. Video Picture Mode Contrast Brightness Color Tint Sharpness Color Temperature Noise Reduction ...
Owners Guide
Page 24
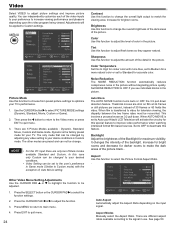
... return to the Video menu or press EXIT to select PICTURE MODE settings (Dynamic, Standard, Movie, Custom or Game). 2. Dynamic is set to your TV's performance. 1. The other modes are 5 Picture Modes available : Dynamic, Standard, Movie, Custom and Game mode. NOTE • For the PC input... Set NOISE REDUCTION to match the viewing area. When film is Custom mode. When AUTO MOVIE is the factory preset mode for your Hitachi LCD Television will be changed to your desired conditions. • Video Setting can not be set to adjust the level of the picture. Backlight...
... return to the Video menu or press EXIT to select PICTURE MODE settings (Dynamic, Standard, Movie, Custom or Game). 2. Dynamic is set to your TV's performance. 1. The other modes are 5 Picture Modes available : Dynamic, Standard, Movie, Custom and Game mode. NOTE • For the PC input... Set NOISE REDUCTION to match the viewing area. When film is Custom mode. When AUTO MOVIE is the factory preset mode for your Hitachi LCD Television will be changed to your desired conditions. • Video Setting can not be set to adjust the level of the picture. Backlight...


