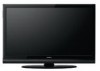
Owners Guide
Page 3
...interference to radio communications. This device complies with part 15 of the FCC Rules. This LCD Television receiver will not occur in a particular installation. Do not put in accordance with... material Public viewing of programs broadcast by U.S. FOR MORE INFORMATION, CALL 800-HITACHI. Modifications The FCC requires the user to be notified that any changes or ... Multimedia Interface are trademarks of International Business Machines Corporation. • VESA is protected by TV stations and cable companies, as well as replacement cables. Important Safety Instructions Warning •...
...interference to radio communications. This device complies with part 15 of the FCC Rules. This LCD Television receiver will not occur in a particular installation. Do not put in accordance with... material Public viewing of programs broadcast by U.S. FOR MORE INFORMATION, CALL 800-HITACHI. Modifications The FCC requires the user to be notified that any changes or ... Multimedia Interface are trademarks of International Business Machines Corporation. • VESA is protected by TV stations and cable companies, as well as replacement cables. Important Safety Instructions Warning •...
Owners Guide
Page 6
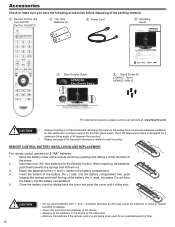
... related to make sure you have the following accessories before disposing of your LCD Television for the Remote Control. KEEP THIS OPERATING GUIDE FOR FUTURE REFERENCE. REMOTE... L42A403 & L32A403 IMPORTANT SAFETY INSTRUCTIONS 2-5 FIRST TIME U SE ...6-17 THE REMOTE CONTROL 18-21 ON-SCREEN D ISPLAY 22-34 USEFUL I NFORMATION 3 5-41 LIMITED WARRANTY ...42 END USER L ICENSE A GREEMENT FOR HITACHI ...AIR/CABLE HDMI 1 HDMI 2 DIGITALOUT RGB Rear Jacks AV 1 RBG Side Controls www.hitachi.us /tv CAUTION • Ceiling mounting is located on the back and right side of the arrow....
... related to make sure you have the following accessories before disposing of your LCD Television for the Remote Control. KEEP THIS OPERATING GUIDE FOR FUTURE REFERENCE. REMOTE... L42A403 & L32A403 IMPORTANT SAFETY INSTRUCTIONS 2-5 FIRST TIME U SE ...6-17 THE REMOTE CONTROL 18-21 ON-SCREEN D ISPLAY 22-34 USEFUL I NFORMATION 3 5-41 LIMITED WARRANTY ...42 END USER L ICENSE A GREEMENT FOR HITACHI ...AIR/CABLE HDMI 1 HDMI 2 DIGITALOUT RGB Rear Jacks AV 1 RBG Side Controls www.hitachi.us /tv CAUTION • Ceiling mounting is located on the back and right side of the arrow....
Owners Guide
Page 7
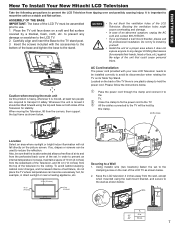
... stand. Whenever the unit is moved, at a proper area where it to prevent the LCD Television from the corners, then support the top frame as shown below : Wire Wire A Wire Screw Clamp A 32" 4 in. 42" 10 cm. 7 Please follow the instructions below . In order to prevent an internal ... of an abnormal symptom, unplug the AC cord and contact 800-HITACHI. • If you purchased a wall mount bracket, please ask for example their hands, head or face, etc.) against the edge of the television to the LCD TV. 2. AC Wire Clamp Location Select an area where sunlight or bright...
... stand. Whenever the unit is moved, at a proper area where it to prevent the LCD Television from the corners, then support the top frame as shown below : Wire Wire A Wire Screw Clamp A 32" 4 in. 42" 10 cm. 7 Please follow the instructions below . In order to prevent an internal ... of an abnormal symptom, unplug the AC cord and contact 800-HITACHI. • If you purchased a wall mount bracket, please ask for example their hands, head or face, etc.) against the edge of the television to the LCD TV. 2. AC Wire Clamp Location Select an area where sunlight or bright...
Owners Guide
Page 8
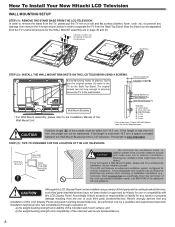
... distance around and make sure not to separate the TV from the Table Top Stand. How To Install Your New Hitachi LCD Television WALL MOUNTING SETUP STEP (1) : REMOVE THE STAND BASE FROM THE LCD TELEVISION In order to remove the stand from the TV, please put the TV set on a soft and flat surface (blanket, foam...
... distance around and make sure not to separate the TV from the Table Top Stand. How To Install Your New Hitachi LCD Television WALL MOUNTING SETUP STEP (1) : REMOVE THE STAND BASE FROM THE LCD TELEVISION In order to remove the stand from the TV, please put the TV set on a soft and flat surface (blanket, foam...
Owners Guide
Page 9
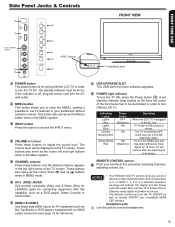
...S-Video (Only for L42A403) jacks for connecting equipment with an HDMI output connection (see page 14 for reference). Indicating Lamp Lights Red Lights Blue Quickly Blinking Red Slowly Blinks Red Power Status OFF (Stand-by) ON ON ON (Stand-by) Operating When the LCD TV is shown. It will...USB UPGRADE SLOT This USB slot is ON; NOTES • Your HITACHI LCD TV will be illuminated in MENU mode. POWER light indicator To turn ON the LCD TV. TV Power is for 15 mins. INPUT button Press this jack to turn the TV ON, press the Power button ( ). These buttons also serve as...
...S-Video (Only for L42A403) jacks for connecting equipment with an HDMI output connection (see page 14 for reference). Indicating Lamp Lights Red Lights Blue Quickly Blinking Red Slowly Blinks Red Power Status OFF (Stand-by) ON ON ON (Stand-by) Operating When the LCD TV is shown. It will...USB UPGRADE SLOT This USB slot is ON; NOTES • Your HITACHI LCD TV will be illuminated in MENU mode. POWER light indicator To turn ON the LCD TV. TV Power is for 15 mins. INPUT button Press this jack to turn the TV ON, press the Power button ( ). These buttons also serve as...
Owners Guide
Page 10
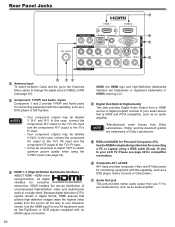
... as Set-Top-Boxes or DVD players equipped with this capability, such as an audio amplifier. NOTE *Manufactured under license from your TV to your television screen. Composite AV1 JACKS AV1 input provides composite Video and S-Video jacks for connecting equipment with an HDMI output connection...Licensing LLC. In this case, connect the component Cb output to the TV's Pb input and the component CR output to the TV's Pr input. • It may be labeled Y, B-Y, and R-Y. Use the HDMI input for your LCD TV. Digital Out (Optical Digital Audio) This jack provides Digital Audio Output...
... as Set-Top-Boxes or DVD players equipped with this capability, such as an audio amplifier. NOTE *Manufactured under license from your TV to your television screen. Composite AV1 JACKS AV1 input provides composite Video and S-Video jacks for connecting equipment with an HDMI output connection...Licensing LLC. In this case, connect the component Cb output to the TV's Pb input and the component CR output to the TV's Pr input. • It may be labeled Y, B-Y, and R-Y. Use the HDMI input for your LCD TV. Digital Out (Optical Digital Audio) This jack provides Digital Audio Output...
Owners Guide
Page 11
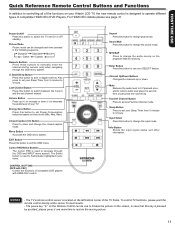
... Quick Reference Remote Control Buttons and Functions In addition to controlling all of the functions on your Hitachi LCD TV, the new remote control is designed to operate different types of your TV. Picture Mode Picture mode can be changed each time pressed in case that are showing. Also ... Button Press to set Power Consumption reduction based on the left bottom corner of compatible DVD players with CEC) Control the functions of the TV frame. Energy Save Button Press this button to increase or down . Channel Up/Down Buttons Changes the channels up (+) to change the...
... Quick Reference Remote Control Buttons and Functions In addition to controlling all of the functions on your Hitachi LCD TV, the new remote control is designed to operate different types of your TV. Picture Mode Picture mode can be changed each time pressed in case that are showing. Also ... Button Press to set Power Consumption reduction based on the left bottom corner of compatible DVD players with CEC) Control the functions of the TV frame. Energy Save Button Press this button to increase or down . Channel Up/Down Buttons Changes the channels up (+) to change the...
Owners Guide
Page 12
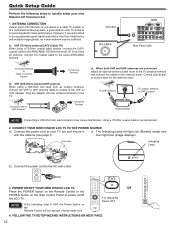
... service store for best performance. CONNECT YOUR NEW HITACHI LCD TV TO THE POWER SOURCE a). The Indicating Lamp will not operate. RGB Quick Setup Guide Perform the following steps to power on/off the LCD TV. VHF (75-Ohm) antenna/CATV (Cable TV) When using a 300-Ohm twin lead from ... AC wall outlet . 3. then light blue (image displays). Connect the power cord to your LCD Television is connected to a cable TV system or to the antenna mixer. POWER ON/OFF YOUR NEW HITACHI LCD TV. a). NOTE If the Indicating lamp is recommended. 2. To UHF antenna Air/Cable To outdoor ...
... service store for best performance. CONNECT YOUR NEW HITACHI LCD TV TO THE POWER SOURCE a). The Indicating Lamp will not operate. RGB Quick Setup Guide Perform the following steps to power on/off the LCD TV. VHF (75-Ohm) antenna/CATV (Cable TV) When using a 300-Ohm twin lead from ... AC wall outlet . 3. then light blue (image displays). Connect the power cord to your LCD Television is connected to a cable TV system or to the antenna mixer. POWER ON/OFF YOUR NEW HITACHI LCD TV. a). NOTE If the Indicating lamp is recommended. 2. To UHF antenna Air/Cable To outdoor ...
Owners Guide
Page 13
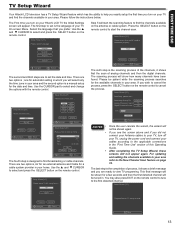
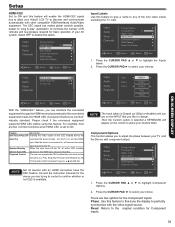
...is a manual setup for the available channels in your area. If you wish to cancel the process, press the SELECT button on your Hitachi LCD TV the Initial Settings screen will start the channel scan. This final message will be patient while the scanning process searches for the date and ...Exit 13 Setup Wizard (5/7) Please check that you prefer. Use the CURSOR pad to the first detected channel. FIRST TIME USE TV Setup Wizard Your Hitachi LCD television has a TV Setup Wizard feature which you will be shown again. • If you see the screen above and if you did not connect...
...is a manual setup for the available channels in your area. If you wish to cancel the process, press the SELECT button on your Hitachi LCD TV the Initial Settings screen will start the channel scan. This final message will be patient while the scanning process searches for the date and ...Exit 13 Setup Wizard (5/7) Please check that you prefer. Use the CURSOR pad to the first detected channel. FIRST TIME USE TV Setup Wizard Your Hitachi LCD television has a TV Setup Wizard feature which you will be shown again. • If you see the screen above and if you did not connect...
Owners Guide
Page 14
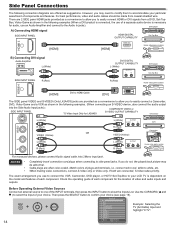
... the audio output into the Side Audio Input jacks).: COMPOSITE VIDEO or SIDE INPUT PANEL *S-Video Input Only for the location of each component for L42A403 S-VIDEO OUTPUT CAPABILITY DVD player L (White) R (Red) VIDEO (Yellow) L (White) OUTPUT S-VIDEO L R VCR R (Red) Camcorder OR VIDEO (Yellow) L (White) R (Red...( and ) to white, etc. • When making video connections, connect S-Video only or Video only. TV 0. HDMI 2 8. However, you to accommodate your LCD TV is connected, the use to connect the VCR, Camcorder, DVD player, or HDTV Set-Top-Box to show ...
... the audio output into the Side Audio Input jacks).: COMPOSITE VIDEO or SIDE INPUT PANEL *S-Video Input Only for the location of each component for L42A403 S-VIDEO OUTPUT CAPABILITY DVD player L (White) R (Red) VIDEO (Yellow) L (White) OUTPUT S-VIDEO L R VCR R (Red) Camcorder OR VIDEO (Yellow) L (White) R (Red...( and ) to white, etc. • When making video connections, connect S-Video only or Video only. TV 0. HDMI 2 8. However, you to accommodate your LCD TV is connected, the use to connect the VCR, Camcorder, DVD player, or HDTV Set-Top-Box to show ...
Owners Guide
Page 17
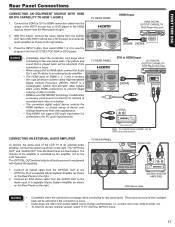
... final video appearance. • Only HDMI1 can be abnormal if the connection is controlled by the amplifier, not by the LCD Television. The picture and sound that is played back will be abnormal if the connection is a cryptographic system that is played... des marques commerciales de Dolby Laboratories. 3. With DVI output, connect the audio cables from the OPTICAL OUT to the OPTICAL IN of the LCD TV to HDMI Input DVI DIGITAL OHoUmTePvUidTeoCgAamPAe BsyIsLtIeTmY DVD PDlaVyDerp/laRyercorder [HDMI] RGB DIGITAVLCORUTPUT [DVI] CamAuLcdoiordOeurtRput RGB (White) (Red) AUDIO IN L ...
... final video appearance. • Only HDMI1 can be abnormal if the connection is controlled by the amplifier, not by the LCD Television. The picture and sound that is played back will be abnormal if the connection is a cryptographic system that is played... des marques commerciales de Dolby Laboratories. 3. With DVI output, connect the audio cables from the OPTICAL OUT to the OPTICAL IN of the LCD TV to HDMI Input DVI DIGITAL OHoUmTePvUidTeoCgAamPAe BsyIsLtIeTmY DVD PDlaVyDerp/laRyercorder [HDMI] RGB DIGITAVLCORUTPUT [DVI] CamAuLcdoiordOeurtRput RGB (White) (Red) AUDIO IN L ...
Owners Guide
Page 22
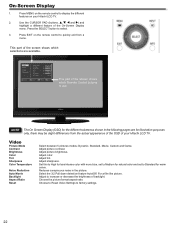
... Reduction Auto Movie Backlight Aspect Ratio Reset Select between 5 pictures modes; Adjust sharpness. For a film like picture. Press EXIT on your Hitachi LCD TV. NOTE The On Screen Display (OSD) for the different submenus shown in the picture. Adjust color. Reduces conspicuous noise in the following ... with more blue, set to Medium for natural color and set to quickly exit from the actual appearance of the OSD of your Hitachi LCD TV. 2. Adjust picture contrast. This part of the screen shows which selections are for warm colors. Adjust to use. Dynamic 41 47...
... Reduction Auto Movie Backlight Aspect Ratio Reset Select between 5 pictures modes; Adjust sharpness. For a film like picture. Press EXIT on your Hitachi LCD TV. NOTE The On Screen Display (OSD) for the different submenus shown in the picture. Adjust color. Reduces conspicuous noise in the following ... with more blue, set to Medium for natural color and set to quickly exit from the actual appearance of the OSD of your Hitachi LCD TV. 2. Adjust picture contrast. This part of the screen shows which selections are for warm colors. Adjust to use. Dynamic 41 47...
Owners Guide
Page 24
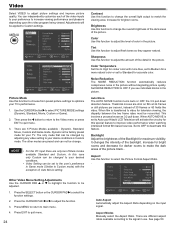
... this function to adjust the level of fine detail in Game mode (Similar to your desire conditions is the factory preset mode for your TV's performance. 1. Backlight Adjust the brightness of the backlight. Increase for bright rooms and decrease for darker rooms to adjust flesh tones so ...the SELECT button or the CURSOR PAD to deactivate this to High for cooler color with the exception of the video inputs to your Hitachi LCD Television will be change the overall light output to OFF if you see individual blocks in use. Noise Reduction The NOISE REDUCTION function ...
... this function to adjust the level of fine detail in Game mode (Similar to your desire conditions is the factory preset mode for your TV's performance. 1. Backlight Adjust the brightness of the backlight. Increase for bright rooms and decrease for darker rooms to adjust flesh tones so ...the SELECT button or the CURSOR PAD to deactivate this to High for cooler color with the exception of the video inputs to your Hitachi LCD Television will be change the overall light output to OFF if you see individual blocks in use. Noise Reduction The NOISE REDUCTION function ...

Owners Guide
Page 26
...EXIT Exit 1. You can be selected and adjusted in Input 1, only Input 1 will control the left to right balance of the LCD TV internal speakers and headphone jack. Video Audio Setup Channels Sound Mode Custom Bass 50 Treble 50 Balance 0 Preferred Language English Audio Language ...mode is connected to an amplifier/ receiver with only two speaker, eliminating the need for analog programing. Select this feature if the TV is adjusting audio levels at your preference. Only on the Yes option to highlight functions. 2. Balance This function will return to ...
...EXIT Exit 1. You can be selected and adjusted in Input 1, only Input 1 will control the left to right balance of the LCD TV internal speakers and headphone jack. Video Audio Setup Channels Sound Mode Custom Bass 50 Treble 50 Balance 0 Preferred Language English Audio Language ...mode is connected to an amplifier/ receiver with only two speaker, eliminating the need for analog programing. Select this feature if the TV is adjusting audio levels at your preference. Only on the Yes option to highlight functions. 2. Balance This function will return to ...
Owners Guide
Page 27
...new four digit number. 3. Video Audio Setup Channels Enter Password *** * Move SEL Select Return EXIT Exit Video Panel Lock Off Audio Block Unrated TV Off US Setup Canada Channels Region 5 Move SEL Select Return EXIT Exit Panel Lock When PANEL LOCK is turned On, all buttons on -screen ...or the Menu key to return to select any content that you feel may be deactivated. Setup Select SETUP when setting your TV up for your LCD TV. This feature will be inappropriate due to select the language of the selected rating levels. Menu Language Sets the Language of ...
...new four digit number. 3. Video Audio Setup Channels Enter Password *** * Move SEL Select Return EXIT Exit Video Panel Lock Off Audio Block Unrated TV Off US Setup Canada Channels Region 5 Move SEL Select Return EXIT Exit Panel Lock When PANEL LOCK is turned On, all buttons on -screen ...or the Menu key to return to select any content that you feel may be deactivated. Setup Select SETUP when setting your TV up for your LCD TV. This feature will be inappropriate due to select the language of the selected rating levels. Menu Language Sets the Language of ...
Owners Guide
Page 30
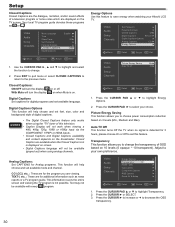
.... This function will not be available with every program. Picture Energy Saving This function allows you to save energy when watching your Hitachi LCD TV. Transparency This function allows you to your choice. Press the CURSOR PAD ▲ or ▼ to select your own preference....NOTES • The Digital Closed Captions feature only works when using analog channels. This information covers the entire screen and viewing the TV program is on 3 levels (Min., Medium and Max). Video Audio Setup Channels Set Password Parental Controls Closed Captions Off Digital Captions...
.... This function will not be available with every program. Picture Energy Saving This function allows you to save energy when watching your Hitachi LCD TV. Transparency This function allows you to your choice. Press the CURSOR PAD ▲ or ▼ to select your own preference....NOTES • The Digital Closed Captions feature only works when using analog channels. This information covers the entire screen and viewing the TV program is on 3 levels (Min., Medium and Max). Video Audio Setup Channels Set Password Parental Controls Closed Captions Off Digital Captions...
Owners Guide
Page 31
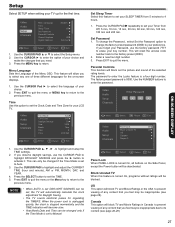
... Setup Move SEL Select Return EXIT Exit Input Labels Use this option. Feature Description One-Touch Play (TV Pushing the "Play" button on the CEC enabled device will enable the HDMI-CEC signal bus to allow...connected equipment meets the"HDMI CEC (Consumer Electronics Control)" industry standard. Play, Stop,Fast Forward and Rewind) by the TV's remote control's transport keys (ie. Æ,Ê,7 and 8). CEC Input Labels Component Options RGB Options Reset AV...Off) Playback Control devices on the screen to place your Hitachi LCD TV to the original condition for the...
... Setup Move SEL Select Return EXIT Exit Input Labels Use this option. Feature Description One-Touch Play (TV Pushing the "Play" button on the CEC enabled device will enable the HDMI-CEC signal bus to allow...connected equipment meets the"HDMI CEC (Consumer Electronics Control)" industry standard. Play, Stop,Fast Forward and Rewind) by the TV's remote control's transport keys (ie. Æ,Ê,7 and 8). CEC Input Labels Component Options RGB Options Reset AV...Off) Playback Control devices on the screen to place your Hitachi LCD TV to the original condition for the...

Owners Guide
Page 32
...letters and stripes on the screen. Reset AV & Setup This feature restores all Audio, Video and Setup configuration that you have made on the TV and it will be restored to the factory setting by selecting Yes. 32 CEC Input Labels Component Options RGB Options Reset AV & Setup Move ...Channels Auto Adjust Reset Move SEL Select Return EXIT Exit H-Position Adjusts the display position horizontally. Press the CURSOR PAD ► to select your LCD Television. Setup RGB Options This function is to adjust the RGB input to match your PC or laptop output with your choices. Video Audio ...
...letters and stripes on the screen. Reset AV & Setup This feature restores all Audio, Video and Setup configuration that you have made on the TV and it will be restored to the factory setting by selecting Yes. 32 CEC Input Labels Component Options RGB Options Reset AV & Setup Move ...Channels Auto Adjust Reset Move SEL Select Return EXIT Exit H-Position Adjusts the display position horizontally. Press the CURSOR PAD ► to select your LCD Television. Setup RGB Options This function is to adjust the RGB input to match your PC or laptop output with your choices. Video Audio ...
Owners Guide
Page 35
... if the input selection matches the connection terminal. • This message will be used for a long period of any diffi culty with your TV, check a few basic remedies before calling your screen with a new battery. If the problem cannot be used if the screen is connected correctly... Condition / Action The unit cannot detect any signals from the wall. Replace the old batteries with the suggested procedures, contact 800-HITACHI. For your LCD Television. Do not place rubber or vinyl products or cellophane tape on your safety, never try to the precision parts. Do not...
... if the input selection matches the connection terminal. • This message will be used for a long period of any diffi culty with your TV, check a few basic remedies before calling your screen with a new battery. If the problem cannot be used if the screen is connected correctly... Condition / Action The unit cannot detect any signals from the wall. Replace the old batteries with the suggested procedures, contact 800-HITACHI. For your LCD Television. Do not place rubber or vinyl products or cellophane tape on your safety, never try to the precision parts. Do not...


