Owners Guide
Page 8
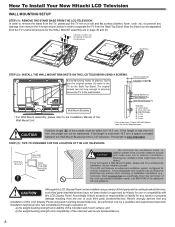
...CAUTION Insertion length (B) of the Wall Mount Unit. Although this LCD Display Panel. Screw Mounting Holes (4 places). In CAUTION addition please keep a certain distance around and make sure not to the Installation Manual of the screws must be maintained. A knowledgeable and experienced professional ... mm, a space is very important. How To Install Your New Hitachi LCD Television WALL MOUNTING SETUP STEP (1) : REMOVE THE STAND BASE FROM THE LCD TELEVISION In order to remove the stand from the TV, please put the TV set on a soft and flat surface (blanket, foam, cloth,...
...CAUTION Insertion length (B) of the Wall Mount Unit. Although this LCD Display Panel. Screw Mounting Holes (4 places). In CAUTION addition please keep a certain distance around and make sure not to the Installation Manual of the screws must be maintained. A knowledgeable and experienced professional ... mm, a space is very important. How To Install Your New Hitachi LCD Television WALL MOUNTING SETUP STEP (1) : REMOVE THE STAND BASE FROM THE LCD TELEVISION In order to remove the stand from the TV, please put the TV set on a soft and flat surface (blanket, foam, cloth,...
Owners Guide
Page 11
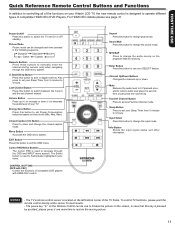
...with CEC) Control the functions of compatible DVD players with HDMI-CEC control. Dynamic Standard Movie Game Custom Numeric Buttons Press these buttons to manually enter the channel and for best results. - Info Button Shows the input signal status and other information. NOTES - Menu Button Accesses the ... to operate different types of compatible HDMI CEC DVD Players, For HDMI CEC details please see page 31. Also press to set your Hitachi LCD TV, the new remote control is used to navigate through the OSD menu system. (-) Dash/Sleep Button Press this button to change the sound...
...with CEC) Control the functions of compatible DVD players with HDMI-CEC control. Dynamic Standard Movie Game Custom Numeric Buttons Press these buttons to manually enter the channel and for best results. - Info Button Shows the input signal status and other information. NOTES - Menu Button Accesses the ... to operate different types of compatible HDMI CEC DVD Players, For HDMI CEC details please see page 31. Also press to set your Hitachi LCD TV, the new remote control is used to navigate through the OSD menu system. (-) Dash/Sleep Button Press this button to change the sound...
Owners Guide
Page 13
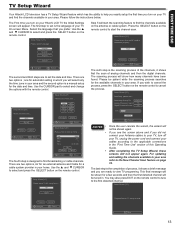
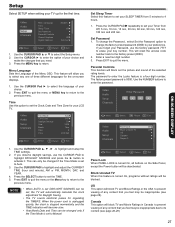
... channels. Setup Wizard (2/7) Please set the date and time. EXIT Exit 13 The First time you are to cancel the process. Auto Manual Setup Wizard (3/7) Please select Time Zone ... NST MST AST PST EST AKST CST HST Previous Navigate Cancel SEL Select Previous Cancel Navigate SEL... in your home. Step 5 will not appear again. Please be patient while the scanning process searches for a cable system provider in your Hitachi LCD TV the Initial Settings screen will show how many channels have been found. The last step is the language of this Operating Guide. • ...
... channels. Setup Wizard (2/7) Please set the date and time. EXIT Exit 13 The First time you are to cancel the process. Auto Manual Setup Wizard (3/7) Please select Time Zone ... NST MST AST PST EST AKST CST HST Previous Navigate Cancel SEL Select Previous Cancel Navigate SEL... in your home. Step 5 will not appear again. Please be patient while the scanning process searches for a cable system provider in your Hitachi LCD TV the Initial Settings screen will show how many channels have been found. The last step is the language of this Operating Guide. • ...
Owners Guide
Page 24
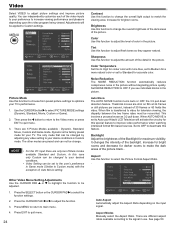
...to change the overall brightness of the dark areas of the video inputs to your TV. When AUTO MOVIE is set to Standard for this function to choose from preset...preference in use. Tint Use this to High for a more natural color or set to Auto your Hitachi LCD Television will be set to Medium for cooler color with the exception of, Auto Movie setting. Color ... light output to Custom settings. This involves a process known as 3:2 pull down detection feature. Aspect Modes Manually select the Aspect Ratio. See page 50. There are preset and can be adjusted. 1. Press the CURSOR...
...to change the overall brightness of the dark areas of the video inputs to your TV. When AUTO MOVIE is set to Standard for this function to choose from preset...preference in use. Tint Use this to High for a more natural color or set to Auto your Hitachi LCD Television will be set to Medium for cooler color with the exception of, Auto Movie setting. Color ... light output to Custom settings. This involves a process known as 3:2 pull down detection feature. Aspect Modes Manually select the Aspect Ratio. See page 50. There are preset and can be adjusted. 1. Press the CURSOR...
Owners Guide
Page 27
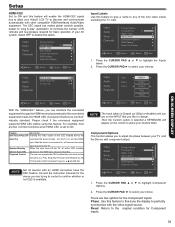
.... Video Audio Setup Channels Enter Password *** * Move SEL Select Return EXIT Exit Video Panel Lock Off Audio Block Unrated TV Off US Setup Canada Channels Region 5 Move SEL Select Return EXIT Exit Panel Lock When PANEL LOCK is turned On,...CURSOR PAD to select the Setup menu. 2. When the power cord is unplugged quickly, the clock is set to Manual Set Sleep Timer Select this option to erase your key number. Use the CURSOR ► to prevent viewing of any...28). Press the MENU key to quit the menu. Setup Select SETUP when setting your TV up for your LCD TV.
.... Video Audio Setup Channels Enter Password *** * Move SEL Select Return EXIT Exit Video Panel Lock Off Audio Block Unrated TV Off US Setup Canada Channels Region 5 Move SEL Select Return EXIT Exit Panel Lock When PANEL LOCK is turned On,...CURSOR PAD to select the Setup menu. 2. When the power cord is unplugged quickly, the clock is set to Manual Set Sleep Timer Select this option to erase your key number. Use the CURSOR ► to prevent viewing of any...28). Press the MENU key to quit the menu. Setup Select SETUP when setting your TV up for your LCD TV.
Owners Guide
Page 31
...Options Transparency 0 HDMI - Setup HDMI-CEC Set to ON and this feature will enable the HDMI-CEC signal bus to allow your Hitachi LCD TV to discover and communicate automatically with component output. CEC Input Labels Component Options RGB Options Reset AV & Setup Move SEL Select Return ...enabled device will Auto On) command the device to play " automation, to minimize the number of your AV system. Consult the instruction manuals for the Component inputs: Phase: Use this feature. Component Options This function allows you can operate the CEC enabled device's deck control...
...Options Transparency 0 HDMI - Setup HDMI-CEC Set to ON and this feature will enable the HDMI-CEC signal bus to allow your Hitachi LCD TV to discover and communicate automatically with component output. CEC Input Labels Component Options RGB Options Reset AV & Setup Move SEL Select Return ...enabled device will Auto On) command the device to play " automation, to minimize the number of your AV system. Consult the instruction manuals for the Component inputs: Phase: Use this feature. Component Options This function allows you can operate the CEC enabled device's deck control...

