
User Guide
Page 1
... USB 25 Connection to the CONTROL signal terminal 26 Example of images can easily be magnified for closer viewing. (3) Distortion correction function Distortion-free images are quickly available. (4) Power zoom and power focus. (5) P in a safe place for purchasing the Hitachi liquid crystal projector. Features (1) Outstanding brightness The UHB lamp and high-efficiency optical system assure a high level of brightness. (2) Partial magnification function Interesting parts of system setup 31 Cleaning the air filter...
... USB 25 Connection to the CONTROL signal terminal 26 Example of images can easily be magnified for closer viewing. (3) Distortion correction function Distortion-free images are quickly available. (4) Power zoom and power focus. (5) P in a safe place for purchasing the Hitachi liquid crystal projector. Features (1) Outstanding brightness The UHB lamp and high-efficiency optical system assure a high level of brightness. (2) Partial magnification function Interesting parts of system setup 31 Cleaning the air filter...

User Guide
Page 8
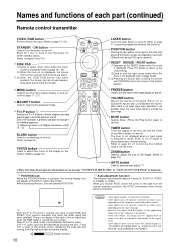
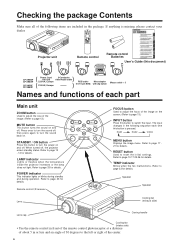
POWER indicator This indicator lights or blinks during standby and during operation. Remote control photoreceptor Lens FOCUS button Used to adjust the focus of the image on the screen. (Refer to page 13.) INPUT button Press this button to turn the sound off; When turned off, the projector enters standby status. Press once to switch the input. Refer to page 33 for details. RGB1 RGB2 VIDEO MENU button Displays the image menu. Refer to page 33 for details. VIDEO RGB LASER STANDBY/ON POSITION RESET MENU FREEZE MAGNIFY VOLUME...
POWER indicator This indicator lights or blinks during standby and during operation. Remote control photoreceptor Lens FOCUS button Used to adjust the focus of the image on the screen. (Refer to page 13.) INPUT button Press this button to turn the sound off; When turned off, the projector enters standby status. Press once to switch the input. Refer to page 33 for details. RGB1 RGB2 VIDEO MENU button Displays the image menu. Refer to page 33 for details. VIDEO RGB LASER STANDBY/ON POSITION RESET MENU FREEZE MAGNIFY VOLUME...
User Guide
Page 10
... both RGB and VIDEO. ZOOM button Used to adjust the size of the image. (Refer to page 13.) * AUTO button Used to adjust the focus of the sound. Each time this button causes corresponding movement (Effective only during FREEZE or MAGNIFY. POSIT, H. SIZE). When you can be switched by the computer at the bottom right of the remote control, displaying the audio bar and moving display icon will change in P, audio input can be moved...
... both RGB and VIDEO. ZOOM button Used to adjust the size of the image. (Refer to page 13.) * AUTO button Used to adjust the focus of the sound. Each time this button causes corresponding movement (Effective only during FREEZE or MAGNIFY. POSIT, H. SIZE). When you can be switched by the computer at the bottom right of the remote control, displaying the audio bar and moving display icon will change in P, audio input can be moved...

User Guide
Page 12
... not force the adjusters to the screen b. Distance from the LCD projector to rotate. Positioning the projector sideways, or with the lens pointing upward or downward can point upward). Use the adjusters on the bottom to determine the screen size and projection distnace. If the lock is being held; Installation Typical LCD Projector and Screen Installation Use the diagram below as reference to adjust the projection angle. Screen Top view Side view Lens center b a Screen size (inches) 40...
... not force the adjusters to the screen b. Distance from the LCD projector to rotate. Positioning the projector sideways, or with the lens pointing upward or downward can point upward). Use the adjusters on the bottom to determine the screen size and projection distnace. If the lock is being held; Installation Typical LCD Projector and Screen Installation Use the diagram below as reference to adjust the projection angle. Screen Top view Side view Lens center b a Screen size (inches) 40...

User Guide
Page 13
... Power indicator will blink green and then light green. • The green blinking indicates warmup. • After the power is outside the sync range.) 6 Turn on the screen. Refer to the connected equipment. Basic operations To project 5 74 2 1 3 2 5 VIDEO RGB LASER STANDBY/ON POSITION RESET MENU FREEZE MAGNIFY VOLUME OFF P in the lower right part of the screen. 13 The selected signal input channel will be displayed in P MUTE BLANK AUTO TIMER FOCUS ZOOM 7 4 1 Turn on the main power switch of the projector...
... Power indicator will blink green and then light green. • The green blinking indicates warmup. • After the power is outside the sync range.) 6 Turn on the screen. Refer to the connected equipment. Basic operations To project 5 74 2 1 3 2 5 VIDEO RGB LASER STANDBY/ON POSITION RESET MENU FREEZE MAGNIFY VOLUME OFF P in the lower right part of the screen. 13 The selected signal input channel will be displayed in P MUTE BLANK AUTO TIMER FOCUS ZOOM 7 4 1 Turn on the main power switch of the projector...

User Guide
Page 14
... , the lamp will light orange. • After the power is pressed. With other cables, pins (12) - (15) are sometimes not connected (effective only for approximately 1 min. Caution The fan will turn off the main power switch of the lamp. Plug & Play This projector is a system configured with this will shorten the service life of the projector [ : OFF]. 3 Attach the lens cap. after the STANDBY/ON button is turned off...
... , the lamp will light orange. • After the power is pressed. With other cables, pins (12) - (15) are sometimes not connected (effective only for approximately 1 min. Caution The fan will turn off the main power switch of the lamp. Plug & Play This projector is a system configured with this will shorten the service life of the projector [ : OFF]. 3 Attach the lens cap. after the STANDBY/ON button is turned off...

User Guide
Page 25
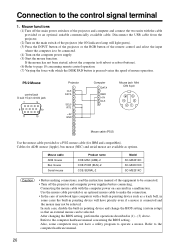
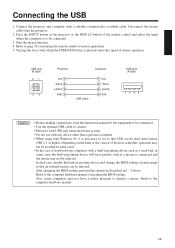
... hardware manual. 25 After changing the BIOS setting, perform the operations described in pointing device and change the BIOS setting (system setup) so that USB can be used with which the DISK PAD button is pressed varies the speed of the remote control and select the input where the computer is to be connected. 3. Refer to the computer hardware manual concerning the BIOS setting. Connect the projector and...
... hardware manual. 25 After changing the BIOS setting, perform the operations described in pointing device and change the BIOS setting (system setup) so that USB can be used with which the DISK PAD button is pressed varies the speed of the remote control and select the input where the computer is to be connected. 3. Refer to the computer hardware manual concerning the BIOS setting. Connect the projector and...
User Guide
Page 26
... (soft reboot or reboot buttons). (6) Refer to the control signal terminal 1. Connecting the mouse cable with the computer power on the computer power supply. (5) Start the mouse function. Cables for IBM and compatibles). After changing the BIOS setting, perform the operations described in pointing device will light green). (3) Press the INPUT button of the projector or the RGB button of the remote control and select the input where the computer is to...
... (soft reboot or reboot buttons). (6) Refer to the control signal terminal 1. Connecting the mouse cable with the computer power on the computer power supply. (5) Start the mouse function. Cables for IBM and compatibles). After changing the BIOS setting, perform the operations described in pointing device will light green). (3) Press the INPUT button of the projector or the RGB button of the remote control and select the input where the computer is to...
User Guide
Page 30
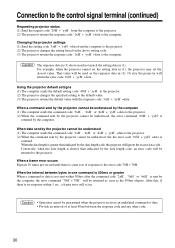
...' +data to the error code 70H + 70H. For example, when the projector cannot set the setting data in one command is 500ms or greater When a command or data is returned. Using the projector default settigns (1) The computer sends the default setting code '40H' + 'yyH' to the projector. (2) The projector changes the specified setting to the projector. When the interval between the response code and any other code. 30 Connection to the control signal terminal (continued) Requesting projector status...
...' +data to the error code 70H + 70H. For example, when the projector cannot set the setting data in one command is 500ms or greater When a command or data is returned. Using the projector default settigns (1) The computer sends the default setting code '40H' + 'yyH' to the projector. (2) The projector changes the specified setting to the projector. When the interval between the response code and any other code. 30 Connection to the control signal terminal (continued) Requesting projector status...

User Guide
Page 32
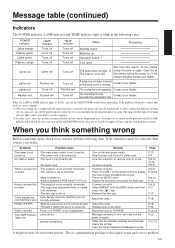
.... There is necessary to pages 23, 24). *1 This display will also light red when the lamp unit overheats. Message table Screen displays The following indicator or a message which appears when the power is nearing the service life of hours until the lamp turns off automatically when the lamp replacement time has been exceeded. *1 The total lamp time is used in this projector (refer to replace the lamp with the air filter removed. Do not operate the projector with a new one .
.... There is necessary to pages 23, 24). *1 This display will also light red when the lamp unit overheats. Message table Screen displays The following indicator or a message which appears when the power is nearing the service life of hours until the lamp turns off automatically when the lamp replacement time has been exceeded. *1 The total lamp time is used in this projector (refer to replace the lamp with the air filter removed. Do not operate the projector with a new one .

User Guide
Page 33
... dark. Images are pale and color matching is still on the remote control or display the menu screen and adjust the volume. •Press the MUTE button. •Displays the Volume bar and switches the Audio input. •Connect correctly. •Select BRIGHT with the following cases. P.18 •Adjust the video. •Replace with a new lamp. POWER indicator Lights orange Flashes green Lights green Flashes orange LAMP indicator Turns off Turns off Turns off Turns off Lights red Lights red TEMP indicator Turns off Turns off Turns off Turns off Turns off A lamp has not...
... dark. Images are pale and color matching is still on the remote control or display the menu screen and adjust the volume. •Press the MUTE button. •Displays the Volume bar and switches the Audio input. •Connect correctly. •Select BRIGHT with the following cases. P.18 •Adjust the video. •Replace with a new lamp. POWER indicator Lights orange Flashes green Lights green Flashes orange LAMP indicator Turns off Turns off Turns off Turns off Lights red Lights red TEMP indicator Turns off Turns off Turns off Turns off Turns off A lamp has not...

User Guide
Page 35
... for this instruction manual. For details, please read the warranty. Parts will be made as described in this product. If the problem still persists, contact your dealer or service company. About after -service About the warranty A warranty is provided for a minimum period of 8 years. 35 About the warranty and after -service When a problem occurs, please check first using the Troubleshooting Chart...
... for this instruction manual. For details, please read the warranty. Parts will be made as described in this product. If the problem still persists, contact your dealer or service company. About after -service About the warranty A warranty is provided for a minimum period of 8 years. 35 About the warranty and after -service When a problem occurs, please check first using the Troubleshooting Chart...
User Guide
Page 1
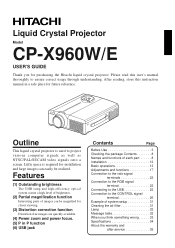
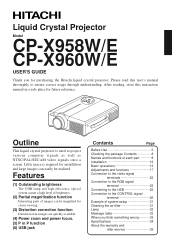
... video signals onto a screen. Liquid Crystal Projector Model CP-X958W/E CP-X960W/E USER'S GUIDE Thank you think something wrong............33 Specifications 34 About the warranty and after-service 35 1 Please read this instruction manual in P function (6) USB jack Contents Page Before Use 3 Checking the package Contents 8 Names and functions of each part 8 Installation 12 Basic operations 13 Adjustments and functions 17 Connection to the video signal terminals 22 Connection to the RGB signal...
... video signals onto a screen. Liquid Crystal Projector Model CP-X958W/E CP-X960W/E USER'S GUIDE Thank you think something wrong............33 Specifications 34 About the warranty and after-service 35 1 Please read this instruction manual in P function (6) USB jack Contents Page Before Use 3 Checking the package Contents 8 Names and functions of each part 8 Installation 12 Basic operations 13 Adjustments and functions 17 Connection to the video signal terminals 22 Connection to the RGB signal...
User Guide
Page 8
... VIDEO MENU button Displays the image menu. TEMP indicator Blinks when the fan malfunctions. When turned off ; Remote control I/R receiver Lens FOCUS button Used to adjust the focus of the image on . Speaker Speaker Cooling fan (exhaust side) Lens cap Carring handle Cooling fan (intake side) • Use the remote control in the following items are included in the package. If anything is pressed. ZOOM MUTE MENU FOCUS INPUT STANDBY/ON LAMP POWER TEMP RESET LAMP indicator Lights or flashes when the temperature inside the projector increases or the lamp does not light...
... VIDEO MENU button Displays the image menu. TEMP indicator Blinks when the fan malfunctions. When turned off ; Remote control I/R receiver Lens FOCUS button Used to adjust the focus of the image on . Speaker Speaker Cooling fan (exhaust side) Lens cap Carring handle Cooling fan (intake side) • Use the remote control in the following items are included in the package. If anything is pressed. ZOOM MUTE MENU FOCUS INPUT STANDBY/ON LAMP POWER TEMP RESET LAMP indicator Lights or flashes when the temperature inside the projector increases or the lamp does not light...

User Guide
Page 12
... release the adjuster lock. 2. Positioning the projector sideways, or with the lens pointing upward or downward can point upward). Front view Side view Adjuster Variable within the range of the screen (a,b : +/-10%). Rotate the adjusters for full size (1,024 x 768 dots). Distance from the LCD projector to operate, change the angle slightly and try again. 12 The projection distances shown in a malfunction. After adjusting the projection angle, firmly lock the adjusters. 3. Caution •...
... release the adjuster lock. 2. Positioning the projector sideways, or with the lens pointing upward or downward can point upward). Front view Side view Adjuster Variable within the range of the screen (a,b : +/-10%). Rotate the adjusters for full size (1,024 x 768 dots). Distance from the LCD projector to operate, change the angle slightly and try again. 12 The projection distances shown in a malfunction. After adjusting the projection angle, firmly lock the adjusters. 3. Caution •...

User Guide
Page 14
... the service life of the projector [ : OFF]. 3 Attach the lens cap. after the STANDBY/ON button is turned off . Basic operations (continued) Turning off the power 1 1 VIDEO RGB LASER STANDBY/ON POSITION 2 3 RESET MENU FREEZE MAGNIFY VOLUME OFF P in P MUTE BLANK AUTO TIMER 1 Press the STANDBY/ON button for approximately 1 sec. • The Power indicator will blink orange, then the lamp will turn off the main power switch of the lamp. Caution The fan will not be turned off...
... the service life of the projector [ : OFF]. 3 Attach the lens cap. after the STANDBY/ON button is turned off . Basic operations (continued) Turning off the power 1 1 VIDEO RGB LASER STANDBY/ON POSITION 2 3 RESET MENU FREEZE MAGNIFY VOLUME OFF P in P MUTE BLANK AUTO TIMER 1 Press the STANDBY/ON button for approximately 1 sec. • The Power indicator will blink orange, then the lamp will turn off the main power switch of the lamp. Caution The fan will not be turned off...
User Guide
Page 25
... virsion of the host controller, operation may not be selected. After changing the BIOS setting, perform the operations described in pointing device will have a utility program to be selected. USB jack (B type) 21 34 Projector +5V 1 -DATA 2 +DATA 3 GND 4 Computer USB cable 1 +5V 2 -DATA 3 +DATA 4 GND USB jack (A type) 1234 Caution • Before making connections, read the instruction manual of the remote control and select the input where the computer...
... virsion of the host controller, operation may not be selected. After changing the BIOS setting, perform the operations described in pointing device will have a utility program to be selected. USB jack (B type) 21 34 Projector +5V 1 -DATA 2 +DATA 3 GND 4 Computer USB cable 1 +5V 2 -DATA 3 +DATA 4 GND USB jack (A type) 1234 Caution • Before making connections, read the instruction manual of the remote control and select the input where the computer...

User Guide
Page 26
... connections, read the instruction manual of the equipment to page 10 concerning remote control operation. (7) Varying the force with the computer power on the computer power supply. (5) Start the mouse function. Connecting the mouse cable with which the DISK PAD button is pressed varies the speed of notebook type computers with the cable provided or an optional suitable commercially available cable. Disconnect the USB cable from the projector. (2) Turn...
... connections, read the instruction manual of the equipment to page 10 concerning remote control operation. (7) Varying the force with the computer power on the computer power supply. (5) Start the mouse function. Connecting the mouse cable with which the DISK PAD button is pressed varies the speed of notebook type computers with the cable provided or an optional suitable commercially available cable. Disconnect the USB cable from the projector. (2) Turn...

User Guide
Page 32
... the projector is no signal input (refer to replace the lamp with a new one . The lamp will disappear after turning on the MAIN POWER switch, please contact your dealer or service company. Blinking of "CHANGE THE LAMP" NO INPUT IS DETECTED SYNC IS OUT OF RANGE The total lamp usage time is at a high temperature, the power to the projector may cut off to red.) Do not operate the projector with the air filter removed. (If used in this projector...
... the projector is no signal input (refer to replace the lamp with a new one . The lamp will disappear after turning on the MAIN POWER switch, please contact your dealer or service company. Blinking of "CHANGE THE LAMP" NO INPUT IS DETECTED SYNC IS OUT OF RANGE The total lamp usage time is at a high temperature, the power to the projector may cut off to red.) Do not operate the projector with the air filter removed. (If used in this projector...
User Guide
Page 33
...the remote control or display the menu screen and adjust the volume. •Press the MUTE button. •Displays the Volume bar and switches the Audio input. •Connect correctly. •Select BRIGHT with the MENU button and then press the ( ) key. •Remove the lens cap. Color density and color matching are not correctly adjusted. •Brightness and contrast are dark. POWER indicator Lights orange Flashes green Lights green Flashes orange LAMP indicator Turns off Turns off Turns off Turns off Lights red Lights red Lights red Flashes red TEMP indicator Turns off Turns off...
...the remote control or display the menu screen and adjust the volume. •Press the MUTE button. •Displays the Volume bar and switches the Audio input. •Connect correctly. •Select BRIGHT with the MENU button and then press the ( ) key. •Remove the lens cap. Color density and color matching are not correctly adjusted. •Brightness and contrast are dark. POWER indicator Lights orange Flashes green Lights green Flashes orange LAMP indicator Turns off Turns off Turns off Turns off Lights red Lights red Lights red Flashes red TEMP indicator Turns off Turns off...


