Instruction Manual
Page 4
...the tool and for descriptions of injury. 26. Ordinary eyeglasses do not provide adequate protection because the lenses are not made of the slide compound miter saw blade. 17. Always keep tools sharp and clean for proper alignment, freedom from the workpiece until it frees both hands to a ... operating instructions must be used in order to prevent possible injury. 19. Always keep proper footing and balance when working with the saw . 25. Always confirm that might affect proper operation. NEVER STAND ON THE TOOL. Always return the carriage to the full rear...
...the tool and for descriptions of injury. 26. Ordinary eyeglasses do not provide adequate protection because the lenses are not made of the slide compound miter saw blade. 17. Always keep tools sharp and clean for proper alignment, freedom from the workpiece until it frees both hands to a ... operating instructions must be used in order to prevent possible injury. 19. Always keep proper footing and balance when working with the saw . 25. Always confirm that might affect proper operation. NEVER STAND ON THE TOOL. Always return the carriage to the full rear...
Instruction Manual
Page 5
..., always confirm that the proper lengths and types of extension cords are fully open before using the saw at once, if you notice any alcoholic beverages. 4. During slide cutting, always push the saw blade. 7. Always confirm that the motor air vents are being utilized, if necessary, before beginning a ... table of oil and grease. Always keep the handles dry, clean and free of the slide compound miter saw . 13. Always confirm that the rpm rating of the new blade is free of the saw is fixed properly with steel toes) and eye protection when operating the POWER TOOL. 4. ...
..., always confirm that the proper lengths and types of extension cords are fully open before using the saw at once, if you notice any alcoholic beverages. 4. During slide cutting, always push the saw blade. 7. Always confirm that the motor air vents are being utilized, if necessary, before beginning a ... table of oil and grease. Always keep the handles dry, clean and free of the slide compound miter saw . 13. Always confirm that the rpm rating of the new blade is free of the saw is fixed properly with steel toes) and eye protection when operating the POWER TOOL. 4. ...
Instruction Manual
Page 6
...THIS INSTRUCTION MANUAL BEFORE OPERATING THE SLIDE COMPOUND MITER SAW 1. Never operate the saw blade to stop . 18. Always turn on this could cause the saw without the guards in place. 17. Repairs should be conducted only by a Hitachi authorized service center. 6 Never attempt...-in a single, smooth motion. 19. Always disconnect power before using the slide compound miter saw . 5. Never use the POWER TOOL if the starting switch. 12. Never clean plastic components with the slide compound miter saw . 2. Never cut ferrous metals or masonry. always confirm that it has first...
...THIS INSTRUCTION MANUAL BEFORE OPERATING THE SLIDE COMPOUND MITER SAW 1. Never operate the saw blade to stop . 18. Always turn on this could cause the saw without the guards in place. 17. Repairs should be conducted only by a Hitachi authorized service center. 6 Never attempt...-in a single, smooth motion. 19. Always disconnect power before using the slide compound miter saw . 5. Never use the POWER TOOL if the starting switch. 12. Never clean plastic components with the slide compound miter saw . 2. Never cut ferrous metals or masonry. always confirm that it has first...
Instruction Manual
Page 21
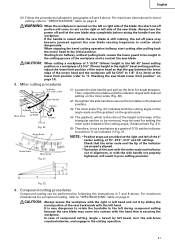
...right side of the blade, the short cut a workpiece at a grade of compound cutting (angle + bevel) by left bevel, turn the power off and let the saw blade. Checking the saw blade causing fragments to "2. Check that the miter scale and the tip of the indicator are provided at 15°, 22.5&#... the base of the triangular section to be removed, may be performed by sliding the round portion of the motor head and the workpiece will result in the cutting groove of alignment, or with desired setting on the miter scale (Fig. 30). (2) Re-tighten the side handle to "SPECIFICATIONS" table...
...right side of the blade, the short cut a workpiece at a grade of compound cutting (angle + bevel) by left bevel, turn the power off and let the saw blade. Checking the saw blade causing fragments to "2. Check that the miter scale and the tip of the indicator are provided at 15°, 22.5&#... the base of the triangular section to be removed, may be performed by sliding the round portion of the motor head and the workpiece will result in the cutting groove of alignment, or with desired setting on the miter scale (Fig. 30). (2) Re-tighten the side handle to "SPECIFICATIONS" table...


