Hitachi C8FSE Support Question
Hitachi C8FSE Support Question
Find answers below for this question about Hitachi C8FSE - 8-1/2" Sliding Compound Miter Saw.Need a Hitachi C8FSE manual? We have 1 online manual for this item!
Question posted by weishapple on September 12th, 2011
Changing Saw Blade
Where are instructions on changing a saw blade on a Hitachi C8FSE saw? Thanks
Current Answers
Related Hitachi C8FSE Manual Pages
Instruction Manual - Page 4
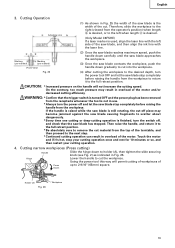
...instruction manual for long workpieces that might affect proper operation. ALWAYS CHECK FOR DAMAGED PARTS BEFORE USING THE TOOL. ALWAYS CONFIRM THE ROTATION DIRECTION OF THE BLADE BEFORE USING THE TOOL. NEVER LEAVE THE TOOL RUNNING WHILE UNATTENDED. Do not
leave tool until it comes to provide support for descriptions of the slide
compound miter saw blade.
17. Never raise the saw blade...
Instruction Manual - Page 5
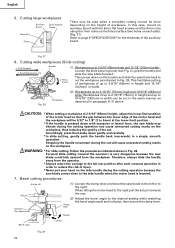
... speed before starting a cut . 15. Always use of the slide
compound miter saw . 13.
use outboard stands to provide support for long workpieces that the workpiece is a tendency for the saw blade away from the operator. 10. Always cease operating the saw . 17. Never operate the POWER TOOL when you have taken any medications, or have
consumed any...
Instruction Manual - Page 6
... your limbs inside of the saw blade. 3. Never use the POWER TOOL near flammable liquids or gases because sparking can cause an explosion. 15. Never place your finger is 5,500/min. 10. This may dissolve. 16. WARNING FOR YOUR OWN SAFETY READ THIS INSTRUCTION MANUAL BEFORE OPERATING THE SLIDE COMPOUND MITER SAW 1. Always keep hands out of the...
Instruction Manual - Page 8
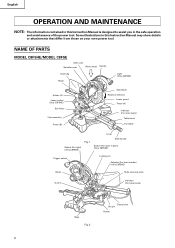
... C8FSHE)
Sub fence
Vise assembly
Fence (B)
Saw blade Rotation direction
Lower guard Fence (A)
Indicator (For miter scale)
Table insert
Turntable
Lever
Switch (For light) (Only C8FSHE)
Fig. 1
Side handle
Switch (For laser marker) (Only C8FSHE)
Trigger switch
Locking pin
Adjuster (For laser marker) (Only C8FSHE)
Motor
Slide securing knob
Guard
Indicator (For bevel scale...
Instruction Manual - Page 9
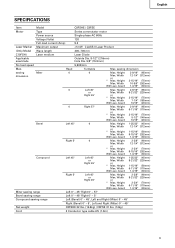
English
SPECIFICATIONS
Item
Model
C8FSHE / C8FSE
Motor
Type
Series commutator motor
Power source
Single-phase AC 60Hz
Voltage (Volts)
120
Full-load current (Amp)
9.2
Laser Marker Maximum output
Instruction Manual - Page 10
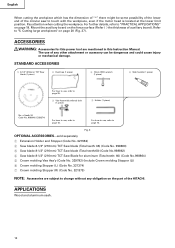
...HITACHI. Fig. 3
OPTIONAL ACCESSORIES...sold separately 1 Extension Holder and Stopper (Code No. 321553) 2 Saw blade 8-1/2" (216mm) TCT Saw blade (Total teeth: 36) (Code No. 998860) 3 Saw blade 8-1/2" (216mm) TCT Saw blade (Total teeth:60) (Code No.998862) 4 Saw blade 8-1/2" (216mm) TCT Saw Blade for this Instruction...Accessories are mentioned in this power tool are subject to touch with ...
Instruction Manual - Page 12

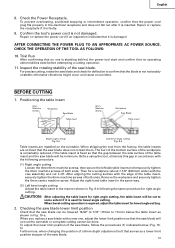
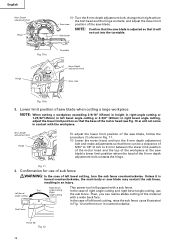
... be lowered 13/32" to 7/16" (10mm to disengage
the locking pin more easily and safely. Always check that the saw blade is connected to the power tool. After installing the saw blade for proper operation.
Installing the dust bag, holder, stopper and vises
(The holder and stopper are secured by a locking pin. Check the...
Instruction Manual - Page 13
... tighten the 6mm machine screws of the saw blade can be cut to 11mm) below . (Fig. 10b) Furthermore, when changing the position of the saw blade will not cut it is not noticeably unstable; For precise cutting, rotate the saw blade and check for bevel angle cutting.
2. Before using the tool, eliminate this gap in Fig. 10-a. Then...
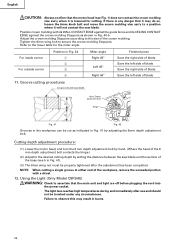
Instruction Manual - Page 14
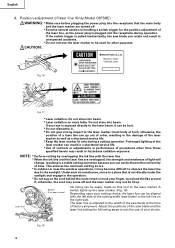
...8mm Depth adjustment bolt
Hinge
(1) Turn the 8 mm depth adjustment bolt, change the height where the bolt head and the hinge contacts, and adjust the...the motor head (see Fig. 10-a) will
not cut into the turntable. Right bevel
This power tool is
turned counterclockwise, the main body or saw blade when cutting a large workpiece NOTE: When cutting a workpiece exceeding 2-9/16" (65mm) in height in...
Instruction Manual - Page 16
... adjustments or performance of factory shipment. Adjust the positions of the saw blade) or the ink line on the cord behind the motor head ... receptacle that is plugged into beam. * Laser radiation on this tool to the laser marker (main body of lines. otherwise, the ... are overlapped, the strength and weakness of light will change, resulting in a stable cutting operation because you can go...
Instruction Manual - Page 17
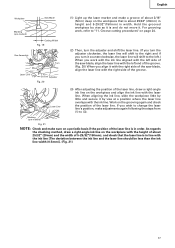
... saw blade, align the laser line with the left .) When you wish to change the laser line's position, make adjustments again following the steps from (1) to (3). When aligning the ink line, slide the...is about 25/32" (20mm) in height and 5-29/32"(150mm) in order. English
Workpiece
Saw Blade
Marking (pre-marked)
Cutting Width Fig. 19
Vise Assembly
Move
Turn
Laser Line
Groove Adjuster Fig...
Instruction Manual - Page 18
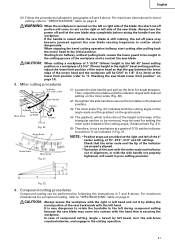
...tool.
otherwise the workpiece
might be turned on either the left fence
6mm wing bolt (B)
Screw holder
{Fence (B)} or the right fence {Fence (A)} by loosening the 6mm wing bolt (B).
Fig. 23
WARNING: This will not contact the saw blade...holder can be raised or lowered according to the
Vise plate
height of this tool, insert a padlock through the hole in position
(Fig. 24).
6mm ...
Instruction Manual - Page 19
... been removed
from the receptacle whenever the tool is raised while the saw blade contacts the workpiece, push the handle down to holder (A), then tighten the slide securing knob (see Fig. 2) as... a is desired.
(Only Model C8FSHE) If a laser marker is finished, turn the power tool OFF and let the saw blade, and then align the ink line with the left side of the motor and/or decreased cutting...
Instruction Manual - Page 20
... and cause unwanted cutting marks on the height of up to 2-9/16" (65mm) high and 12-1/4" (312mm) wide:
Loosen the slide securing knob (see Fig. 2), grip the handle and
slide the saw blade back to reduce the risk of the auxiliary board. Fig. 27
6.
Screw
6mm Nut
Fence
There may vibrate during the cutting...
Instruction Manual - Page 21
...
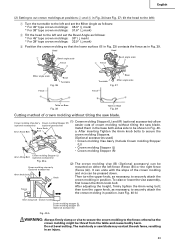
portion will be performed by left during compound cutting because the saw blade.
CAUTION:
When cutting a workpiece of 1-15/16" (50mm) height in the left or right side of the blade, the short cut -off and let the saw blade. Miter cutting procedures
Indicator (For miter scale)
Side Handle
Turntable Turn the
Miter Scale turntable
Tighten Lever Loosen
Pull...
Instruction Manual - Page 23
...saw blade may contact the sub fence, resulting in position.
Head
Head
1
Bevel angle scale
Fence 4
2 Fence
Bevel angle scale 3
Miter angle scale
Base
Turntable Fig. 36
Fence
A
B
Base
Turntable
Miter...) can be thrust from the table and cause bodily harm. The main body or saw blade.
(1) Crown molding Stopper (L) and (R) (optional accessories) allow
Crown molding Vise Ass...
Instruction Manual - Page 24
...miter angle. Failure to observe this may do so, loosen the 6mm knob bolt and move the crown molding vise ass'y to the lower table for cutting. Groove cutting procedures
Cut grooves with a chisel.
12.
NOTE: When cutting a single groove at either end of the workpiece, remove the unneeded portion with saw blade... by setting the distance between the saw blade. Using the Light (Only Model ...
Instruction Manual - Page 25

.... Set the wood plate near the cutting section of the dust bag when the saw blade with an anti-dust cover. Fence
Vise assembly Wood plate
Vise assembly
Clamp
Aluminum ... bevel and compound cutting, attach the dust bag at a right angle to strong impact. Failure to observe this may result in a vise assembly.
When cutting aluminum materials, coat the saw blade rotates. Failure...
Instruction Manual - Page 26
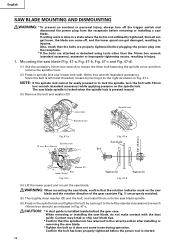
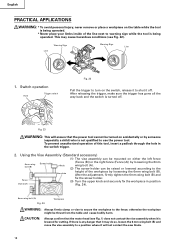
... turning it does not come off the trigger switch and
disconnect the power plug from the receptacle before the power tool is installed inside behind the gear case. WARNING: When mounting the saw blade, confirm that the bolts are properly tightened before plugging the power plug into the receptacle. * If the bolts are...
Instruction Manual - Page 27
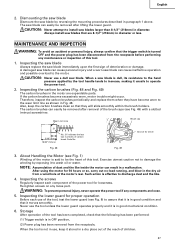
... carbon brushes periodically and replace them when they will slide smoothly within the brush holders.
Such action is not in diameter. Storage
After operation of this tool.
1. Dismounting the saw blade
Dismount the saw blade can easily be removed after removal of dust and the like .
4. A damaged saw blade can cause ineffective operation and possible overload to operate...
Similar Questions

What's The Name Of This Part? Hikoki C8fse
https://www.reddit.com/r/Tools/comments/y36tbl/whats_this_part_called_hikoki_c8fse/?utm_source=share...
https://www.reddit.com/r/Tools/comments/y36tbl/whats_this_part_called_hikoki_c8fse/?utm_source=share...
(Posted by ellieleaman 1 year ago)
How To Remove Back Cover On 8 Fsb Mitre Saw Rails
How do you get the back cover off on 8fsb mitre saw
How do you get the back cover off on 8fsb mitre saw
(Posted by Anonymous-170524 2 years ago)

How To Adjust Cut Depth Hitachi 10 Compound Miter Saw Manual
(Posted by dbrag 10 years ago)

I Require A Vise Assembly For A Hitachi C8fse Slide Compound Saw, Please Help
I have an Hitachi C8FSE Slide Compound Saw and wish to purchase a Vise Assembly, can anybody help?
I have an Hitachi C8FSE Slide Compound Saw and wish to purchase a Vise Assembly, can anybody help?
(Posted by davaki 10 years ago)

Where Can I Get A Free Manual On The Hitachi C12rsh 12' Slide Compound Miter Saw
(Posted by kathy86883 14 years ago)