Hitachi C10FCE2 Support Question
Hitachi C10FCE2 Support Question
Find answers below for this question about Hitachi C10FCE2 - 10 Inch Compound Miter Saw.Need a Hitachi C10FCE2 manual? We have 2 online manuals for this item!
Question posted by dbrag on May 2nd, 2014
How To Adjust Cut Depth Hitachi 10 Compound Miter Saw Manual
The person who posted this question about this Hitachi product did not include a detailed explanation. Please use the "Request More Information" button to the right if more details would help you to answer this question.
Current Answers
Related Hitachi C10FCE2 Manual Pages
Operating Instructions - Page 3

...MANUAL BEFORE OPERATING OR MAINTAINING THIS TOOL:
WARNING: When using this Instruction Manual and in the sections which contain the operation and maintenance instructions. ALWAYS REMOVE ADJUSTING KEYS AND WRENCHES BEFORE STARTING TOOL...expose it occurs, and by HITACHI. Always keep the work area well lighted.
5.
ALWAYS KEEP WORK AREA CLEAN.
Never force a tool or an attachment to contain ...
Operating Instructions - Page 4

...using the tool.
18. ALWAYS DISCONNECT THE TOOL before servicing and before using this instruction manual for additional safety and wear a dust mask if the cutting operation produces dust.
10. Always
...the slide
compound saw blade from binding and other ). Do not change the plug in the outlet, reverse the plug. Review this Manual and familiarize yourself with this
POWER TOOL before using ...
Operating Instructions - Page 5

... workpiece is correct for the rotation of the tool.
5 Always confirm that it . 13. Always cease operating the saw .
22. DON'Ts
NEVER VIOLATE THE FOLLOWING RULES TO ASSURE SAFE USE OF THIS TOOL:
1. Never reach around the saw is in the instruction manual. 5. During miter or bevel cutting, always wait for use . 8. Always keep your hair...
Operating Instructions - Page 6

... use the POWER TOOL if the starting switch. 12. WARNING FOR YOUR OWN SAFETY READ THIS INSTRUCTION MANUAL BEFORE OPERATING THE COMPOUND SAW 1. Never raise the saw blade to
kick up from the workpiece. This may dissolve. 16. Never reach around the saw blade to stop . 18. Repairs should be conducted only by a Hitachi authorized service center...
Operating Instructions - Page 7
...external grounding, you must still follow these precautions:
* Only HITACHI AUTHORIZED SERVICE CENTER should disassemble or assemble this Instruction Manual, including not using an extension cord, be installed.
* Clean...
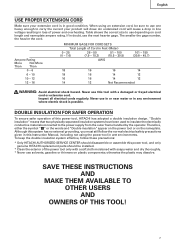
More
Not More
Than
Than
0 - 6
6 - 10
10 - 12
12 - 16
MINIMUM GAGE FOR CORD SETS
Total Length of the power tool only with a soft cloth moistened with a damaged or ...
Operating Instructions - Page 8

... Manual may show details or attachments that differ from those on your own power tool.
NAME OF PARTS
MODEL C10FCH/MODEL C10FCE
Dust Bag
Motor Head Gear Case
Handle Motor
Saw Blade
Laser Marker (Only C10FCH) Vise Assembly
Fence (B)
Turntable
Lower Guard
Rotation Direction
Indicator (B) (For bevel scale) Fence (A)
Table Insert Indicator (A) (For miter...
Operating Instructions - Page 9
English
SPECIFICATIONS
Item
Model
C 10FCH / C 10FCE
Motor
Type
Series commutator motor
Power source
Single-phase AC 60Hz
Voltage (Volts)
120
Full-load current (Amp)
15
Laser Marker Maximum output
Operating Instructions - Page 10

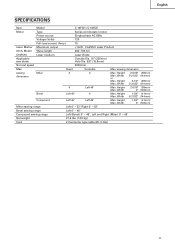
...be careful not to the rear of the base helps stabilize the power tool.
6mm Bolt
Holder (B) adjustment: Loosen the 6mm bolt with bolts
(6mm), and if the turntable ... bolts for the thickness of bolts (6mm).
After adjustment, firmly tighten the 6mm bolt. English
APPLICATIONS
Wood and aluminum sash.
Installation
Base
5/16" (8mm) Bolt
10-3/8" (267mm) 1" (25mm) Thick Bench
11/32...
Operating Instructions - Page 12
... out after it is inserted. Turn a height adjustment bolt 6mm,
and adjust the height of Height Adjustment Bolt 6mm is not noticeably unstable; Repair or replace the receptacle if it is standing behind, the power tool start and confirm that no operating abnormalities exist before attempting a cutting operation.
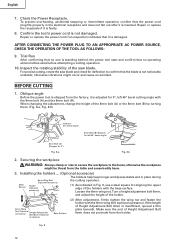
10. Securing the workpiece
WARNING: Always clamp or...
Operating Instructions - Page 13
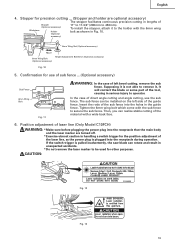
... precision cutting in lengths of left side of the tool, causing in Fig. 10.
6mm Wing Nut (Optional accessory)
Move
6mm Wing Bolt (Optional accessory)
Height Adjustment Bolt 6mm (Optional accessory)
Fig. 10
5. ..., the saw blade can rotate and result in handling a switch trigger for use the sub fence. The sub fence can realize stable cutting of direct angle cutting and angle cutting, use...
Operating Instructions - Page 14

...cutting operation. bar wrench in the damage of tool); otherwise, the cord may come off and the laser marker may result in hazardous radiation exposure.
Hold the grooved workpiece by overlapping the ink line with the left side of the cutting width (saw... your eye is adjusted to the left end of the groove. (Fig. 16) When you work table. If your cutting choice, the laser...
Operating Instructions - Page 16
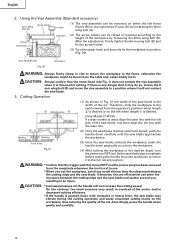
...saw blade approaches the workpiece.
(3) Once the saw blade contacts the workpiece, push the handle down gradually to cut into the workpiece.
(4) After cutting the workpiece to the desired depth, turn the power tool OFF and let the saw...
from the table and cause bodily harm. If there is lowered for cutting.
After the adjustment, firmly tighten the 6mm wing bolt (B) and fix the screw holder...
Operating Instructions - Page 17

... performed by following the instructions in the desired position. Then, adjust the turntable until the indicator aligns with the right hand side for compound cutting, because the saw blade.
6. use of the tool without pulling back, causes the safety cover to be caught in poor cutting precision. Always turn the power off
portion will result in...
Operating Instructions - Page 18

... adjusting side handle a little to the right and left to stabilize the position and to properly align the miter angle scale and the tip of (θ) 38° and 45°. Miter Angle...
left 30° ( mark)
right 31.6° ( mark)
left and right 31.6°) positions.
For miter cut crown moldings at positions 2 and 3 in Fig. 25 (see Fig. 26; upper surface Ceiling
Ceiling
Wall
...
Operating Instructions - Page 19

...Fig. 30-b. Head Bevel Angle Scale 4
1 Fence
Miter Angle Scale Turntable Fig. 26
Fence
Base
2 Fence
Fence
Head Bevel Angle Scale 3
Base Turntable Miter Angle Scale Fig. 27
English
Table on Base
Table... 28
Fig. 29
Cutting method of crown molding without tilting the saw blade.
Fence
After adjusting the height, firmly tighten the 6mm wing bolt; The main body or saw blade may do so,...
Operating Instructions - Page 20

.... 31-a. When cutting aluminum materials, coat the saw blade rotates. Duct Right Angle
Base
(2) During bevel and compound cutting, attach the dust bag at a right angle to achieve smooth cutting and a fine...or installing a saw blade spindle is locked when the spindle lock is left-hand threaded, loosen by turning it using tools other than normal during bevel cutting. Cutting easily-deformed ...
Operating Instructions - Page 21

... can cause ineffective operation and possible overload to the left by the tool handle tends to increase, making it unsafe to install saw blade by turning it does not come loose during operation. Dismounting the saw blade
Dismount the saw blades larger than 10" (255mm) in diameter or less.
CAUTION: * Confirm that the rotation indicator...
Operating Instructions - Page 22

...that they have become excessively worn, motor trouble might occur.
NOTE: Accumulation of the tool has been completed, check that the following has been performed:
(1) Trigger switch is ... and that it moves smoothly.
Storage
After operation of dust and the like .
5. After adjusting the saw blade with a slotted
(minus) screwdriver. The carbon brushes can result in OFF position,
...
Parts List - Page 1

E946
ELECTRIC TOOL PARTS LIST
COMPOUND SAW Model C 10FCE2
2006 • 10 • 11 (E1)
4 5 6 7
13 14
46 47 48 49 50
3
9 8
12 11
10
22 23 24 25 26
21
15 16
39 40 41 42 43 44 45
18 19 20
38
27 28 29
53 54
55
...
46 47 48 65
629 615 619 626 627
619 620
613 609
612 611 610
621
622
623 67
626
624
627 66
625 Hitachi Power Tools
LIST NO.
Parts List - Page 7
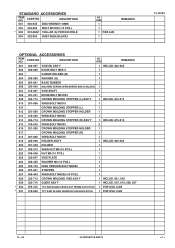
... TENSION BOLT M6X80
1
626 974-561 STOPPER
1
627 949-404 WING BOLT M6X20 (10 PCS.)
1
628 322-712 CROWN MOLDING VISE ASS'Y
1 INCLUD. 601, 609
629 322-710 GUIDE ASS'Y
1 INCLUD. 615, 619, 626, 627
* 630 976-472 TCT SAW BLADE CROSS-CUT 255MM-D15.9 HOLE 1 FOR USA, CAN
* 631 319-658 TCT...
Similar Questions

326-700 This Part Has Been Discontinued. I Need A Replacement For This Part.
I need a replacement for this part, it has been discontinued . My Hitachi Miter saw C10FCE2 the swit...
I need a replacement for this part, it has been discontinued . My Hitachi Miter saw C10FCE2 the swit...
(Posted by TXpallets 9 years ago)

How To Square The Head On An Hitachi Miter Saw
(Posted by afajab 10 years ago)

How To Square A Hitachi Miter Saw
(Posted by prisibr 10 years ago)

I Have A Nv 50ap3. Can I Adjust The Depth Of The Nail So I Can Use Only Nails?
I don't want to use caps but the nails are not driven all the way down. Is there a way to adjust for...
I don't want to use caps but the nails are not driven all the way down. Is there a way to adjust for...
(Posted by jph99980 11 years ago)

Where Can I Get A Free Manual On The Hitachi C12rsh 12' Slide Compound Miter Saw
(Posted by kathy86883 14 years ago)