Instruction Manual
Page 8
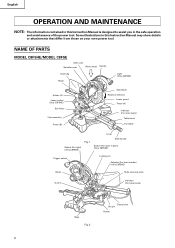
... PARTS MODEL C8FSHE/MODEL C8FSE Gear case Spindle cover Motor head Handle Dust bag Hinge Light (Only C8FSHE) Holder (A) Laser marker (Only C8FSHE) Sub fence Vise assembly Fence (B) Saw blade Rotation direction Lower guard Fence (A) Indicator (For miter scale) Table insert Turntable... Lever Switch (For light) (Only C8FSHE) Fig. 1 Side handle Switch (For laser marker) (Only C8FSHE) Trigger switch Locking pin Adjuster (For laser marker) (Only C8FSHE) Motor Slide securing knob...
... PARTS MODEL C8FSHE/MODEL C8FSE Gear case Spindle cover Motor head Handle Dust bag Hinge Light (Only C8FSHE) Holder (A) Laser marker (Only C8FSHE) Sub fence Vise assembly Fence (B) Saw blade Rotation direction Lower guard Fence (A) Indicator (For miter scale) Table insert Turntable... Lever Switch (For light) (Only C8FSHE) Fig. 1 Side handle Switch (For laser marker) (Only C8FSHE) Trigger switch Locking pin Adjuster (For laser marker) (Only C8FSHE) Motor Slide securing knob...
Instruction Manual
Page 9
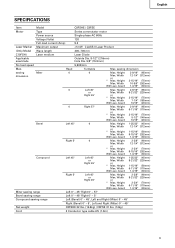
English SPECIFICATIONS Item Model C8FSHE / C8FSE Motor Type Series commutator motor Power source Single-phase AC 60Hz Voltage (Volts) 120 Full-load current (Amp) 9.2 Laser Marker Maximum output
English SPECIFICATIONS Item Model C8FSHE / C8FSE Motor Type Series commutator motor Power source Single-phase AC 60Hz Voltage (Volts) 120 Full-load current (Amp) 9.2 Laser Marker Maximum output
Instruction Manual
Page 16
... impact to the sunlight. If your eye is pulled inadvertently, the saw blade can easily discern the conformity of the cutting width (saw blade) or the ink line on this tool to the laser marker. Laser line Switch (For laser marker) Ink lining can result in the operation. * Do not ...tug on work table. otherwise, the position of a laser line can be easily made on the...
... impact to the sunlight. If your eye is pulled inadvertently, the saw blade can easily discern the conformity of the cutting width (saw blade) or the ink line on this tool to the laser marker. Laser line Switch (For laser marker) Ink lining can result in the operation. * Do not ...tug on work table. otherwise, the position of a laser line can be easily made on the...
Instruction Manual
Page 17
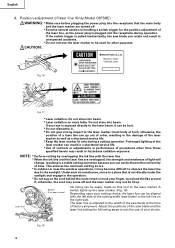
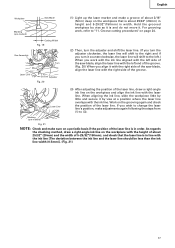
.... Groove cutting procedures" on page 24. (2) Then, turn the adjuster and shift the laser line. (If you turn the adjuster clockwise, the laser line will shift to the right and if you turn it . When aligning the ink line, slide the workpiece little by little and secure it by vise as it is... and do not move it counterclockwise, the laser line will shift to the left.) When you work , refer to (3). English Workpiece Saw Blade Marking (pre-marked) Cutting Width Fig. 19...
.... Groove cutting procedures" on page 24. (2) Then, turn the adjuster and shift the laser line. (If you turn the adjuster clockwise, the laser line will shift to the right and if you turn it . When aligning the ink line, slide the workpiece little by little and secure it by vise as it is... and do not move it counterclockwise, the laser line will shift to the left.) When you work , refer to (3). English Workpiece Saw Blade Marking (pre-marked) Cutting Width Fig. 19...
Instruction Manual
Page 19
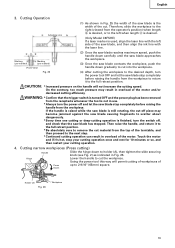
... is finished, turn the power tool OFF and let the saw blade contacts the workpiece, push the handle down to scatter about dangerously. * Every time one cutting or deep-cutting operation is used, align the laser line with the laser line. Therefore, slide the workpiece to the right (viewed from the top of the...
... is finished, turn the power tool OFF and let the saw blade contacts the workpiece, push the handle down to scatter about dangerously. * Every time one cutting or deep-cutting operation is used, align the laser line with the laser line. Therefore, slide the workpiece to the right (viewed from the top of the...

Instruction Manual
Page 25
... Insert the plug on the main unit into a power socket. (For light) (2) Turning on the laser marker switch. (3) Set the light switch into the upper position (ON) to light it using both ...the vise assembly and the clamp available in the market. Duct (2) During bevel and compound cutting, attach the dust bag at a right angle to the eyes. Failure to observe this...accumulate more quickly than normal during bevel cutting. 25 When cutting aluminum materials, coat the saw blade rotates. Sawdust will cause inefficient cutting and possible overload of the workpiece and tighten it...
... Insert the plug on the main unit into a power socket. (For light) (2) Turning on the laser marker switch. (3) Set the light switch into the upper position (ON) to light it using both ...the vise assembly and the clamp available in the market. Duct (2) During bevel and compound cutting, attach the dust bag at a right angle to the eyes. Failure to observe this...accumulate more quickly than normal during bevel cutting. 25 When cutting aluminum materials, coat the saw blade rotates. Sawdust will cause inefficient cutting and possible overload of the workpiece and tighten it...
Instruction Manual
Page 28
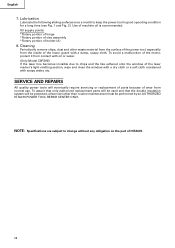
... routine maintenance) must be protected, all service (other waste material from the surface of the power tool, especially from the inside of the laser marker's light-emitting section, wipe and clean the window with a dry cloth or a soft cloth moistened with a damp, soapy cloth.... TOOL REPAIR CENTER ONLY. To avoid a malfunction of HITACHI. 28 NOTE: Specifications are subject to keep the power tool in good operating condition for a long time (see Fig. 1 and Fig. 2). English 7. Lubrication Lubricate the following sliding surfaces once a month to change without any obligation on the...
... routine maintenance) must be protected, all service (other waste material from the surface of the power tool, especially from the inside of the laser marker's light-emitting section, wipe and clean the window with a dry cloth or a soft cloth moistened with a damp, soapy cloth.... TOOL REPAIR CENTER ONLY. To avoid a malfunction of HITACHI. 28 NOTE: Specifications are subject to keep the power tool in good operating condition for a long time (see Fig. 1 and Fig. 2). English 7. Lubrication Lubricate the following sliding surfaces once a month to change without any obligation on the...

Instruction Manual
Page 87
... SPACER (A) SHAFT (A) E-RING SIDE HANDLE LEVER SHAFT LEVER SPRING (D) CAUTION LABEL (E) SHAFT (C) SEAL LOCK HEX. SOCKET SET. SOCKET SET SCREW M5 × 6 COVER (A) PLATE (A) HOLDER (B) LASER MARKET MACHINE SCREW M4 × 12 CAUTION LABEL (J) CORD MACHINE SCREW (W/WASHERS) M4 × 12 NYLON CLIP SUPPORT BALL BUSHING BUSHINGH KNOB BOLT M6 ×...
... SPACER (A) SHAFT (A) E-RING SIDE HANDLE LEVER SHAFT LEVER SPRING (D) CAUTION LABEL (E) SHAFT (C) SEAL LOCK HEX. SOCKET SET. SOCKET SET SCREW M5 × 6 COVER (A) PLATE (A) HOLDER (B) LASER MARKET MACHINE SCREW M4 × 12 CAUTION LABEL (J) CORD MACHINE SCREW (W/WASHERS) M4 × 12 NYLON CLIP SUPPORT BALL BUSHING BUSHINGH KNOB BOLT M6 ×...


