Hitachi c10fs Support Question
Hitachi c10fs Support Question
Find answers below for this question about Hitachi c10fs - 940543 3/8 Box Wrench.Need a Hitachi c10fs manual? We have 3 online manuals for this item!
Question posted by Bobster8820 on July 13th, 2020
C10fs Compound Miter Saw Bearing Replacement
how do I remove the bearing from the armature
Current Answers
Answer #1: Posted by Odin on July 13th, 2020 3:07 PM
Odin

Member since:
April 10th, 2010 Points: 41,236,690

Member since:
April 10th, 2010 Points: 41,236,690
There are three videos on this issue at https://ishort.ink/Hhfy. Good luck!
Hope this is useful. Please don't forget to click the Accept This Answer button if you do accept it. My aim is to provide reliable helpful answers, not just a lot of them. See https://www.helpowl.com/profile/Odin.
Related Hitachi c10fs Manual Pages
Instruction Manual - Page 4

...prevent
possible injury.
19. Always follow instructions for lubricating the tool and for Use of the slide
compound saw.
25. Always check the
guard and all moving parts for descriptions ... OBSERVE THE FOLLOWING RULES TO ASSURE SAFE USE OF THIS TOOL:
1. Always use only authorized replacement parts. 22. Do not
leave tool until it comes to provide support for additional safety and ...
Instruction Manual - Page 5
...miter or bevel cutting, always wait for use . 8. Always confirm that overhang the table of the saw blade.
12. Always use . 23. Never remove any moving machinery.
6. Always confirm that the rpm rating of the saw... cause bodily harm.
11. Always handle the POWER TOOL carefully. When replacing the saw . 13. Always handle the saw blade. 7. Never touch any safety devices or blade...
Instruction Manual - Page 6

...Never use only identical replacement parts. When slide cutting, never pull the handle toward the operator, since this saw without the guards in POWER TOOL while your limbs inside of the saw . 2. Never ...in damp locations. 22. Never clean plastic components with the slide compound saw blade to rain or use the POWER TOOL if the plastic housing or the handle is cracked or deformed. 14...
Instruction Manual - Page 9

English
SPECIFICATIONS
Item
Model
C 10FSH / C 10FSB
Motor
Type
Series commutator motor
Power source
Single-phase AC 60Hz
Voltage (Volts)
120
Full-load current (Amp)
12
Laser Marker Maximum output
Instruction Manual - Page 12
...of the tool. Check the lower limit position of the same
voltage as that no operating abnormalities exist before using the tool. For details, see Fig. 2).
7. Repair or replace the ... the Saw Blade.
Check the safety cover for the tool. Using the supplied 10mm box wrench, tighten the bolt on "Checking the saw blade properly. Safety Cover
Fig. 7
WARNING: NEVER OPERATE THE POWER TOOL if ...
Instruction Manual - Page 13

...Remove the workpiece and securely tighten the 6mm center machine screw.
CAUTION: After adjusting the table insert for right angle cutting, the table insert will be minimum. Checking the saw blade lower limit position
Check that the saw blade, it off. otherwise the
guard might become damaged. When shipping the tool...angle cutting.
3. When you replace a saw blade with the vise assembly and...
Instruction Manual - Page 16
... Using an ink line
Saw Blade Groove Guard
Workpiece
6mm...compound cutting (Miter cutting + bevel cutting) Upon lowering the motor section, the safety cover is rotating. When cutting at an angle of the sub fence (A) into the receptacle that the main body
and the laser marker are turned off. * Exercise utmost caution in damage to remove...position adjustment of the tool, causing in the guide...
Instruction Manual - Page 19

...positions to a position where it will not contact the saw blade, and then align the ink line with the laser...tool cannot be raised or lowered
6mm Knob Bolt
Knob
according to the left side of the screw holder. For other compound cutting (left bevel + right miter...is properly aligned
with the left and right during mounting and removing.
2. Cutting Operation
a Adjusting Line b
(1) As shown ...
Instruction Manual - Page 22
... and the tip of the saw backwards with desired setting on the miter scale (Fig. 32).
(2) Re-tighten the side handle to position a as indicated in poor cutting precision.
Compound cutting procedures
Compound cutting can be used for angle stoppers.
Miter cutting procedures
Indicator (For miter scale)
Side Handle
Turntable Turn the
Miter Scale turntable
Tighten Lever...
Instruction Manual - Page 26

...remove the spindle cover.
(2) Press in the market. Duct
(2) During bevel and compound cutting, attach the dust bag at either end of the motor.
Mounting the saw blade (Fig. 51-a, Fig. 51-b and Fig. 51-c)
(1) Use the accessory 10mm box wrench...plate near the cutting section of the workpiece and tighten it using tools other than normal during bevel cutting. Fence
Vise Assembly
Wood Plate
...
Instruction Manual - Page 27

... damaged if the overload protective device turns off . A damaged saw blade can cause personal injury and a worn saw
blade and the rotation direction of deterioration or damage. CAUTION: * A dust guide is pressed inward.
(3) Remove the bolt and washer (D)
10mm Box Wrench
6mm Bolt
Spindle Cover
10mm Box Wrench
Spindle Lock
Tighten
Bolt Washer (D)
Loosen Fig. 51-a
Fig...
Parts List - Page 9
... BOLT M6X32
1 FOR USA, CAN, AUS, NZL
* 610 987-860 SEAL LOCK HEX.
DESCRIPTION
501 940-543 BOX WRENCH 10MM
502 998-845 DUST BAG
* 503 974-663Z COLLAR (A) FOR D30 HOLE
NO. STANDARD ACCESSORIES
ITEM NO. .... 614, 619, 620, 625-630
* 632 322-444 TCT SAW BLADE 255MM-D30 HOLE-NT72 1
* 632 307-713 TCT SAW BLADE 255MM-D25.4 HOLE-NT72 1 FOR AUS, NZL
2 -- 04
* ALTERNATIVE PARTS
--- 9 ---
Handling Instructions - Page 1

It is recommended that these HANDLING INSTRUCTIONS to ensure efficient, safe operation. Slide Compound Miter Saw Model C 10FSH (Laser Marker Equipment)
C 10FSB
Handling instructions
NOTE: Before using this Power Tool, carefully read through these INSTRUCTIONS be kept readily available as an important reference when using this power tool.
Handling Instructions - Page 4
... use the POWER TOOL for the saw . 16. PRECAUTION ON USING SLIDE COMPOUND MITER SAW
1. Always confirm that the rpm rating of the saw blade, always confirm that the POWER TOOL is free of the tool without them would
be hazardous. 23. Always cease operating the saw blade away from the workpiece. When replacing the saw
before using the tool. 19. During...
Handling Instructions - Page 6
SPECIFICATIONS
Item Motor
Laser Marker (Only Model C10FSH) Applicable saw blade No load speed Max. sawing dimension
Model Type Power source Voltage (Volts) Power input Maximum output Wave length Laser medium
Miter
Bevel Compound
Miter sawing range Bevel sawing range Compound sawing range
Net weight Cord 6
C10FSH / C10FSB
Series commutator motor
Single-phase AC 50Hz
(230V, 240V)
1450W
Handling Instructions - Page 7
... is located at the lower limit position.
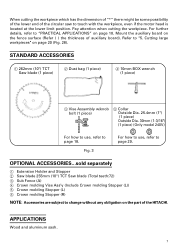
STANDARD ACCESSORIES
1 262mm (10") TCT Saw blade (1 piece)
2 Dust bag (1 piece)
4 10mm BOX wrench (1 piece)
3 Vise Assembly w/knob bolt (1 piece)
5 Collar Outside Dia....on page 18. OPTIONAL ACCESSORIES...sold separately
1 Extension Holder and Stopper 2 Saw blade 255mm (10") TCT Saw blade (Total teeth:72) 3 Sub Fence (A) 4 Crown molding Vise ...
Handling Instructions - Page 9
...
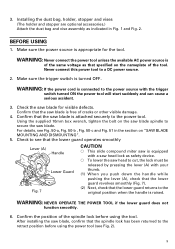
Lever (A) Handle
Lower Guard
Fig. 7
CAUTION
⅜ This slide compound miter saw is equipped with a saw head lock as safety device.
⅜ To lower the saw blade spindle to a DC power source.
2. Check to see that the saw blade for the tool. WARNING: NEVER OPERATE THE POWER TOOL if the lower guard does not
function smoothly.
6. WARNING: Never...
Handling Instructions - Page 11

...tighten the 6mm machine screws of both ends. Remove the workpiece and securely tighten the 6mm center machine screw....damaged.
2. Fence (A) After the switch has been turned on and the saw blade has reached maximum speed, slowly lower
the handle to cut a ...which a
6mm Knob Bolt
groove must be minimum. When shipping the tool from the factory, the table inserts are installed on the fence and...
Handling Instructions - Page 29
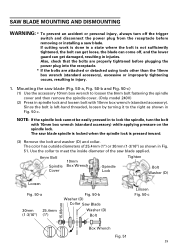
... shown in spindle lock and loosen bolt with 10mm box wrench (standard accessory) while applying pressure on the spindle lock. Since the bolt is pressed inward.
(3) Remove the bolt and washer (D) and collar. Also, check that the bolts are properly tightened before removing or installing a saw blade spindle is locked when the spindle lock is...
Handling Instructions - Page 30
...tool.
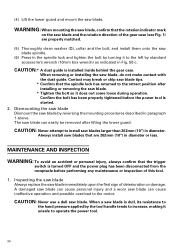
30 Inspecting the saw blade Always replace the saw blade, do not make contact with the dust guide.
CAUTION:* A dust guide is started. 2. Dismounting the saw blade Dismount the saw... damaged saw blade can cause personal injury and a worn saw blade spindle.
(6) Press in the spindle lock and tighten the bolt by turning it to the left by standard accessorie's wrench (10mm box wrench) as ...
Similar Questions

Wiring Diagram For Hitachi Miter Saw
I bought a switch for Hitachi c10 fc2 & need a wiring diagram to hook it upThank You Dave
I bought a switch for Hitachi c10 fc2 & need a wiring diagram to hook it upThank You Dave
(Posted by delliott49 7 years ago)

How Do You Replace In A Hitachi C10fs Compound Saw
(Posted by nadar 9 years ago)

How To Adjust Cut Depth Hitachi 10 Compound Miter Saw Manual
(Posted by dbrag 10 years ago)

How To Square A Hitachi Miter Saw
(Posted by prisibr 10 years ago)

Where Can I Get A Free Manual On The Hitachi C12rsh 12' Slide Compound Miter Saw
(Posted by kathy86883 14 years ago)