
Instruction Manual
Page 12
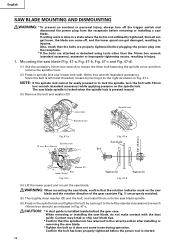
... tool. Always check that the spindle lock has been returned to 11mm) below the table insert. After installing the saw blade, confirm that the lower guard moves smoothly and covers the saw blade. Although it was adjusted before using the power tool (see Fig. 47-b). 7. For details, ... a DC power source. 2. Lower guard Fig. 8 WARNING: NEVER OPERATE THE POWER TOOL if the safety cover does not function smoothly. 6. Confirm that the saw blade lower limit position". 12 For details, see the section on "SAW BLADE MOUNTING AND DISMOUNTING". 5. Installing the dust bag, holder, stopper...
... tool. Always check that the spindle lock has been returned to 11mm) below the table insert. After installing the saw blade, confirm that the lower guard moves smoothly and covers the saw blade. Although it was adjusted before using the power tool (see Fig. 47-b). 7. For details, ... a DC power source. 2. Lower guard Fig. 8 WARNING: NEVER OPERATE THE POWER TOOL if the safety cover does not function smoothly. 6. Confirm that the saw blade lower limit position". 12 For details, see the section on "SAW BLADE MOUNTING AND DISMOUNTING". 5. Installing the dust bag, holder, stopper...
Instruction Manual
Page 26
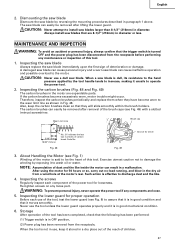
.... 47-a Spindle Lock 10 mm Box Wrench Tighten Fig. 47-b Saw blade Bolt Loosen Washer (D) Lower Guard Bolt Fig. 47-c Washer (D) Fig. 47-d Washer (D) (4) Lift the lower guard and mount the saw blade, do not make contact with 10mm box wrench (standard accessory). When removing or installing the saw blade. CAUTION: * A dust guide is left-hand threaded, loosen...
.... 47-a Spindle Lock 10 mm Box Wrench Tighten Fig. 47-b Saw blade Bolt Loosen Washer (D) Lower Guard Bolt Fig. 47-c Washer (D) Fig. 47-d Washer (D) (4) Lift the lower guard and mount the saw blade, do not make contact with 10mm box wrench (standard accessory). When removing or installing the saw blade. CAUTION: * A dust guide is left-hand threaded, loosen...
Instruction Manual
Page 27
...slide smoothly within the brush holders. Wear Limit Line Brush cap 21 3/16" (5mm) 15/32" (12mm) No. 21 indicates the last two numbers of this tool. Exercise utmost caution not to discharge dust and the like inside the motor can easily be removed after lifting the lower guard...: (1) Trigger switch is in paragraph 1 above. Inspecting the lower guard for proper operation Before each component of the tool, test the lower guard (see Fig. 8) to operate the power tool. 2. Dismounting the saw blade Dismount the saw blade is turned OFF and the power plug has been disconnected ...
...slide smoothly within the brush holders. Wear Limit Line Brush cap 21 3/16" (5mm) 15/32" (12mm) No. 21 indicates the last two numbers of this tool. Exercise utmost caution not to discharge dust and the like inside the motor can easily be removed after lifting the lower guard...: (1) Trigger switch is in paragraph 1 above. Inspecting the lower guard for proper operation Before each component of the tool, test the lower guard (see Fig. 8) to operate the power tool. 2. Dismounting the saw blade Dismount the saw blade is turned OFF and the power plug has been disconnected ...


