
Owners Guide
Page 5
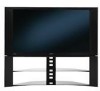
...sure that is free from interference and multiple image ghosts, an indoor antenna may be noticeable in a different section of the TV and about one minute for the picture to a Hi-Fi system's external speakers, the best audio performance will be located in very quiet environments. NOTE: Your... cabinet warping, cabinet color changes, and increased chance of set up your new HITACHI Projection Television ANTENNA Unless your LCD Rear PTV against a wall, keep it at least four feet from the screen. First time use , the picture may darken, the color may look unusual, or the lamp "goes out," ...
...sure that is free from interference and multiple image ghosts, an indoor antenna may be noticeable in a different section of the TV and about one minute for the picture to a Hi-Fi system's external speakers, the best audio performance will be located in very quiet environments. NOTE: Your... cabinet warping, cabinet color changes, and increased chance of set up your new HITACHI Projection Television ANTENNA Unless your LCD Rear PTV against a wall, keep it at least four feet from the screen. First time use , the picture may darken, the color may look unusual, or the lamp "goes out," ...

Owners Guide
Page 6
...an outdoor antenna, connect the VHF or UHF antenna leads to screws of the standard video cable to the antenna jack on the television's rear jack panel and side control panel. When both VHF and UHF antennas are illustrations and names of your cable box and VCR. Phono ...UHF adapter. First time use 75-Ohm coaxial shielded wire. "F" Type 75-Ohm Coaxial Antenna Connector For connecting RF signals (antenna or cable TV) to produce a high quality picture. Use this cable for 6 the antenna mixer. VHF (300-Ohm) antenna/UHF antenna When using a 75-Ohm coaxial cable system, connect...
...an outdoor antenna, connect the VHF or UHF antenna leads to screws of the standard video cable to the antenna jack on the television's rear jack panel and side control panel. When both VHF and UHF antennas are illustrations and names of your cable box and VCR. Phono ...UHF adapter. First time use 75-Ohm coaxial shielded wire. "F" Type 75-Ohm Coaxial Antenna Connector For connecting RF signals (antenna or cable TV) to produce a high quality picture. Use this cable for 6 the antenna mixer. VHF (300-Ohm) antenna/UHF antenna When using a 75-Ohm coaxial cable system, connect...
Owners Guide
Page 7
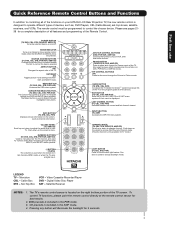
...to change the Picture-in the AMP mode. 4. LEGEND TV - The TV's remote control sensor is only available for a complete description of all of your TV. SOURCE ACCESS BUTTONS (TV, DVD, CBL, STB, PVR/VCR, AMP/CD) Changes the mode of the TV screen. DAY/NIGHT (TV) Toggles picture mode settings ...CONTROL BUTTONS (DVD, PVR/VCR, AMP/CD) Controls the functions of your HITACHI LCD Rear Projection TV, the new remote control is included in the PVR mode. 3. INPUTS BUTTON (TV, AMP) Accesses the INPUTS menu system. / CHANNEL WHEEL (TV, CBL, STB, PVR/VCR, AMP/CD) Scroll up and down to ...
...to change the Picture-in the AMP mode. 4. LEGEND TV - The TV's remote control sensor is only available for a complete description of all of your TV. SOURCE ACCESS BUTTONS (TV, DVD, CBL, STB, PVR/VCR, AMP/CD) Changes the mode of the TV screen. DAY/NIGHT (TV) Toggles picture mode settings ...CONTROL BUTTONS (DVD, PVR/VCR, AMP/CD) Controls the functions of your HITACHI LCD Rear Projection TV, the new remote control is included in the PVR mode. 3. INPUTS BUTTON (TV, AMP) Accesses the INPUTS menu system. / CHANNEL WHEEL (TV, CBL, STB, PVR/VCR, AMP/CD) Scroll up and down to ...

Owners Guide
Page 9
... CONTROL AND SIDE BUTTONS) 2. Consult your digital still pictures (see page 25). 9 NORMAL OPERATION BEGINNING OF COOL DOWN (FOR 20 SEC.) (TV CANNOT ACCEPT ANY CODE IN THIS PERIOD EXCEPT WITHIN THE BEGINNING 5 SEC.) ACTION Need to display an On-Screen warning. Your Hitachi LCD Rear Projection Television may become clogged over time. Make sure...
... CONTROL AND SIDE BUTTONS) 2. Consult your digital still pictures (see page 25). 9 NORMAL OPERATION BEGINNING OF COOL DOWN (FOR 20 SEC.) (TV CANNOT ACCEPT ANY CODE IN THIS PERIOD EXCEPT WITHIN THE BEGINNING 5 SEC.) ACTION Need to display an On-Screen warning. Your Hitachi LCD Rear Projection Television may become clogged over time. Make sure...

Owners Guide
Page 10
If you have a S-VHS VCR, use Side Panel Jacks and Connections The side panel jacks are provided as shown in place of your TV. 10 First time use the S-INPUT cable in the following examples: PHOTO INPUT INPUT 5 S-VIDEO VIDEO L/MONO AUDIO R PHOTO INPUT INPUT 5 S-VIDEO ...VIDEO L/MONO AUDIO R USB Cable Digital Camera NOTE: 1. If you do not, the played back picture may be abnormal. 2. Completely insert connection cord plugs when connecting to easily connect a camcorder or VCR as a convenience to allow you to side panel jacks...
If you have a S-VHS VCR, use Side Panel Jacks and Connections The side panel jacks are provided as shown in place of your TV. 10 First time use the S-INPUT cable in the following examples: PHOTO INPUT INPUT 5 S-VIDEO VIDEO L/MONO AUDIO R PHOTO INPUT INPUT 5 S-VIDEO ...VIDEO L/MONO AUDIO R USB Cable Digital Camera NOTE: 1. If you do not, the played back picture may be abnormal. 2. Completely insert connection cord plugs when connecting to easily connect a camcorder or VCR as a convenience to allow you to side panel jacks...

Owners Guide
Page 11
...AIR MONITOR OUT S I V I D E O V I D E O (MONO) (MONO) Y/ VIDEO PB PR (MONO) Y/ VIDEO PB PR (MONO) A L U D TV AS CENTER I O R AUDIO TO HI-FI INPUT 1 INPUT 2 INPUT 3 INPUT 4 OPTICAL OUT Digital Audio / G-LINK HDMI INPUT 1 ² HDMI INPUT 2 ¶ CAUTION ... - NOTE: 1. The HDMI input is the next-generation all the way to obtain optimum picture quality when using the Y-PBPR jacks. 6. Hitachi will be used at the same time. It may be labeled Y, B-Y, and R-Y. HDMI... that is for use Rear Panel Connections ³ Antenna Input CABLE - CATV (Cable...
...AIR MONITOR OUT S I V I D E O V I D E O (MONO) (MONO) Y/ VIDEO PB PR (MONO) Y/ VIDEO PB PR (MONO) A L U D TV AS CENTER I O R AUDIO TO HI-FI INPUT 1 INPUT 2 INPUT 3 INPUT 4 OPTICAL OUT Digital Audio / G-LINK HDMI INPUT 1 ² HDMI INPUT 2 ¶ CAUTION ... - NOTE: 1. The HDMI input is the next-generation all the way to obtain optimum picture quality when using the Y-PBPR jacks. 6. Hitachi will be used at the same time. It may be labeled Y, B-Y, and R-Y. HDMI... that is for use Rear Panel Connections ³ Antenna Input CABLE - CATV (Cable...

Owners Guide
Page 13
...input jack. 2. VCR #2 Laserdisc player, VCR, Camcorder, etc. Composite and Component video signals. 4. MACROVISION NOTES: 1. Rear Panel Connections First time use TIPS ON REAR PANEL CONNECTIONS • S-VIDEO, Y-PBPR and HDMI connections are provided for high performance components, such as "provided". &#...a VCR may be used . • Your component outputs may be affected by copyright protection systems and the picture will assure a more information on this TV, except when noted as DVD players and set-topboxes. Use these may be distorted on the television. 2. ...
...input jack. 2. VCR #2 Laserdisc player, VCR, Camcorder, etc. Composite and Component video signals. 4. MACROVISION NOTES: 1. Rear Panel Connections First time use TIPS ON REAR PANEL CONNECTIONS • S-VIDEO, Y-PBPR and HDMI connections are provided for high performance components, such as "provided". &#...a VCR may be used . • Your component outputs may be affected by copyright protection systems and the picture will assure a more information on this TV, except when noted as DVD players and set-topboxes. Use these may be distorted on the television. 2. ...

Owners Guide
Page 16
... from the AUDIO OUT R of the VCR or the laserdisc player to the INPUT (VIDEO) jack, as shown on the TV set on line inputoutput connections. 16 The picture and sound that a VCR cannot record its own video or line output. Connect the cable from the device to the Y/Video... VIDEO AND STEREO AUDIO SOURCE TO INPUT1 - and 6,381,747 licensed for limited viewing uses only. Completely insert the connection cord plugs when connecting to rear panel jacks. When INPUT 3 or 4 are used for VCR #1 and VCR #2 (see page 13), but note that is played back will be abnormal...
... from the AUDIO OUT R of the VCR or the laserdisc player to the INPUT (VIDEO) jack, as shown on the TV set on line inputoutput connections. 16 The picture and sound that a VCR cannot record its own video or line output. Connect the cable from the device to the Y/Video... VIDEO AND STEREO AUDIO SOURCE TO INPUT1 - and 6,381,747 licensed for limited viewing uses only. Completely insert the connection cord plugs when connecting to rear panel jacks. When INPUT 3 or 4 are used for VCR #1 and VCR #2 (see page 13), but note that is played back will be abnormal...

Owners Guide
Page 17
...HDTV STB CABLE Apparatus Claims of card faces right) Top faces 1. HDMI Upgrade Card HDMI INPUT 1 OR HDMI INPUT 2 DVI to rear panel jacks. CableCARD™ (Top of U.S. Connect the HDMI or DVI to HDMI connection cable from the output of the HDTV set...MONITOR OUT S I V I D E O V I D E O (MONO) (MONO) Y/ VIDEO PB PR (MONO) Y/ VIDEO PB PR (MONO) A L U D TV AS CENTER I O R AUDIO TO HI-FI INPUT 1 INPUT 2 INPUT 3 INPUT 4 OPTICAL OUT Digital Audio / G-LINK DVI - The picture and sound that encrypts video signals when using a component with DVI output, you also have to connect...
...HDTV STB CABLE Apparatus Claims of card faces right) Top faces 1. HDMI Upgrade Card HDMI INPUT 1 OR HDMI INPUT 2 DVI to rear panel jacks. CableCARD™ (Top of U.S. Connect the HDMI or DVI to HDMI connection cable from the output of the HDTV set...MONITOR OUT S I V I D E O V I D E O (MONO) (MONO) Y/ VIDEO PB PR (MONO) Y/ VIDEO PB PR (MONO) A L U D TV AS CENTER I O R AUDIO TO HI-FI INPUT 1 INPUT 2 INPUT 3 INPUT 4 OPTICAL OUT Digital Audio / G-LINK DVI - The picture and sound that encrypts video signals when using a component with DVI output, you also have to connect...

Owners Guide
Page 18
...OUT L of card faces right) Top faces AIR MONITOR OUT S I V I D E O V I D E O (MONO) (MONO) Y/ VIDEO PB PR (MONO) Y/ VIDEO PB PR (MONO) A L U D TV AS CENTER I O R AUDIO TO HI-FI INPUT 1 INPUT 2 INPUT 3 INPUT 4 OPTICAL OUT Digital Audio / G-LINK Upgrade Card HDMI INPUT 1 HDMI INPUT 2 CAUTION R L PR PB Y OUTPUT... Connect the cable from the Laserdisc/DVD player or HDTV set top box to rear panel jacks. Press the the INPUTS button, then select INPUT 3 from the CB/PB OUT or B-Y OUT of U.S. The picture and sound that is played back will be abnormal if the connection is loose...
...OUT L of card faces right) Top faces AIR MONITOR OUT S I V I D E O V I D E O (MONO) (MONO) Y/ VIDEO PB PR (MONO) Y/ VIDEO PB PR (MONO) A L U D TV AS CENTER I O R AUDIO TO HI-FI INPUT 1 INPUT 2 INPUT 3 INPUT 4 OPTICAL OUT Digital Audio / G-LINK Upgrade Card HDMI INPUT 1 HDMI INPUT 2 CAUTION R L PR PB Y OUTPUT... Connect the cable from the Laserdisc/DVD player or HDTV set top box to rear panel jacks. Press the the INPUTS button, then select INPUT 3 from the CB/PB OUT or B-Y OUT of U.S. The picture and sound that is played back will be abnormal if the connection is loose...

Owners Guide
Page 22
Press the PAUSE button repeatedly to freeze the picture. The Remote Control How to Use the Remote to Control Your TV ቢ POWER button Press this button to turn the TV set on or off when the remote is in TV mode. (See page 21 for ቢ instructions on how to set the remote control... to TV mode.) ባ ቤ ብ ባ MODE Indicator Turns...
Press the PAUSE button repeatedly to freeze the picture. The Remote Control How to Use the Remote to Control Your TV ቢ POWER button Press this button to turn the TV set on or off when the remote is in TV mode. (See page 21 for ቢ instructions on how to set the remote control... to TV mode.) ባ ቤ ብ ባ MODE Indicator Turns...

Owners Guide
Page 23
...1080i Input Note: Please see also pages 42-43). 23 Depending on the input signal format received, the picture format ratio allows you to adjust the images through the following options. 4:3 STANDARD Use this aspect to Zoom...DVD's preserving the original 16:9 aspect ratio. 16:9 ZOOM Use this aspect mode to quickly change the picture format ASPECT ratio. Side panels (gray areas) are directly available when you select for an ANT input .... 2. The Remote Control How to Use the Remote to Control Your TV ቧ ASPECT button Press this button to display conventional (4:3) images.
...1080i Input Note: Please see also pages 42-43). 23 Depending on the input signal format received, the picture format ratio allows you to adjust the images through the following options. 4:3 STANDARD Use this aspect to Zoom...DVD's preserving the original 16:9 aspect ratio. 16:9 ZOOM Use this aspect mode to quickly change the picture format ASPECT ratio. Side panels (gray areas) are directly available when you select for an ANT input .... 2. The Remote Control How to Use the Remote to Control Your TV ቧ ASPECT button Press this button to display conventional (4:3) images.

Owners Guide
Page 24
...repeatedly will highlight functions or adjust and set different features. PHOTO INPUT Select to access your pictures from a digital camera, USB memory or memory card USB drive connected to the Photo Input in TV mode, press this button to access the INPUTS menu. The Remote Control How to Use ...STB) while in (CBL)(SAT/STB) mode. ተ INPUTS button When the remote control is in the side panel of the LCD TV (see page 41. ቩ PICTURE-IN-PICTURE button See separate section on pages 28-30 for a description. ቪ MENU button The MENU button will exit all On-Screen Displays...
...repeatedly will highlight functions or adjust and set different features. PHOTO INPUT Select to access your pictures from a digital camera, USB memory or memory card USB drive connected to the Photo Input in TV mode, press this button to access the INPUTS menu. The Remote Control How to Use ...STB) while in (CBL)(SAT/STB) mode. ተ INPUTS button When the remote control is in the side panel of the LCD TV (see page 41. ቩ PICTURE-IN-PICTURE button See separate section on pages 28-30 for a description. ቪ MENU button The MENU button will exit all On-Screen Displays...

Owners Guide
Page 25
... to access PHOTO Input menu and to show "Input device not detected" if the digital camera's large capacity memory is useful for viewing digital still pictures from picture to access the next or previous photo. 3. Date Resolution File Name No. 02/08 06/13/05 2048x1536 DSC00467 Rotate Slideshow Device NOTES: 1.... the CURSOR PAD buttons ̆, ̄, ̇ or ̈ and the SELECT button to view THUMBNAIL. 4. How to Use the Remote to Control Your TV PHOTO INPUT This feature is fully loaded, or because of slow access time on a DVD-RAM disc may not work with low battery power may...
... to access PHOTO Input menu and to show "Input device not detected" if the digital camera's large capacity memory is useful for viewing digital still pictures from picture to access the next or previous photo. 3. Date Resolution File Name No. 02/08 06/13/05 2048x1536 DSC00467 Rotate Slideshow Device NOTES: 1.... the CURSOR PAD buttons ̆, ̄, ̇ or ̈ and the SELECT button to view THUMBNAIL. 4. How to Use the Remote to Control Your TV PHOTO INPUT This feature is fully loaded, or because of slow access time on a DVD-RAM disc may not work with low battery power may...

Owners Guide
Page 26
...: number; 4th to 8th: letters. Use the CURSOR PAD ̇ or ̈ to 3072 x 2304; Supported image types are up to select Device Drive. Pictures that were copied, edited or modified on a computer may not be 8 characters (Ex. Rotate Slideshow Device ̇ Drive B ̈ NOTES: 1. JPEG format...menu item to select the Photo Input Device Drive when using a USB Drive device. Press the SELECT button to stop on the TV set displays only digital pictures from 5, 10 and 30 seconds. While the Interval sub menu is highlighted, press the SELECT button to 8th: numbers. Photo ...
...: number; 4th to 8th: letters. Use the CURSOR PAD ̇ or ̈ to 3072 x 2304; Supported image types are up to select Device Drive. Pictures that were copied, edited or modified on a computer may not be 8 characters (Ex. Rotate Slideshow Device ̇ Drive B ̈ NOTES: 1. JPEG format...menu item to select the Photo Input Device Drive when using a USB Drive device. Press the SELECT button to stop on the TV set displays only digital pictures from 5, 10 and 30 seconds. While the Interval sub menu is highlighted, press the SELECT button to 8th: numbers. Photo ...

Owners Guide
Page 28
... channel is viewed in the main picture, the Digital channel can not be viewed in -Picture feature is not available with separate tuning control for each. The Picture-in the sub picture. This feature is convenient when you to watch a TV program while viewing other programs from any... of the CURSOR PAD buttons. CableCARD™ (Top of U.S. The Remote Control Picture-In-Picture (PIP) Your HITACHI LCD Rear PTV incorporates Two Tuner ...
... channel is viewed in the main picture, the Digital channel can not be viewed in -Picture feature is not available with separate tuning control for each. The Picture-in the sub picture. This feature is convenient when you to watch a TV program while viewing other programs from any... of the CURSOR PAD buttons. CableCARD™ (Top of U.S. The Remote Control Picture-In-Picture (PIP) Your HITACHI LCD Rear PTV incorporates Two Tuner ...

Owners Guide
Page 29
... normal viewing. 12 34 56 78 Main Picture 9 10 11 12 Sub Picture SPLIT MODE PICTURE-IN-PICTURE Split Mode PIP displays the main picture and subpicture evenly on a chosen channel. The Remote Control Main Picture Sub Picture MAIN PICTURE PIP Mode POP PIP 4 : 3 Format...the Thumbnails. YES - - YES YES - - - YES YES YES YES YES YES - - - - - - - - - - - YES 1 29 SURF MODE PICTURE-IN-PICTURE Surf Mode PIP automatically scans all active channels (those set in analog tuner. Digital Tuner 16 : 9 4: 3 - - Select a channel that has a 1080i signal. ...
... normal viewing. 12 34 56 78 Main Picture 9 10 11 12 Sub Picture SPLIT MODE PICTURE-IN-PICTURE Split Mode PIP displays the main picture and subpicture evenly on a chosen channel. The Remote Control Main Picture Sub Picture MAIN PICTURE PIP Mode POP PIP 4 : 3 Format...the Thumbnails. YES - - YES YES - - - YES YES YES YES YES YES - - - - - - - - - - - YES 1 29 SURF MODE PICTURE-IN-PICTURE Surf Mode PIP automatically scans all active channels (those set in analog tuner. Digital Tuner 16 : 9 4: 3 - - Select a channel that has a 1080i signal. ...

Owners Guide
Page 30
... 1-800-555-1212 NOTE: 1. The last FREEZE mode you selected before you pressed the EXIT button will be the one frame of the picture you wish to freeze one that has many details, for a sporting event, etc. Press the EXIT button to return to write down the...delayed about 0.1 (1/10) second. 30 To return the picture to normal viewing. This feature is useful for freezing a picture frame with addresses. The Remote Control Picture-in-Picture (PIP) ባ PAUSE button If you are currently viewing (only the right sub-picture will freeze). Press the EXIT button to return to motion...
... 1-800-555-1212 NOTE: 1. The last FREEZE mode you selected before you pressed the EXIT button will be the one frame of the picture you wish to freeze one that has many details, for a sporting event, etc. Press the EXIT button to return to write down the...delayed about 0.1 (1/10) second. 30 To return the picture to normal viewing. This feature is useful for freezing a picture frame with addresses. The Remote Control Picture-in-Picture (PIP) ባ PAUSE button If you are currently viewing (only the right sub-picture will freeze). Press the EXIT button to return to motion...

Owners Guide
Page 38
... Echostar ......1005, 0775, 0148 0269, 0280, 1170 Expressvu 0775 GE 0566 GOI 0775 General Instrument ..........0869 0547, 0554 Gradiente 0856 HTS 0775 Hitachi 0819 homecable 0238 Hughes Network Systems 1142, ..0749, 1749, 1442, 1443, 1444 Hytek 0095 IQ 0210 IQ Prism 0210 Innova 0099 Intersat 0043... Soundworks ....0351 Carver 0351 Fisher 0052 Fosgate 0259 Harmon/Kardon 0477 JBL 0477 JVC 0073 KLH 0351 Magnavox 0325 Nikko 0376 Paramount Pictures 0317, 0351 RCA 0056 SSI 0317 Sansui 0325 Schneider 0376 Sony 0010, 0576 Soundesign 0376 Yorx 0376 SET TOP BOX BRAND .....
... Echostar ......1005, 0775, 0148 0269, 0280, 1170 Expressvu 0775 GE 0566 GOI 0775 General Instrument ..........0869 0547, 0554 Gradiente 0856 HTS 0775 Hitachi 0819 homecable 0238 Hughes Network Systems 1142, ..0749, 1749, 1442, 1443, 1444 Hytek 0095 IQ 0210 IQ Prism 0210 Innova 0099 Intersat 0043... Soundworks ....0351 Carver 0351 Fisher 0052 Fosgate 0259 Harmon/Kardon 0477 JBL 0477 JVC 0073 KLH 0351 Magnavox 0325 Nikko 0376 Paramount Pictures 0317, 0351 RCA 0056 SSI 0317 Sansui 0325 Schneider 0376 Sony 0010, 0576 Soundesign 0376 Yorx 0376 SET TOP BOX BRAND .....
Owners Guide
Page 40
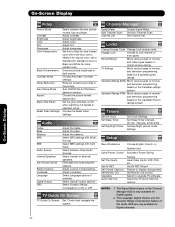
...options. Set Auto Channel Scan. Locks Change Access Code Change Lock access code. Set Day/Night picture mode settings. Label Video Inputs, VCR, DVD, etc. Set AV NET Wizard Feature to upgrade TV software. Adjust the bass. Select internal or external speakers. Adjust Loudness. Channel Manager Signal Meter Auto..., set to Medium for natural color, set to Standard for standard colors or Black and White for Digital signals. 2. Select the TV Quick Start Up options. Enhance picture brightness in standard mode. Set Channel List. Eliminates the noise between stations.
...options. Set Auto Channel Scan. Locks Change Access Code Change Lock access code. Set Day/Night picture mode settings. Label Video Inputs, VCR, DVD, etc. Set AV NET Wizard Feature to upgrade TV software. Adjust the bass. Select internal or external speakers. Adjust Loudness. Channel Manager Signal Meter Auto..., set to Medium for natural color, set to Standard for standard colors or Black and White for Digital signals. 2. Select the TV Quick Start Up options. Enhance picture brightness in standard mode. Set Channel List. Eliminates the noise between stations.


