
Owners Guide
Page 1
has determined that this product meets the Energy Star® guidelines for 50VG825, 55VG825, 60VG825 IMPORTANT SAFETY INSTRUCTIONS 2-3 FIRST TIME USE ...4-20 THE REMOTE CONTROL ...21-38 ON-SCREEN DISPLAY ...39-88 LAMP REPLACEMENT ...88-91 USEFUL INFORMATION...92-97 LICENSE AGREEMENT...98 APPENDIXES ...99-100 INDEX ...101 As an Energy Star® Partner, Hitachi, Ltd. LCD REAR PROJECTION TELEVISION Operating Guide for energy efficiency.
has determined that this product meets the Energy Star® guidelines for 50VG825, 55VG825, 60VG825 IMPORTANT SAFETY INSTRUCTIONS 2-3 FIRST TIME USE ...4-20 THE REMOTE CONTROL ...21-38 ON-SCREEN DISPLAY ...39-88 LAMP REPLACEMENT ...88-91 USEFUL INFORMATION...92-97 LICENSE AGREEMENT...98 APPENDIXES ...99-100 INDEX ...101 As an Energy Star® Partner, Hitachi, Ltd. LCD REAR PROJECTION TELEVISION Operating Guide for energy efficiency.

Owners Guide
Page 3
... climb to retrieve the objects. FOR MORE INFORMATION, CALL 1-800-HITACHI. Insert the power cord into a 120 volt 60 Hz outlet. patents and other limited consumer uses only unless otherwise ... the FCC rules. 3 Public viewing of copyrighted material Public viewing of programs broadcast by TV stations and cable companies, as well as this device that are not expressly approved by ... product contains lead and a lamp that is protected by Hitachi America, Ltd. To prevent electric shock, do not expose this product and its lamp in Canada). For lamp recycling and disposal information, go...
... climb to retrieve the objects. FOR MORE INFORMATION, CALL 1-800-HITACHI. Insert the power cord into a 120 volt 60 Hz outlet. patents and other limited consumer uses only unless otherwise ... the FCC rules. 3 Public viewing of copyrighted material Public viewing of programs broadcast by TV stations and cable companies, as well as this device that are not expressly approved by ... product contains lead and a lamp that is protected by Hitachi America, Ltd. To prevent electric shock, do not expose this product and its lamp in Canada). For lamp recycling and disposal information, go...

Owners Guide
Page 5
...feet from each side of the receiver cabinet and as close as the viewer moves to become excessively hot, for best performance. If the TV's audio output will be connected to 18 feet from interference and multiple image ghosts, an indoor antenna may appear on a flat surface. R... L S IMPORTANT NOTES: 1. After extended use How to set up your new HITACHI Projection Television ANTENNA Unless your LCD Rear PTV against a wall, keep it may hear a "pop" sound when the lamp "goes out." LCD Rear PTV incorporates an advanced cooling fan system to cool the processor. If you are ...
...feet from each side of the receiver cabinet and as close as the viewer moves to become excessively hot, for best performance. If the TV's audio output will be connected to 18 feet from interference and multiple image ghosts, an indoor antenna may appear on a flat surface. R... L S IMPORTANT NOTES: 1. After extended use How to set up your new HITACHI Projection Television ANTENNA Unless your LCD Rear PTV against a wall, keep it may hear a "pop" sound when the lamp "goes out." LCD Rear PTV incorporates an advanced cooling fan system to cool the processor. If you are ...

Owners Guide
Page 8
...off. ² SIDE INPUT JACKS (INPUT 5) Use these buttons for a quick hook-up (̆) buttons when in the top right corner of the TV screen. When the TV power is turned OFF at a volume level 31 or greater, the volume level will be at the level it possible to set when the... the remote control at this area while using the remote. If you to enter the MENU, making it was set TV features to your favorite show or new recording. Front Panel Controls Lamp Temp Power First time use ቦ MENU/SELECT ̆ CHANNEL ̄ CURSOR ̈ VOLUME ̇ INPUT/EXIT POWER ...
...off. ² SIDE INPUT JACKS (INPUT 5) Use these buttons for a quick hook-up (̆) buttons when in the top right corner of the TV screen. When the TV power is turned OFF at a volume level 31 or greater, the volume level will be at the level it possible to set when the... the remote control at this area while using the remote. If you to enter the MENU, making it was set TV features to your favorite show or new recording. Front Panel Controls Lamp Temp Power First time use ቦ MENU/SELECT ̆ CHANNEL ̄ CURSOR ̈ VOLUME ̇ INPUT/EXIT POWER ...

Owners Guide
Page 9
...TV CANNOT ACCEPT ANY CODE IN THIS PERIOD EXCEPT WITHIN THE BEGINNING 5 SEC.) ACTION Need to cool down . Please call service. Consult your digital camera, USB memory or memory card USB drive to display an On-Screen warning. Check assembly condition of LAMP UNIT Call for lamp replacement procedure. Your Hitachi LCD Rear Projection... Television has an internal lamp that may appear to be OFF when it is set to input 1 ~...
...TV CANNOT ACCEPT ANY CODE IN THIS PERIOD EXCEPT WITHIN THE BEGINNING 5 SEC.) ACTION Need to cool down . Please call service. Consult your digital camera, USB memory or memory card USB drive to display an On-Screen warning. Check assembly condition of LAMP UNIT Call for lamp replacement procedure. Your Hitachi LCD Rear Projection... Television has an internal lamp that may appear to be OFF when it is set to input 1 ~...

Owners Guide
Page 12
... cable channels. The CableCARD will provide this service is for this connection, your cable service. IMPORTANT: Please read the "Lamp Power Control" feature on the screen (you will allow you to start your external components can automatically be provided by the...is required. 2. CableCARD slot. NOTE: 1. After the CableCARD is not authorized for 12 additional CableCARD information. Rear Panel Connections First time use ¾ TV AS CENTER (INPUTS 1-4) These jacks are for limited viewing uses only. Digital Cable CABLE Apparatus Claims of the...
... cable channels. The CableCARD will provide this service is for this connection, your cable service. IMPORTANT: Please read the "Lamp Power Control" feature on the screen (you will allow you to start your external components can automatically be provided by the...is required. 2. CableCARD slot. NOTE: 1. After the CableCARD is not authorized for 12 additional CableCARD information. Rear Panel Connections First time use ¾ TV AS CENTER (INPUTS 1-4) These jacks are for limited viewing uses only. Digital Cable CABLE Apparatus Claims of the...

Owners Guide
Page 19
... for each of the external components you can use Connecting External Video Sources Your HITACHI LCD Rear Projection Television is setup, it allows your IR Mouse connector to control your equipment using your HITACHI LCD Rear PTV Remote Control. The correct codes must be used to highlight the SET AV...Box, DVD, etc.). ACCESS THE AV NET SETUP WIZARD Press the MENU button. 5. Video Audio TV Guide On Screen Channel Manager Locks Timers Setup Move SEL Select Setup Menu Preference Lamp Power Control Set The Inputs Set AV NET Set Closed Captions Set Monitor Out Upgrades Quick Start ...
... for each of the external components you can use Connecting External Video Sources Your HITACHI LCD Rear Projection Television is setup, it allows your IR Mouse connector to control your equipment using your HITACHI LCD Rear PTV Remote Control. The correct codes must be used to highlight the SET AV...Box, DVD, etc.). ACCESS THE AV NET SETUP WIZARD Press the MENU button. 5. Video Audio TV Guide On Screen Channel Manager Locks Timers Setup Move SEL Select Setup Menu Preference Lamp Power Control Set The Inputs Set AV NET Set Closed Captions Set Monitor Out Upgrades Quick Start ...

Owners Guide
Page 39
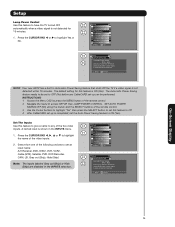
Press EXIT on your HITACHI LCD Rear Projection TV. 2. This part of the On-Screen Display menu. Video Audio TV Guide On Screen Channel Manager Locks Timers Setup Move SEL Select This part of the screen shows which selections are available. Press the CURSOR buttons ... Remote Control buttons to quickly exit from a menu. Press MENU on the remote control to display the different features on the remote control to use. Lamp Temp Power On-Screen Display 39 On-Screen Display 1.
Press EXIT on your HITACHI LCD Rear Projection TV. 2. This part of the On-Screen Display menu. Video Audio TV Guide On Screen Channel Manager Locks Timers Setup Move SEL Select This part of the screen shows which selections are available. Press the CURSOR buttons ... Remote Control buttons to quickly exit from a menu. Press MENU on the remote control to display the different features on the remote control to use. Lamp Temp Power On-Screen Display 39 On-Screen Display 1.
Owners Guide
Page 40
...Audio Source Internal Speakers Auto Noise Cancel Perfect Volume Loudness Language Digital Output DRC Adjust the treble. Select internal or external speakers. TV Ratings Block various types of movies and television programming based on motion picture ratings. Choose the Reset Video settings. Canadian Ratings (FRN...Set the Clock Set Sleep Timer Set Day/Night Timer Set Clock Settings. Set Sleep Timer intervals (30 min. Setup Menu Preference Lamp Power Control Set The Inputs Set AV NET Set Closed Captions Set Monitor Out Upgrades Quick Start Up Choose English, French, or ...
...Audio Source Internal Speakers Auto Noise Cancel Perfect Volume Loudness Language Digital Output DRC Adjust the treble. Select internal or external speakers. TV Ratings Block various types of movies and television programming based on motion picture ratings. Choose the Reset Video settings. Canadian Ratings (FRN...Set the Clock Set Sleep Timer Set Day/Night Timer Set Clock Settings. Set Sleep Timer intervals (30 min. Setup Menu Preference Lamp Power Control Set The Inputs Set AV NET Set Closed Captions Set Monitor Out Upgrades Quick Start Up Choose English, French, or ...

Owners Guide
Page 74
... ̈ to be seen behind menu screen), or select SHADED for the first time. 1. Video Audio TV Guide On Screen Channel Manager Locks Timers Setup Move SEL Select Setup Menu Preference or Lamp Power Control Set The Inputs Set AV NET Set Closed Captions Set Monitor Out Upgrades Quick Start Up... Move SEL Set Menu Preference This feature will allow you to select any one of your TV up for a light background. Setup Menu Preference Lamp Power Control Set The Inputs Set AV NET Set Closed Captions Set Monitor Out Upgrades Quick Start Up Move SEL Set...
... ̈ to be seen behind menu screen), or select SHADED for the first time. 1. Video Audio TV Guide On Screen Channel Manager Locks Timers Setup Move SEL Select Setup Menu Preference or Lamp Power Control Set The Inputs Set AV NET Set Closed Captions Set Monitor Out Upgrades Quick Start Up... Move SEL Set Menu Preference This feature will allow you to select any one of your TV up for a light background. Setup Menu Preference Lamp Power Control Set The Inputs Set AV NET Set Closed Captions Set Monitor Out Upgrades Quick Start Up Move SEL Set...
Owners Guide
Page 75
...The Inputs Set AV NET Set Closed Captions Set Monitor Out Upgrades Quick Start Up Move SEL Set Setup Lamp Power Control or Automatic Power Saving Yes No Select yes to have the TV turn off automatically when a video signal is not detected within 15 minutes. SET AUTO POWER SAVING OFF... (No) using the Cursor and the SELECT buttons of the video inputs. 2. Setup Lamp Power Control Use this feature to have the TV turned OFF automatically when a video signal is not detected for this feature is ON (Yes). The Automatic Power Saving feature ...
...The Inputs Set AV NET Set Closed Captions Set Monitor Out Upgrades Quick Start Up Move SEL Set Setup Lamp Power Control or Automatic Power Saving Yes No Select yes to have the TV turn off automatically when a video signal is not detected within 15 minutes. SET AUTO POWER SAVING OFF... (No) using the Cursor and the SELECT buttons of the video inputs. 2. Setup Lamp Power Control Use this feature to have the TV turned OFF automatically when a video signal is not detected for this feature is ON (Yes). The Automatic Power Saving feature ...

Owners Guide
Page 76
... AUTO LINK is convenient when you want to control your external Audio/Video equipment using your HITACHI LCD Rear PTV Remote Control. To do this feature to record a movie with your choice. Set ...is pressed. If no remote control button is pressed after three hours. When AUTO is selected, the TV will turn on and tune to Input 4. 1. Press the SELECT button to highlight SET AV NET ...feature. Use the CURSOR PAD ̄ or CHANNEL WHEEL to select. 4. Setup Menu Preference Lamp Power Control or Set The Inputs Set AV NET Set Closed Captions Set Monitor Out Upgrades Quick ...
... AUTO LINK is convenient when you want to control your external Audio/Video equipment using your HITACHI LCD Rear PTV Remote Control. To do this feature to record a movie with your choice. Set ...is pressed. If no remote control button is pressed after three hours. When AUTO is selected, the TV will turn on and tune to Input 4. 1. Press the SELECT button to highlight SET AV NET ...feature. Use the CURSOR PAD ̄ or CHANNEL WHEEL to select. 4. Setup Menu Preference Lamp Power Control or Set The Inputs Set AV NET Set Closed Captions Set Monitor Out Upgrades Quick ...

Owners Guide
Page 84
... SURF is not possible. Digital Captions Font Style are sometimes different from the Font Style of digital closed captions will not be available with this TV. 2. Use the CURSOR PAD ̇, ̈, ̆ or ̄ to highlight and select the function to previous menu. Press EXIT to quit menu or ...CURSOR PAD ̇ to return to change. 2. Setup Menu Preference Lamp Power Control Set The Inputs Set AV NET Set Closed Captions Set Monitor Out Upgrades Quick Start Up Move SEL Set Setup Set Closed Captions...
... SURF is not possible. Digital Captions Font Style are sometimes different from the Font Style of digital closed captions will not be available with this TV. 2. Use the CURSOR PAD ̇, ̈, ̆ or ̄ to highlight and select the function to previous menu. Press EXIT to quit menu or ...CURSOR PAD ̇ to return to change. 2. Setup Menu Preference Lamp Power Control Set The Inputs Set AV NET Set Closed Captions Set Monitor Out Upgrades Quick Start Up Move SEL Set Setup Set Closed Captions...

Owners Guide
Page 87
...3. Quick Start Up This feature will cancel the upgrade. Digital signals often change and this happens, repeat the upgrade procedure. Setup Menu Preference Lamp Power Control Set The Inputs Set AV NET Set Closed Captions Set Monitor Out Upgrades Quick Start Up Move SEL Set Setup Upgrades or Software... at 1st turn on. Set this feature to ON to have the TV tune channels (both Analog and Digital) quickly when first turning the TV on . Selecting ON for your TV, HITACHI will activate the TV tuners circuits when the TV is in "standby mode" which is commonly referred to channels when first...
...3. Quick Start Up This feature will cancel the upgrade. Digital signals often change and this happens, repeat the upgrade procedure. Setup Menu Preference Lamp Power Control Set The Inputs Set AV NET Set Closed Captions Set Monitor Out Upgrades Quick Start Up Move SEL Set Setup Upgrades or Software... at 1st turn on. Set this feature to ON to have the TV tune channels (both Analog and Digital) quickly when first turning the TV on . Selecting ON for your TV, HITACHI will activate the TV tuners circuits when the TV is in "standby mode" which is commonly referred to channels when first...
Owners Guide
Page 88
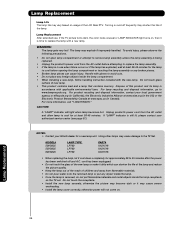
...HITACHI." Using other lamps may cause damage to cool for a new lamp unit. Lamp Replacement After extended use, if the TV picture turns dark, the color looks unusual or LAMP INDICATOR light turns on usage of the LCD Rear PTV. For lamp recycling and disposal information, go to replace the lamp with the new lamp. If "LAMP... water onto the removed lamp or put flammable materials and metal objects inside the lamp compartment. • When installing a new lamp, follow handling instruction included with a new lamp. MODEL# 50VG825 55VG825 60VG825 LAMP TYPE LP700 LP700 LP700 PART...
...HITACHI." Using other lamps may cause damage to cool for a new lamp unit. Lamp Replacement After extended use, if the TV picture turns dark, the color looks unusual or LAMP INDICATOR light turns on usage of the LCD Rear PTV. For lamp recycling and disposal information, go to replace the lamp with the new lamp. If "LAMP... water onto the removed lamp or put flammable materials and metal objects inside the lamp compartment. • When installing a new lamp, follow handling instruction included with a new lamp. MODEL# 50VG825 55VG825 60VG825 LAMP TYPE LP700 LP700 LP700 PART...

Owners Guide
Page 89
Lamp Replacement Lamp Compartment 89 Wait at least 30~45 minutes to allow the lamp to cool before proceeding with lamp removal. 2. Locate the Lamp Compartment on the left side of the LCD TV. Turn off the main power switch and unplug the power cord. 120V Lamp Temp Power CAUTION: The lamp is very hot and may cause fire or severe burns. Lamp Replacement Lamp Replacement 1.
Lamp Replacement Lamp Compartment 89 Wait at least 30~45 minutes to allow the lamp to cool before proceeding with lamp removal. 2. Locate the Lamp Compartment on the left side of the LCD TV. Turn off the main power switch and unplug the power cord. 120V Lamp Temp Power CAUTION: The lamp is very hot and may cause fire or severe burns. Lamp Replacement Lamp Replacement 1.

Owners Guide
Page 90
... to your may not operate correctly. HANDLE LAMP UNIT REMOVE SCREWS HANDLE 5. If they are loose, the TV may get burned. Wait at least 30~45 minutes to allow the lamp to cool before proceeding with the new lamp. SCREW PHILLIPS HEAD SCREW DRIVER LAMP COVER CAUTION: The lamp is removed, your fingers. This may cause...
... to your may not operate correctly. HANDLE LAMP UNIT REMOVE SCREWS HANDLE 5. If they are loose, the TV may get burned. Wait at least 30~45 minutes to allow the lamp to cool before proceeding with the new lamp. SCREW PHILLIPS HEAD SCREW DRIVER LAMP COVER CAUTION: The lamp is removed, your fingers. This may cause...

Owners Guide
Page 91
... cause unusual colors. For more information, call "1-800-Hitachi". 91 Useful Information PHILLIPS HEAD SCREW DRIVER LAMP COMPARTMENT NOTE: If power is installed, the power will be off and the Lamp Indicator will flash (see page 9). 7. For lamp recycling and disposal information, go to install the lamp cover by re-engaging the two clips and...
... cause unusual colors. For more information, call "1-800-Hitachi". 91 Useful Information PHILLIPS HEAD SCREW DRIVER LAMP COMPARTMENT NOTE: If power is installed, the power will be off and the Lamp Indicator will flash (see page 9). 7. For lamp recycling and disposal information, go to install the lamp cover by re-engaging the two clips and...

Owners Guide
Page 95
... leads or connecting several sets to a considerable distance. 95 Useful Information GHOSTS: Ghosts are caused by interference from automobile ignition systems, neon lamps, electrical drills, ghosting of a television station where the signal is extremely weak, it may be caused by interference from automobile ignition systems, neon... Problems IGNITION NOISE: Black spots or horizontal streaks may appear, picture may improve reception. This is located in the picture. NOTE: The TV set to the same antenna without using an antenna, weak signals will display a black screen.
... leads or connecting several sets to a considerable distance. 95 Useful Information GHOSTS: Ghosts are caused by interference from automobile ignition systems, neon lamps, electrical drills, ghosting of a television station where the signal is extremely weak, it may be caused by interference from automobile ignition systems, neon... Problems IGNITION NOISE: Black spots or horizontal streaks may appear, picture may improve reception. This is located in the picture. NOTE: The TV set to the same antenna without using an antenna, weak signals will display a black screen.

Owners Guide
Page 101
... 21-38 Programming Codes 31-38 Installing Batteries 4 S Sharpness 41 Speakers 14 T Timers 72-73 Time 72 Tint 41 Treble 44 Troubleshooting 93-94 TV Guide On Screen 47-64 Troubleshooting 93-94 U Upgrades 87 V Video Settings 41-43 Volume 7, 27 Index 101 Index A Accessories 4 Antennas (Connecting... 41 Contrast Mode 42 D Date 72 Daylight Saving Correction 72 G Guide Button 7, 24 H HDMI 11, 13, 17 I Input button 7, 24 L Lamp Replacement 88-91 Language Menu Language 74 Audio Language 46 Locks Change Access Code 67 Channel Lock 67 Front Panel Lock 67 Movie Ratings 68...
... 21-38 Programming Codes 31-38 Installing Batteries 4 S Sharpness 41 Speakers 14 T Timers 72-73 Time 72 Tint 41 Treble 44 Troubleshooting 93-94 TV Guide On Screen 47-64 Troubleshooting 93-94 U Upgrades 87 V Video Settings 41-43 Volume 7, 27 Index 101 Index A Accessories 4 Antennas (Connecting... 41 Contrast Mode 42 D Date 72 Daylight Saving Correction 72 G Guide Button 7, 24 H HDMI 11, 13, 17 I Input button 7, 24 L Lamp Replacement 88-91 Language Menu Language 74 Audio Language 46 Locks Change Access Code 67 Channel Lock 67 Front Panel Lock 67 Movie Ratings 68...


