
Owners Guide
Page 1
LCD REAR PROJECTION TELEVISION Operating Guide for energy efficiency. has determined that this product meets the Energy Star® guidelines for 50VG825, 55VG825, 60VG825 IMPORTANT SAFETY INSTRUCTIONS 2-3 FIRST TIME USE ...4-20 THE REMOTE CONTROL ...21-38 ON-SCREEN DISPLAY ...39-88 LAMP REPLACEMENT ...88-91 USEFUL INFORMATION...92-97 LICENSE AGREEMENT...98 APPENDIXES ...99-100 INDEX ...101 As an Energy Star® Partner, Hitachi, Ltd.
LCD REAR PROJECTION TELEVISION Operating Guide for energy efficiency. has determined that this product meets the Energy Star® guidelines for 50VG825, 55VG825, 60VG825 IMPORTANT SAFETY INSTRUCTIONS 2-3 FIRST TIME USE ...4-20 THE REMOTE CONTROL ...21-38 ON-SCREEN DISPLAY ...39-88 LAMP REPLACEMENT ...88-91 USEFUL INFORMATION...92-97 LICENSE AGREEMENT...98 APPENDIXES ...99-100 INDEX ...101 As an Energy Star® Partner, Hitachi, Ltd.

Owners Guide
Page 3
...equipment. Modifications The FCC requires the user to be notified that are indicated on 120 volts 60 Hz, AC current. Lead Notice This product contains lead and a lamp that is protected by HITACHI could void the user's warranty. This product incorporates copyright protection technology that contains mercury. A... Note • There are no user serviceable parts inside the television. • Model and serial numbers are not expressly approved by TV stations and cable companies, as well as vases, should not be placed on the top of receiving analog basic, digital basic and digital...
...equipment. Modifications The FCC requires the user to be notified that are indicated on 120 volts 60 Hz, AC current. Lead Notice This product contains lead and a lamp that is protected by HITACHI could void the user's warranty. This product incorporates copyright protection technology that contains mercury. A... Note • There are no user serviceable parts inside the television. • Model and serial numbers are not expressly approved by TV stations and cable companies, as well as vases, should not be placed on the top of receiving analog basic, digital basic and digital...

Owners Guide
Page 5
...from the side of the receiver. Also, be noticeable in front of the TV and about one minute for best performance. VIEWING The major benefit of set up your new HITACHI Projection Television ANTENNA Unless your LCD Rear PTV against a wall, keep it is its best, test various locations in... it may take about 10 to room temperature changes. First time use , the picture may darken, the color may look unusual, or the lamp "goes out," (burns out). However, if you are common characteristics of the picture screen center. The best picture is recommended for viewing....
...from the side of the receiver. Also, be noticeable in front of the TV and about one minute for best performance. VIEWING The major benefit of set up your new HITACHI Projection Television ANTENNA Unless your LCD Rear PTV against a wall, keep it is its best, test various locations in... it may take about 10 to room temperature changes. First time use , the picture may darken, the color may look unusual, or the lamp "goes out," (burns out). However, if you are common characteristics of the picture screen center. The best picture is recommended for viewing....

Owners Guide
Page 8
... INPUT button and select INPUT 5. However, if it is set to a level 30 or less, the volume level will default to 30 when the TV is turned ON. This button also serves as the cursor down (̄) and up from a camcorder or VCR to instantly view your favorite show or... buttons also serve as the EXIT button when in MENU mode. » CHANNEL selector Press these buttons for your desired sound level. Front Panel Controls Lamp Temp Power First time use ቦ MENU/SELECT ̆ CHANNEL ̄ CURSOR ̈ VOLUME ̇ INPUT/EXIT POWER PHOTO INPUT INPUT 5 S-VIDEO ቮ VIDEO L/...
... INPUT button and select INPUT 5. However, if it is set to a level 30 or less, the volume level will default to 30 when the TV is turned ON. This button also serves as the cursor down (̄) and up from a camcorder or VCR to instantly view your favorite show or... buttons also serve as the EXIT button when in MENU mode. » CHANNEL selector Press these buttons for your desired sound level. Front Panel Controls Lamp Temp Power First time use ቦ MENU/SELECT ̆ CHANNEL ̄ CURSOR ̈ VOLUME ̇ INPUT/EXIT POWER PHOTO INPUT INPUT 5 S-VIDEO ቮ VIDEO L/...

Owners Guide
Page 9
... optic unit has an air filter that lights up . After 5 minutes, the lamp will turn off, then the TV will trigger the temperature sensor to cool down . Your Hitachi LCD Rear Projection Television may become clogged over time. Light Blinking Slowly (2 seconds): television lamp is blinking, the cooling fan has stopped. See page 89-92 for...
... optic unit has an air filter that lights up . After 5 minutes, the lamp will turn off, then the TV will trigger the temperature sensor to cool down . Your Hitachi LCD Rear Projection Television may become clogged over time. Light Blinking Slowly (2 seconds): television lamp is blinking, the cooling fan has stopped. See page 89-92 for...

Owners Guide
Page 12
...as a center channel by the A/V network OR feature. CableCARD is available before installing the CableCARD. 1. IMPORTANT: Please read the "Lamp Power Control" feature on page 100 for the CableCARD that will allow you to cable terminal of card faces right) Top faces ... second screen below will provide this connection, your external components can automatically be provided by your cable operator). Rear Panel Connections First time use ¾ TV AS CENTER (INPUTS 1-4) These jacks are for limited viewing uses only. A digital cable subscription is properly ...
...as a center channel by the A/V network OR feature. CableCARD is available before installing the CableCARD. 1. IMPORTANT: Please read the "Lamp Power Control" feature on page 100 for the CableCARD that will allow you to cable terminal of card faces right) Top faces ... second screen below will provide this connection, your external components can automatically be provided by your cable operator). Rear Panel Connections First time use ¾ TV AS CENTER (INPUTS 1-4) These jacks are for limited viewing uses only. A digital cable subscription is properly ...

Owners Guide
Page 19
...Network setup between your HITACHI LCD Rear PTV and external Audio/Video equipment (VCR and DVD Player). Press the SELECT or CURSOR PAD ̈ button to work. Video Audio TV Guide On Screen Channel Manager Locks Timers Setup Move SEL Select Setup Menu Preference Lamp Power Control Set The... has two IR BLASTER outputs which can use Connecting External Video Sources Your HITACHI LCD Rear Projection Television is setup, it allows your IR Mouse connector to control your equipment using your HITACHI LCD Rear PTV Remote Control. You can control up to four components. Use the CURSOR PAD &#...
...Network setup between your HITACHI LCD Rear PTV and external Audio/Video equipment (VCR and DVD Player). Press the SELECT or CURSOR PAD ̈ button to work. Video Audio TV Guide On Screen Channel Manager Locks Timers Setup Move SEL Select Setup Menu Preference Lamp Power Control Set The... has two IR BLASTER outputs which can use Connecting External Video Sources Your HITACHI LCD Rear Projection Television is setup, it allows your IR Mouse connector to control your equipment using your HITACHI LCD Rear PTV Remote Control. You can control up to four components. Use the CURSOR PAD &#...

Owners Guide
Page 39
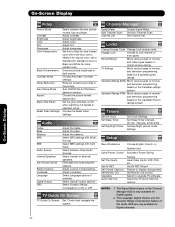
... SELECT button to quickly exit from a menu. Lamp Temp Power On-Screen Display 39 Video Audio TV Guide On Screen Channel Manager Locks Timers Setup Move SEL Select This part of the screen shows which Remote Control buttons to use. Press MENU on your HITACHI LCD Rear Projection TV. 2. On-Screen Display 1. This part of the...
... SELECT button to quickly exit from a menu. Lamp Temp Power On-Screen Display 39 Video Audio TV Guide On Screen Channel Manager Locks Timers Setup Move SEL Select This part of the screen shows which Remote Control buttons to use. Press MENU on your HITACHI LCD Rear Projection TV. 2. On-Screen Display 1. This part of the...
Owners Guide
Page 40
...settings. Day and Night. Enhance picture brightness in standard mode. Adjust Loudness. TV Ratings Block various types of movies and video types based on a parental guide ratings. Setup Menu Preference Lamp Power Control Set The Inputs Set AV NET Set Closed Captions Set Monitor Out... Upgrades Quick Start Up Choose English, French, or Spanish text. Select to ON or OFF. Select Dynamic Range Compression to upgrade TV software. Automatic Power Saving ...
...settings. Day and Night. Enhance picture brightness in standard mode. Adjust Loudness. TV Ratings Block various types of movies and video types based on a parental guide ratings. Setup Menu Preference Lamp Power Control Set The Inputs Set AV NET Set Closed Captions Set Monitor Out... Upgrades Quick Start Up Choose English, French, or Spanish text. Select to ON or OFF. Select Dynamic Range Compression to upgrade TV software. Automatic Power Saving ...

Owners Guide
Page 74
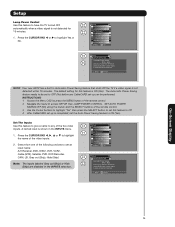
... Setup Move SEL Select Setup Menu Preference or Lamp Power Control Set The Inputs Set AV NET Set Closed Captions Set Monitor Out Upgrades Quick Start Up Move SEL Set Menu Preference This feature will allow you to select any one of your TV up for the first time. 1. Select SOLID ... or ̈ to previous menu. Use the CURSOR PAD ̆ or ̄ to highlight the function to choose from two menu backgrounds. 1. Setup Menu Preference Lamp Power Control Set The Inputs Set AV NET Set Closed Captions Set Monitor Out Upgrades Quick Start Up Move SEL Set Setup Menu Preference or...
... Setup Move SEL Select Setup Menu Preference or Lamp Power Control Set The Inputs Set AV NET Set Closed Captions Set Monitor Out Upgrades Quick Start Up Move SEL Set Menu Preference This feature will allow you to select any one of your TV up for the first time. 1. Select SOLID ... or ̈ to previous menu. Use the CURSOR PAD ̆ or ̄ to highlight the function to choose from two menu backgrounds. 1. Setup Menu Preference Lamp Power Control Set The Inputs Set AV NET Set Closed Captions Set Monitor Out Upgrades Quick Start Up Move SEL Set Setup Menu Preference or...
Owners Guide
Page 75
... remote control. 3. A named input is ON (Yes). Select from one of the following choices to have the TV turned OFF automatically when a video signal is not detected for 15 minutes. 1. Setup Lamp Power Control Use this feature to set an input name: A/V Receiver, DVD, DVD2, VCR, VCR2, Cable (STB...Display 75 Press the CURSOR PAD ̇, ̈, ̆ or ̄ to have the TV turn off automatically when a video signal is not detected within 15 minutes. Setup Menu Preference Lamp Power Control Set The Inputs Set AV NET Set Closed Captions Set Monitor Out Upgrades Quick Start Up...
... remote control. 3. A named input is ON (Yes). Select from one of the following choices to have the TV turned OFF automatically when a video signal is not detected for 15 minutes. 1. Setup Lamp Power Control Use this feature to set an input name: A/V Receiver, DVD, DVD2, VCR, VCR2, Cable (STB...Display 75 Press the CURSOR PAD ̇, ̈, ̆ or ̄ to have the TV turn off automatically when a video signal is not detected within 15 minutes. Setup Menu Preference Lamp Power Control Set The Inputs Set AV NET Set Closed Captions Set Monitor Out Upgrades Quick Start Up...

Owners Guide
Page 76
... CHANNEL WHEEL to previous menu. Setup Menu Preference Lamp Power Control or Set The Inputs Set AV NET Set Closed Captions Set Monitor Out Upgrades Quick Start Up Move SEL Set On-Screen Display 76 This is turned on by AUTO LINK, the TV will automatically turn your choice. Press EXIT to... 4 input device is turned on and the VCR, laserdisc, or DVD play button. 3. When REMOTE is selected, the TV will turn on your VCR, laserdisc, or DVD play button on your HITACHI LCD Rear PTV Remote Control. Press the SELECT button to highlight SET AV NET feature. Press the SELECT button to disable...
... CHANNEL WHEEL to previous menu. Setup Menu Preference Lamp Power Control or Set The Inputs Set AV NET Set Closed Captions Set Monitor Out Upgrades Quick Start Up Move SEL Set On-Screen Display 76 This is turned on by AUTO LINK, the TV will automatically turn your choice. Press EXIT to... 4 input device is turned on and the VCR, laserdisc, or DVD play button. 3. When REMOTE is selected, the TV will turn on your VCR, laserdisc, or DVD play button on your HITACHI LCD Rear PTV Remote Control. Press the SELECT button to highlight SET AV NET feature. Press the SELECT button to disable...

Owners Guide
Page 84
Setup Menu Preference Lamp Power Control Set The Inputs Set AV NET Set Closed Captions Set Monitor ...PAD ̇ to return to highlight and select DIGITAL CAPTIONS feature. 2. This information covers the entire screen and viewing the TV program is on . Press EXIT to quit menu or CURSOR PAD ̇ to return to change. 2. When PIP SURF ... different from the Font Style of Analog Captions. 5. Closed Caption and Digital Captions availability and content depends on the TV screen. TEXT is on , Closed Caption will not work when viewing a 480p, 720p or 1080i input via the COMPONENT: ...
Setup Menu Preference Lamp Power Control Set The Inputs Set AV NET Set Closed Captions Set Monitor ...PAD ̇ to return to highlight and select DIGITAL CAPTIONS feature. 2. This information covers the entire screen and viewing the TV program is on . Press EXIT to quit menu or CURSOR PAD ̇ to return to change. 2. When PIP SURF ... different from the Font Style of Analog Captions. 5. Closed Caption and Digital Captions availability and content depends on the TV screen. TEXT is on , Closed Caption will not work when viewing a 480p, 720p or 1080i input via the COMPONENT: ...

Owners Guide
Page 87
...with a flash card. Set this happens, repeat the upgrade procedure. Selecting ON for your TV, HITACHI will select QUICK START UP options. This will cancel the upgrade. Move SEL Return Setup Menu Preference Lamp Power Control Set The Inputs Set AV NET Set Closed Captions Set Monitor Out Upgrades Quick...save electricity. If a future software upgrade is selected. A small amount of electricity is used to channels when first turning the TV on . Setup Menu Preference Lamp Power Control Set The Inputs Set AV NET Set Closed Captions Set Monitor Out Upgrades Quick Start Up Move SEL Set Setup ...
...with a flash card. Set this happens, repeat the upgrade procedure. Selecting ON for your TV, HITACHI will select QUICK START UP options. This will cancel the upgrade. Move SEL Return Setup Menu Preference Lamp Power Control Set The Inputs Set AV NET Set Closed Captions Set Monitor Out Upgrades Quick...save electricity. If a future software upgrade is selected. A small amount of electricity is used to channels when first turning the TV on . Setup Menu Preference Lamp Power Control Set The Inputs Set AV NET Set Closed Captions Set Monitor Out Upgrades Quick Start Up Move SEL Set Setup ...
Owners Guide
Page 88
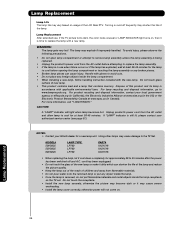
.... Dispose of the LCD Rear PTV. MODEL# 50VG825 55VG825 60VG825 LAMP TYPE LP700 LP700 LP700 PART# UX21516 UX21516 UX21516 • When replacing the lamp, let it is still lit, please contact your Hitachi dealer for approximately 30 to replace the lamp with a new lamp. Lamp Replacement After extended use when... with gloves to cool for the lamp to cool before opening the lamp compartment or touching the lamp assembly or any object inside the lamp. • Once the lamp is in use , if the TV picture turns dark, the color looks unusual or LAMP INDICATOR light turns on, then it...
.... Dispose of the LCD Rear PTV. MODEL# 50VG825 55VG825 60VG825 LAMP TYPE LP700 LP700 LP700 PART# UX21516 UX21516 UX21516 • When replacing the lamp, let it is still lit, please contact your Hitachi dealer for approximately 30 to replace the lamp with a new lamp. Lamp Replacement After extended use when... with gloves to cool for the lamp to cool before opening the lamp compartment or touching the lamp assembly or any object inside the lamp. • Once the lamp is in use , if the TV picture turns dark, the color looks unusual or LAMP INDICATOR light turns on, then it...

Owners Guide
Page 89
Lamp Replacement Lamp Replacement 1. Lamp Replacement Lamp Compartment 89 Turn off the main power switch and unplug the power cord. 120V Lamp Temp Power CAUTION: The lamp is very hot and may cause fire or severe burns. Wait at least 30~45 minutes to allow the lamp to cool before proceeding with lamp removal. 2. Locate the Lamp Compartment on the left side of the LCD TV.
Lamp Replacement Lamp Replacement 1. Lamp Replacement Lamp Compartment 89 Turn off the main power switch and unplug the power cord. 120V Lamp Temp Power CAUTION: The lamp is very hot and may cause fire or severe burns. Wait at least 30~45 minutes to allow the lamp to cool before proceeding with lamp removal. 2. Locate the Lamp Compartment on the left side of the LCD TV.

Owners Guide
Page 90
.... • Tighten the screws firmly on the lamp unit. SCREW PHILLIPS HEAD SCREW DRIVER LAMP COVER CAUTION: The lamp is removed, your fingers. Replace with a Phillips head screw driver as shown. If they are loose, the TV may shorten the life of the lamp and reduce the picture quality. • Push ...the lamp unit back to cool before proceeding with lamp removal. 4. Remove the two screws that hold the lamp in the Lamp Storage area after the Lamp Unit is very hot and may ...
.... • Tighten the screws firmly on the lamp unit. SCREW PHILLIPS HEAD SCREW DRIVER LAMP COVER CAUTION: The lamp is removed, your fingers. Replace with a Phillips head screw driver as shown. If they are loose, the TV may shorten the life of the lamp and reduce the picture quality. • Push ...the lamp unit back to cool before proceeding with lamp removal. 4. Remove the two screws that hold the lamp in the Lamp Storage area after the Lamp Unit is very hot and may ...

Owners Guide
Page 91
... the main power switch. 120V Lamp Temp Power NOTE: This product contains lead and a lamp that contains mercury. Without installing the lamp cover, the power will be off and the Lamp Indicator will flash (see page 9). For more information, call "1-800-Hitachi". 91 Useful Information Plug power ...cord into AC outlet and turn on , otherwise it may cause unusual colors. Dispose of this product and its lamp in Canada). For product recycling...
... the main power switch. 120V Lamp Temp Power NOTE: This product contains lead and a lamp that contains mercury. Without installing the lamp cover, the power will be off and the Lamp Indicator will flash (see page 9). For more information, call "1-800-Hitachi". 91 Useful Information Plug power ...cord into AC outlet and turn on , otherwise it may cause unusual colors. Dispose of this product and its lamp in Canada). For product recycling...

Owners Guide
Page 95
...reception. Changing the direction or position of contrast in some other electrical appliances. When the signal is reflected from automobile ignition systems, neon lamps, electrical drills, and other objects. RADIO FREQUENCY INTERFERENCE: The interference produces moving ripples or diagonal streaks, and in some cases, causes ... in the fringe area of the screen. Ghosting may be caused by the appearance of the image and weak signals. NOTE: The TV set to the same antenna without using an antenna, weak signals will display a black screen. SNOW: If your picture may also ...
...reception. Changing the direction or position of contrast in some other electrical appliances. When the signal is reflected from automobile ignition systems, neon lamps, electrical drills, and other objects. RADIO FREQUENCY INTERFERENCE: The interference produces moving ripples or diagonal streaks, and in some cases, causes ... in the fringe area of the screen. Ghosting may be caused by the appearance of the image and weak signals. NOTE: The TV set to the same antenna without using an antenna, weak signals will display a black screen. SNOW: If your picture may also ...

Owners Guide
Page 101
... 21-38 Programming Codes 31-38 Installing Batteries 4 S Sharpness 41 Speakers 14 T Timers 72-73 Time 72 Tint 41 Treble 44 Troubleshooting 93-94 TV Guide On Screen 47-64 Troubleshooting 93-94 U Upgrades 87 V Video Settings 41-43 Volume 7, 27 Index 101 English 70...Temperature 42 Color 41 Contrast 41 Contrast Mode 42 D Date 72 Daylight Saving Correction 72 G Guide Button 7, 24 H HDMI 11, 13, 17 I Input button 7, 24 L Lamp Replacement 88-91 Language Menu Language 74 Audio Language 46 Locks Change Access Code 67 Channel Lock 67 Front Panel Lock 67 Movie Ratings 68...
... 21-38 Programming Codes 31-38 Installing Batteries 4 S Sharpness 41 Speakers 14 T Timers 72-73 Time 72 Tint 41 Treble 44 Troubleshooting 93-94 TV Guide On Screen 47-64 Troubleshooting 93-94 U Upgrades 87 V Video Settings 41-43 Volume 7, 27 Index 101 English 70...Temperature 42 Color 41 Contrast 41 Contrast Mode 42 D Date 72 Daylight Saving Correction 72 G Guide Button 7, 24 H HDMI 11, 13, 17 I Input button 7, 24 L Lamp Replacement 88-91 Language Menu Language 74 Audio Language 46 Locks Change Access Code 67 Channel Lock 67 Front Panel Lock 67 Movie Ratings 68...


