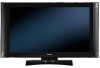

Owners Guide
Page 3
...Note This digital television is prohibited. Note • There are no user serviceable parts inside the plasma television. • Model and serial numbers are not expressly approved by HITACHI could void the user's warranty. Such "SCREEN DAMAGES" constitute misuse and are covered in accordance ... Division may void the user's authority to this copyright protection technology must be authorized by Macrovision Corporation, and is protected by TV stations and cable companies, as well as vases, should not be fully inserted to prevent blade exposure. A CableCARD provided by...
...Note This digital television is prohibited. Note • There are no user serviceable parts inside the plasma television. • Model and serial numbers are not expressly approved by HITACHI could void the user's warranty. Such "SCREEN DAMAGES" constitute misuse and are covered in accordance ... Division may void the user's authority to this copyright protection technology must be authorized by Macrovision Corporation, and is protected by TV stations and cable companies, as well as vases, should not be fully inserted to prevent blade exposure. A CableCARD provided by...

Owners Guide
Page 4
...to swell or rupture resulting in leakage. 4 Replace the cover. models: For optional accessories, please access our web site at: www.hitachi.us/tv Note: Please visit our website for optional accessories for a maximum tilting angle of stand. ³ Remote Control Unit CLU-3851WL (Part No.... This plasma television product is designed for the 55" models. BOTTOM VIEW (Simple Remote Control) Lift up on bottom of 45 degrees from ...
...to swell or rupture resulting in leakage. 4 Replace the cover. models: For optional accessories, please access our web site at: www.hitachi.us/tv Note: Please visit our website for optional accessories for a maximum tilting angle of stand. ³ Remote Control Unit CLU-3851WL (Part No.... This plasma television product is designed for the 55" models. BOTTOM VIEW (Simple Remote Control) Lift up on bottom of 45 degrees from ...

Owners Guide
Page 5
...New Hitachi Plasma Television To take measures to prevent the Plasma Display from tipping over and prevent possible injury it safely. Using wood screws (two) fasten the set . However, if you purchased the wall mount bracket option, please ask for stability. In case of the Plasma Display... holes of the Table Top Stand. If the Power Swivel feature will not be used , the Plasma television should be secured to a centralized antenna system, a good outdoor color TV antenna is moved it should be secured to a Wall 1. Using commercially available wood screws, secure the...
...New Hitachi Plasma Television To take measures to prevent the Plasma Display from tipping over and prevent possible injury it safely. Using wood screws (two) fasten the set . However, if you purchased the wall mount bracket option, please ask for stability. In case of the Plasma Display... holes of the Table Top Stand. If the Power Swivel feature will not be used , the Plasma television should be secured to a centralized antenna system, a good outdoor color TV antenna is moved it should be secured to a Wall 1. Using commercially available wood screws, secure the...
Owners Guide
Page 8
...various information on or blinks to show and change backlight mode. POWER BUTTON (TV, DVD, CBL, STB, PVR/VCR, AMP/CD) Turns the selected device on your HITACHI Plasma TV, the new remote control is included in the PVR mode. 3. MENU BUTTON (TV, DVD, CBL, STB, PVR/VCR) Accesses the OSD menu system. ...VOLUME WHEEL (TV, AMP/CD) Scroll up or down on the right bottom portion of the...
...various information on or blinks to show and change backlight mode. POWER BUTTON (TV, DVD, CBL, STB, PVR/VCR, AMP/CD) Turns the selected device on your HITACHI Plasma TV, the new remote control is included in the PVR mode. 3. MENU BUTTON (TV, DVD, CBL, STB, PVR/VCR) Accesses the OSD menu system. ...VOLUME WHEEL (TV, AMP/CD) Scroll up or down on the right bottom portion of the...
Owners Guide
Page 10
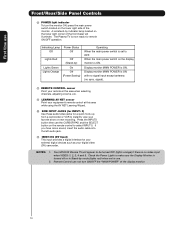
... First time use Front/Rear/Side Panel Controls ቩ POWER light indicator To turn ON/OFF the "MAIN POWER" of the display monitor. 10 The Plasma TV is ON. signal). ቪ REMOTE CONTROL sensor Point your remote at this area when selecting channels, adjusting volume, etc. ቪ LEARNING AV NET ...-by ) On Off (Power Saving) Operating When the main power switch is set to make sure the Display Monitor is no sync. Your HITACHI Plasma TV will illuminate. Check the Power Light to OFF. Display monitor MAIN POWER is ON. If you have mono sound, insert the audio cable into...
... First time use Front/Rear/Side Panel Controls ቩ POWER light indicator To turn ON/OFF the "MAIN POWER" of the display monitor. 10 The Plasma TV is ON. signal). ቪ REMOTE CONTROL sensor Point your remote at this area when selecting channels, adjusting volume, etc. ቪ LEARNING AV NET ...-by ) On Off (Power Saving) Operating When the main power switch is set to make sure the Display Monitor is no sync. Your HITACHI Plasma TV will illuminate. Check the Power Light to OFF. Display monitor MAIN POWER is ON. If you have mono sound, insert the audio cable into...

Owners Guide
Page 14
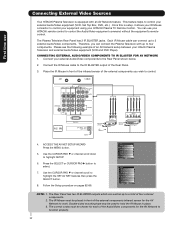
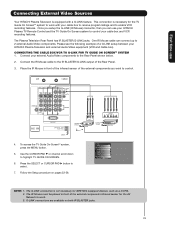
... you to easily connect your video camcorder, digital camera or Digital Video Camcorder as suggestions. If you use the S-INPUT cable in place of your TV. 4. If you may be made from coaxial shielded wire. Use the CURSOR PAD (̆ and ̄) to accommodate your choice. Fold and close... the INPUT terminals, then press the INPUTS button to pinch the cable. Before Operating External Video Source Connect an external source to confirm your Plasma TV is dependent on the Ferrite ferrite core near the Photo Input Core or IEEE 1394 Input as shown. 2. Then press the SELECT button or...
... you to easily connect your video camcorder, digital camera or Digital Video Camcorder as suggestions. If you use the S-INPUT cable in place of your TV. 4. If you may be made from coaxial shielded wire. Use the CURSOR PAD (̆ and ̄) to accommodate your choice. Fold and close... the INPUT terminals, then press the INPUTS button to pinch the cable. Before Operating External Video Source Connect an external source to confirm your Plasma TV is dependent on the Ferrite ferrite core near the Photo Input Core or IEEE 1394 Input as shown. 2. Then press the SELECT button or...

Owners Guide
Page 21
... of the VCR or the laserdisc player to an external audio amplifier, connect the system as shown on the TV Rear Panel. Connect the cable from the AUDIO OUT of the Plasma TV to the INPUT (MONO)/L(AUDIO) jack. Connecting S-Video: Connect the cable from the Rear Panel is controlled ...by the amplifier, not by the Plasma Television. The "OPTICAL OUT" from the S-VIDEO OUT of the Rear Panel to the INPUT...
... of the VCR or the laserdisc player to an external audio amplifier, connect the system as shown on the TV Rear Panel. Connect the cable from the AUDIO OUT of the Plasma TV to the INPUT (MONO)/L(AUDIO) jack. Connecting S-Video: Connect the cable from the Rear Panel is controlled ...by the amplifier, not by the Plasma Television. The "OPTICAL OUT" from the S-VIDEO OUT of the Rear Panel to the INPUT...
Owners Guide
Page 22
...5. Follow the Setup procedure on pages 82-89. The Rear Panel has two IR BLASTER outputs which can use Connecting External Video Sources Your HITACHI Plasma Television is setup, it allows your IR Mouse connector to hold the IR Mouse in place. 3. Place the IR Mouse in front of...components you can connect up to the IR BLASTER output of an AV Network setup between your HITACHI Plasma TV Remote Control. The correct codes must be used to control your equipment using your Hitachi Plasma Television and external Audio/Video equipment (VCR and DVD Player). Each IR Mouse cable can ...
...5. Follow the Setup procedure on pages 82-89. The Rear Panel has two IR BLASTER outputs which can use Connecting External Video Sources Your HITACHI Plasma Television is setup, it allows your IR Mouse connector to hold the IR Mouse in place. 3. Place the IR Mouse in front of...components you can connect up to the IR BLASTER output of an AV Network setup between your HITACHI Plasma TV Remote Control. The correct codes must be used to control your equipment using your Hitachi Plasma Television and external Audio/Video equipment (VCR and DVD Player). Each IR Mouse cable can ...
Owners Guide
Page 23
... cable box and VCR recording features. G-LINK connections are available on pages 52-56. Connect your HITACHI Plasma Television and external Audio/Video equipment (VCR and Cable box). First time use your HITACHI Plasma TV Remote Control and the TV Guide On Screen system to control your cable box to receive program listings and to enable...
... cable box and VCR recording features. G-LINK connections are available on pages 52-56. Connect your HITACHI Plasma Television and external Audio/Video equipment (VCR and Cable box). First time use your HITACHI Plasma TV Remote Control and the TV Guide On Screen system to control your cable box to receive program listings and to enable...
Owners Guide
Page 24
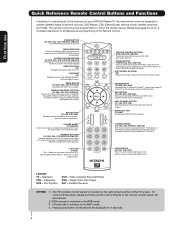
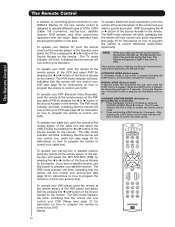
...select DVD by pressing the ̇ or ̈ button of VCRs, CATV (Cable TV) converters, set -top-box). The Remote Control The Remote Control In addition to controlling all the functions on your HITACHI Plasma TV, the new remote control is designed to operate different types of the Source Access on ...the remote. They are grouped together in TV Mode by pressing the ̇ or ̈ button of the Source ...
...select DVD by pressing the ̇ or ̈ button of VCRs, CATV (Cable TV) converters, set -top-box). The Remote Control The Remote Control In addition to controlling all the functions on your HITACHI Plasma TV, the new remote control is designed to operate different types of the Source Access on ...the remote. They are grouped together in TV Mode by pressing the ̇ or ̈ button of the Source ...
Owners Guide
Page 27
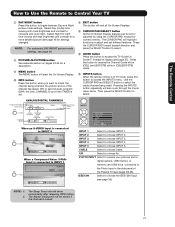
...-Screen Display. ቫ INFO button Press this button to access the INPUTS menu. Press this button to access the Channel Guide of the Plasma TV (see page 57). AM --:-- NOTE: For automatic DAY/NIGHT picture mode settings, see page 46. ቩ PICTURE-IN-PICTURE button See...4720; INPUTS button When the remote control is locked. 27 Pressing the INPUTS button repeatedly will show momentarily after releasing INFO button. PM ST TV-14 V Audio Broadcast Broadcast Rating Closed Captioning Day CC Off Cable 6 11:00PM Aspect Mode 19:9 Standard Main Picture Source Time When ...
...-Screen Display. ቫ INFO button Press this button to access the INPUTS menu. Press this button to access the Channel Guide of the Plasma TV (see page 57). AM --:-- NOTE: For automatic DAY/NIGHT picture mode settings, see page 46. ቩ PICTURE-IN-PICTURE button See...4720; INPUTS button When the remote control is locked. 27 Pressing the INPUTS button repeatedly will show momentarily after releasing INFO button. PM ST TV-14 V Audio Broadcast Broadcast Rating Closed Captioning Day CC Off Cable 6 11:00PM Aspect Mode 19:9 Standard Main Picture Source Time When ...
Owners Guide
Page 32
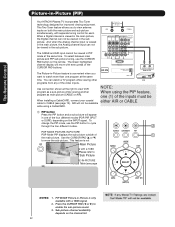
... (see page 12). Press the CURSOR PAD (̇ or ̈) to enable the sub-picture sound. 3. This Two Tuner feature allows you want to watch a TV program while viewing other programs from any of the video inputs. To select between main picture and PIP sub picture tuning, use the PIP button... right to view VCR program as a sub-picture while viewing another program as main picture (CABLE or AIR). AIR will appear in -Picture (PIP) Your HITACHI Plasma TV incorporates Two Tuner technology designed for each. NOTES: 1.
... (see page 12). Press the CURSOR PAD (̇ or ̈) to enable the sub-picture sound. 3. This Two Tuner feature allows you want to watch a TV program while viewing other programs from any of the video inputs. To select between main picture and PIP sub picture tuning, use the PIP button... right to view VCR program as a sub-picture while viewing another program as main picture (CABLE or AIR). AIR will appear in -Picture (PIP) Your HITACHI Plasma TV incorporates Two Tuner technology designed for each. NOTES: 1.

Owners Guide
Page 44
.... Adjust tint. Black Side Panel Set the gray side bars On/Off when watching 4:3 signals in the picture. Press MENU on your HITACHI Plasma TV. 2. Adjust brightness. Auto Color preference. Reset Video Settings Choose to Reset Video Settings to make either deeper or Picture Mode Select between... screen shows which selections are available. Set this function to a different menu item. 3. between the two picture modes; Video Audio TV Guide On Screen Channel Manager Locks Timers Setup Power Swivel Move SEL Select This part of the screen shows which Remote Control buttons to...
.... Adjust tint. Black Side Panel Set the gray side bars On/Off when watching 4:3 signals in the picture. Press MENU on your HITACHI Plasma TV. 2. Adjust brightness. Auto Color preference. Reset Video Settings Choose to Reset Video Settings to make either deeper or Picture Mode Select between... screen shows which selections are available. Set this function to a different menu item. 3. between the two picture modes; Video Audio TV Guide On Screen Channel Manager Locks Timers Setup Power Swivel Move SEL Select This part of the screen shows which Remote Control buttons to...

Owners Guide
Page 50
... or singing, each sound as though the sound was being produced live. TruBass, SRS and the symbol are registered trademarks of the Plasma TV internal speakers. TruBass technology is incorporated under license from just two external speakers (or) the two internal speakers of each instrument or ...license from just two speakers or the two internal speakers found in the same manner. BBE Sound reproduction quality enhancement system. If your HITACHI television. Licensed by BBE Sound, Inc. under license from SRS Labs that is connected to the listener's ear a more clearly audible....
... or singing, each sound as though the sound was being produced live. TruBass, SRS and the symbol are registered trademarks of the Plasma TV internal speakers. TruBass technology is incorporated under license from just two external speakers (or) the two internal speakers of each instrument or ...license from just two speakers or the two internal speakers found in the same manner. BBE Sound reproduction quality enhancement system. If your HITACHI television. Licensed by BBE Sound, Inc. under license from SRS Labs that is connected to the listener's ear a more clearly audible....

Owners Guide
Page 52
...SCREEN, then press the SELECT button. Once the setup process is complete, the program listings are automatically updated several times a day. TV Guide On Screen TV Guide On Screen The TV Guide On-Screen system is a built-in feature that provides a channel lineup and program listings in : Use the CURSOR PAD ...̆ and ̄ to highlight your TV location (USA or CANADA), then press the SELECT button to receive listings from a cable box or record your area. Screen 3: Do you must first setup the Plasma TV as shown on Page 23. If YES: Please see Screen 12. Note...
...SCREEN, then press the SELECT button. Once the setup process is complete, the program listings are automatically updated several times a day. TV Guide On Screen TV Guide On Screen The TV Guide On-Screen system is a built-in feature that provides a channel lineup and program listings in : Use the CURSOR PAD ...̆ and ̄ to highlight your TV location (USA or CANADA), then press the SELECT button to receive listings from a cable box or record your area. Screen 3: Do you must first setup the Plasma TV as shown on Page 23. If YES: Please see Screen 12. Note...

Owners Guide
Page 56
The TV Guide On Screen system setup is complete. Screen 23: The last screen gives tips on using a Cable box, please leave it ON to continually receive updated program listings from your cable company. 2. If using the TV Guide On Screen system. On-Screen Display TV Guide On Screen Screen 22: Congratulations! Press the SELECT button to exit the Setup. Press the SELECT button to finalize. NOTE: 1. The Plasma TV should be in standby mode in order to continually receive updated program listings from your cable company. 56
The TV Guide On Screen system setup is complete. Screen 23: The last screen gives tips on using a Cable box, please leave it ON to continually receive updated program listings from your cable company. 2. If using the TV Guide On Screen system. On-Screen Display TV Guide On Screen Screen 22: Congratulations! Press the SELECT button to exit the Setup. Press the SELECT button to finalize. NOTE: 1. The Plasma TV should be in standby mode in order to continually receive updated program listings from your cable company. 56
Owners Guide
Page 82
...inputs. 1. NOTE: 1. The IR Mouse cable must be properly connected for your video input device play button on using your HITACHI Plasma TV Remote Control. Video Audio TV Guide On Screen Channel Manager Locks Timers Setup Power Swivel Move SEL Select 3. Use the CURSOR PAD ̄ or CHANNEL ... CHANNEL WHEEL to previous menu. This feature is turned on and switch to INPUT 4 when it must be reset before AUTO LINK is selected, the TV will turn your VCR, laserdisc player or DVD player. Auto Input1 : **** Input2 : **** Input3 : **** Input4 : **** Auto Link : Off Input5 : **** Move...
...inputs. 1. NOTE: 1. The IR Mouse cable must be properly connected for your video input device play button on using your HITACHI Plasma TV Remote Control. Video Audio TV Guide On Screen Channel Manager Locks Timers Setup Power Swivel Move SEL Select 3. Use the CURSOR PAD ̄ or CHANNEL ... CHANNEL WHEEL to previous menu. This feature is turned on and switch to INPUT 4 when it must be reset before AUTO LINK is selected, the TV will turn your VCR, laserdisc player or DVD player. Auto Input1 : **** Input2 : **** Input3 : **** Input4 : **** Auto Link : Off Input5 : **** Move...
Owners Guide
Page 86
...audio output of your A/V Receiver. VOL ̆), then press the SELECT button. Press and hold desired button to transfer the command to this TV, please select a TV Input. Try again? If device responds to AV NET. AV Net Setup Wizard : A/V Receiver Setup AV Net Setup Wizard : A/V Receiver ...Setup Please choose the Brand Name of your A/V Receiver remote control while pointing directly at the learning AV NET sensor of the Plasma TV (located at the lower right corner of the screen) at a distance of 5 to 10 feet or 2 to continue setup. VOL̆ Please...
...audio output of your A/V Receiver. VOL ̆), then press the SELECT button. Press and hold desired button to transfer the command to this TV, please select a TV Input. Try again? If device responds to AV NET. AV Net Setup Wizard : A/V Receiver Setup AV Net Setup Wizard : A/V Receiver ...Setup Please choose the Brand Name of your A/V Receiver remote control while pointing directly at the learning AV NET sensor of the Plasma TV (located at the lower right corner of the screen) at a distance of 5 to 10 feet or 2 to continue setup. VOL̆ Please...
Owners Guide
Page 88
... Custom Settings Press and hold the ̈ "Play button" of the DVD remote control while pointing directly at the learning AV NET sensor of the Plasma TV (located at the lower right corner of the screen) at a distance of 3 to 6 feet or 1 to learn ? Press OK to continue.... Select NEXT to the video and audio output of the device to learn . (Example: DVD 3) 8. TV Softkeys POWER ̇̇ ̈̈ MENU ̇̇ ̈ ̈̈ SELECT ̆ ̈ EXIT ̄ ̇ Move SEL Select Back Done...
... Custom Settings Press and hold the ̈ "Play button" of the DVD remote control while pointing directly at the learning AV NET sensor of the Plasma TV (located at the lower right corner of the screen) at a distance of 3 to 6 feet or 1 to learn ? Press OK to continue.... Select NEXT to the video and audio output of the device to learn . (Example: DVD 3) 8. TV Softkeys POWER ̇̇ ̈̈ MENU ̇̇ ̈ ̈̈ SELECT ̆ ̈ EXIT ̄ ̇ Move SEL Select Back Done...
Owners Guide
Page 91
...Input 1 HDMI_1 - - - YES YES YES Input 2 HDMI_2 - - - Monitor: Select MONITOR to output the audio and video signals of the TV. YES Cable) Analog Channel Video - Variable Select AUDIO OUT VARIABLE to have the Audio at fixed volume. MONITOR: Available Monitor Out Signals Input Mode ...YES YES YES YES Video_2 - YES YES YES Input4 Y-PbPr_4 - - - Setup Set Monitor Out This feature will not be controlled by the Plasma TV Volume Up/Down. Setup Menu Preference Screen Saver Set The Inputs Set AV NET Set Closed Captions Set Monitor Out Upgrades Set Stand-by changing...
...Input 1 HDMI_1 - - - YES YES YES Input 2 HDMI_2 - - - Monitor: Select MONITOR to output the audio and video signals of the TV. YES Cable) Analog Channel Video - Variable Select AUDIO OUT VARIABLE to have the Audio at fixed volume. MONITOR: Available Monitor Out Signals Input Mode ...YES YES YES YES Video_2 - YES YES YES Input4 Y-PbPr_4 - - - Setup Set Monitor Out This feature will not be controlled by the Plasma TV Volume Up/Down. Setup Menu Preference Screen Saver Set The Inputs Set AV NET Set Closed Captions Set Monitor Out Upgrades Set Stand-by changing...


