
Owners Guide
Page 2
... normally, or has been dropped. 15. Servicing is required when the apparatus has been damaged in any way, such as close to the proper operation of cable 2 blades with the apparatus. recommended safety standards for your HITACHI plasma television. plasma television. 1. Read these instructions. 3. A polarized plug has two system of the building, as power-supply cord or plug is also foremost in our minds...
... normally, or has been dropped. 15. Servicing is required when the apparatus has been damaged in any way, such as close to the proper operation of cable 2 blades with the apparatus. recommended safety standards for your HITACHI plasma television. plasma television. 1. Read these instructions. 3. A polarized plug has two system of the building, as power-supply cord or plug is also foremost in our minds...

Owners Guide
Page 3
... Safety Instructions Power source This plasma television is designed to very high voltages and other hazards. Prevention of screen damages Continuous on-screen displays such as vases, should not be exposed to dripping or splashing and objects filled with an extension cord, receptacle, or other fixed (non-moving) patterns can expose you to operate on -demand, a cable operator's enhanced program guide and data-enhanced television services...
... Safety Instructions Power source This plasma television is designed to very high voltages and other hazards. Prevention of screen damages Continuous on-screen displays such as vases, should not be exposed to dripping or splashing and objects filled with an extension cord, receptacle, or other fixed (non-moving) patterns can expose you to operate on -demand, a cable operator's enhanced program guide and data-enhanced television services...

Owners Guide
Page 5
... Plasma television 4 inches away from the wall except when mounted using the top and base on the picture screen. If the Power Swivel feature will not fall directly on both sides of the Plasma Display stand as shown in fig. (a). 5. Do not grab the speakers or the back cover when lifting. TURNING RADIUS The maximum turning radius is recommended for professional installer. Using commercially available wood screws, secure the set...
... Plasma television 4 inches away from the wall except when mounted using the top and base on the picture screen. If the Power Swivel feature will not fall directly on both sides of the Plasma Display stand as shown in fig. (a). 5. Do not grab the speakers or the back cover when lifting. TURNING RADIUS The maximum turning radius is recommended for professional installer. Using commercially available wood screws, secure the set...

Owners Guide
Page 9
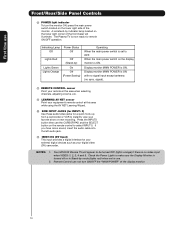
..." models. ቨ POWER button Display Monitor "MAIN POWER" button This power button is for stand-by remote control. The Main Power button is set TV features to your digital still pictures (see pages 28-29). ብ INPUT/EXIT button Press this button to ON condition (lights red) for the complete system, and must be turned ON/OFF manually. Press again to the claw. Firmly bind the cables. Front/Rear/Side Panel Controls FRONT VIEW First time use CURSOR PHOTO INPUT IEEE1394 DV INPUT POWER...
..." models. ቨ POWER button Display Monitor "MAIN POWER" button This power button is for stand-by remote control. The Main Power button is set TV features to your digital still pictures (see pages 28-29). ብ INPUT/EXIT button Press this button to ON condition (lights red) for the complete system, and must be turned ON/OFF manually. Press again to the claw. Firmly bind the cables. Front/Rear/Side Panel Controls FRONT VIEW First time use CURSOR PHOTO INPUT IEEE1394 DV INPUT POWER...
Owners Guide
Page 10
... mono sound, insert the audio cable into the left audio jack. ቭ IEEE1394 (DV Input) This input provides a digital interface for a quick hook-up from a camcorder or VCR to select INPUT 5. Check the Power Light to make sure the Display Monitor is now ready for remote ON/OFF operation. The Plasma TV is turned off or in Stand-by mode (lights red) when not in use. 2. signal). ቪ REMOTE CONTROL sensor Point your remote at...
... mono sound, insert the audio cable into the left audio jack. ቭ IEEE1394 (DV Input) This input provides a digital interface for a quick hook-up from a camcorder or VCR to select INPUT 5. Check the Power Light to make sure the Display Monitor is now ready for remote ON/OFF operation. The Plasma TV is turned off or in Stand-by mode (lights red) when not in use. 2. signal). ቪ REMOTE CONTROL sensor Point your remote at...
Owners Guide
Page 11
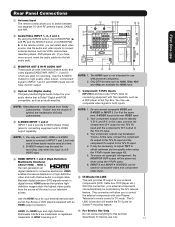
... HDMI - The HDMI input is Dolby® Digital and PCM compatible, such as a DVD player or Set Top Box. S-VIDEO output may be necessary to adjust TINT to control the external components with this connection, your audio device that pristine highdefinition images retain the highest video quality from Dolby Laboratories. HDMI enables the secure distribution of HDMI Licensing LLC. With this capability, such as an audio amplifier. Rear Panel Connections First time use ቢ Antenna Input The remote control allows...
... HDMI - The HDMI input is Dolby® Digital and PCM compatible, such as a DVD player or Set Top Box. S-VIDEO output may be necessary to adjust TINT to control the external components with this connection, your audio device that pristine highdefinition images retain the highest video quality from Dolby Laboratories. HDMI enables the secure distribution of HDMI Licensing LLC. With this capability, such as an audio amplifier. Rear Panel Connections First time use ቢ Antenna Input The remote control allows...
Owners Guide
Page 13
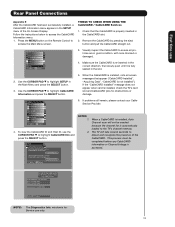
... CableCARD pins for this device, please contact your Cable Service Provider. Setup Menu Preference Screen Saver Set The Inputs Set AV NET Set Closed Captions Set Monitor Out CableCARD Information Upgrades Set Stand-By Mode Move SEL Select 4. If the "CableCARD Installed" message does not appear when card is properly inserted in the Main Menu and press the SELECT button. 3. In order to start cable service for obstructions or damage. Make sure the...
... CableCARD pins for this device, please contact your Cable Service Provider. Setup Menu Preference Screen Saver Set The Inputs Set AV NET Set Closed Captions Set Monitor Out CableCARD Information Upgrades Set Stand-By Mode Move SEL Select 4. If the "CableCARD Installed" message does not appear when card is properly inserted in the Main Menu and press the SELECT button. 3. In order to start cable service for obstructions or damage. Make sure the...

Owners Guide
Page 14
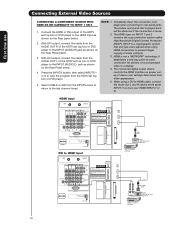
... player, DVD player, or HDTV Set Top Box to your video camcorder, digital camera or Digital Video Camcorder as shown in place of the VIDEO cable. The following examples: Left Side Panel INPUT 5 Left Side Panel INPUT 5 R L/MONO ̆ AUDIO VIDEO S-VIDEO IEEE1394 DV INPUT PHOTO INPUT R L/MONO ̆ AUDIO VIDEO S-VIDEO IEEE1394 DV INPUT PHOTO INPUT S-Video cable Ferrite Core Instructions: 1. First time use Connecting External Video Sources The front panel jacks are offered as suggestions. Check the owner's manual of each component. IEEE 1394 Cable Ferrite Core USB...
... player, DVD player, or HDTV Set Top Box to your video camcorder, digital camera or Digital Video Camcorder as shown in place of the VIDEO cable. The following examples: Left Side Panel INPUT 5 Left Side Panel INPUT 5 R L/MONO ̆ AUDIO VIDEO S-VIDEO IEEE1394 DV INPUT PHOTO INPUT R L/MONO ̆ AUDIO VIDEO S-VIDEO IEEE1394 DV INPUT PHOTO INPUT S-Video cable Ferrite Core Instructions: 1. First time use Connecting External Video Sources The front panel jacks are offered as suggestions. Check the owner's manual of each component. IEEE 1394 Cable Ferrite Core USB...
Owners Guide
Page 18
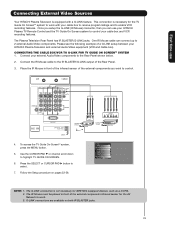
... HDMI Cable DIGITAL OUTPUT Back of HDTV Set-Top-Box or DVD Player HDTV Set-Top-Box or DVD Player 18 Press the INPUTS button, then select INPUTS 1 or 2 to view the program from the AUDIO OUT R of the HDTV set top box or DVD player. 5. Completely insert the connection cord plugs when connecting to the last channel tuned. Connect the HDMI or DVI output of the HDTV set top box or DVD player to the INPUT (AUDIO/R) jack as shown on the Rear Panel below . 4. NOTE: 1. HDCP is a cryptographic system that is played...
... HDMI Cable DIGITAL OUTPUT Back of HDTV Set-Top-Box or DVD Player HDTV Set-Top-Box or DVD Player 18 Press the INPUTS button, then select INPUTS 1 or 2 to view the program from the AUDIO OUT R of the HDTV set top box or DVD player. 5. Completely insert the connection cord plugs when connecting to the last channel tuned. Connect the HDMI or DVI output of the HDTV set top box or DVD player to the INPUT (AUDIO/R) jack as shown on the Rear Panel below . 4. NOTE: 1. HDCP is a cryptographic system that is played...
Owners Guide
Page 19
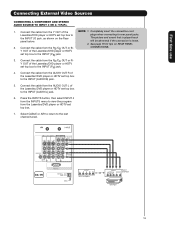
... Laserdisc/DVD player or HDTV set top box to the INPUT (PB) jack. 3. Completely insert the connection cord Laserdisc/DVD player or HDTV set top box to the INPUT (AUDIO/L) jack. 6. Connect the cable from the Y OUT of VIDEO AUDIO DVD Player PR/CR PB/CB Y L R DVD Player 19 Select CABLE or AIR to return to rear panel jacks. set top box to plugs when connecting to the last channel tuned. / G-LINK OUTPUT L R Y PB PR OR HDTV Set-Top Box OUTPUT Back of the NOTE: 1. First time use Connecting External Video Sources CONNECTING...
... Laserdisc/DVD player or HDTV set top box to the INPUT (PB) jack. 3. Completely insert the connection cord Laserdisc/DVD player or HDTV set top box to the INPUT (AUDIO/L) jack. 6. Connect the cable from the Y OUT of VIDEO AUDIO DVD Player PR/CR PB/CB Y L R DVD Player 19 Select CABLE or AIR to return to rear panel jacks. set top box to plugs when connecting to the last channel tuned. / G-LINK OUTPUT L R Y PB PR OR HDTV Set-Top Box OUTPUT Back of the NOTE: 1. First time use Connecting External Video Sources CONNECTING...
Owners Guide
Page 23
... front of the external components you can connect up to 2 external Audio/Video components. Press the SELECT or CURSOR PAD ̈ button to select. 7. First time use your HITACHI Plasma TV Remote Control and the TV Guide On Screen system to control your cable box and VCR recording features. This connection is equipped with your cable box to receive program listings and to enable VCR recording features. Video Audio TV Guide On Screen Channel Manager Locks Timers Setup Power Swivel Move SEL...
... front of the external components you can connect up to 2 external Audio/Video components. Press the SELECT or CURSOR PAD ̈ button to select. 7. First time use your HITACHI Plasma TV Remote Control and the TV Guide On Screen system to control your cable box and VCR recording features. This connection is equipped with your cable box to receive program listings and to enable VCR recording features. Video Audio TV Guide On Screen Channel Manager Locks Timers Setup Power Swivel Move SEL...
Owners Guide
Page 24
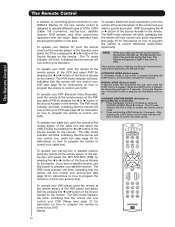
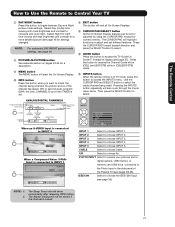
... your HITACHI Plasma TV, the new remote control is designed to operate different types of VCRs, CATV (Cable TV) converters, set-top-box, satellite receiver, DVD players, and other audio/video equipment with one area. The illumination will now control your PVR (see page 38 for instruction on the remote. CHANGING LIGHTING MODES (Automatic to Manual/Manual to confirm the remote control mode. 2. Press and hold the LIGHT button for instructions on the remote. The DVD mode indicator will blink...
... your HITACHI Plasma TV, the new remote control is designed to operate different types of VCRs, CATV (Cable TV) converters, set-top-box, satellite receiver, DVD players, and other audio/video equipment with one area. The illumination will now control your PVR (see page 38 for instruction on the remote. CHANGING LIGHTING MODES (Automatic to Manual/Manual to confirm the remote control mode. 2. Press and hold the LIGHT button for instructions on the remote. The DVD mode indicator will blink...
Owners Guide
Page 27
... contrast for night time viewing with room light. Press the CURSOR PAD toward desired direction and press the SELECT button to select. ቯ GUIDE button Press this button when you want to check the channel being used. PM ST TV-14 V Audio Broadcast Broadcast Rating Closed Captioning Day CC Off Cable 6 11:00PM Aspect Mode 19:9 Standard Main Picture Source Time When an S-VIDEO Input is connected to INPUT 3 S-IN:3 480i...
... contrast for night time viewing with room light. Press the CURSOR PAD toward desired direction and press the SELECT button to select. ቯ GUIDE button Press this button when you want to check the channel being used. PM ST TV-14 V Audio Broadcast Broadcast Rating Closed Captioning Day CC Off Cable 6 11:00PM Aspect Mode 19:9 Standard Main Picture Source Time When an S-VIDEO Input is connected to INPUT 3 S-IN:3 480i...

Owners Guide
Page 36
... programming procedure as shown on the remote control to position the LED light to instruction manual of the Set-TopBox/Satellite Receiver for operation of your set -top-box/satellite receiver and press the POWER button. To switch to pages 41-42 for operating the TV. 36 If your set-top-box/satellite receiver cannot be operated after performing the above . The remote will ባ flash 3 times if the code was accepted. 5. Turn...
... programming procedure as shown on the remote control to position the LED light to instruction manual of the Set-TopBox/Satellite Receiver for operation of your set -top-box/satellite receiver and press the POWER button. To switch to pages 41-42 for operating the TV. 36 If your set-top-box/satellite receiver cannot be operated after performing the above . The remote will ባ flash 3 times if the code was accepted. 5. Turn...

Owners Guide
Page 45
... input, and/or front panel. Set Sleep Timer intervals (30 min. Set Monitor Out source. Set Auto Channel Scan. Set Day/Night picture mode settings. Adjust Loudness. Timers Set the Clock Set Sleep Timer Set Day/Night Timer Set Clock Settings. Label Video Inputs, VCR, DVD, etc. Control the motorized Table Top Stand Power Swivel disabled. Engage Lock Choose to ON or OFF. Power Swivel feature is only available when Table Top Stand is installed in fixed setting. Locks Change Access Code Change Lock access code. Select internal or external speakers...
... input, and/or front panel. Set Sleep Timer intervals (30 min. Set Monitor Out source. Set Auto Channel Scan. Set Day/Night picture mode settings. Adjust Loudness. Timers Set the Clock Set Sleep Timer Set Day/Night Timer Set Clock Settings. Label Video Inputs, VCR, DVD, etc. Control the motorized Table Top Stand Power Swivel disabled. Engage Lock Choose to ON or OFF. Power Swivel feature is only available when Table Top Stand is installed in fixed setting. Locks Change Access Code Change Lock access code. Select internal or external speakers...
Owners Guide
Page 47
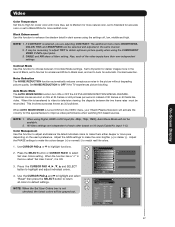
... still pictures per second, instead of each of Black, set to Normal for television viewing, the disparity between 3 Contrast Mode settings. Use the CURSOR PAD ̆ and ̄ to highlight and select "Reset" then press the SELECT button to return all colors to match real life colors. 1. or NOTE: When the Set User Colors box is turned ON from the VIDEO menu, your Hitachi Plasma Television will not be selected and adjusted in...
... still pictures per second, instead of each of Black, set to Normal for television viewing, the disparity between 3 Contrast Mode settings. Use the CURSOR PAD ̆ and ̄ to highlight and select "Reset" then press the SELECT button to return all colors to match real life colors. 1. or NOTE: When the Set User Colors box is turned ON from the VIDEO menu, your Hitachi Plasma Television will not be selected and adjusted in...
Owners Guide
Page 57
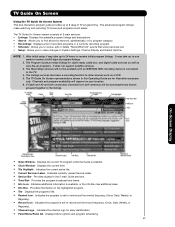
...-air programs. It does not support satellite services. 3. The TV Guide On Screen representations shown in this Operating Guide are both connected, channels from both antennas will depend on the highlighted program. • Tile- Displays the current TV program while the Guide is available, or the Info Box has additional sizes. • Info Box- Indicates the channel logo for cable-ready, cable box, and digital cable services as well as a VCR. 5. If Cable and...
...-air programs. It does not support satellite services. 3. The TV Guide On Screen representations shown in this Operating Guide are both connected, channels from both antennas will depend on the highlighted program. • Tile- Displays the current TV program while the Guide is available, or the Info Box has additional sizes. • Info Box- Indicates the channel logo for cable-ready, cable box, and digital cable services as well as a VCR. 5. If Cable and...

Owners Guide
Page 85
... SETUP. Inputs settings Video Input Audio Input Not Connected Not Connected Move Change Source Back SEL Select Next 15. AV Net Setup Wizard : A/V Receiver Setup Do you like to the video and audio output of your equipment to highlight the IR CODE Set, then use an A/V Receiver. Press the CURSOR PAD ̇ or ̈ to highlight " No thanks, I 'mdone. The Learning Mode will power up the A/V Receiver. AV Net Setup Wizard : Device Settings DVD Settings Brand Name IR Code Set Video Input Audio Input Hitachi...
... SETUP. Inputs settings Video Input Audio Input Not Connected Not Connected Move Change Source Back SEL Select Next 15. AV Net Setup Wizard : A/V Receiver Setup Do you like to the video and audio output of your equipment to highlight the IR CODE Set, then use an A/V Receiver. Press the CURSOR PAD ̇ or ̈ to highlight " No thanks, I 'mdone. The Learning Mode will power up the A/V Receiver. AV Net Setup Wizard : Device Settings DVD Settings Brand Name IR Code Set Video Input Audio Input Hitachi...

Owners Guide
Page 99
... card USB drive) • Technology • TV Guide On ScreenTM Video: • 1024 x 1024 Display Resolution • ALiS (Alternate Lighting of SRS Labs, Inc. ULTRAVISION and Director's Series are registered trademarks of HITACHI Home Electronics (America), Inc. Licensed by input format Plasma televisions display HDTV when combined with one remote control. - 2 IR Mouse cables included • Illuminated and Preprogrammed Remote Control • Power Management: ON/OFF via signal detection • Picture Enhancement • Input Signal...
... card USB drive) • Technology • TV Guide On ScreenTM Video: • 1024 x 1024 Display Resolution • ALiS (Alternate Lighting of SRS Labs, Inc. ULTRAVISION and Director's Series are registered trademarks of HITACHI Home Electronics (America), Inc. Licensed by input format Plasma televisions display HDTV when combined with one remote control. - 2 IR Mouse cables included • Illuminated and Preprogrammed Remote Control • Power Management: ON/OFF via signal detection • Picture Enhancement • Input Signal...

Owners Guide
Page 102
... CONDITIONS OF ANY DIFFERENT OR SUPPLEMENTARY LICENSE THAT MAY ACCOMPANY SUCH UPGRADE, (A) DO NOT USE ANY HITACHI-PROVIDED FLASH CARD OR OTHER MEDIA, (B) DO NOT PERFORM INSTALL ANY HITACHI-PROVIDED UPGRADE SOFTWARE ON YOUR DTV, AND (C) PROMPTLY RETURN SUCH FLASH CARD OR OTHER MEDIA TO HITACHI. 5. You specifically agree not to export or reexport the Software: (i) to which will , lost data, business interruption, procurement of substitute...
... CONDITIONS OF ANY DIFFERENT OR SUPPLEMENTARY LICENSE THAT MAY ACCOMPANY SUCH UPGRADE, (A) DO NOT USE ANY HITACHI-PROVIDED FLASH CARD OR OTHER MEDIA, (B) DO NOT PERFORM INSTALL ANY HITACHI-PROVIDED UPGRADE SOFTWARE ON YOUR DTV, AND (C) PROMPTLY RETURN SUCH FLASH CARD OR OTHER MEDIA TO HITACHI. 5. You specifically agree not to export or reexport the Software: (i) to which will , lost data, business interruption, procurement of substitute...


