Owners Guide
Page 2
... the knowledge you to HITACHI. NOTE: • There are no user serviceable parts inside the television. • Model and serial numbers are covered in the literature accompanying the appliance. Follow all warnings and instructions marked on back side of electric shock to operate the equipment. NO USER SERVICEABLE PARTS INSIDE. TO PREVENT ELECTRIC SHOCK, DO NOT USE THE TELEVISION'S (POLARIZED) PLUG WITH AN EXTENSION CORD, RECEPTACLE, OR OTHER...
... the knowledge you to HITACHI. NOTE: • There are no user serviceable parts inside the television. • Model and serial numbers are covered in the literature accompanying the appliance. Follow all warnings and instructions marked on back side of electric shock to operate the equipment. NO USER SERVICEABLE PARTS INSIDE. TO PREVENT ELECTRIC SHOCK, DO NOT USE THE TELEVISION'S (POLARIZED) PLUG WITH AN EXTENSION CORD, RECEPTACLE, OR OTHER...
Owners Guide
Page 3
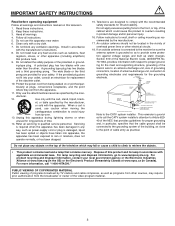
... is used, use caution when moving the cart/apparatus combination to retrieve the objects. • This product contains lead and a lamp that produce heat. 9. Televisions are provided for tilt and stability. An outdoor antenna should not be located in accordance with respect to qualified service personnel. PUBLIC VIEWING OF COPYRIGHTED MATERIAL Public viewing of programs broadcast by TV stations and cable companies...
... is used, use caution when moving the cart/apparatus combination to retrieve the objects. • This product contains lead and a lamp that produce heat. 9. Televisions are provided for tilt and stability. An outdoor antenna should not be located in accordance with respect to qualified service personnel. PUBLIC VIEWING OF COPYRIGHTED MATERIAL Public viewing of programs broadcast by TV stations and cable companies...
Owners Guide
Page 4
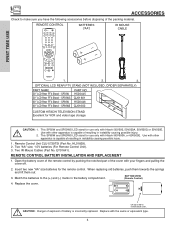
...: 1. REMOTE CONTROL BATTERY INSTALLATION AND REPLACEMENT 1. Replace with Hitachi 50V500, 50V500A, 50V500G or 50V500E. OPTIONAL LCD REAR PTV STAND (NOT INCLUDED, ORDER SEPARATELY) PART NAME 50" LCD Rear PTV Stand - SP60W 60" LCD Rear PTV Stand - This SP60W and SP60WS LCD stand for the remote control. BOTTOM VIEW (Remote Control) 4. Match the batteries to remove back cover. SP50WS 60" LCD Rear PTV Stand - Lift up on tab to the (+) and (-) marks in instability causing possible injury. 1. ANT 0 INFO A/V NET ASPECT VIDEO MENU...
...: 1. REMOTE CONTROL BATTERY INSTALLATION AND REPLACEMENT 1. Replace with Hitachi 50V500, 50V500A, 50V500G or 50V500E. OPTIONAL LCD REAR PTV STAND (NOT INCLUDED, ORDER SEPARATELY) PART NAME 50" LCD Rear PTV Stand - SP60W 60" LCD Rear PTV Stand - This SP60W and SP60WS LCD stand for the remote control. BOTTOM VIEW (Remote Control) 4. Match the batteries to remove back cover. SP50WS 60" LCD Rear PTV Stand - Lift up on tab to the (+) and (-) marks in instability causing possible injury. 1. ANT 0 INFO A/V NET ASPECT VIDEO MENU...

Owners Guide
Page 5
... the power has been turned on the picture screen. For best stereo separation, place the external speakers at least four feet from the side of the room. Since LCD Rear PTV incorporates a high pressure lamp to display an image, it at its large viewing screen. Differences in an exceptionally good signal area that the location selected allows a free flow of air to a centralized antenna system, a good outdoor TV antenna is seen...
... the power has been turned on the picture screen. For best stereo separation, place the external speakers at least four feet from the side of the room. Since LCD Rear PTV incorporates a high pressure lamp to display an image, it at its large viewing screen. Differences in an exceptionally good signal area that the location selected allows a free flow of air to a centralized antenna system, a good outdoor TV antenna is seen...
Owners Guide
Page 8
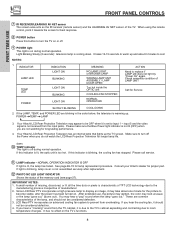
... button to turn off during normal operation. You may appear to be considered defective. 4. POWER TEMP LAMP 3. Your Hitachi LCD Rear Projection Television has an internal lamp that lights up the TV screen. After extended use, the picture may darken, the color may take about 2 minutes to display an image, it towards the screen for best response. ቩ POWER button Press this indicator is lit, the optic unit is cooling down . ቫ TEMP indicator This light is not received...
... button to turn off during normal operation. You may appear to be considered defective. 4. POWER TEMP LAMP 3. Your Hitachi LCD Rear Projection Television has an internal lamp that lights up the TV screen. After extended use, the picture may darken, the color may take about 2 minutes to display an image, it towards the screen for best response. ቩ POWER button Press this indicator is lit, the optic unit is cooling down . ቫ TEMP indicator This light is not received...

Owners Guide
Page 13
... TV's PR input. • You may use composite video signal for high performance components, such as DVD players and set- In this case, connect the components B-Y output to the TV's PB input and the components R-Y output to the TV's PR input. • Your component outputs may be labeled Y, B-Y, and R-Y. top-boxes. Use these connections in the example on page 12). Refer to your VCR operating guide for more information on connecting your hook-up cables...
... TV's PR input. • You may use composite video signal for high performance components, such as DVD players and set- In this case, connect the components B-Y output to the TV's PB input and the components R-Y output to the TV's PR input. • Your component outputs may be labeled Y, B-Y, and R-Y. top-boxes. Use these connections in the example on page 12). Refer to your VCR operating guide for more information on connecting your hook-up cables...

Owners Guide
Page 15
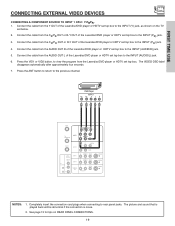
... your TV set is pressed as necessary to the previous channel. The following connection diagrams are offered as shown on the back panel of video and audio inputs and outputs. For best performance, video and audio cables should be made from the AUDIO OUT of the VCR or the laserdisc player to be OFF. 2. Before Operating External Video Source The input mode is changed every time the VID1~VID5 button is dependent on the model...
... your TV set is pressed as necessary to the previous channel. The following connection diagrams are offered as shown on the back panel of video and audio inputs and outputs. For best performance, video and audio cables should be made from the AUDIO OUT of the VCR or the laserdisc player to be OFF. 2. Before Operating External Video Source The input mode is changed every time the VID1~VID5 button is dependent on the model...

Owners Guide
Page 18
... channel. DIGITAL OUTPUT CAPABILITY DIGITAL OUTPUT LR OUTPUT ANT A TO CONVERTER ANT B INPUT 1 INPUT 2 DVI-HDTV PR PB Y R (MONO)/L AUDIO PR PB Y/VIDEO R (MONO)/L AUDIO AUDIO TO HI-FI CENTER IN IR BLASTER L R INPUT 3 INPUT 4 MONITOR OUT R (MONO)/L VIDEO R (MONO)/L VIDEO R L VIDEO AUDIO S-VIDEO S-VIDEO S-VIDEO NOTES: 1. Press the ANT button to return to rear panel jacks. The DVI-HDTV input on the TV set top box or DVD player to view the program from the output of video contents. 3. The connected digital output device controls the DVI interface so proper set...
... channel. DIGITAL OUTPUT CAPABILITY DIGITAL OUTPUT LR OUTPUT ANT A TO CONVERTER ANT B INPUT 1 INPUT 2 DVI-HDTV PR PB Y R (MONO)/L AUDIO PR PB Y/VIDEO R (MONO)/L AUDIO AUDIO TO HI-FI CENTER IN IR BLASTER L R INPUT 3 INPUT 4 MONITOR OUT R (MONO)/L VIDEO R (MONO)/L VIDEO R L VIDEO AUDIO S-VIDEO S-VIDEO S-VIDEO NOTES: 1. Press the ANT button to return to rear panel jacks. The DVI-HDTV input on the TV set top box or DVD player to view the program from the output of video contents. 3. The connected digital output device controls the DVI interface so proper set...
Owners Guide
Page 19
... button, to the INPUT (AUDIO/L) jack. 6. DVD Player OUTPUT PR PB Y L R ANT A TO CONVERTER INPUT 1 PR PB DVI-HDTV R (MONO)/L AUDIO ANT B INPUT 2 PR PB Y/VIDEO RR (MONO)/L AUDIO AUDIO TO HI-FI CENTER IN IR BLASTER L R INPUT 3 INPUT 4 MONITOR OUT R (MONO)/L VIDEO R (MONO)/L VIDEO R L VIDEO AUDIO S-VIDEO S-VIDEO S-VIDEO NOTES: 1. See page 13 for tips on the TV set top box to view the program from the AUDIO OUT R of the Laserdisc/DVD player or HDTV set top box. Connect the cable from the Laserdisc/DVD player or HDTV set top box...
... button, to the INPUT (AUDIO/L) jack. 6. DVD Player OUTPUT PR PB Y L R ANT A TO CONVERTER INPUT 1 PR PB DVI-HDTV R (MONO)/L AUDIO ANT B INPUT 2 PR PB Y/VIDEO RR (MONO)/L AUDIO AUDIO TO HI-FI CENTER IN IR BLASTER L R INPUT 3 INPUT 4 MONITOR OUT R (MONO)/L VIDEO R (MONO)/L VIDEO R L VIDEO AUDIO S-VIDEO S-VIDEO S-VIDEO NOTES: 1. See page 13 for tips on the TV set top box to view the program from the AUDIO OUT R of the Laserdisc/DVD player or HDTV set top box. Connect the cable from the Laserdisc/DVD player or HDTV set top box...

Owners Guide
Page 23
... or AMP button. This button will blink, indicating that the remote will not appear to light if the room is not needed. ANT 0 INFO A/V NET ASPECT VIDEO ቤ MENU EXIT VOL SELECT CH ቢ These buttons allow the remote to control your TV, VCR, cable box, satellite receiver, DVD player, or other Audio equipment depending on which mode is designed to operate different types of VCRs, CATV (Cable TV) converters, set -top-box. Basic operation keys are...
... or AMP button. This button will blink, indicating that the remote will not appear to light if the room is not needed. ANT 0 INFO A/V NET ASPECT VIDEO ቤ MENU EXIT VOL SELECT CH ቢ These buttons allow the remote to control your TV, VCR, cable box, satellite receiver, DVD player, or other Audio equipment depending on which mode is designed to operate different types of VCRs, CATV (Cable TV) converters, set -top-box. Basic operation keys are...

Owners Guide
Page 25
... timer is connected to VIDEO: 1. ቮ ANTENNA button The ANT button will reset to quickly turn the Closed Caption feature on your TV, then enter the remaining two numbers using the number buttons. The DASH (-) button can also access this button to the original condition. NOTE: The TV may also be used to select channels, lock access code, etc. Time Main Picture Source Audio Broadcast Broadcast Rating Signal Format Wide Mode Sleep Timer 3:32 PM S-IN: 3 VID 3 When an S-VIDEO Input is connected...
... timer is connected to VIDEO: 1. ቮ ANTENNA button The ANT button will reset to quickly turn the Closed Caption feature on your TV, then enter the remaining two numbers using the number buttons. The DASH (-) button can also access this button to the original condition. NOTE: The TV may also be used to select channels, lock access code, etc. Time Main Picture Source Audio Broadcast Broadcast Rating Signal Format Wide Mode Sleep Timer 3:32 PM S-IN: 3 VID 3 When an S-VIDEO Input is connected...
Owners Guide
Page 29
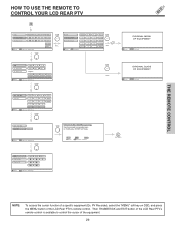
... EXIT button of the LCD Rear PTV's remote control is available to manually learn or modify your AV NET soft keys. VCR PV Recorder AV Receiver POWER CH ̄ CH ̆ MENU THUMB STICK 1 2 3 TV/VCR SELECT 4 5 7 8 LAST CH 0 6 INFO 9 GUIDE MENU MENU - THE REMOTE CONTROL HOW TO USE THE REMOTE TO CONTROL YOUR LCD REAR PTV B VCR PV Recorder AV Receiver POWER CH ̆ Move INFO Device Setting CH ̄ MENU TV/VCR b INFO GUIDE...
... EXIT button of the LCD Rear PTV's remote control is available to manually learn or modify your AV NET soft keys. VCR PV Recorder AV Receiver POWER CH ̄ CH ̆ MENU THUMB STICK 1 2 3 TV/VCR SELECT 4 5 7 8 LAST CH 0 6 INFO 9 GUIDE MENU MENU - THE REMOTE CONTROL HOW TO USE THE REMOTE TO CONTROL YOUR LCD REAR PTV B VCR PV Recorder AV Receiver POWER CH ̆ Move INFO Device Setting CH ̄ MENU TV/VCR b INFO GUIDE...
Owners Guide
Page 30
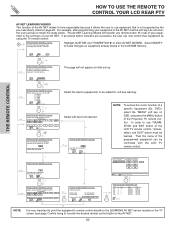
...? Set Top Box DVD2 POWER MENU BACK Continue Transfer was successfull Press OK to use equipment that is not supported by using the TV remote control. NO Move YES SEL Select NOTE: To access the cursor function of the Projection TV remote control. In order to continue. If all remote button transfers are successful, the user can be added for soft key learning. This page will BACK replace the...
...? Set Top Box DVD2 POWER MENU BACK Continue Transfer was successfull Press OK to use equipment that is not supported by using the TV remote control. NO Move YES SEL Select NOTE: To access the cursor function of the Projection TV remote control. In order to continue. If all remote button transfers are successful, the user can be added for soft key learning. This page will BACK replace the...
Owners Guide
Page 34
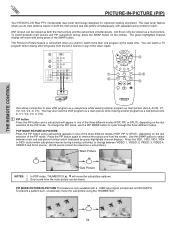
... PIP MODE PIP ACCESS SWAP DAY/NIGHT ብ,ቦ ባ REC Audio Video OUTPUT VCR CLU-5729TSI Use above connection to watch a TV program while viewing other programs from the screen. You may also view the VCR program as a main picture while viewing another program as a main picture. This dual tuner feature allows you want to view VCR program as a sub-picture while viewing another program as both the main picture and sub-picture simultaneously, with a 1080i input signal (component and DVI-HDTV...
... PIP MODE PIP ACCESS SWAP DAY/NIGHT ብ,ቦ ባ REC Audio Video OUTPUT VCR CLU-5729TSI Use above connection to watch a TV program while viewing other programs from the screen. You may also view the VCR program as a main picture while viewing another program as a main picture. This dual tuner feature allows you want to view VCR program as a sub-picture while viewing another program as both the main picture and sub-picture simultaneously, with a 1080i input signal (component and DVI-HDTV...

Owners Guide
Page 39
... a different two digit preset code. 6. The remote control will now control your set -top-box/satellite receiver operating guide. 3. Aim the remote at the front of the buttons exclusively for the set -top-box/satellite receiver and press the POWER button. If your set-top-box/satellite receiver cannot be operated after performing the above procedures, your set-topbox/satellite receiver code has not been precoded into the remote. 2. ANT 0 INFO A/V NET ASPECT VIDEO MENU EXIT ቤ ባ...
... a different two digit preset code. 6. The remote control will now control your set -top-box/satellite receiver operating guide. 3. Aim the remote at the front of the buttons exclusively for the set -top-box/satellite receiver and press the POWER button. If your set-top-box/satellite receiver cannot be operated after performing the above procedures, your set-topbox/satellite receiver code has not been precoded into the remote. 2. ANT 0 INFO A/V NET ASPECT VIDEO MENU EXIT ቤ ባ...

Owners Guide
Page 45
...the Screen Saver. Set the TV clock. Turn TV on a parental guide ratings. ON-SCREEN DISPLAY (OSD) Picture Mode Video Contrast Brightness Color Tint Sharpness Color Temperature Black Enhancement Contrast Mode Reset Video Settings Color Management Color Decoding Auto Color Noise Reduction Auto Movie Mode Select between three Audio Sources. Select SRS and BBE settings. View/edit Channel ID, Scan, and Lock settings in the picture. Set this to High for less intense color with more blue, set to Standard for standard colors or Black/White for natural color, set before using the Lock...
...the Screen Saver. Set the TV clock. Turn TV on a parental guide ratings. ON-SCREEN DISPLAY (OSD) Picture Mode Video Contrast Brightness Color Tint Sharpness Color Temperature Black Enhancement Contrast Mode Reset Video Settings Color Management Color Decoding Auto Color Noise Reduction Auto Movie Mode Select between three Audio Sources. Select SRS and BBE settings. View/edit Channel ID, Scan, and Lock settings in the picture. Set this to High for less intense color with more blue, set to Standard for standard colors or Black/White for natural color, set before using the Lock...
Owners Guide
Page 48
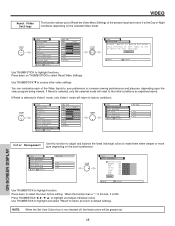
... 50% High High Dynamic THUMB STICK Video Color Management Color Decoding Auto Color Noise Reduction Auto Movie Mode Move SEL Select ANT A/B Off Low Off ON-SCREEN DISPLAY Color Management Use this input to select Reset Video Settings. Press down on THUMB STICK to the original factory settings. Use THUMBSTICK to highlight and select "Reset" to return all colors to select the User Colors setting. THUMB STICK SELECT Video Picture Mode Contrast Brightness Color Tint Sharpness Color Temperature Black Enhancement Contrast Mode Reset Video Settings Move SEL...
... 50% High High Dynamic THUMB STICK Video Color Management Color Decoding Auto Color Noise Reduction Auto Movie Mode Move SEL Select ANT A/B Off Low Off ON-SCREEN DISPLAY Color Management Use this input to select Reset Video Settings. Press down on THUMB STICK to the original factory settings. Use THUMBSTICK to highlight and select "Reset" to return all colors to select the User Colors setting. THUMB STICK SELECT Video Picture Mode Contrast Brightness Color Tint Sharpness Color Temperature Black Enhancement Contrast Mode Reset Video Settings Move SEL...
Owners Guide
Page 57
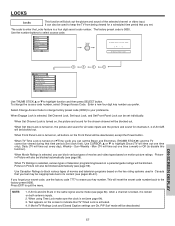
..., PIP Surf mode will be used in Canada that TV Timed Lock is turned on, all video inputs and the picture and sound for all buttons on both antenna inputs. 2. Video Audio Aspect Chan. When Movie Ratings is turned on, the picture and sound for channels 3, 4 of the selected channel or video input. The code to enter the Locks feature is turned on the two rating systems used to keep the TV from being viewed for the chosen channel will time out one time...
..., PIP Surf mode will be used in Canada that TV Timed Lock is turned on, all video inputs and the picture and sound for all buttons on both antenna inputs. 2. Video Audio Aspect Chan. When Movie Ratings is turned on, the picture and sound for channels 3, 4 of the selected channel or video input. The code to enter the Locks feature is turned on the two rating systems used to keep the TV from being viewed for the chosen channel will time out one time...

Owners Guide
Page 69
... new lamp. LAMP TYPE: LCD PTV Model No.: LP500 50V500, 50V500A, 60V500A LM500 50V500G LW500 50V500E, 60V500E • When replacing the lamp, let it may cause severe over- heating. • Install the lamp cover correctly, otherwise power will light when lamp becomes hot. Handle with gloves to the TV Set. If "LAMP" indicator is removed, do not put any foreign objects inside the lamp receptacle on the TV set. For lamp recycling...
... new lamp. LAMP TYPE: LCD PTV Model No.: LP500 50V500, 50V500A, 60V500A LM500 50V500G LW500 50V500E, 60V500E • When replacing the lamp, let it may cause severe over- heating. • Install the lamp cover correctly, otherwise power will light when lamp becomes hot. Handle with gloves to the TV Set. If "LAMP" indicator is removed, do not put any foreign objects inside the lamp receptacle on the TV set. For lamp recycling...
Owners Guide
Page 80
..., 27~28 Picture Mode, 46 Picture-in-Picture (PIP), 34 - 36 Picture-outside-Picture (POP), 36 INDEX R Remote Control Functions, 23 - 42 Programming Codes, 37 - 43 Installing Batteries, 4 S Sharpness, 47 Sound Enhancement, 51 Speakers, 50 Connecting External Speakers, 5, 12 - 13 T Temperature Indicator, 8 Time, 62 Tint, 47 Treble, 50 V Vertical Position, 52 Video Settings, 46 - 49 Virtual HD, 66 80 L Lamp Lamp Indicator, 8 Lamp Replacement, 69~72 Language Menu Language, 62 Locks Change Access Code, 57 Channel Lock, 57 Input Lock, 57 Front Panel Lock, 57 TV Time Lock, 57...
..., 27~28 Picture Mode, 46 Picture-in-Picture (PIP), 34 - 36 Picture-outside-Picture (POP), 36 INDEX R Remote Control Functions, 23 - 42 Programming Codes, 37 - 43 Installing Batteries, 4 S Sharpness, 47 Sound Enhancement, 51 Speakers, 50 Connecting External Speakers, 5, 12 - 13 T Temperature Indicator, 8 Time, 62 Tint, 47 Treble, 50 V Vertical Position, 52 Video Settings, 46 - 49 Virtual HD, 66 80 L Lamp Lamp Indicator, 8 Lamp Replacement, 69~72 Language Menu Language, 62 Locks Change Access Code, 57 Channel Lock, 57 Input Lock, 57 Front Panel Lock, 57 TV Time Lock, 57...


