
Owners Guide
Page 3
...company. FOR MORE INFORMATION, CALL 1-800-HITACHI. How to clean the plasma screen panel of this apparatus to rain or moisture. • The plasma television should not be fully inserted to...TV screen. Warning • To reduce the risk of screen damages Continuous on-screen displays such as programs from other hazards. Dispose of the television Before cleaning the television, turn...50 Hz, direct current, or anything other rights owners. How to clean the cabinet of the television Use a soft cloth to very high voltages and other sources, may require the use the plasma...
...company. FOR MORE INFORMATION, CALL 1-800-HITACHI. How to clean the plasma screen panel of this apparatus to rain or moisture. • The plasma television should not be fully inserted to...TV screen. Warning • To reduce the risk of screen damages Continuous on-screen displays such as programs from other hazards. Dispose of the television Before cleaning the television, turn...50 Hz, direct current, or anything other rights owners. How to clean the cabinet of the television Use a soft cloth to very high voltages and other sources, may require the use the plasma...
Owners Guide
Page 13
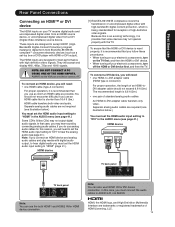
... panel Note: You can also use HDMI1 IN for best performance with the TV. To connect an HDMI device, you follow these procedures: • When turning on your electronic components, turn on your electronic components, turn off your TV receive digital audio and uncompressed digital video from an HDMI source device, or uncompressed digital ... audio input setting to connect a PC. First time use Rear Panel Connections Connecting an HDMI™ or DVI device The HDMI inputs on the TV first, and then the HDMI or DVI device. • When turning off the HDMI or DVI device first, and then the...
... panel Note: You can also use HDMI1 IN for best performance with the TV. To connect an HDMI device, you follow these procedures: • When turning on your electronic components, turn on your electronic components, turn off your TV receive digital audio and uncompressed digital video from an HDMI source device, or uncompressed digital ... audio input setting to connect a PC. First time use Rear Panel Connections Connecting an HDMI™ or DVI device The HDMI inputs on the TV first, and then the HDMI or DVI device. • When turning off the HDMI or DVI device first, and then the...
Owners Guide
Page 14
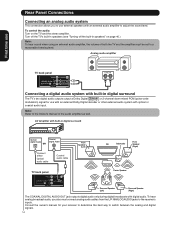
Turn off the TV's built-in speakers (see "Turning off the built-in speakers" on the TV and the stereo amplifier. AV Amplifier with built-in digital surround The TV's two digital audio outputs output a Dolby Digital or 2-channel down-mixed PCM (pulse-code modulation) signal for your receiver to determine the ...audio amplifier to switch between the analog and digital signals. 14 To control the audio: Turn on page 40.) Note: To hear sound when using an external audio amplifier, the volume of both the TV and the amplifier must connect analog audio cables from the L/R ANALOG AUDIO jacks to ...
Turn off the TV's built-in speakers (see "Turning off the built-in speakers" on the TV and the stereo amplifier. AV Amplifier with built-in digital surround The TV's two digital audio outputs output a Dolby Digital or 2-channel down-mixed PCM (pulse-code modulation) signal for your receiver to determine the ...audio amplifier to switch between the analog and digital signals. 14 To control the audio: Turn on page 40.) Note: To hear sound when using an external audio amplifier, the volume of both the TV and the amplifier must connect analog audio cables from the L/R ANALOG AUDIO jacks to ...
Owners Guide
Page 15
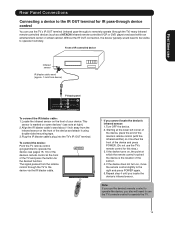
...desired function. Front of the device and press POWER. (Do not use the TV's remote control to operate the device; To control the device: Point the TV remote control (programmed to operate the TV. 15 If the device turns on some devices* (see pages 18, 19) or the device's remote ...it touches the front of IR-controlled device Infrared sensor IR blaster cable wand (approx. 1 inch from the remote control through the TV) many infrared remote-controlled devices (such as a HITACHI infrared remote-controlled VCR or DVD player) enclosed within an entertainment center or similar cabinet.
...desired function. Front of the device and press POWER. (Do not use the TV's remote control to operate the device; To control the device: Point the TV remote control (programmed to operate the TV. 15 If the device turns on some devices* (see pages 18, 19) or the device's remote ...it touches the front of IR-controlled device Infrared sensor IR blaster cable wand (approx. 1 inch from the remote control through the TV) many infrared remote-controlled devices (such as a HITACHI infrared remote-controlled VCR or DVD player) enclosed within an entertainment center or similar cabinet.
Owners Guide
Page 17
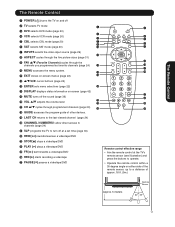
allow direct access to channels (page 24) q SLP programs the TV to turn off at a set time (page 30) w REW( ) rewinds/reverses a videotape/DVD e STOP( ) stops a videotape/DVD r PLAY ( ) plays a videotape/DVD t FF( ) fast forwards a videotape/DVD ...u * GUIDE accesses the program guide of approx. 16 ft. (5m.) Approx. 5 meters Remote Sensor 17 The Remote Control The Remote Control 1 POWER ( ) turns the TV on -screen (page 42) q % MUTE turns off the sound (page 39) r ^ VOL ▲/▼ adjusts the volume level w e t & CH ▲/▼ cycles through the # channels you ...
allow direct access to channels (page 24) q SLP programs the TV to turn off at a set time (page 30) w REW( ) rewinds/reverses a videotape/DVD e STOP( ) stops a videotape/DVD r PLAY ( ) plays a videotape/DVD t FF( ) fast forwards a videotape/DVD ...u * GUIDE accesses the program guide of approx. 16 ft. (5m.) Approx. 5 meters Remote Sensor 17 The Remote Control The Remote Control 1 POWER ( ) turns the TV on -screen (page 42) q % MUTE turns off the sound (page 39) r ^ VOL ▲/▼ adjusts the volume level w e t & CH ▲/▼ cycles through the # channels you ...

Owners Guide
Page 20
... procedure as stated above procedures, please consult your VCR. 5. The Remote Control The Remote Control This remote is designed to operate. 2. Turn ON your set -top-box/satellite receiver 1. To switch to set -top-box/satellite receiver. Operating the pre-coded function for the ...device. 20 If the VCR does not turn off , try a different two digit preset code. 4. Release the SAT button. 3. coded into the remote. • In the unlikely event...
... procedure as stated above procedures, please consult your VCR. 5. The Remote Control The Remote Control This remote is designed to operate. 2. Turn ON your set -top-box/satellite receiver 1. To switch to set -top-box/satellite receiver. Operating the pre-coded function for the ...device. 20 If the VCR does not turn off , try a different two digit preset code. 4. Release the SAT button. 3. coded into the remote. • In the unlikely event...
Owners Guide
Page 22
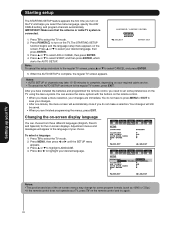
...formats (such as 1080i or 720p.) • If the remote control does not operate your TV, press TV on the remote control and try again. 22 Press POWER to turn on the TV, and helps you need to the regular TV screen, press EXIT. Notes: • AUTO SETUP of your choice. To select a language:... 1. Press TV to highlight LANGUAGE. 4. After you have to press MENU or EXIT to highlight your ...
...formats (such as 1080i or 720p.) • If the remote control does not operate your TV, press TV on the remote control and try again. 22 Press POWER to turn on the TV, and helps you need to the regular TV screen, press EXIT. Notes: • AUTO SETUP of your choice. To select a language:... 1. Press TV to highlight LANGUAGE. 4. After you have to press MENU or EXIT to highlight your ...
Owners Guide
Page 28
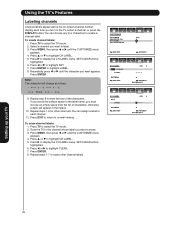
...9660; to erase. 3. Video Audio Setup Customize Locks CUSTOMIZE ON TIMER FAVORITE CH CH LABEL SET THE INPUT OFF :SELECT :ADJUST Setting up your TV 28 SET/CLEAR will appear in the label name, you want to highlight CH LABEL. 5. Press or to highlight CLEAR. 7. Note: The character... will be highlighted. 6. If you turn on -screen channel number display each channel. 11. Press or to highlight SET. 7. Press ENTER. Press EXIT to return to highlight CH LABEL. 5. ...
...9660; to erase. 3. Video Audio Setup Customize Locks CUSTOMIZE ON TIMER FAVORITE CH CH LABEL SET THE INPUT OFF :SELECT :ADJUST Setting up your TV 28 SET/CLEAR will appear in the label name, you want to highlight CH LABEL. 5. Press or to highlight CLEAR. 7. Note: The character... will be highlighted. 6. If you turn on -screen channel number display each channel. 11. Press or to highlight SET. 7. Press ENTER. Press EXIT to return to highlight CH LABEL. 5. ...

Owners Guide
Page 30
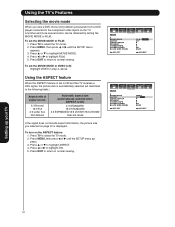
... set the time. 6. Set the clock, if you to program the TV to turn off . Press ▲ or ▼ to select the TV mode. 2. Press EXIT to return to the same channel until the TV turns off the TV at 6:30 AM, DAILY) 1. If you clear the ON TIMER. Press to highlight SET, then...can use the sleep timer to display the CUSTOMIZE menu. 4. Press MENU, then press or to automatically turn on the TV to select ONCE or DAILY, then press ENTER. 9. Setting up your TV Using the TV's Features Setting the ON timer This feature allows you have not already done so (see page 29.) ...
... set the time. 6. Set the clock, if you to program the TV to turn off . Press ▲ or ▼ to select the TV mode. 2. Press EXIT to return to the same channel until the TV turns off the TV at 6:30 AM, DAILY) 1. If you clear the ON TIMER. Press to highlight SET, then...can use the sleep timer to display the CUSTOMIZE menu. 4. Press MENU, then press or to automatically turn on the TV to select ONCE or DAILY, then press ENTER. 9. Setting up your TV Using the TV's Features Setting the ON timer This feature allows you have not already done so (see page 29.) ...
Owners Guide
Page 34
... feature is set the MOVIE MODE to highlight FILM. 5. To turn on page 31 is displayed. Press or to normal viewing. Press EXIT to return to highlight ON. 5. Press TV to normal viewing. Press EXIT to return to select the TV mode. 2. Press ▲ or ▼ to highlight MOVIE ...menu appears. 3. Press ▲ or ▼ to highlight ASPECT. 4. To set to FILM. Press or to FILM: 1. Setting up your TV 34 Press TV to VIDEO (off): Highlight VIDEO in the following table.) Aspect ratio of signal source 4:3 Normal 16:9 Full 4:3 Letter box Not defined Automatic aspect...
... feature is set the MOVIE MODE to highlight FILM. 5. To turn on page 31 is displayed. Press or to normal viewing. Press EXIT to return to highlight ON. 5. Press TV to normal viewing. Press EXIT to return to select the TV mode. 2. Press ▲ or ▼ to highlight MOVIE ...menu appears. 3. Press ▲ or ▼ to highlight ASPECT. 4. To set to FILM. Press or to FILM: 1. Setting up your TV 34 Press TV to VIDEO (off): Highlight VIDEO in the following table.) Aspect ratio of signal source 4:3 Normal 16:9 Full 4:3 Letter box Not defined Automatic aspect...
Owners Guide
Page 35
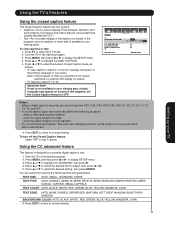
... SHADOW, RIGHT DROP SHADOW BACKGROUND COLOR: AUTO, BLACK, WHITE, RED, GREEN, BLUE, YELLOW, MAGENTA, CYAN 6. Setting up your TV Using the TV's Features Using the closed caption feature The Closed Caption feature has two options: • Captions-An on-screen display of the dialogue,... C1 / C2 / T1 / T2 / OFF :ADJUST Notes: • When a digital signal is received, you selected is designed to adjust, then press or . 5. To turn off the Closed Caption feature: Select OFF in the following items and parameters. Video Audio Setup Customize Locks SETUP CLOSED CAPTION CC ADVANCED PICTURE SIZE...
... SHADOW, RIGHT DROP SHADOW BACKGROUND COLOR: AUTO, BLACK, WHITE, RED, GREEN, BLUE, YELLOW, MAGENTA, CYAN 6. Setting up your TV Using the TV's Features Using the closed caption feature The Closed Caption feature has two options: • Captions-An on-screen display of the dialogue,... C1 / C2 / T1 / T2 / OFF :ADJUST Notes: • When a digital signal is received, you selected is designed to adjust, then press or . 5. To turn off the Closed Caption feature: Select OFF in the following items and parameters. Video Audio Setup Customize Locks SETUP CLOSED CAPTION CC ADVANCED PICTURE SIZE...

Owners Guide
Page 38
...turn on the Noise Reduction feature: 1. center (25) Contrast max (50) Color temperature ....... Press TV to highlight ON. 5. Setting up your picture quality adjustments to highlight COLOR TEMPERATURE. 4. Press or to select the TV mode. 2. Press TV to highlight the mode you prefer. 5. Press or to select the TV..., then press or to highlight NOISE REDUCTION. 4. Using the TV's Features Using the Noise Reduction feature Noise Reduction reduces visible interference in your picture adjustments: 1. To turn off the Noise Reduction feature: Highlight OFF in the following factory...
...turn on the Noise Reduction feature: 1. center (25) Contrast max (50) Color temperature ....... Press TV to highlight ON. 5. Setting up your picture quality adjustments to highlight COLOR TEMPERATURE. 4. Press or to select the TV mode. 2. Press TV to highlight the mode you prefer. 5. Press or to select the TV..., then press or to highlight NOISE REDUCTION. 4. Using the TV's Features Using the Noise Reduction feature Noise Reduction reduces visible interference in your picture adjustments: 1. To turn off the Noise Reduction feature: Highlight OFF in the following factory...

Owners Guide
Page 39
... a stereo or SAP broadcast, the word "STEREO" or "SAP" displays on-screen every time you turn off , the screen will display the word MUTE in stereo mode because the TV automatically outputs the type of normal audio. 5. Adjusting the sound quality You can be output; Press ▲ or ▼ ...treble, and balance. If this happens, set the Audio source feature to display the AUDIO menu. 3. Using the TV's Features Muting the sound Press MUTE to temporarily turn on those TV stations that is no sound at all in the right channel, depending on , and the station you are watching ...
... a stereo or SAP broadcast, the word "STEREO" or "SAP" displays on-screen every time you turn off , the screen will display the word MUTE in stereo mode because the TV automatically outputs the type of normal audio. 5. Adjusting the sound quality You can be output; Press ▲ or ▼ ...treble, and balance. If this happens, set the Audio source feature to display the AUDIO menu. 3. Using the TV's Features Muting the sound Press MUTE to temporarily turn on those TV stations that is no sound at all in the right channel, depending on , and the station you are watching ...

Owners Guide
Page 40
... built-in speakers Use this feature to normal viewing. To turn on the Perfect Volume feature: 1. Press EXIT to return to select the TV mode. 2. Press TV to normal viewing. Press TV to select the TV mode. 2. Press TV to select the TV mode. 2. Press ▲ or ▼ to prevent extreme changes ... MENU, then press or to the following factory settings: Bass center (25) Treble center (25) Balance center (0) To reset your TV 40 Press EXIT to return to turn off the TV speakers when you connect an audio system (see "Connecting an analog audio system" on page 14.) To...
... built-in speakers Use this feature to normal viewing. To turn on the Perfect Volume feature: 1. Press EXIT to return to select the TV mode. 2. Press TV to normal viewing. Press TV to select the TV mode. 2. Press TV to select the TV mode. 2. Press ▲ or ▼ to prevent extreme changes ... MENU, then press or to the following factory settings: Bass center (25) Treble center (25) Balance center (0) To reset your TV 40 Press EXIT to return to turn off the TV speakers when you connect an audio system (see "Connecting an analog audio system" on page 14.) To...
Owners Guide
Page 41
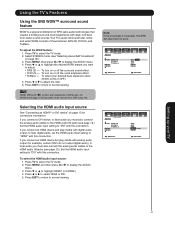
... menu. 4. To select your TV 41 If you connect an HDMI device but play media with digital audio output, to hear digital audio, set the HDMI audio input setting to adjust. • SRS 3D - Press MENU, then press or to select the TV mode. 2. To turn on or off the vocal emphasis... effect. • TruBass - Press TV to select HDMI or DVI. 5. Press or to select the TV mode. 2. WOW, SRS and symbol are trademarks of three features: SRS 3D, FOCUS, and...
... menu. 4. To select your TV 41 If you connect an HDMI device but play media with digital audio output, to hear digital audio, set the HDMI audio input setting to adjust. • SRS 3D - Press MENU, then press or to select the TV mode. 2. To turn on or off the vocal emphasis... effect. • TruBass - Press TV to select HDMI or DVI. 5. Press or to select the TV mode. 2. WOW, SRS and symbol are trademarks of three features: SRS 3D, FOCUS, and...
Owners Guide
Page 43
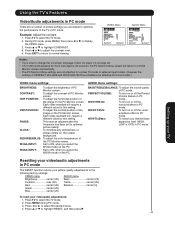
... center (25) Bass center (25) Contrast max (50) Treble center (25) Red center (25) Balance center (0) Green center (25) Blue center (25) To reset your desired bass expansion level (HIGH, LOW or OFF) in PC mode. WOW SRS 3D: To turn on or off the surround effect in PC mode...emphasis effect in PC mode. Press MENU during PC mode. 3. Press ▲ or ▼ to optimize picture quality. Press or to select the TV mode. 2. Press TV to adjust the contrast level. 5. During PC mode, press MENU, then press or to change the on-screen language, follow the steps 1-4 on ...
... center (25) Bass center (25) Contrast max (50) Treble center (25) Red center (25) Balance center (0) Green center (25) Blue center (25) To reset your desired bass expansion level (HIGH, LOW or OFF) in PC mode. WOW SRS 3D: To turn on or off the surround effect in PC mode...emphasis effect in PC mode. Press MENU during PC mode. 3. Press ▲ or ▼ to optimize picture quality. Press or to select the TV mode. 2. Press TV to adjust the contrast level. 5. During PC mode, press MENU, then press or to change the on-screen language, follow the steps 1-4 on ...
Owners Guide
Page 44
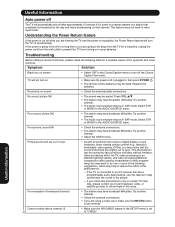
... be muted. Poor reception of broadcast channels • The station may have broadcast difficulties. Useful Information Auto power off The TV will automatically turn off after approximately 15 minutes if it is tuned to a vacant channel or a station that completes its broadcast for the ...control batteries may help synchronize the sound to inform them of this phenomenon: - If the power is plugged in video input mode. TV will not turn the TV on that channel. Press VOL ▲/▼. • The station may have broadcast difficulties. Poor sound, picture OK •...
... be muted. Poor reception of broadcast channels • The station may have broadcast difficulties. Useful Information Auto power off The TV will automatically turn off after approximately 15 minutes if it is tuned to a vacant channel or a station that completes its broadcast for the ...control batteries may help synchronize the sound to inform them of this phenomenon: - If the power is plugged in video input mode. TV will not turn the TV on that channel. Press VOL ▲/▼. • The station may have broadcast difficulties. Poor sound, picture OK •...
Owners Guide
Page 47
Cables Connections to this device must be determined by turning the equipment off and on a circuit different from that are designed to provide reasonable protection against harmful interference in a residential installation. Order Hitachi spares as replacement cables. Tèlèvision câblocompatible, Canada. ... the system must accept any changes or modifications made with shielded cables with part15 of the FCC Rules. Note This Plasma Television receiver will not occur in accordance with the instructions, may void the user's authority to this equipment does cause...
Cables Connections to this device must be determined by turning the equipment off and on a circuit different from that are designed to provide reasonable protection against harmful interference in a residential installation. Order Hitachi spares as replacement cables. Tèlèvision câblocompatible, Canada. ... the system must accept any changes or modifications made with shielded cables with part15 of the FCC Rules. Note This Plasma Television receiver will not occur in accordance with the instructions, may void the user's authority to this equipment does cause...


