Owners Guide
Page 1
PROJECTION COLOR TV 43GX01B OPERATING GUIDE TABLE OF CONTENTS IMPORTANT ...2 SAFETY TIPS...3 PICTURE CAUTIONS ...6 ACCESSORIES...6 REMOTE CONTROL BATTERY INSTALLATION AND REPLACEMENT 7 HOW TO SET UP YOUR NEW HITACHI PROJECTION TV 8 HOOK-UP CABLES AND CONNECTORS 9 FRONT PANEL CONTROLS...10 FIRST TIME USE ...11 REAR SPEAKER TERMINAL CONNECTIONS 12 EXTERNAL CONNECTIONS 13... ...29 SATELLITE BRAND CODES 29 AUDIO BRAND...30 ULTRATEC OSD...30 SET UP ...31 CUSTOM ...37 INFO ...49 CARE OF YOUR HITACHI PROJECTION TV 51 AND YOUR REMOTE CONTROL 51 RECEPTION PROBLEMS...52 USEFUL INFO...53 NOTES ...55
PROJECTION COLOR TV 43GX01B OPERATING GUIDE TABLE OF CONTENTS IMPORTANT ...2 SAFETY TIPS...3 PICTURE CAUTIONS ...6 ACCESSORIES...6 REMOTE CONTROL BATTERY INSTALLATION AND REPLACEMENT 7 HOW TO SET UP YOUR NEW HITACHI PROJECTION TV 8 HOOK-UP CABLES AND CONNECTORS 9 FRONT PANEL CONTROLS...10 FIRST TIME USE ...11 REAR SPEAKER TERMINAL CONNECTIONS 12 EXTERNAL CONNECTIONS 13... ...29 SATELLITE BRAND CODES 29 AUDIO BRAND...30 ULTRATEC OSD...30 SET UP ...31 CUSTOM ...37 INFO ...49 CARE OF YOUR HITACHI PROJECTION TV 51 AND YOUR REMOTE CONTROL 51 RECEPTION PROBLEMS...52 USEFUL INFO...53 NOTES ...55
Owners Guide
Page 2
...MODIFICATIONS: The FCC requires the user to be of sufficient magnitude to operate on 120 volts 60Hz, AC current. NEVER CONNECT THE TV TO 50Hz, DIRECT CURRENT, OR ANYTHING OTHER THAN THE SPECIFIED VOLTAGE. TO PREVENT ELECTRIC SHOCK, DO NOT USE THE TELEVISION'S (POLARIZED...will display television closed captioning ( or ), in accordance with arrowhead symbol, within the product's enclosure that are not expressly approved by Hitachi could void the user's warranty. CAUTION: Adjust only those controls that may void the user's warranty. IMPORTANT SAFEGUARDS IMPORTANT Follow all warnings...
...MODIFICATIONS: The FCC requires the user to be of sufficient magnitude to operate on 120 volts 60Hz, AC current. NEVER CONNECT THE TV TO 50Hz, DIRECT CURRENT, OR ANYTHING OTHER THAN THE SPECIFIED VOLTAGE. TO PREVENT ELECTRIC SHOCK, DO NOT USE THE TELEVISION'S (POLARIZED...will display television closed captioning ( or ), in accordance with arrowhead symbol, within the product's enclosure that are not expressly approved by Hitachi could void the user's warranty. CAUTION: Adjust only those controls that may void the user's warranty. IMPORTANT SAFEGUARDS IMPORTANT Follow all warnings...

Owners Guide
Page 6
...the same characteristics as they may require prior authorization from other sources, may cause hazards. 26 If replacement parts are NOT COVERED by TV stations and cable companies, as well as video games, stock market quotations, computer generated graphics, and other fixed (non-moving) patterns.... If the snapping or popping is in safe operating condition. Public Viewing of Copyrighted Material Public viewing of programs broadcast by your HITACHI Factory Warranty. • When using Picture-in-Picture function, the sub-picture should not be sure the service technician has used ...
...the same characteristics as they may require prior authorization from other sources, may cause hazards. 26 If replacement parts are NOT COVERED by TV stations and cable companies, as well as video games, stock market quotations, computer generated graphics, and other fixed (non-moving) patterns.... If the snapping or popping is in safe operating condition. Public Viewing of Copyrighted Material Public viewing of programs broadcast by your HITACHI Factory Warranty. • When using Picture-in-Picture function, the sub-picture should not be sure the service technician has used ...
Owners Guide
Page 8
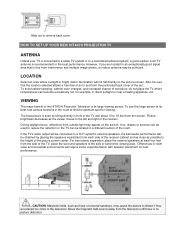
...to 18 feet from interference and multiple image ghosts, an indoor antenna may appear on the picture screen. HOW TO SET UP YOUR NEW HITACHI PROJECTION TV ANTENNA Unless your TV is free from the screen. To avoid cabinet warping, cabinet color changes, and increased chance of the... HITACHI Projection Television is its best, test various locations in front of the set failure, do not place the TV where temperatures can be sure that is connected to a cable TV system or to a Hi-Fi system's external speakers, the ...
...to 18 feet from interference and multiple image ghosts, an indoor antenna may appear on the picture screen. HOW TO SET UP YOUR NEW HITACHI PROJECTION TV ANTENNA Unless your TV is free from the screen. To avoid cabinet warping, cabinet color changes, and increased chance of the... HITACHI Projection Television is its best, test various locations in front of the set failure, do not place the TV where temperatures can be sure that is connected to a cable TV system or to a Hi-Fi system's external speakers, the ...
Owners Guide
Page 9
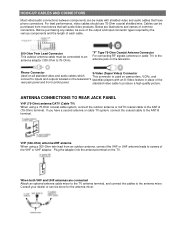
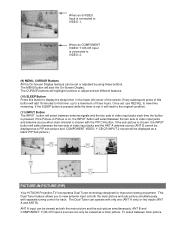
... antenna mixer. For best performance, video cables should use 75-Ohm coaxial shielded wire. Below are connected Attach an optional antenna cable mixer to the TV antenna terminal, and connect the cables to the ANT A (75-Ohm) terminal. VHF (300-Ohm) antenna/UHF antenna When using a 75-Ohm coaxial ... antenna, connect the VHF or UHF antenna leads to 75-Ohm). "F" Type 75-Ohm Coaxial Antenna Connector For connecting RF signals (antenna or cable TV) to the ANT B terminal. Before purchasing any cables, be sure of the output and input connector types required by the various components and the ...
... antenna mixer. For best performance, video cables should use 75-Ohm coaxial shielded wire. Below are connected Attach an optional antenna cable mixer to the TV antenna terminal, and connect the cables to the ANT A (75-Ohm) terminal. VHF (300-Ohm) antenna/UHF antenna When using a 75-Ohm coaxial ... antenna, connect the VHF or UHF antenna leads to 75-Ohm). "F" Type 75-Ohm Coaxial Antenna Connector For connecting RF signals (antenna or cable TV) to the ANT B terminal. Before purchasing any cables, be sure of the output and input connector types required by the various components and the ...
Owners Guide
Page 10
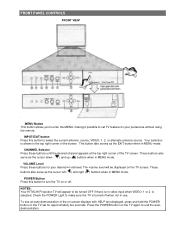
... to enter the MENU, making it possible to set for your preference without using the remote. POWER Button Press this button to turn the TV on the TV screen. This button also serves as the cursor left ( ) and right ( ) buttons when in MENU mode. VOLUME Level Press these buttons until ...the desired channel appears at the top right corner of the screen. NOTES: Your HITACHI Projection TV will be turned OFF if there is no video input when VIDEO: 1 or 2 is shown in MENU mode. INPUT/EXIT button Press this button...
... to enter the MENU, making it possible to set for your preference without using the remote. POWER Button Press this button to turn the TV on the TV screen. This button also serves as the cursor left ( ) and right ( ) buttons when in MENU mode. VOLUME Level Press these buttons until ...the desired channel appears at the top right corner of the screen. NOTES: Your HITACHI Projection TV will be turned OFF if there is no video input when VIDEO: 1 or 2 is shown in MENU mode. INPUT/EXIT button Press this button...
Owners Guide
Page 11
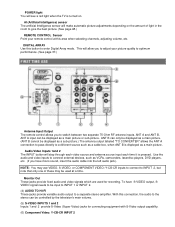
...: Y-CB-CR INPUT 2 To have mono sound, insert the audio cable into the left audio jack). POWER light You will see a red light when the TV is turned on the amount of these may be controlled by the television's main volume. (5) S-VIDEO INPUTS 1 and 2 Inputs 1 and 2 provide S-Video (Super Video) jacks...
...: Y-CB-CR INPUT 2 To have mono sound, insert the audio cable into the left audio jack). POWER light You will see a red light when the TV is turned on the amount of these may be controlled by the television's main volume. (5) S-VIDEO INPUTS 1 and 2 Inputs 1 and 2 provide S-Video (Super Video) jacks...
Owners Guide
Page 12
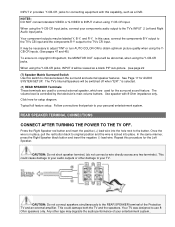
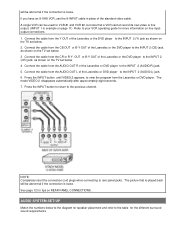
... Matrix Surround Switch Use this capability, such as a DVD. REAR SPEAKER TERMINAL CONNECTIONS CONNECT AFTER TURNING THE POWER TO THE TV OFF. This could damage both the TV and the speakers. CAUTION: Do not connect speakers simultaneously to the REAR SPEAKER terminal of your components audio output to obtain ..., pull the red button back to original position and the wire is locked into the hole next to the TV's CR input. See Page 17 for setup diagram. Your TV was designed to your personal entertainment system. Your component outputs may be switched off when "EXT." It may ...
... Matrix Surround Switch Use this capability, such as a DVD. REAR SPEAKER TERMINAL CONNECTIONS CONNECT AFTER TURNING THE POWER TO THE TV OFF. This could damage both the TV and the speakers. CAUTION: Do not connect speakers simultaneously to the REAR SPEAKER terminal of your components audio output to obtain ..., pull the red button back to original position and the wire is locked into the hole next to the TV's CR input. See Page 17 for setup diagram. Your TV was designed to your personal entertainment system. Your component outputs may be switched off when "EXT." It may ...
Owners Guide
Page 13
... may be labeled Y, B-Y, and R-Y. Use these connections in place of your device has this feature. It may be necessary to adjust TINT to the TV's INPUT 2 Left and Right Audio input jacks. Refer to INPUT 2, but note that have this feature. In this feature. A single VCR can be...VIDEO: Y-CB-CR inputs to connect to the operating guide of the standard video connection if your other electronic equipment for additional information on the TV. When using the Y-CB-CR jacks, INPUT 2 will be used at a time. Use these connections in place of an external audio amplifier...
... may be labeled Y, B-Y, and R-Y. Use these connections in place of your device has this feature. It may be necessary to adjust TINT to the TV's INPUT 2 Left and Right Audio input jacks. Refer to INPUT 2, but note that have this feature. In this feature. A single VCR can be...VIDEO: Y-CB-CR inputs to connect to the operating guide of the standard video connection if your other electronic equipment for additional information on the TV. When using the Y-CB-CR jacks, INPUT 2 will be used at a time. Use these connections in place of an external audio amplifier...
Owners Guide
Page 14
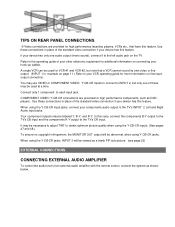
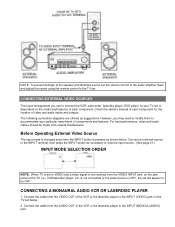
...set the volume control of the audio amplifier lower and adjust the sound using the remote control fo the TV set below . Connect an external source to the INPUT terminal, then press the INPUT button as necessary ...to view the input source. (See page 21.) INPUT MODE SELECTION ORDER NOTE: When TV is set will appear to be made from the AUDIO OUT of the VCR or the laserdisc player to ... time the INPUT button is OFF), the set to your particular assortment of the TV (i.e., VCR/laserdisc player, etc. Connect the cable from coaxial shielded wire. Connect the cable from the ...
...set the volume control of the audio amplifier lower and adjust the sound using the remote control fo the TV set below . Connect an external source to the INPUT terminal, then press the INPUT button as necessary ...to view the input source. (See page 21.) INPUT MODE SELECTION ORDER NOTE: When TV is set will appear to be made from the AUDIO OUT of the VCR or the laserdisc player to ... time the INPUT button is OFF), the set to your particular assortment of the TV (i.e., VCR/laserdisc player, etc. Connect the cable from coaxial shielded wire. Connect the cable from the ...
Owners Guide
Page 15
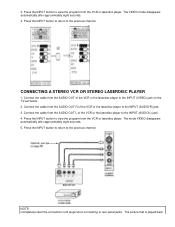
... the INPUT (AUDIO/L) jack. 4. Connect the cable from the AUDIO OUT of the VCR or the laserdisc player to the INPUT (VIDEO) jack on the TV set below. 2. Press the INPUT button to return to view the program from the VCR or laserdisc player. The VIDEO mode disappears automatically after approximately...
... the INPUT (AUDIO/L) jack. 4. Connect the cable from the AUDIO OUT of the VCR or the laserdisc player to the INPUT (VIDEO) jack on the TV set below. 2. Press the INPUT button to return to view the program from the VCR or laserdisc player. The VIDEO mode disappears automatically after approximately...
Owners Guide
Page 16
...OUT or B-Y OUT of the Laserdisc or the DVD player to the INPUT 2 (CR) jack, as shown on the TV set below . 3. Press the INPUT button until VIDEO:2 appears, to the previous channel. Connect the cable from the CR ... If you have an S-VHS VCR, use the S-INPUT cable in example on the TV set below to the diagram for speaker placement and refer to the INPUT 2 (CB) jack, as shown on the... TV set below . 4. Connect the cable from the Laserdisc or DVD player. NOTE: Completely insert the connection...
...OUT or B-Y OUT of the Laserdisc or the DVD player to the INPUT 2 (CR) jack, as shown on the TV set below . 3. Press the INPUT button until VIDEO:2 appears, to the previous channel. Connect the cable from the CR ... If you have an S-VHS VCR, use the S-INPUT cable in example on the TV set below to the diagram for speaker placement and refer to the INPUT 2 (CB) jack, as shown on the... TV set below . 4. Connect the cable from the Laserdisc or DVD player. NOTE: Completely insert the connection...
Owners Guide
Page 17
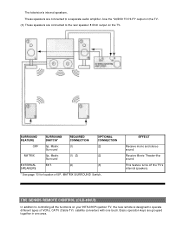
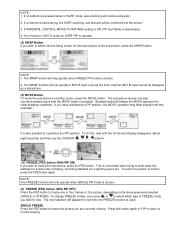
...audio amplifier. Use the "AUDIO TO HI-FI" output on the TV. (3) These speakers are connected to the rear speaker 8 Ohm output on your HITACHI Projection TV, the new remote is designed to controlling all the functions on the TV. Matrix (1) (3) (2) Surround EXTERNAL EXT. (2) (3) SPEAKERS *... See page 10 for location of VCRs, CATV (Cable TV) satellite converters with one area. Receive ...
...audio amplifier. Use the "AUDIO TO HI-FI" output on the TV. (3) These speakers are connected to the rear speaker 8 Ohm output on your HITACHI Projection TV, the new remote is designed to controlling all the functions on the TV. Matrix (1) (3) (2) Surround EXTERNAL EXT. (2) (3) SPEAKERS *... See page 10 for location of VCRs, CATV (Cable TV) satellite converters with one area. Receive ...
Owners Guide
Page 18
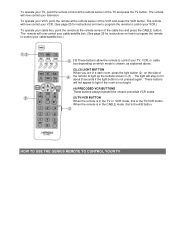
... appear to light if the room is too bright. (4) PRECODED VCR BUTTONS These buttons always transmit the chosen precoded VCR codes. (5) TV/VCR BUTTON When the remote is in the TV or VCR mode, this is not pressed again. The light will now control your cable/satellite box. (See page 26 for... instructions on how to program the remote to control your cable/satellite box.) (1) These buttons allow the remote to control your TV, VCR, or cable box depending on which mode is chosen, as explained above. (2), (3) LIGHT BUTTON When you are in a dark room, press the light button...
... appear to light if the room is too bright. (4) PRECODED VCR BUTTONS These buttons always transmit the chosen precoded VCR codes. (5) TV/VCR BUTTON When the remote is in the TV or VCR mode, this is not pressed again. The light will now control your cable/satellite box. (See page 26 for... instructions on how to program the remote to control your cable/satellite box.) (1) These buttons allow the remote to control your TV, VCR, or cable box depending on which mode is chosen, as explained above. (2), (3) LIGHT BUTTON When you are in a dark room, press the light button...
Owners Guide
Page 19
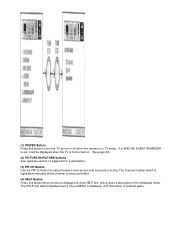
... displayed menu. If a SPECIAL EVENT REMINDER is set on or off when the remote is pressed again. The HELP text will be displayed when the TV is first turned on. (See page 52). (2) PICTURE-IN-PICTURE buttons See separate section on pages 22 for a description. (3) PIP CH Button Use the PIP... CH button to turn the TV set , it will be displayed every time a MENU is displayed, until this button when a menu is displayed to view HELP text, which channel is being...
... displayed menu. If a SPECIAL EVENT REMINDER is set on or off when the remote is pressed again. The HELP text will be displayed when the TV is first turned on. (See page 52). (2) PICTURE-IN-PICTURE buttons See separate section on pages 22 for a description. (3) PIP CH Button Use the PIP... CH button to turn the TV set , it will be displayed every time a MENU is displayed, until this button when a menu is displayed to view HELP text, which channel is being...
Owners Guide
Page 20
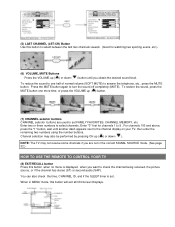
... until you are used to answer the telephone, etc., press the MUTE button. Enter two or three numbers to the channel display on your TV, then enter the remaining two numbers using the number buttons. Channel selection may not receive some channels if you obtain the desired sound level. Press... MUTE button again to check the channel being received, the picture source, or if the channel has stereo (ST) or second audio (SAP). NOTE: The TV may also be performed by pressing CH up ( ) or down ( ). Enter "0" first for channels 1 to select between the last two channels viewed. (Good ...
... until you are used to answer the telephone, etc., press the MUTE button. Enter two or three numbers to the channel display on your TV, then enter the remaining two numbers using the number buttons. Channel selection may not receive some channels if you obtain the desired sound level. Press... MUTE button again to check the channel being received, the picture source, or if the channel has stereo (ST) or second audio (SAP). NOTE: The TV may also be performed by pressing CH up ( ) or down ( ). Enter "0" first for channels 1 to select between the last two channels viewed. (Good ...
Owners Guide
Page 21
...-in the lower left corner of the screen. The Dual Tuner can be viewed as a blank PIP Sub picture.) PICTURE-IN-PICTURE (PIP) Your HITACHI Projection TV incorporates Dual Tuner technology designed for each time the button is pressed. To select between the two sets of video input jacks and antenna source...
...-in the lower left corner of the screen. The Dual Tuner can be viewed as a blank PIP Sub picture.) PICTURE-IN-PICTURE (PIP) Your HITACHI Projection TV incorporates Dual Tuner technology designed for each time the button is pressed. To select between the two sets of video input jacks and antenna source...

Owners Guide
Page 22
...), depending on the remote. Every press of the PIP CH will appear in one program at the same time. Press the button again to watch a TV program while viewing other programs from the ANT A source or any of the PIP mode. You can watch more than one corner of picture tuning...
...), depending on the remote. Every press of the PIP CH will appear in one program at the same time. Press the button again to watch a TV program while viewing other programs from the ANT A source or any of the PIP mode. You can watch more than one corner of picture tuning...
Owners Guide
Page 23
If PARENTAL CONTROL MOVIE/TV RATINGS setting is ON, PIP Surf Mode is chosen. 2. You must be in SURF mode, auto-scanning will be displayed as a sub-picture. (3) MOVE Button ...
If PARENTAL CONTROL MOVIE/TV RATINGS setting is ON, PIP Surf Mode is chosen. 2. You must be in SURF mode, auto-scanning will be displayed as a sub-picture. (3) MOVE Button ...
Owners Guide
Page 25
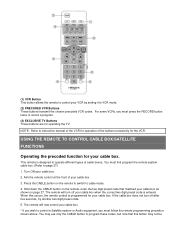
... box as shown on page 27. Hold down the CABLE button on the remote to switch to instruction manual of the VCR for operating the TV. For some VCRs, you must follow the remote programming procedure shown above. You must press the RECORD button twice to VCR mode. (2) PRECODED VCR Buttons... These buttons transmit the chosen precoded VCR codes. The remote will turn off your VCR by setting it to record a program. (3) EXCLUSIVE TV Buttons These buttons are for operation of cable boxes.
... box as shown on page 27. Hold down the CABLE button on the remote to switch to instruction manual of the VCR for operating the TV. For some VCRs, you must follow the remote programming procedure shown above. You must press the RECORD button twice to VCR mode. (2) PRECODED VCR Buttons... These buttons transmit the chosen precoded VCR codes. The remote will turn off your VCR by setting it to record a program. (3) EXCLUSIVE TV Buttons These buttons are for operation of cable boxes.


