Owners Guide
Page 1
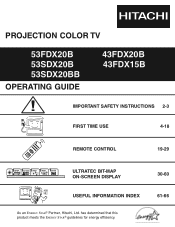
has determined that this product meets the ENERGY STAR® guidelines for energy efficiency. 30-60 61-66 PROJECTION COLOR TV 53FDX20B 53SDX20B 53SDX20BB OPERATING GUIDE 43FDX20B 43FDX15B IMPORTANT SAFETY INSTRUCTIONS 2-3 FIRST TIME USE 4-18 REMOTE CONTROL 19-29 SETUP CUSTOMIZE VIDEO SEL AUDIO THEATER ULTRATEC BIT-MAP ON-SCREEN DISPLAY USEFUL INFORMATION INDEX As an ENERGY STAR® Partner, Hitachi, Ltd.
has determined that this product meets the ENERGY STAR® guidelines for energy efficiency. 30-60 61-66 PROJECTION COLOR TV 53FDX20B 53SDX20B 53SDX20BB OPERATING GUIDE 43FDX20B 43FDX15B IMPORTANT SAFETY INSTRUCTIONS 2-3 FIRST TIME USE 4-18 REMOTE CONTROL 19-29 SETUP CUSTOMIZE VIDEO SEL AUDIO THEATER ULTRATEC BIT-MAP ON-SCREEN DISPLAY USEFUL INFORMATION INDEX As an ENERGY STAR® Partner, Hitachi, Ltd.
Owners Guide
Page 3
...not use this television. 1. The wide blade or the third prong are provided for tilt and stability. Televisions are NOT COVERED by TV stations and cable companies, as well as practical. Follow all warnings. 4. Install in accordance with the recommended safety standards for your...or objects have fallen into your outlet, consult an electrician for the grounding electrode. Do not apply excessive pulling force to your HITACHI Factory Warranty. Use only with the cart, stand, tripod, bracket, or table specified by the manufacturer. 17. Refer all ...
...not use this television. 1. The wide blade or the third prong are provided for tilt and stability. Televisions are NOT COVERED by TV stations and cable companies, as well as practical. Follow all warnings. 4. Install in accordance with the recommended safety standards for your...or objects have fallen into your outlet, consult an electrician for the grounding electrode. Do not apply excessive pulling force to your HITACHI Factory Warranty. Use only with the cart, stand, tripod, bracket, or table specified by the manufacturer. 17. Refer all ...
Owners Guide
Page 4
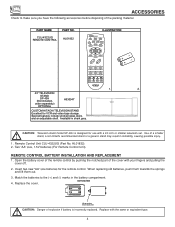
.... BOTTOM VIEW Lift up on tab to the (+) and (-) marks in the battery compartment. 4. CLU-4322UG REMOTE CONTROL HL01832 ILLUSTRATION POWER TV CBL/SAT DVD/VCR SWAP PIP MODE PIP FREEZE HELP PIP CH MENU SELECT MUTE EXIT LAST CH VOL CH 1 2 3 4 5 ...VID1 REC VID2 VID5 VID3 VID4 ASPECT MODE CLU-4322UG 1. 2. 43" TELEVISION STAND SP-43H (Not included, order separately) OPTIONAL H530047 CUSTOM HITACHI TELEVISION STAND Excellent for VCR and video-tape storage. Match the batteries to remove back cover. HL01832). 2. CAUTION: Danger of a smaller stand, a non...
.... BOTTOM VIEW Lift up on tab to the (+) and (-) marks in the battery compartment. 4. CLU-4322UG REMOTE CONTROL HL01832 ILLUSTRATION POWER TV CBL/SAT DVD/VCR SWAP PIP MODE PIP FREEZE HELP PIP CH MENU SELECT MUTE EXIT LAST CH VOL CH 1 2 3 4 5 ...VID1 REC VID2 VID5 VID3 VID4 ASPECT MODE CLU-4322UG 1. 2. 43" TELEVISION STAND SP-43H (Not included, order separately) OPTIONAL H530047 CUSTOM HITACHI TELEVISION STAND Excellent for VCR and video-tape storage. Match the batteries to remove back cover. HL01832). 2. CAUTION: Danger of a smaller stand, a non...

Owners Guide
Page 5
... 4' MINIMUM L 20' S 50 BEST HORIZONTAL 5' 10' 15' 20' 50 VIEWING ANGLE S CAUTION: Magnetic fields, such as possible to the height of the HITACHI Projection Television is recommended for best performance. To see this large screen at least four feet from the television until there is seen by placing...speakers, may appear on the picture screen. HOW TO SET UP YOUR NEW HITACHI PROJECTION TV ANTENNA Unless your TV is connected to a cable TV system or to a centralized antenna system, a good outdoor color TV antenna is its best, test various locations in the room to find the optimum...
... 4' MINIMUM L 20' S 50 BEST HORIZONTAL 5' 10' 15' 20' 50 VIEWING ANGLE S CAUTION: Magnetic fields, such as possible to the height of the HITACHI Projection Television is recommended for best performance. To see this large screen at least four feet from the television until there is seen by placing...speakers, may appear on the picture screen. HOW TO SET UP YOUR NEW HITACHI PROJECTION TV ANTENNA Unless your TV is connected to a cable TV system or to a centralized antenna system, a good outdoor color TV antenna is its best, test various locations in the room to find the optimum...

Owners Guide
Page 6
...use 75-Ohm coaxial shielded wire. Phono Connector Used on all standard video and audio cables which connect to inputs and outputs located on the TV. Plug the adapter into the antenna terminal on the television's rear jack panel and front control panel. Consult your dealer or service store for...must be connected to an antenna adapter (300-Ohm to 75-Ohm). ''F'' Type 75-Ohm Coaxial Antenna Connector For connecting RF signals (antenna or cable TV) to the antenna jack on the television. VHF (300-Ohm) antenna/UHF antenna When using a 75-Ohm coaxial cable system, connect the outdoor ...
...use 75-Ohm coaxial shielded wire. Phono Connector Used on all standard video and audio cables which connect to inputs and outputs located on the TV. Plug the adapter into the antenna terminal on the television's rear jack panel and front control panel. Consult your dealer or service store for...must be connected to an antenna adapter (300-Ohm to 75-Ohm). ''F'' Type 75-Ohm Coaxial Antenna Connector For connecting RF signals (antenna or cable TV) to the antenna jack on the television. VHF (300-Ohm) antenna/UHF antenna When using a 75-Ohm coaxial cable system, connect the outdoor ...
Owners Guide
Page 7
...SRS (G)€/ CH+ POWER INPUT MENU VOL- The volume level will appear to be displayed on the TV set TV features to make sure the TV is turned off . To change to end the autodemonstration. 7 Your HITACHI Projection TV will be turned OFF if there is no video input when VIDEO: 1, 2, 3, 4 or 5 is...VOLUME level Press these buttons until the desired channel appears in MENU mode. ባ INPUT/EXIT button Press this button to turn the TV on the TV again to video inputs, press VID1~VID5 buttons depending on your choice (see an auto-demonstration of the on-screen displays with HELP ...
...SRS (G)€/ CH+ POWER INPUT MENU VOL- The volume level will appear to be displayed on the TV set TV features to make sure the TV is turned off . To change to end the autodemonstration. 7 Your HITACHI Projection TV will be turned OFF if there is no video input when VIDEO: 1, 2, 3, 4 or 5 is...VOLUME level Press these buttons until the desired channel appears in MENU mode. ባ INPUT/EXIT button Press this button to turn the TV on the TV again to video inputs, press VID1~VID5 buttons depending on your choice (see an auto-demonstration of the on-screen displays with HELP ...
Owners Guide
Page 8
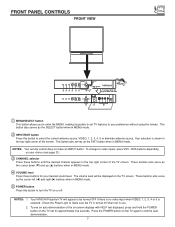
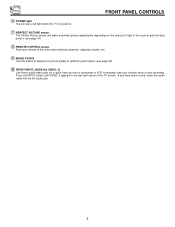
... a camcorder or VCR to instantly view your favorite show or new recording. FRONT PANEL CONTROLS ቧ POWER light You will see a red light when the TV is turned on. ቨ PERFECT PICTURE sensor The Perfect Picture sensor will make automatic picture adjustments depending on the amount of the...
... a camcorder or VCR to instantly view your favorite show or new recording. FRONT PANEL CONTROLS ቧ POWER light You will see a red light when the TV is turned on. ቨ PERFECT PICTURE sensor The Perfect Picture sensor will make automatic picture adjustments depending on the amount of the...

Owners Guide
Page 9
If you have a mono VCR, insert the audio cable into the left audio jack of your TV. 9 If you do not, the played back picture may be abnormal. 2. If you have a S-VHS VCR, use the S-INPUT cable in the following examples: MAGIC ...
If you have a mono VCR, insert the audio cable into the left audio jack of your TV. 9 If you do not, the played back picture may be abnormal. 2. If you have a S-VHS VCR, use the S-INPUT cable in the following examples: MAGIC ...

Owners Guide
Page 11
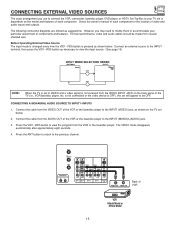
... input. 3. Your component outputs may be labeled Y, B-Y, and R-Y. Input 4 and 5 (Y/VIDEO) can be necessary to adjust TINT to the TV's PR input. 2. You may be viewed as a DVD player or Set Top Box. It may use standard video signal for standard video input. ... signal can be abnormal, when using the Y-PBPR inputs. (See pages 55 and 56.) 4. NOTES: 1. In this case, connect the components B-Y output to the TV's PB input and the components R-Y output to obtain optimum picture quality when using the Y-PBPR jacks. 5. REAR PANEL JACKS ቧ Component: Y-PBPR Inputs Inputs 4 ...
... input. 3. Your component outputs may be labeled Y, B-Y, and R-Y. Input 4 and 5 (Y/VIDEO) can be necessary to adjust TINT to the TV's PR input. 2. You may be viewed as a DVD player or Set Top Box. It may use standard video signal for standard video input. ... signal can be abnormal, when using the Y-PBPR inputs. (See pages 55 and 56.) 4. NOTES: 1. In this case, connect the components B-Y output to the TV's PB input and the components R-Y output to obtain optimum picture quality when using the Y-PBPR jacks. 5. REAR PANEL JACKS ቧ Component: Y-PBPR Inputs Inputs 4 ...

Owners Guide
Page 12
...Follow connections that pertain to each input jack. 2. HDTV Set-Top Box NOTE: 1. REAR PANEL CONNECTIONS TYPICAL FULL-FEATURE SETUP Outside antenna or cable TV coaxial cable 2-Way signal splitter VCR #1 ANT OUTPUT IN S-VIDEO V L R Optional, see tips on page 13 DVD Player OUTPUT Y PB...PB (MONO) L PR R AUDIO INPUT 4 PB (MONO) L L PR R AUDIO R AUDIO INPUT 5 MONITOR OUT Optional, see tips on page 13 OUTPUT INPUT Cable TV Box Optional, see tips on page 13 S-VIDEO V L R OUTPUT Y PB PR L R OUTPUT Laserdisc player, VCR, camcorder, etc. Connect only 1 component to your ...
...Follow connections that pertain to each input jack. 2. HDTV Set-Top Box NOTE: 1. REAR PANEL CONNECTIONS TYPICAL FULL-FEATURE SETUP Outside antenna or cable TV coaxial cable 2-Way signal splitter VCR #1 ANT OUTPUT IN S-VIDEO V L R Optional, see tips on page 13 DVD Player OUTPUT Y PB...PB (MONO) L PR R AUDIO INPUT 4 PB (MONO) L L PR R AUDIO R AUDIO INPUT 5 MONITOR OUT Optional, see tips on page 13 OUTPUT INPUT Cable TV Box Optional, see tips on page 13 S-VIDEO V L R OUTPUT Y PB PR L R OUTPUT Laserdisc player, VCR, camcorder, etc. Connect only 1 component to your ...
Owners Guide
Page 13
... a time. In this case, connect the components CB output to the TV's PB input and the components CR output to the TV's PR input. In this case, connect the components B-Y output to the TV's PB input and the components R-Y output to the TV's PR input. that a VCR cannot record its own video or line...
... a time. In this case, connect the components CB output to the TV's PB input and the components CR output to the TV's PR input. In this case, connect the components B-Y output to the TV's PB input and the components R-Y output to the TV's PR input. that a VCR cannot record its own video or line...
Owners Guide
Page 14
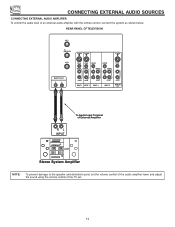
CONNECTING EXTERNAL AUDIO SOURCES CONNECTING EXTERNAL AUDIO AMPLIFIER To control the audio level of the TV set. 14 REAR PANEL OF TELEVISION ANT A TO CONVERTER S-VIDEO S-VIDEO S-VIDEO ANT B AUDIO TO HI-FI R L VIDEO VIDEO Y/VIDEO Y/VIDEO VIDEO (MONO) (MONO) L L R R AUDIO ...
CONNECTING EXTERNAL AUDIO SOURCES CONNECTING EXTERNAL AUDIO AMPLIFIER To control the audio level of the TV set. 14 REAR PANEL OF TELEVISION ANT A TO CONVERTER S-VIDEO S-VIDEO S-VIDEO ANT B AUDIO TO HI-FI R L VIDEO VIDEO Y/VIDEO Y/VIDEO VIDEO (MONO) (MONO) L L R R AUDIO ...
Owners Guide
Page 15
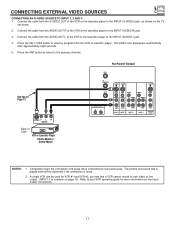
... press the VID1~VID5 button as shown below . 2. Press the ANT button to return to view the program from the AUDIO OUT of VCR VCR Hitachi Model or Similar Model 15 Check the owner's manual of each component. However, you use to connect the VCR, camcorder, laserdisc player, DVD player, or... pressed as necessary to view the input source. (See page 16) INPUT MODE SELECTION ORDER (ANTENNA) (INPUT) Ant A VID1 Video:1 VID1 ANT NOTE: When the TV is set to VIDEO and a video signal is not received from coaxial shielded wire. Connect the cable from the VIDEO OUT of the VCR or...
... press the VID1~VID5 button as shown below . 2. Press the ANT button to return to view the program from the AUDIO OUT of VCR VCR Hitachi Model or Similar Model 15 Check the owner's manual of each component. However, you use to connect the VCR, camcorder, laserdisc player, DVD player, or... pressed as necessary to view the input source. (See page 16) INPUT MODE SELECTION ORDER (ANTENNA) (INPUT) Ant A VID1 Video:1 VID1 ANT NOTE: When the TV is set to VIDEO and a video signal is not received from coaxial shielded wire. Connect the cable from the VIDEO OUT of the VCR or...

Owners Guide
Page 16
... laserdisc player. A single VCR can be abnormal if the connection is played back will be used for more information on the TV set below. 2. Press the ANT button to return to rear panel jacks. Press the VID1~VID5 button to view the program... (MONO) (MONO) L L R R AUDIO AUDIO INPUT 1 INPUT 2 PB (MONO) L PR R AUDIO INPUT 4 PB (MONO) L L PR R AUDIO R AUDIO INPUT 5 MONITOR OUT VCR Hitachi Model or Similar Model NOTES: 1. CONNECTING EXTERNAL VIDEO SOURCES CONNECTING A STEREO SOURCE TO INPUT1~INPUT5 1. Completely insert the connection cord plugs when connecting to the...
... laserdisc player. A single VCR can be abnormal if the connection is played back will be used for more information on the TV set below. 2. Press the ANT button to return to rear panel jacks. Press the VID1~VID5 button to view the program... (MONO) (MONO) L L R R AUDIO AUDIO INPUT 1 INPUT 2 PB (MONO) L PR R AUDIO INPUT 4 PB (MONO) L L PR R AUDIO R AUDIO INPUT 5 MONITOR OUT VCR Hitachi Model or Similar Model NOTES: 1. CONNECTING EXTERNAL VIDEO SOURCES CONNECTING A STEREO SOURCE TO INPUT1~INPUT5 1. Completely insert the connection cord plugs when connecting to the...
Owners Guide
Page 17
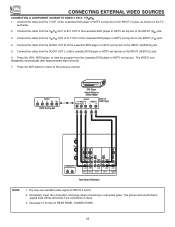
... from the S-VIDEO OUT of the VCR or the laserdisc player to rear panel jacks. A single VCR can be used for more information on the TV set below. 2. Connect the cable from the AUDIO OUT R of the VCR or the laserdisc player to the INPUT (AUDIO/L) jack. 4. Completely insert the ... is loose. 2. Connect the cable from the VCR or laserdisc player. See tips on Page 13 S-VIDEO V L R OUTPUT Back of VCR VCR or Laserdisc Player Hitachi Model or Similar Model Rear Panel of the VCR or the laserdisc player to the INPUT (S-VIDEO) jack, as shown on line inputoutput connections. 17...
... from the S-VIDEO OUT of the VCR or the laserdisc player to rear panel jacks. A single VCR can be used for more information on the TV set below. 2. Connect the cable from the AUDIO OUT R of the VCR or the laserdisc player to the INPUT (AUDIO/L) jack. 4. Completely insert the ... is loose. 2. Connect the cable from the VCR or laserdisc player. See tips on Page 13 S-VIDEO V L R OUTPUT Back of VCR VCR or Laserdisc Player Hitachi Model or Similar Model Rear Panel of the VCR or the laserdisc player to the INPUT (S-VIDEO) jack, as shown on line inputoutput connections. 17...
Owners Guide
Page 18
.... 4. Press the VID4~VID5 button, to the INPUT (Y) jack, as shown on REAR PANEL CONNECTIONS. 18 OUTPUT L R Y PB PR HDTV Set-Top Box DVD Player Hitachi Model or Similar Model OUTPUT Back of VIDEO AUDIO DVD Player OR PR/CR PB/CB Y L R ANT A TO CONVERTER S-VIDEO S-VIDEO S-VIDEO ANT B AUDIO TO... OUT or B-Y OUT of Television NOTE: 1. The VIDEO icon disappears automatically after approximately eight seconds. 7. You may use standard video signal for tips on the TV set top box. Connect the cable from the Laserdisc/DVD player or HDTV set below. 2.
.... 4. Press the VID4~VID5 button, to the INPUT (Y) jack, as shown on REAR PANEL CONNECTIONS. 18 OUTPUT L R Y PB PR HDTV Set-Top Box DVD Player Hitachi Model or Similar Model OUTPUT Back of VIDEO AUDIO DVD Player OR PR/CR PB/CB Y L R ANT A TO CONVERTER S-VIDEO S-VIDEO S-VIDEO ANT B AUDIO TO... OUT or B-Y OUT of Television NOTE: 1. The VIDEO icon disappears automatically after approximately eight seconds. 7. You may use standard video signal for tips on the TV set top box. Connect the cable from the Laserdisc/DVD player or HDTV set below. 2.
Owners Guide
Page 19
... explained above. When in TV mode, these buttons transmit the chosen precoded VCR/DVD codes. ASPECT BUTTON When the remote is in one touch. The remote will select from five video input sources. To operate your HITACHI Projection TV, the new remote control is the TV/VCR button. 19 Basic ...operation keys are grouped together in the TV or VCR mode, this is designed to operate different types of VCRs, CBL (Cable...
... explained above. When in TV mode, these buttons transmit the chosen precoded VCR/DVD codes. ASPECT BUTTON When the remote is in one touch. The remote will select from five video input sources. To operate your HITACHI Projection TV, the new remote control is the TV/VCR button. 19 Basic ...operation keys are grouped together in the TV or VCR mode, this is designed to operate different types of VCRs, CBL (Cable...
Owners Guide
Page 20
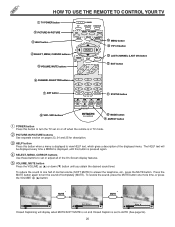
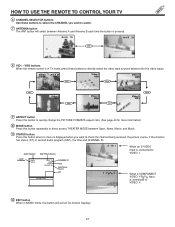
.... To restore the sound, press the MUTE button one half of normal volume (SOFT MUTE) to turn the TV set on or off completely (MUTE). HOW TO USE THE REMOTE TO CONTROL YOUR TV ቢ TV POWER button ባ PICTURE-IN-PICTURE ቤ HELP button ብ SELECT, MENU, CURSOR buttons ቦ VOLUME...buttons CLU-4322UG ቫ MODE button ቪ ASPECT button ᕃ POWER button Press this button to turn the sound off when the remote is in TV mode. ባ PICTURE-IN-PICTURE buttons See separate section on pages 23, 24 and 25 for description. ቤ HELP button Press this button is ...
.... To restore the sound, press the MUTE button one half of normal volume (SOFT MUTE) to turn the TV set on or off completely (MUTE). HOW TO USE THE REMOTE TO CONTROL YOUR TV ቢ TV POWER button ባ PICTURE-IN-PICTURE ቤ HELP button ብ SELECT, MENU, CURSOR buttons ቦ VOLUME...buttons CLU-4322UG ቫ MODE button ቪ ASPECT button ᕃ POWER button Press this button to turn the sound off when the remote is in TV mode. ባ PICTURE-IN-PICTURE buttons See separate section on pages 23, 24 and 25 for description. ቤ HELP button Press this button is ...
Owners Guide
Page 21
... PIP Ant A 12 CHANNEL ID Time Sub-Picture Source PIP Y - PBPR: 4 When a COMPONENT VIDEO: Y-PBPR Input is connected to VIDEO: 4. ቮ EXIT button When in TV mode, press these buttons to select the CHANNEL you want to check the channel being received, the picture source, if the channel has stereo (ST... you wish to watch. ቨ ANTENNA button The ANT button will exit all On-Screen Displays. 21 HOW TO USE THE REMOTE TO CONTROL YOUR TV ቧ CHANNEL SELECTOR buttons Use these buttons to directly select the video input sources between the five video inputs.
... PIP Ant A 12 CHANNEL ID Time Sub-Picture Source PIP Y - PBPR: 4 When a COMPONENT VIDEO: Y-PBPR Input is connected to VIDEO: 4. ቮ EXIT button When in TV mode, press these buttons to select the CHANNEL you want to check the channel being received, the picture source, if the channel has stereo (ST... you wish to watch. ቨ ANTENNA button The ANT button will exit all On-Screen Displays. 21 HOW TO USE THE REMOTE TO CONTROL YOUR TV ቧ CHANNEL SELECTOR buttons Use these buttons to directly select the video input sources between the five video inputs.
Owners Guide
Page 22
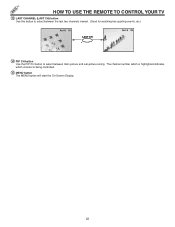
The channel number which is highlighted indicates which channel is being controlled. ቱ MENU button The MENU button will start the On-Screen Display. 22 HOW TO USE THE REMOTE TO CONTROL YOUR TV ቯ LAST CHANNEL (LAST CH) button Use this button to select between the last two channels viewed. (Good for watching two sporting events, etc.) Ant A 10 LAST CH Ant A 39 ተ PIP CH button Use the PIP CH button to select between main picture and sub-picture tuning.
The channel number which is highlighted indicates which channel is being controlled. ቱ MENU button The MENU button will start the On-Screen Display. 22 HOW TO USE THE REMOTE TO CONTROL YOUR TV ቯ LAST CHANNEL (LAST CH) button Use this button to select between the last two channels viewed. (Good for watching two sporting events, etc.) Ant A 10 LAST CH Ant A 39 ተ PIP CH button Use the PIP CH button to select between main picture and sub-picture tuning.


