Owners Guide
Page 3
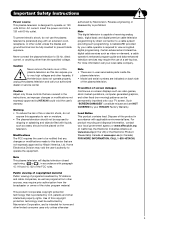
... modifications made to this device that are not expressly approved by HITACHI could void the user's warranty. If the television does not operate properly, unplug the plasma television and call your TV screen. Caution Adjust only those controls that are covered in accordance... laws. Public viewing of copyrighted material Public viewing of programs broadcast by TV stations and cable companies, as well as improper changes or modifications not expressly approved by Hitachi America, Ltd. Note This plasma television will display television closed captioning, ( or ), in Canada). Insert...
... modifications made to this device that are not expressly approved by HITACHI could void the user's warranty. If the television does not operate properly, unplug the plasma television and call your TV screen. Caution Adjust only those controls that are covered in accordance... laws. Public viewing of copyrighted material Public viewing of programs broadcast by TV stations and cable companies, as well as improper changes or modifications not expressly approved by Hitachi America, Ltd. Note This plasma television will display television closed captioning, ( or ), in Canada). Insert...
Owners Guide
Page 4
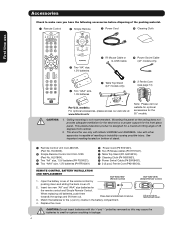
...For optional accessories, please access our web site at: www.hitachi.us/tv Note: Please visit our website for optional accessories for a ...5V batteries ¶ Table Top Stand (42" models only) µ 2 Ferrite Core (see page 14) For U.S. This plasma television product is designed for the 55" models. Insert two new "AA" and "AAA" size batteries for use Accessories Check... bottom of stand. ³ Remote Control Unit CLU-3851WL (Part No. CAUTION: 1. Use with Hitachi 42HDX62 and 42HDX62A. Press down and sliding the back cover off. 2. First time use only with other apparatus...
...For optional accessories, please access our web site at: www.hitachi.us/tv Note: Please visit our website for optional accessories for a ...5V batteries ¶ Table Top Stand (42" models only) µ 2 Ferrite Core (see page 14) For U.S. This plasma television product is designed for the 55" models. Insert two new "AA" and "AAA" size batteries for use Accessories Check... bottom of stand. ³ Remote Control Unit CLU-3851WL (Part No. CAUTION: 1. Use with Hitachi 42HDX62 and 42HDX62A. Press down and sliding the back cover off. 2. First time use only with other apparatus...

Owners Guide
Page 5
... ghosts, an indoor antenna may be secured to the wall as shown below . Using wood screws (two) fasten the set failure, do not place the TV where temperatures can become excessively hot, for model 55HDT52 are required to transport it safely. Do not place any objects on the rear of the... monitor when using the wall mount bracket. 2. First time use How To Set Up Your New Hitachi Plasma Television To take measures to prevent the Plasma Display from tipping over and prevent possible injury it is 30˚ (left and right).
... ghosts, an indoor antenna may be secured to the wall as shown below . Using wood screws (two) fasten the set failure, do not place the TV where temperatures can become excessively hot, for model 55HDT52 are required to transport it safely. Do not place any objects on the rear of the... monitor when using the wall mount bracket. 2. First time use How To Set Up Your New Hitachi Plasma Television To take measures to prevent the Plasma Display from tipping over and prevent possible injury it is 30˚ (left and right).

Owners Guide
Page 8
... OSD, INPUTS, and AV NET menu systems. (-) BUTTON (TV,STB) The (-) button is used to operate different types of your TV. LEGEND TV - ASPECT BUTTON (TV) Changes the aspect ratio of your HITACHI Plasma TV, the new remote control is designed to Select/Activate highlighted menu... items. INFO BUTTON (TV, STB, CBL, PVR) Displays various information on the ...
... OSD, INPUTS, and AV NET menu systems. (-) BUTTON (TV,STB) The (-) button is used to operate different types of your TV. LEGEND TV - ASPECT BUTTON (TV) Changes the aspect ratio of your HITACHI Plasma TV, the new remote control is designed to Select/Activate highlighted menu... items. INFO BUTTON (TV, STB, CBL, PVR) Displays various information on the ...
Owners Guide
Page 10
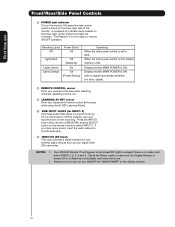
Display monitor MAIN POWER is ON. Your HITACHI Plasma TV will illuminate. First time use the CURSOR PAD and the SELECT button on the remote control to select INPUT 5. Display monitor MAIN POWER is ON ... on the lower right corner of the display monitor. 10 A red stand-by indicator lamp located on the lower right side of the monitor. The Plasma TV is ON. Indicating Lamp Power Status Off Off Lights Red Lights Green Lights Orange Off (Stand-by mode (lights red) when not in Stand-by...
Display monitor MAIN POWER is ON. Your HITACHI Plasma TV will illuminate. First time use the CURSOR PAD and the SELECT button on the remote control to select INPUT 5. Display monitor MAIN POWER is ON ... on the lower right corner of the display monitor. 10 A red stand-by indicator lamp located on the lower right side of the monitor. The Plasma TV is ON. Indicating Lamp Power Status Off Off Lights Red Lights Green Lights Orange Off (Stand-by mode (lights red) when not in Stand-by...

Owners Guide
Page 14
... 1394 cable (not supplied) on the model and features of each component for the location of your choice (see page 27). If you to your TV. 4. S-VIDEO input takes priority over VIDEO input. 5. Check the owner's manual of components and features. First time use Connecting External Video Sources The front ... or Digital Video Camcorder as shown. 2. If you do not, the played back picture may need to modify them to left audio jack of your Plasma TV is dependent on the Ferrite ferrite core near the Photo Input Core or IEEE 1394 Input as shown in place of the INPUT terminals, then...
... 1394 cable (not supplied) on the model and features of each component for the location of your choice (see page 27). If you to your TV. 4. S-VIDEO input takes priority over VIDEO input. 5. Check the owner's manual of components and features. First time use Connecting External Video Sources The front ... or Digital Video Camcorder as shown. 2. If you do not, the played back picture may need to modify them to left audio jack of your Plasma TV is dependent on the Ferrite ferrite core near the Photo Input Core or IEEE 1394 Input as shown in place of the INPUT terminals, then...

Owners Guide
Page 21
...S-Video only or Video only. Press the INPUTS button, then select INPUT 2 from the Rear Panel is controlled by the amplifier, not by the Plasma Television. Connecting S-Video: Connect the cable from the S-VIDEO OUT of the VCR or Laserdisk player. Select CABLE or AIR from the VCR or...G-LINK Optional R L V S-VIDEO INPUT 2. Connect the Cable and/or Air cables / G-LINK 3. Connect an optical cable from the AUDIO IN L of the Plasma TV to the OUTPUT (AUDIO/L) jack on the right. It does not output component video. 1. AUDIO OUT VIDEO OUT Back of VCR CONNECTING AN EXTERNAL AUDIO ...
...S-Video only or Video only. Press the INPUTS button, then select INPUT 2 from the Rear Panel is controlled by the amplifier, not by the Plasma Television. Connecting S-Video: Connect the cable from the S-VIDEO OUT of the VCR or Laserdisk player. Select CABLE or AIR from the VCR or...G-LINK Optional R L V S-VIDEO INPUT 2. Connect the Cable and/or Air cables / G-LINK 3. Connect an optical cable from the AUDIO IN L of the Plasma TV to the OUTPUT (AUDIO/L) jack on the right. It does not output component video. 1. AUDIO OUT VIDEO OUT Back of VCR CONNECTING AN EXTERNAL AUDIO ...

Owners Guide
Page 22
... of the Audio/Video components for each of the external components you can use Connecting External Video Sources Your HITACHI Plasma Television is setup, it allows your HITACHI Plasma TV Remote Control. This feature helps to highlight the SET AV NET features then press the SELECT button. 8. Use... the CURSOR PAD ̄ or channel scroll to control your Hitachi Plasma Television and external Audio/Video equipment (VCR and DVD Player...
... of the Audio/Video components for each of the external components you can use Connecting External Video Sources Your HITACHI Plasma Television is setup, it allows your HITACHI Plasma TV Remote Control. This feature helps to highlight the SET AV NET features then press the SELECT button. 8. Use... the CURSOR PAD ̄ or channel scroll to control your Hitachi Plasma Television and external Audio/Video equipment (VCR and DVD Player...

Owners Guide
Page 23
...CONNECTING THE CABLE BOX/VCR TO G-LINK FOR TV GUIDE ON SCREENTM SYSTEM 1. To access the TV Guide On-ScreenTM system, press the MENU button. 5. One IR Mouse cable can use Connecting External Video Sources Your HITACHI Plasma Television is equipped with your cable box to receive...external Audio/Video components. Connect your external Audio/Video components to work . 3. The Plasma Television Rear Panel has IR BLASTER/G-LINK jacks. First time use your HITACHI Plasma TV Remote Control and the TV Guide On Screen system to control your cable box and VCR recording features. This ...
...CONNECTING THE CABLE BOX/VCR TO G-LINK FOR TV GUIDE ON SCREENTM SYSTEM 1. To access the TV Guide On-ScreenTM system, press the MENU button. 5. One IR Mouse cable can use Connecting External Video Sources Your HITACHI Plasma Television is equipped with your cable box to receive...external Audio/Video components. Connect your external Audio/Video components to work . 3. The Plasma Television Rear Panel has IR BLASTER/G-LINK jacks. First time use your HITACHI Plasma TV Remote Control and the TV Guide On Screen system to control your cable box and VCR recording features. This ...

Owners Guide
Page 24
...The Remote Control In addition to controlling all the functions on your HITACHI Plasma TV, the new remote control is designed to operate different types of ...dark. When the LIGHT button is pressed (including the LIGHT button), the illumination will now control your Plasma TV, point the remote control at the remote sensor of the settop-box and select the SET-TOP-BOX.... MANUAL MODE (Optional mode) In Manual mode, the illumination will blink 3 times to Automatic) 1. The TV mode indicator will only work when the LIGHT button is pressed, the illumination will blink 3 times to control ...
...The Remote Control In addition to controlling all the functions on your HITACHI Plasma TV, the new remote control is designed to operate different types of ...dark. When the LIGHT button is pressed (including the LIGHT button), the illumination will now control your Plasma TV, point the remote control at the remote sensor of the settop-box and select the SET-TOP-BOX.... MANUAL MODE (Optional mode) In Manual mode, the illumination will blink 3 times to Automatic) 1. The TV mode indicator will only work when the LIGHT button is pressed, the illumination will blink 3 times to control ...

Owners Guide
Page 27
...ተ INPUTS button When the remote control is locked. 27 Press this button to access the Channel Guide of the Plasma TV (see page 46 for numeric entries. PM ST TV-14 V Audio Broadcast Broadcast Rating Closed Captioning Day CC Off Cable 6 11:00PM Aspect Mode 19:9 Standard Main Picture...if the TIMER is connected to choose the IEEE1394 Input (see page 57). INPUT 5 Select to choose INPUT 1. AIR Select to access the TV Guide On ScreenTM interactive display (see page 30). IEEE1394 Select to INPUT 1 YPBPR:1 480i 11:00PM INFO Day CC Off 4:3 Expanded Photo Input...
...ተ INPUTS button When the remote control is locked. 27 Press this button to access the Channel Guide of the Plasma TV (see page 46 for numeric entries. PM ST TV-14 V Audio Broadcast Broadcast Rating Closed Captioning Day CC Off Cable 6 11:00PM Aspect Mode 19:9 Standard Main Picture...if the TIMER is connected to choose the IEEE1394 Input (see page 57). INPUT 5 Select to choose INPUT 1. AIR Select to access the TV Guide On ScreenTM interactive display (see page 30). IEEE1394 Select to INPUT 1 YPBPR:1 480i 11:00PM INFO Day CC Off 4:3 Expanded Photo Input...

Owners Guide
Page 32
... not Main Picture available with every press of ቢ the main picture. Press the CURSOR PAD (̇ or ̈) to watch a TV program while viewing other programs from any of the video inputs. AIR will not be either AIR or CABLE ቢ PIP button Press the ... available while using a CableCARD. Please refer to view antenna inputs on the INPUT signal. The Remote Control Picture-in-Picture (PIP) Your HITACHI Plasma TV incorporates Two Tuner technology designed for each. Connect the Cable and/or Air cables / G-LINK The CABLE and AIR input cannot be viewed ...
... not Main Picture available with every press of ቢ the main picture. Press the CURSOR PAD (̇ or ̈) to watch a TV program while viewing other programs from any of the video inputs. AIR will not be either AIR or CABLE ቢ PIP button Press the ... available while using a CableCARD. Please refer to view antenna inputs on the INPUT signal. The Remote Control Picture-in-Picture (PIP) Your HITACHI Plasma TV incorporates Two Tuner technology designed for each. Connect the Cable and/or Air cables / G-LINK The CABLE and AIR input cannot be viewed ...

Owners Guide
Page 44
... or CHANNEL WHEEL to navigate to quickly exit from a menu. Press EXIT on the remote control to a different menu item. 3. Video Audio TV Guide On Screen Channel Manager Locks Timers Setup Power Swivel Move SEL Select This part of Red, Green and Color according to adjust the Contrast... the remote control to constant color levels even after a program or channel changes. standard mode. On-Screen Display 1. Press MENU on your HITACHI Plasma TV. 2. Standard for standard colors or Black and White for more blue, set to Medium for less intense automatically monitors and adjusts the color...
... or CHANNEL WHEEL to navigate to quickly exit from a menu. Press EXIT on the remote control to a different menu item. 3. Video Audio TV Guide On Screen Channel Manager Locks Timers Setup Power Swivel Move SEL Select This part of Red, Green and Color according to adjust the Contrast... the remote control to constant color levels even after a program or channel changes. standard mode. On-Screen Display 1. Press MENU on your HITACHI Plasma TV. 2. Standard for standard colors or Black and White for more blue, set to Medium for less intense automatically monitors and adjusts the color...

Owners Guide
Page 50
...system, BBE will also create an incredible crisp sound experience from just two external speakers (or) the two internal speakers of the Plasma TV internal speakers. TruBass technology is selected you are trademarks of the original performance. Press EXIT to quit the MENU, or select ... SRS Labs, Inc. The additional menu items Bass and Balance can be selected and Balance SRS BBE L R Off Hard adjusted in your HITACHI Television. BBE brings to Off, Low, Medium and High. Audio Treble 50% NOTE: If TREBLE is incorporated under license from SRS Labs...
...system, BBE will also create an incredible crisp sound experience from just two external speakers (or) the two internal speakers of the Plasma TV internal speakers. TruBass technology is selected you are trademarks of the original performance. Press EXIT to quit the MENU, or select ... SRS Labs, Inc. The additional menu items Bass and Balance can be selected and Balance SRS BBE L R Off Hard adjusted in your HITACHI Television. BBE brings to Off, Low, Medium and High. Audio Treble 50% NOTE: If TREBLE is incorporated under license from SRS Labs...

Owners Guide
Page 52
... immediate access to enter the ZIP code (USA) or postal code (CANADA) of your location. To Setup the TV Guide On Screen System: 1. Screen 3: Do you must first setup the Plasma TV as shown on Page 23. If NO: Please see Screen 4. Once the setup process is complete, the program ...listings are automatically updated several times a day. Use the CURSOR PAD ̄ to continue. Press the SELECT button to highlight TV GUIDE ON SCREEN, then press...
... immediate access to enter the ZIP code (USA) or postal code (CANADA) of your location. To Setup the TV Guide On Screen System: 1. Screen 3: Do you must first setup the Plasma TV as shown on Page 23. If NO: Please see Screen 4. Once the setup process is complete, the program ...listings are automatically updated several times a day. Use the CURSOR PAD ̄ to continue. Press the SELECT button to highlight TV GUIDE ON SCREEN, then press...

Owners Guide
Page 56
The TV Guide On Screen system setup is complete. Screen 23: The last screen gives tips on using a Cable box, please leave it ON to exit the Setup. NOTE: 1. On-Screen Display TV Guide On Screen Screen 22: Congratulations! Press the SELECT button to continually receive updated program listings from your cable company. 2. The Plasma TV should be in standby mode in order to finalize. If using the TV Guide On Screen system. Press the SELECT button to continually receive updated program listings from your cable company. 56
The TV Guide On Screen system setup is complete. Screen 23: The last screen gives tips on using a Cable box, please leave it ON to exit the Setup. NOTE: 1. On-Screen Display TV Guide On Screen Screen 22: Congratulations! Press the SELECT button to continually receive updated program listings from your cable company. 2. The Plasma TV should be in standby mode in order to finalize. If using the TV Guide On Screen system. Press the SELECT button to continually receive updated program listings from your cable company. 56

Owners Guide
Page 82
...button. 3. However, intended operation is for use with your VCR, laserdisc, or DVD player OFF. Video Audio TV Guide On Screen Channel Manager Locks Timers Setup Power Swivel Move SEL Select 3. Press the SELECT button to watch it...Move SEL Select INPUT 4 Auto Link Use this function to automatically turn on your VCR and watch a movie with your TV as described above. 2. Use the CURSOR PAD ̆, ̄, ̇ or ̈ to INPUT 4 automatically ... CURSOR PAD ̄ or CHANNEL WHEEL to record a movie with your HITACHI Plasma TV Remote Control. Press the SELECT button to select.
...button. 3. However, intended operation is for use with your VCR, laserdisc, or DVD player OFF. Video Audio TV Guide On Screen Channel Manager Locks Timers Setup Power Swivel Move SEL Select 3. Press the SELECT button to watch it...Move SEL Select INPUT 4 Auto Link Use this function to automatically turn on your VCR and watch a movie with your TV as described above. 2. Use the CURSOR PAD ̆, ̄, ̇ or ̈ to INPUT 4 automatically ... CURSOR PAD ̄ or CHANNEL WHEEL to record a movie with your HITACHI Plasma TV Remote Control. Press the SELECT button to select.

Owners Guide
Page 86
... : A/V Receiver Setup Please choose the Brand Name of your A/V Receiver remote control while pointing directly at the learning AV NET sensor of the Plasma TV (located at the lower right corner of the screen) at a distance of 5 to 10 feet or 2 to the next screen. Move SEL... OK VOL̆ Transfer was successful, the screen below appears. Otherwise, try again. Use the CURSOR PAD ̆ or ̄ to the next SETUP screen. TV Softkeys POWER CH̆ VOL̆ MUTE CH̄ VOL̄ AUDIO SOURCE 1 SOURCE 2 SOURCE 3 SOURCE 4 SOURCE 5 SOURCE 6 SOURCE 7 SOURCE 8 SOURCE...
... : A/V Receiver Setup Please choose the Brand Name of your A/V Receiver remote control while pointing directly at the learning AV NET sensor of the Plasma TV (located at the lower right corner of the screen) at a distance of 5 to 10 feet or 2 to the next screen. Move SEL... OK VOL̆ Transfer was successful, the screen below appears. Otherwise, try again. Use the CURSOR PAD ̆ or ̄ to the next SETUP screen. TV Softkeys POWER CH̆ VOL̆ MUTE CH̄ VOL̄ AUDIO SOURCE 1 SOURCE 2 SOURCE 3 SOURCE 4 SOURCE 5 SOURCE 6 SOURCE 7 SOURCE 8 SOURCE...

Owners Guide
Page 88
... : Custom Settings Press and hold the ̈ "Play button" of the DVD remote control while pointing directly at the learning AV NET sensor of the Plasma TV (located at the lower right corner of the screen) at a distance of 3 to 6 feet or 1 to this command. 15. Use the CURSOR ...AV Net Setup Wizard : Custom Settings Custom settings Please choose the device you wish to learn . Select NEXT to learn . (Example: PLAY ̈ button). 10. TV Softkeys POWER ̇̇ ̈̈ MENU ̇̇ ̈ ̈̈ SELECT ̆ ̈ EXIT ̄ ̇ Move SEL Select Back ...
... : Custom Settings Press and hold the ̈ "Play button" of the DVD remote control while pointing directly at the learning AV NET sensor of the Plasma TV (located at the lower right corner of the screen) at a distance of 3 to 6 feet or 1 to this command. 15. Use the CURSOR ...AV Net Setup Wizard : Custom Settings Custom settings Please choose the device you wish to learn . Select NEXT to learn . (Example: PLAY ̈ button). 10. TV Softkeys POWER ̇̇ ̈̈ MENU ̇̇ ̈ ̈̈ SELECT ̆ ̈ EXIT ̄ ̇ Move SEL Select Back ...

Owners Guide
Page 91
... Monitor: Select MONITOR to output the audio Setup and video signals of the TV. Setup Menu Preference Screen Saver Set The Inputs Set AV NET Set Closed Captions Set Monitor Out Upgrades Set Stand-by the Plasma TV Volume Up/Down. YES Cable) Analog Channel Video - YES Video_3 - When... TV TUNER OUT is connected to the audio and video output of the chosen input source (CABLE, AIR,...
... Monitor: Select MONITOR to output the audio Setup and video signals of the TV. Setup Menu Preference Screen Saver Set The Inputs Set AV NET Set Closed Captions Set Monitor Out Upgrades Set Stand-by the Plasma TV Volume Up/Down. YES Cable) Analog Channel Video - YES Video_3 - When... TV TUNER OUT is connected to the audio and video output of the chosen input source (CABLE, AIR,...


