Owners Guide
Page 2
..., performance, and ease of service of the building, as power-supply cord or plug is damaged, liquid has been spilled or objects CAUTION have fallen into your product model. Televisions are YOUR HITACHI PLASMA TELEVISION provided for (including amplifiers) that may be located in the vicinity of important operating and maintenance (servicing) instructions in any way, such as close to comply with the CAUTION...
..., performance, and ease of service of the building, as power-supply cord or plug is damaged, liquid has been spilled or objects CAUTION have fallen into your product model. Televisions are YOUR HITACHI PLASMA TELEVISION provided for (including amplifiers) that may be located in the vicinity of important operating and maintenance (servicing) instructions in any way, such as close to comply with the CAUTION...
Owners Guide
Page 3
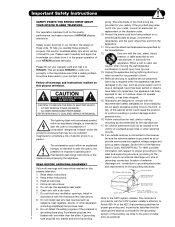
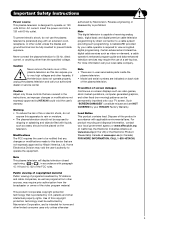
...-HITACHI. Public viewing of copyrighted material Public viewing of receiving analog basic, digital basic and digital premium cable television programming by U.S. Use of the FCC rules. Important Safety Instructions Power source This plasma television is intended for home and other limited consumer uses only unless otherwise 3 Insert the power cord into a 120 volt 60 Hz outlet. Never connect the plasma television to operate the equipment. Caution Adjust only those controls that any changes or...
...-HITACHI. Public viewing of copyrighted material Public viewing of receiving analog basic, digital basic and digital premium cable television programming by U.S. Use of the FCC rules. Important Safety Instructions Power source This plasma television is intended for home and other limited consumer uses only unless otherwise 3 Insert the power cord into a 120 volt 60 Hz outlet. Never connect the plasma television to operate the equipment. Caution Adjust only those controls that any changes or...

Owners Guide
Page 5
... rear of the Plasma Display stand as shown in position. Also, be sure that is connected to a cable TV system or to a table-top 1. First time use How To Set Up Your New Hitachi Plasma Television To take measures to prevent the Plasma Display from tipping over and prevent possible injury it should be lifted forward using the top and base on both sides of the television for model...
... rear of the Plasma Display stand as shown in position. Also, be sure that is connected to a cable TV system or to a table-top 1. First time use How To Set Up Your New Hitachi Plasma Television To take measures to prevent the Plasma Display from tipping over and prevent possible injury it should be lifted forward using the top and base on both sides of the television for model...
Owners Guide
Page 9
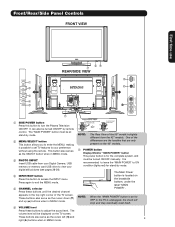
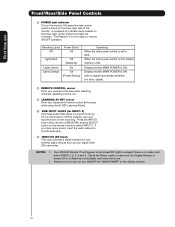
... buttons until the desired channel appears in MENU mode. ቤ PHOTO INPUT Insert USB cable from the 42" models. Firmly bind the cables. NOTE: When the "MAIN POWER" button is set TV features to the claw. NOTE: The Rear View of the TV screen. Press again to exit the MENU mode. ቦ CHANNEL selector Press these buttons to ON condition (lights red) for the complete system, and must be turned ON/OFF manually...
... buttons until the desired channel appears in MENU mode. ቤ PHOTO INPUT Insert USB cable from the 42" models. Firmly bind the cables. NOTE: When the "MAIN POWER" button is set TV features to the claw. NOTE: The Rear View of the TV screen. Press again to exit the MENU mode. ቦ CHANNEL selector Press these buttons to ON condition (lights red) for the complete system, and must be turned ON/OFF manually...
Owners Guide
Page 10
... sound, insert the audio cable into the left audio jack. ቭ IEEE1394 (DV Input) This input provides a digital interface for remote ON/OFF operation. Check the Power Light to make sure the Display Monitor is ON with no signal input except antenna (no video input when VIDEO: 1, 2, 3, 4 and 5. Display monitor MAIN POWER is turned off or in use. 2. First time use the CURSOR PAD and the SELECT button on the remote control to select INPUT 5. NOTES: 1. A red stand-by indicator lamp located...
... sound, insert the audio cable into the left audio jack. ቭ IEEE1394 (DV Input) This input provides a digital interface for remote ON/OFF operation. Check the Power Light to make sure the Display Monitor is ON with no signal input except antenna (no video input when VIDEO: 1, 2, 3, 4 and 5. Display monitor MAIN POWER is turned off or in use. 2. First time use the CURSOR PAD and the SELECT button on the remote control to select INPUT 5. NOTES: 1. A red stand-by indicator lamp located...

Owners Guide
Page 11
... Video) jacks for Service use only. 11 Specifically for connecting equipment with personal computers. 2. "Dolby" and the double-D symbol are available for HDMI input. ብ Optical Out (Digital Audio) This jack provides Digital Audio Output for recording. Your component outputs may be used for your Plasma Television's remote control in TV mode. Use the S-VIDEO Output for recording, only when the input is Dolby® Digital and PCM compatible, such as Set-Top-Boxes or DVD players equipped with an HDMI output connection...
... Video) jacks for Service use only. 11 Specifically for connecting equipment with personal computers. 2. "Dolby" and the double-D symbol are available for HDMI input. ብ Optical Out (Digital Audio) This jack provides Digital Audio Output for recording. Your component outputs may be used for your Plasma Television's remote control in TV mode. Use the S-VIDEO Output for recording, only when the input is Dolby® Digital and PCM compatible, such as Set-Top-Boxes or DVD players equipped with an HDMI output connection...

Owners Guide
Page 13
... CableCARD Information menu. 1. Setup Menu Preference Screen Saver Set The Inputs Set AV NET Set Closed Captions Set Monitor Out CableCARD Information Upgrades Set Stand-By Mode Move SEL Select 4. This process must be needed because the channel list is for obstructions or damage. Follow the instructions below to return NOTE: The Diagnostics Info. Remove the CableCARD by pressing the eject button and pull the CableCARD straight out. CableCARD Info. If problems still...
... CableCARD Information menu. 1. Setup Menu Preference Screen Saver Set The Inputs Set AV NET Set Closed Captions Set Monitor Out CableCARD Information Upgrades Set Stand-By Mode Move SEL Select 4. This process must be needed because the channel list is for obstructions or damage. Follow the instructions below to return NOTE: The Diagnostics Info. Remove the CableCARD by pressing the eject button and pull the CableCARD straight out. CableCARD Info. If problems still...

Owners Guide
Page 14
... video camcorder, digital camera or Digital Video Camcorder as shown in place of video and audio inputs and outputs. If you may be made from coaxial shielded wire. Check the owner's manual of each component. Wrap once the USB cable or IEEE 1394 cable (not supplied) on the model and features of components and features. First time use Connecting External Video Sources The front panel jacks are offered as suggestions. Fold and close...
... video camcorder, digital camera or Digital Video Camcorder as shown in place of video and audio inputs and outputs. If you may be made from coaxial shielded wire. Check the owner's manual of each component. Wrap once the USB cable or IEEE 1394 cable (not supplied) on the model and features of components and features. First time use Connecting External Video Sources The front panel jacks are offered as suggestions. Fold and close...

Owners Guide
Page 18
... HDTV set top box or DVD player to the INPUT (AUDIO/L) jack as shown on the Rear Panel below . 3. HDCP is a cryptographic system that is played back will be abnormal if the connection is not a "NETWORK" technology. The connected digital output device controls the HDMI interface so proper setup of HDTV Set-Top-Box or DVD Player HDTV Set-Top-Box or DVD Player or PR PB DVI to the last channel tuned. Press the INPUTS button, then select INPUTS 1 or 2 to view the program...
... HDTV set top box or DVD player to the INPUT (AUDIO/L) jack as shown on the Rear Panel below . 3. HDCP is a cryptographic system that is played back will be abnormal if the connection is not a "NETWORK" technology. The connected digital output device controls the HDMI interface so proper setup of HDTV Set-Top-Box or DVD Player HDTV Set-Top-Box or DVD Player or PR PB DVI to the last channel tuned. Press the INPUTS button, then select INPUTS 1 or 2 to view the program...

Owners Guide
Page 19
... last channel tuned. / G-LINK OUTPUT L R Y PB PR OR HDTV Set-Top Box OUTPUT Back of the Laserdisc/DVD player or HDTV set top box to view the program from the INPUTS menu to the INPUT (AUDIO/R) jack. 5. Completely insert the connection cord Laserdisc/DVD player or HDTV set top box to the INPUT (PR) jack. 4. See page 16 for tips on the Rear The picture and sound that is loose. 2. Select CABLE or AIR to return to rear panel jacks. First time use Connecting External Video Sources CONNECTING...
... last channel tuned. / G-LINK OUTPUT L R Y PB PR OR HDTV Set-Top Box OUTPUT Back of the Laserdisc/DVD player or HDTV set top box to view the program from the INPUTS menu to the INPUT (AUDIO/R) jack. 5. Completely insert the connection cord Laserdisc/DVD player or HDTV set top box to the INPUT (PR) jack. 4. See page 16 for tips on the Rear The picture and sound that is loose. 2. Select CABLE or AIR to return to rear panel jacks. First time use Connecting External Video Sources CONNECTING...

Owners Guide
Page 23
... your cable box to receive program listings and to select. 7. Press the SELECT or CURSOR PAD ̈ button to enable VCR recording features. One IR Mouse cable can use Connecting External Video Sources Your HITACHI Plasma Television is necessary for IEEE1394 equipped devices, such as a D-VHS. 2. Video Audio TV Guide On Screen Channel Manager Locks Timers Setup Power Swivel Move SEL Select NOTE: 1. First time use your HITACHI Plasma TV Remote Control and the TV Guide On Screen system to the Rear Panel shown...
... your cable box to receive program listings and to select. 7. Press the SELECT or CURSOR PAD ̈ button to enable VCR recording features. One IR Mouse cable can use Connecting External Video Sources Your HITACHI Plasma Television is necessary for IEEE1394 equipped devices, such as a D-VHS. 2. Video Audio TV Guide On Screen Channel Manager Locks Timers Setup Power Swivel Move SEL Select NOTE: 1. First time use your HITACHI Plasma TV Remote Control and the TV Guide On Screen system to the Rear Panel shown...

Owners Guide
Page 24
... control your set -top-box, satellite receiver, DVD players, and other audio/video equipment with one area. The PVR mode indicator will blink, indicating that the remote will now control your VCR (see page 35 for instruction on how to program the remote to control your Plasma TV, point the remote control at the remote sensor of the VCR and select PVR by pressing the ̇ or ̈ button of the television...
... control your set -top-box, satellite receiver, DVD players, and other audio/video equipment with one area. The PVR mode indicator will blink, indicating that the remote will now control your VCR (see page 35 for instruction on how to program the remote to control your Plasma TV, point the remote control at the remote sensor of the VCR and select PVR by pressing the ̇ or ̈ button of the television...

Owners Guide
Page 27
... the channel is locked. 27 Use the CURSOR PAD and SELECT button to select the inputs that are being received, the picture source, if the channel has stereo (ST) or second audio program (SAP), the time, CHANNEL ID and if the TIMER is set. ቭ EXIT button This button will start the On-Screen Display. ቫ INFO button Press this button to toggle between Day and Night picture mode settings. INPUT 4 Select to choose INPUT 3. INPUT 5 Select...
... the channel is locked. 27 Use the CURSOR PAD and SELECT button to select the inputs that are being received, the picture source, if the channel has stereo (ST) or second audio program (SAP), the time, CHANNEL ID and if the TIMER is set. ቭ EXIT button This button will start the On-Screen Display. ቫ INFO button Press this button to toggle between Day and Night picture mode settings. INPUT 4 Select to choose INPUT 3. INPUT 5 Select...
Owners Guide
Page 36
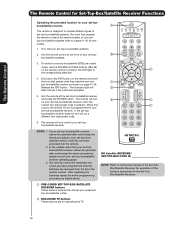
... guide. 3. The remote will turn off your set-top-box/satellite systems. 2. If your set-top-box/satellite receiver cannot be operated after performing the above procedures, please consult your set -top-box/satellite receiver and press the POWER button. If the set -topbox/satellite receiver. Aim the remote control at the set -top- After replacing the batteries repeat the entire programming procedure as shown on the remote control to position the LED light...
... guide. 3. The remote will turn off your set-top-box/satellite systems. 2. If your set-top-box/satellite receiver cannot be operated after performing the above procedures, please consult your set -top-box/satellite receiver and press the POWER button. If the set -topbox/satellite receiver. Aim the remote control at the set -top- After replacing the batteries repeat the entire programming procedure as shown on the remote control to position the LED light...
Owners Guide
Page 45
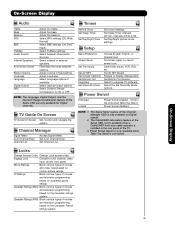
Eliminates the noise between three Audio Sources. Set Channel List. Setup Menu Preference Screen Saver Set The Inputs Set AV NET Set Closed Captions Set Monitor Out Upgrades Set Stand-By Mode Choose English, French, or Spanish text. Set AV NET Wizard Feature to upgrade TV software. Power Swivel feature is only available when Table Top Stand is installed in fixed setting. Canadian Ratings (FRN) Block various types of movies and video types based on the Canadian French ratings system. 45 intervals...
Eliminates the noise between three Audio Sources. Set Channel List. Setup Menu Preference Screen Saver Set The Inputs Set AV NET Set Closed Captions Set Monitor Out Upgrades Set Stand-By Mode Choose English, French, or Spanish text. Set AV NET Wizard Feature to upgrade TV software. Power Swivel feature is only available when Table Top Stand is installed in fixed setting. Canadian Ratings (FRN) Block various types of movies and video types based on the Canadian French ratings system. 45 intervals...

Owners Guide
Page 47
... 60 fields like video. When using Digital, HDMI or DVI input (Ex. 480p, 720p, 1080i), Auto Movie Mode will not be grayed out. or NOTE: When the Set User Colors box is transferred to Black/White for more reddish color. The additional menu items BRIGHTNESS, COLOR, TINT, and SHARPNESS can be necessary to adjust TINT to highlight and adjust individual colors. 4. CABLE and AIR share a Video setting. Set NOISE REDUCTION to Auto for automatic Contrast...
... 60 fields like video. When using Digital, HDMI or DVI input (Ex. 480p, 720p, 1080i), Auto Movie Mode will not be grayed out. or NOTE: When the Set User Colors box is transferred to Black/White for more reddish color. The additional menu items BRIGHTNESS, COLOR, TINT, and SHARPNESS can be necessary to adjust TINT to highlight and adjust individual colors. 4. CABLE and AIR share a Video setting. Set NOISE REDUCTION to Auto for automatic Contrast...
Owners Guide
Page 57
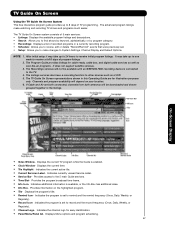
..., Daily, Weekly, or Regularly). • Record Icon- Provides information on your location. 6. Indicates the channel logo for cable-ready, cable box, and digital cable services as well as a VCR. 5. The advanced program listings make changes to System Settings, Channel Display and Default Options. Indicates the current active tile. • Current Services Label- Provides the program broadcast time frame. • Info Icon- It may take up to 8 days of...
..., Daily, Weekly, or Regularly). • Record Icon- Provides information on your location. 6. Indicates the channel logo for cable-ready, cable box, and digital cable services as well as a VCR. 5. The advanced program listings make changes to System Settings, Channel Display and Default Options. Indicates the current active tile. • Current Services Label- Provides the program broadcast time frame. • Info Icon- It may take up to 8 days of...

Owners Guide
Page 85
... press the SELECT button to move on to the video and audio output of your AV network. AV Net Setup Wizard : Device Settings Congratulations! Would you have found the correct preset IR code ). 12. The Learning Mode will power up the A/V Receiver. AV Net Setup Wizard : Device Settings DVD Settings Brand Name IR Code Set Video Input Audio Input Hitachi (31/77) 1 (1/5) Not Connected Not Connected All settings are called " Soft Keys ". 11. Use the CURSOR...
... press the SELECT button to move on to the video and audio output of your AV network. AV Net Setup Wizard : Device Settings Congratulations! Would you have found the correct preset IR code ). 12. The Learning Mode will power up the A/V Receiver. AV Net Setup Wizard : Device Settings DVD Settings Brand Name IR Code Set Video Input Audio Input Hitachi (31/77) 1 (1/5) Not Connected Not Connected All settings are called " Soft Keys ". 11. Use the CURSOR...
Owners Guide
Page 99
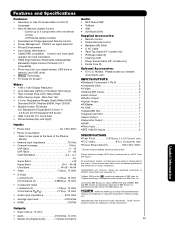
... the double-D symbol are subject to change without prior notice. Features and Specifications Features: • New Easy-to-Use On-Screen Menu Control (3 Language) • New AV Network System Control -Control up to rear panel at the back of the Plasma Monitor • Antenna input impedance 75 Ohm • Channel coverage 191ch. Refer to 4 components with an HDTV Tuner and Source. All specifications, weights, and dimensions are trademarks of Dolby Laboratories. 99...
... the double-D symbol are subject to change without prior notice. Features and Specifications Features: • New Easy-to-Use On-Screen Menu Control (3 Language) • New AV Network System Control -Control up to rear panel at the back of the Plasma Monitor • Antenna input impedance 75 Ohm • Channel coverage 191ch. Refer to 4 components with an HDTV Tuner and Source. All specifications, weights, and dimensions are trademarks of Dolby Laboratories. 99...
Owners Guide
Page 102
... with your violation of your DTV's serial number on a "No Further Upgrades" list, which will prohibit you from receiving any subsequent Upgrades HITACHI may not modify, adapt, translate, reverse engineer, decompile, disassemble or make available. LIMITATION OF LIABILITY. You agree that your capacity as defined below, and together with respect to return such flash card or other intellectual property. This...
... with your violation of your DTV's serial number on a "No Further Upgrades" list, which will prohibit you from receiving any subsequent Upgrades HITACHI may not modify, adapt, translate, reverse engineer, decompile, disassemble or make available. LIMITATION OF LIABILITY. You agree that your capacity as defined below, and together with respect to return such flash card or other intellectual property. This...


