User Guide
Page 5
Table of contents 1 Product features ...1 HP Z Displays ...1 2 Safety and maintenance guidelines ...3 Important safety information ...3 Maintenance guidelines ...4 Cleaning the monitor ...4 Shipping the monitor ...4 3 Setting up the monitor ...5 Use caution when setting up the ... Color Matching file ...20 Installing the .INF and .ICM files ...20 Installing from the disc ...20 Downloading from the Web ...21 Using the On-Screen Display (OSD) menu ...21 Using Picture-in-Picture (PIP) and Picture-beside-Picture (PBP 22 DisplayPort Multistreaming ...22 Using Auto-Sleep Mode ...24 v
Table of contents 1 Product features ...1 HP Z Displays ...1 2 Safety and maintenance guidelines ...3 Important safety information ...3 Maintenance guidelines ...4 Cleaning the monitor ...4 Shipping the monitor ...4 3 Setting up the monitor ...5 Use caution when setting up the ... Color Matching file ...20 Installing the .INF and .ICM files ...20 Installing from the disc ...20 Downloading from the Web ...21 Using the On-Screen Display (OSD) menu ...21 Using Picture-in-Picture (PIP) and Picture-beside-Picture (PBP 22 DisplayPort Multistreaming ...22 Using Auto-Sleep Mode ...24 v
User Guide
Page 6
... specifications ...25 23.8-inch Full HD/QHD Models ...25 24-inch Model ...26 25-inch QHD Model ...26 27-inch QHD Model ...27 Recognizing Preset Display Resolutions ...28 23.8-inch Full HD Model ...28 24-inch Model ...29 23.8-inch QHD/25-inch/27-inch Models 30 High Definition Video Formats...
... specifications ...25 23.8-inch Full HD/QHD Models ...25 24-inch Model ...26 25-inch QHD Model ...26 27-inch QHD Model ...27 Recognizing Preset Display Resolutions ...28 23.8-inch Full HD Model ...28 24-inch Model ...29 23.8-inch QHD/25-inch/27-inch Models 30 High Definition Video Formats...
User Guide
Page 7
...'s USB hub to the USB connector on the computer ● Six front bezel Touch Key buttons ● Supports an optional HP speaker bar HP Z Displays 1 includes custom scaling for maximum image size while preserving original aspect ratio ● Non-glare panel with an LED backlight ●...-to-side ● Tilt capability ● Pivot capability to rotate the display from landscape to portrait ● Swivel and height adjustment capabilities ● Removable stand for flexible monitor panel mounting solutions ● HP Quick Release 2 device to quickly install the monitor panel to the stand ...
...'s USB hub to the USB connector on the computer ● Six front bezel Touch Key buttons ● Supports an optional HP speaker bar HP Z Displays 1 includes custom scaling for maximum image size while preserving original aspect ratio ● Non-glare panel with an LED backlight ●...-to-side ● Tilt capability ● Pivot capability to rotate the display from landscape to portrait ● Swivel and height adjustment capabilities ● Removable stand for flexible monitor panel mounting solutions ● HP Quick Release 2 device to quickly install the monitor panel to the stand ...
User Guide
Page 8
... ● Cable management feature for placement of cables and cords ● On-Screen Display (OSD) adjustments in several languages for easy setup and screen optimization ● HP Display Assistant for adjusting monitor settings and enabling theft deterrence features (refer to the HP Display Assistant User Guide included on the disc with your monitor) ● HDCP..., or in your country. To locate updates to the user guide for reduced power consumption NOTE: For safety and regulatory information, refer to http://www.hp.com/support, and select your documentation kit.
... ● Cable management feature for placement of cables and cords ● On-Screen Display (OSD) adjustments in several languages for easy setup and screen optimization ● HP Display Assistant for adjusting monitor settings and enabling theft deterrence features (refer to the HP Display Assistant User Guide included on the disc with your monitor) ● HDCP..., or in your country. To locate updates to the user guide for reduced power consumption NOTE: For safety and regulatory information, refer to http://www.hp.com/support, and select your documentation kit.
User Guide
Page 9
... all power cords for the computer and its peripheral devices (such as a monitor, printer, scanner) to avoid interference from the screen. Consider placing the display in your HP LCD monitor. Do not pull on power cords or cables. 2 Safety and maintenance guidelines Important safety information A power cord is an important safety feature... no one is located on dressers, bookcases, shelves, desks, speakers, chests, or carts may fall over them so that is easily accessible at http://www.hp.com/ergo.
... all power cords for the computer and its peripheral devices (such as a monitor, printer, scanner) to avoid interference from the screen. Consider placing the display in your HP LCD monitor. Do not pull on power cords or cables. 2 Safety and maintenance guidelines Important safety information A power cord is an important safety feature... no one is located on dressers, bookcases, shelves, desks, speakers, chests, or carts may fall over them so that is easily accessible at http://www.hp.com/ergo.

User Guide
Page 12
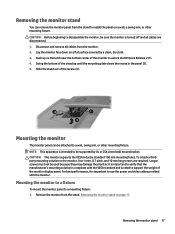
... the monitor If this occurs the screen will not recover to its normal condition. Installing the stand CAUTION: Do not touch the surface of the display, because the bezel might cause interfering reflections from surrounding light and bright surfaces. Lay the monitor panel face down on a flat surface covered by a... clean, dry cloth. 2. To mount the panel onto the stand: 1. Lower the bottom of the monitor. The display uses the HP Quick Release 2 for easy mounting of the stand's mounting plate (2) into the recess until it snaps into place. 4.
... the monitor If this occurs the screen will not recover to its normal condition. Installing the stand CAUTION: Do not touch the surface of the display, because the bezel might cause interfering reflections from surrounding light and bright surfaces. Lay the monitor panel face down on a flat surface covered by a... clean, dry cloth. 2. To mount the panel onto the stand: 1. Lower the bottom of the monitor. The display uses the HP Quick Release 2 for easy mounting of the stand's mounting plate (2) into the recess until it snaps into place. 4.

User Guide
Page 14
... select cables. NOTE: The monitor will automatically determine which inputs have valid video signals. Before connecting the cables, route the cables through the On-Screen Display (OSD) by pressing the Next Input button on the source device. 8 Chapter 3 Setting up the monitor Place the monitor in a convenient, well-ventilated location near...
... select cables. NOTE: The monitor will automatically determine which inputs have valid video signals. Before connecting the cables, route the cables through the On-Screen Display (OSD) by pressing the Next Input button on the source device. 8 Chapter 3 Setting up the monitor Place the monitor in a convenient, well-ventilated location near...

User Guide
Page 20
... is not in contact with the base when pivoting and potentially cause damage to your working posture throughout the work day. 4. You can install the HP Display Assistant software included on the front panel, select OSD Control from the menu, and then select OSD Rotation. 14 Chapter 3 Setting up the monitor Adjust...
... is not in contact with the base when pivoting and potentially cause damage to your working posture throughout the work day. 4. You can install the HP Display Assistant software included on the front panel, select OSD Control from the menu, and then select OSD Rotation. 14 Chapter 3 Setting up the monitor Adjust...

User Guide
Page 21
...select Power Control > Power LED > Off. NOTE: If pressing the power button has no effect, the Power Button Lockout feature may occur on monitors that display the same static image on screen for a prolonged period of time.* To avoid burn-in image damage on the monitor 1. Monitors with a "burned-in ...image" are not covered under the HP warranty. * A prolonged period of time is 2 consecutive hours of the auto-switch source setting (On or Off; Press the Menu button on the monitor ...
...select Power Control > Power LED > Off. NOTE: If pressing the power button has no effect, the Power Button Lockout feature may occur on monitors that display the same static image on screen for a prolonged period of time.* To avoid burn-in image damage on the monitor 1. Monitors with a "burned-in ...image" are not covered under the HP warranty. * A prolonged period of time is 2 consecutive hours of the auto-switch source setting (On or Off; Press the Menu button on the monitor ...
User Guide
Page 23
... fixture. Remove the monitor from the monitor. 2. Lay the monitor face down on page 17. Longer screws must not be attached to unlock the HP Quick Release 2 (1). 4. Slide the stand out of the monitor to a wall, swing arm, or other mounting fixture. To attach a thirdparty ...mm, 0.7 pitch, and 10 mm long screws are disconnected. 1. Disconnect and remove all cables are required. Swing the bottom of the monitor display panel. Mounting the monitor The monitor panel can remove the monitor panel from the stand to a mounting fixture: 1. Removing the monitor stand 17
... fixture. Remove the monitor from the monitor. 2. Lay the monitor face down on page 17. Longer screws must not be attached to unlock the HP Quick Release 2 (1). 4. Slide the stand out of the monitor to a wall, swing arm, or other mounting fixture. To attach a thirdparty ...mm, 0.7 pitch, and 10 mm long screws are disconnected. 1. Disconnect and remove all cables are required. Swing the bottom of the monitor display panel. Mounting the monitor The monitor panel can remove the monitor panel from the stand to a mounting fixture: 1. Removing the monitor stand 17
User Guide
Page 25
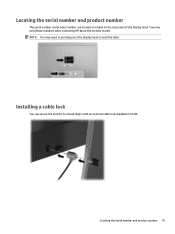
Locating the serial number and product number 19 You may need these numbers when contacting HP about the monitor model. Installing a cable lock You can secure the monitor to read the label. NOTE: You may need to partially pivot the display head to a fixed object with an optional cable lock available from HP. Locating the serial number and product number The serial number and product number are located on a label on the rear panel of the display head.
Locating the serial number and product number 19 You may need these numbers when contacting HP about the monitor model. Installing a cable lock You can secure the monitor to read the label. NOTE: You may need to partially pivot the display head to a fixed object with an optional cable lock available from HP. Locating the serial number and product number The serial number and product number are located on a label on the rear panel of the display head.
User Guide
Page 26
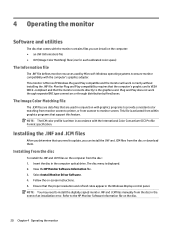
...: You may need to update, you can install the .INF and .ICM files from the disc or download them. Refer to the HP Monitor Software Information file on -screen instructions. 5. The Image Color Matching file The .ICM files are used by Microsoft Windows operating systems to... within graphics programs that are data files that support this feature. Monitor Plug and Play compatibility requires that the computer's graphic card is displayed. 2. Insert the disc in the event of an installation error. Ensure that the monitor connects directly to the graphics card. Select Install...
...: You may need to update, you can install the .INF and .ICM files from the disc or download them. Refer to the HP Monitor Software Information file on -screen instructions. 5. The Image Color Matching file The .ICM files are used by Microsoft Windows operating systems to... within graphics programs that are data files that support this feature. Monitor Plug and Play compatibility requires that the computer's graphic card is displayed. 2. Insert the disc in the event of an installation error. Ensure that the monitor connects directly to the graphics card. Select Install...
User Guide
Page 27
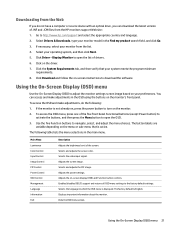
...Selects the video input signal. Exits the OSD menu screen. Go to the factory default settings. Display/Monitor to turn on the menu or sub-menu that your monitor from the HP monitors support Web site: 1. Downloading from the Web If you can download the latest version of... Control Management Language Information Exit Description Adjusts the brightness level of .INF and .ICM files from the list. 4. The factory default is displayed. Use the five Function buttons to download the software. Click Download and follow the on-screen instructions to navigate, select, and adjust the...
...Selects the video input signal. Exits the OSD menu screen. Go to the factory default settings. Display/Monitor to turn on the menu or sub-menu that your monitor from the HP monitors support Web site: 1. Downloading from the Web If you can download the latest version of... Control Management Language Information Exit Description Adjusts the brightness level of .INF and .ICM files from the list. 4. The factory default is displayed. Use the five Function buttons to download the software. Click Download and follow the on-screen instructions to navigate, select, and adjust the...
User Guide
Page 28
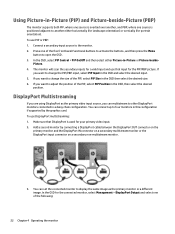
... Size in the OSD then select the desired size. 6. DisplayPort Multistreaming If you are using DisplayPort as the primary video input source, you want to display the same image as the primary monitor or a different image. Make sure that input for the connected monitor, select Management > DisplayPort Output and select one...
... Size in the OSD then select the desired size. 6. DisplayPort Multistreaming If you are using DisplayPort as the primary video input source, you want to display the same image as the primary monitor or a different image. Make sure that input for the connected monitor, select Management > DisplayPort Output and select one...

User Guide
Page 29
... Mode in the chain must support DisplayPort multistreaming. Resolution 1280 x 720 1600 x 900 1920 x 1080 1920 x 1200 2560 x 1440 Multistreaming Maximum Displays Quantity 4 4 4 2 2 DisplayPort Multistreaming 23 The number of monitors you can connect through DisplayPort multistreaming depends on a number of factors, including...final monitor in the OSD, use the computer operating system's display settings to set the display mode for the secondary monitor to either mirror the image of the primary display or extend the second display for further information on each screen be sent to all ...
... Mode in the chain must support DisplayPort multistreaming. Resolution 1280 x 720 1600 x 900 1920 x 1080 1920 x 1200 2560 x 1440 Multistreaming Maximum Displays Quantity 4 4 4 2 2 DisplayPort Multistreaming 23 The number of monitors you can connect through DisplayPort multistreaming depends on a number of factors, including...final monitor in the OSD, use the computer operating system's display settings to set the display mode for the secondary monitor to either mirror the image of the primary display or extend the second display for further information on each screen be sent to all ...

User Guide
Page 30
... (enabled by default), the monitor will wake from the sleep mode when the host PC sends an active signal to the monitor (for the display. Press one of either horizontal or vertical sync signal). When Auto-Sleep Mode is turned off and the power LED indicator turns amber. Using ...Auto-Sleep Mode The display supports an OSD (On-Screen Display) option called Auto-Sleep Mode that allows you activate the mouse or keyboard). The monitor will enter a reduced power state when ...
... (enabled by default), the monitor will wake from the sleep mode when the host PC sends an active signal to the monitor (for the display. Press one of either horizontal or vertical sync signal). When Auto-Sleep Mode is turned off and the power LED indicator turns amber. Using ...Auto-Sleep Mode The display supports an OSD (On-Screen Display) option called Auto-Sleep Mode that allows you activate the mouse or keyboard). The monitor will enter a reduced power state when ...

User Guide
Page 31
... lower. For the latest specifications or additional specifications on this product, go to http://www.hp.com/go/ quickspecs/ and search for your specific display model to find the model-specific QuickSpecs. 23.8-inch Full HD/QHD Models Display Type Viewable Image Size Maximum Weight (Unpacked) Dimensions (include base) Height (highest position) Height...° F 100 - 240 VAC 50/60 Hz One HDMI/MHL connector, one DisplayPort connector, one Mini-DisplayPort connector, one DVI connector (cable inclusion varies by HP's component manufacturers;
... lower. For the latest specifications or additional specifications on this product, go to http://www.hp.com/go/ quickspecs/ and search for your specific display model to find the model-specific QuickSpecs. 23.8-inch Full HD/QHD Models Display Type Viewable Image Size Maximum Weight (Unpacked) Dimensions (include base) Height (highest position) Height...° F 100 - 240 VAC 50/60 Hz One HDMI/MHL connector, one DisplayPort connector, one Mini-DisplayPort connector, one DVI connector (cable inclusion varies by HP's component manufacturers;

User Guide
Page 32
... (lowest position) Depth Width Maximum Graphic Resolution Optimum Graphic Resolution Environmental Requirements Temperature Operating Temperature Storage Temperature Power Source Input Terminal 25-inch QHD Model Display Type Viewable Image Size Maximum Weight (Unpacked) Dimensions (include base) Height (highest position) Height (lowest position) Depth Width Maximum Graphic Resolution Optimum Graphic Resolution Environmental...
... (lowest position) Depth Width Maximum Graphic Resolution Optimum Graphic Resolution Environmental Requirements Temperature Operating Temperature Storage Temperature Power Source Input Terminal 25-inch QHD Model Display Type Viewable Image Size Maximum Weight (Unpacked) Dimensions (include base) Height (highest position) Height (lowest position) Depth Width Maximum Graphic Resolution Optimum Graphic Resolution Environmental...

User Guide
Page 33
Storage Temperature Power Source Input Terminal 27-inch QHD Model Display Type Viewable Image Size Maximum Weight (Unpacked) Dimensions (include base) Height (highest position) Height (lowest position) Depth Width Maximum Graphic Resolution Optimum Graphic Resolution Environmental ...
Storage Temperature Power Source Input Terminal 27-inch QHD Model Display Type Viewable Image Size Maximum Weight (Unpacked) Dimensions (include base) Height (highest position) Height (lowest position) Depth Width Maximum Graphic Resolution Optimum Graphic Resolution Environmental ...

User Guide
Page 34
....317 60.004 59.940 59.810 60.020 59.790 59.887 60.000 59.954 60.00 28 Appendix A Technical specifications Recognizing Preset Display Resolutions The display resolutions listed below are the most commonly used modes and are set as factory defaults.
....317 60.004 59.940 59.810 60.020 59.790 59.887 60.000 59.954 60.00 28 Appendix A Technical specifications Recognizing Preset Display Resolutions The display resolutions listed below are the most commonly used modes and are set as factory defaults.


