ProBook 4440s Screen - HP
ProBook 4440s Screen
Related Manual Pages

Related Videos

DIY - How to Replace Your Laptop Screen in an HP ProBook 4440s
Duration: 13:37
Total Views: 5,680
Duration: 13:37
Total Views: 5,680
Similar Questions

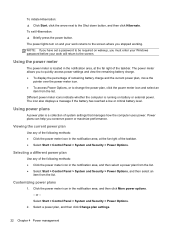
Screen Display
My HP 8730w, the screen will all the sudden go so dim that you can hardly readit. You close the lid ...
My HP 8730w, the screen will all the sudden go so dim that you can hardly readit. You close the lid ...
(Posted by jgray720 10 years ago)

Thank You, I Want To Start Webcam & Touch Screen.
(Posted by yochimjanie 11 years ago)

Hp Dv8380 Pravilion Laptop Has A White Screen.
when you turn on laptop , it will boot up but the screen turns white.
when you turn on laptop , it will boot up but the screen turns white.
(Posted by jrgarmon 11 years ago)

How To Replace A Screen Of An Hp Mini 110 - 1112nr
Which screws i need to removed and how to remove the screen frame after removed the battery
Which screws i need to removed and how to remove the screen frame after removed the battery
(Posted by dycubano 11 years ago)
Related Terms
The following terms were also used when searching for ProBook 4440s Screen - HP:- drivers probook 4440s
- hewlett packard probook 4440s manual
- hp probook 4410s
- hp probook 4410s driver
- hp probook 4410s drivers
- hp probook 4420s drivers
- hp probook 4440s
- hp probook 4440s 14
- hp probook 4440s 14 laptop computer
- hp probook 4440s 320gb
- hp probook 4440s ac adapter
- hp probook 4440s acpi driver
- hp probook 4440s amazon
- hp probook 4440s base system device
- hp probook 4440s base system device driver
- hp probook 4440s battery
- hp probook 4440s battery life
- hp probook 4440s battery original
- hp probook 4440s best buy
- hp probook 4440s bios
- hp probook 4440s bios password reset
- hp probook 4440s bios update
- hp probook 4440s blinking light
- hp probook 4440s bluetooth
- hp probook 4440s business notebook
- hp probook 4440s camera activation
- hp probook 4440s carrying case
- hp probook 4440s cd drive
- hp probook 4440s charger
- hp probook 4440s charging disabled
- hp probook 4440s cpu
- hp probook 4440s disassembly
- hp probook 4440s docking station
- hp probook 4440s driver
- hp probook 4440s drivers
- hp probook 4440s drivers for win7
- hp probook 4440s drivers for windows 7
- hp probook 4440s drivers for windows 8
- hp probook 4440s ethernet controller driver
- hp probook 4440s factory reset
- hp probook 4440s factory restore
- hp probook 4440s fingerprint scanner
- hp probook 4440s hackintosh
- hp probook 4440s hard drive
- hp probook 4440s hard drive removal
- hp probook 4440s i3
- hp probook 4440s i5
- hp probook 4440s i7
- hp probook 4440s internet button disabled
- hp probook 4440s keyboard
- hp probook 4440s lap
- hp probook 4440s laptop
- hp probook 4440s laptop case
- hp probook 4440s lcd
- hp probook 4440s manual
- hp probook 4440s memory
- hp probook 4440s motherboard
- hp probook 4440s needs reset
- hp probook 4440s network adapter driver
- hp probook 4440s network drivers
- hp probook 4440s notebook
- hp probook 4440s notebook pc
- hp probook 4440s notebook pc (energy star)
- hp probook 4440s notebook pc drivers
- hp probook 4440s pdf
- hp probook 4440s power adapter
- hp probook 4440s power cord
- hp probook 4440s price
- hp probook 4440s price in india
- hp probook 4440s processor upgrade
- hp probook 4440s ram
- hp probook 4440s ram upgrade
- hp probook 4440s recovery
- hp probook 4440s replacement battery
- hp probook 4440s replacement screen
- hp probook 4440s restore disk
- hp probook 4440s review
- hp probook 4440s reviews
- hp probook 4440s screen
- hp probook 4440s screen replacement
- hp probook 4440s screen size
- hp probook 4440s screens
- hp probook 4440s scroll
- hp probook 4440s skins
- hp probook 4440s spec
- hp probook 4440s specification
- hp probook 4440s specifications
- hp probook 4440s specs
- hp probook 4440s support
- hp probook 4440s support downloads
- hp probook 4440s system restore
- hp probook 4440s touchpad not working
- hp probook 4440s user manual
- hp probook 4440s webcam
- hp probook 4440s webcam driver
- hp probook 4440s webcam software
- hp probook 4440s wifi and bluetooth driver
- hp probook 4440s wifi driver
- hp probook 4440s wifi drivers
- hp probook 4440s windows 7 drivers
- hp probook 4440s wireless driver
- hp probook 4440s wireless driver not working
- hp probook 4440s with windows 7 specs
- hp probook4440s
- probook 4410s
- probook 4410s driver
- probook 4410s drivers
- probook 4420s drivers
- probook 4440 s review
- probook 4440s
- probook 4440s 14
- probook 4440s 14 laptop computer
- probook 4440s 14 laptop computer review
- probook 4440s 320gb
- probook 4440s ac adapter
- probook 4440s acpi driver
- probook 4440s amazon
- probook 4440s assembly
- probook 4440s base system device
- probook 4440s base system device driver
- probook 4440s battery
- probook 4440s battery life
- probook 4440s battery original
- probook 4440s best buy
- probook 4440s bios
- probook 4440s bios password
- probook 4440s bios password reset
- probook 4440s bios update
- probook 4440s blinking light
- probook 4440s bluetooth
- probook 4440s bluetooth driver
- probook 4440s brightness
- probook 4440s built in camera
- probook 4440s business notebook
- probook 4440s camera activation
- probook 4440s carrying case
- probook 4440s cd drive
- probook 4440s celeron
- probook 4440s charger
- probook 4440s charging disabled
- probook 4440s cpu
- probook 4440s cpu upgrade
- probook 4440s disassembly
- probook 4440s display driver
- probook 4440s docking station
- probook 4440s driver
- probook 4440s drivers
- probook 4440s drivers for win7
- probook 4440s drivers for windows 7
- probook 4440s drivers for windows 8
- probook 4440s dvd
- probook 4440s ethernet controller driver
- probook 4440s factory reset
- probook 4440s factory restore
- probook 4440s fingerprint
- probook 4440s fingerprint scanner
- probook 4440s function key
- probook 4440s hackintosh
- probook 4440s hard drive
- probook 4440s hard drive removal
- probook 4440s hard drive replacement
- probook 4440s hp
- probook 4440s i3
- probook 4440s i5
- probook 4440s i7
- probook 4440s internet button disabled
- probook 4440s keyboard
- probook 4440s lap
- probook 4440s laptop
- probook 4440s laptop case
- probook 4440s lcd
- probook 4440s manual
- probook 4440s max ram
- probook 4440s memory
- probook 4440s motherboard
- probook 4440s needs reset
- probook 4440s network adapter driver
- probook 4440s network controller
- probook 4440s network drivers
- probook 4440s notebook
- probook 4440s notebook pc
- probook 4440s notebook pc (energy star)
- probook 4440s notebook pc drivers
- probook 4440s power adapter
- probook 4440s power cord
- probook 4440s price
- probook 4440s price in bangladesh
- probook 4440s price in india
- probook 4440s processor upgrade
- probook 4440s ram
- probook 4440s ram upgrade
- probook 4440s recovery
- probook 4440s recovery disk
- probook 4440s replacement battery
- probook 4440s replacement screen
- probook 4440s restore
- probook 4440s restore disk
- probook 4440s review
- probook 4440s reviews
- probook 4440s screen
- probook 4440s screen replacement
- probook 4440s screen size
- probook 4440s screens
- probook 4440s scroll
- probook 4440s service manual
- probook 4440s skins
- probook 4440s spec
- probook 4440s specification
- probook 4440s specifications
- probook 4440s specs
- probook 4440s support
- probook 4440s support downloads
- probook 4440s system restore
- probook 4440s touchpad disable
- probook 4440s touchpad lock key
- probook 4440s touchpad not working
- probook 4440s unknown device
- probook 4440s usb 3.0 drivers
- probook 4440s user manual
- probook 4440s webcam
- probook 4440s webcam driver
- probook 4440s webcam software
- probook 4440s weight
- probook 4440s wifi
- probook 4440s wifi and bluetooth driver
- probook 4440s wifi driver
- probook 4440s wifi drivers
- probook 4440s windows 7 drivers
- probook 4440s wireless driver
- probook 4440s wireless driver not working
- probook 4440s with windows 7 specs
- probook 4440s wont turn on
- probook 4440s-lap