

User Guide
Page 3
...memory card 6 Install the software...6 Using your camera...7 2 Taking pictures and recording video clips Taking pictures...8 Recording video clips...9 Instant Review...9 Auto focus and exposure...9 Focusing on the subject...10 Optimizing focus...10 Using Focus Lock...11 Optimizing exposure...11 Using zoom...11 Optical... Panorama mode...15 Using the Self-Timer setting 16 Using the Burst setting...17 Adaptive Lighting...17 White Balance...17 4 Reviewing images and video clips Deleting images...19 Viewing thumbnails...19 Magnifying images...19 Using the Playback Menu...20 Removing red eyes......
...memory card 6 Install the software...6 Using your camera...7 2 Taking pictures and recording video clips Taking pictures...8 Recording video clips...9 Instant Review...9 Auto focus and exposure...9 Focusing on the subject...10 Optimizing focus...10 Using Focus Lock...11 Optimizing exposure...11 Using zoom...11 Optical... Panorama mode...15 Using the Self-Timer setting 16 Using the Burst setting...17 Adaptive Lighting...17 White Balance...17 4 Reviewing images and video clips Deleting images...19 Viewing thumbnails...19 Magnifying images...19 Using the Playback Menu...20 Removing red eyes......
User Guide
Page 5
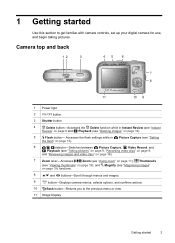
Getting started Use this section to the previous menu or view. 11 Image Display. 1 Getting started 3 Accesses the flash settings while in Instant Review (see "Instant Review" on page 9 and Playback (see "Magnifying images" on page 19). 5 Flash button- Camera top and back 12 3 45 6 7 8 11 10... selector-Switches between Picture Capture, Video Record, and Playback (see "Taking pictures" on page 8, "Recording video clips" on page 9, and "Reviewing images and video clips" on page 18). 7 Zoom lever-Accesses / Zoom (see "Using zoom" on page 11), Thumbnails (see "Viewing ...
Getting started Use this section to the previous menu or view. 11 Image Display. 1 Getting started 3 Accesses the flash settings while in Instant Review (see "Instant Review" on page 9 and Playback (see "Magnifying images" on page 19). 5 Flash button- Camera top and back 12 3 45 6 7 8 11 10... selector-Switches between Picture Capture, Video Record, and Playback (see "Taking pictures" on page 8, "Recording video clips" on page 9, and "Reviewing images and video clips" on page 18). 7 Zoom lever-Accesses / Zoom (see "Using zoom" on page 11), Thumbnails (see "Viewing ...
User Guide
Page 9
... software. Macintosh: 1. To learn about Windows Vista support for more information). You may change settings so the HP Photosmart Software starts automatically when you can take and review pictures and video clips. Using your CD drive, then click OK. 3. If the installation screen does not appear...restarted your camera Now that you've completed setup, you connect your camera to your camera to a computer See "Transferring images with HP Photosmart Software" on page 25 For information on printing images See "Printing images directly to a printer" on -screen instructions. Using your...
... software. Macintosh: 1. To learn about Windows Vista support for more information). You may change settings so the HP Photosmart Software starts automatically when you can take and review pictures and video clips. Using your CD drive, then click OK. 3. If the installation screen does not appear...restarted your camera Now that you've completed setup, you connect your camera to your camera to a computer See "Transferring images with HP Photosmart Software" on page 25 For information on printing images See "Printing images directly to a printer" on -screen instructions. Using your...

User Guide
Page 11
...to be in proper focus or exposure when viewed in Playback, see the topics on blurry, dark, light, or grainy images in Instant Review. When you follow the suggestions for pictures only). Frame the subject in the Image Display turn solid green when focus is set to ...Video Record. 1. Instant Review After you press the Shutter button halfway down to begin recording video. 5. TIP: If you auto focus: Indicator Green focus brackets Red focus ...
...to be in proper focus or exposure when viewed in Playback, see the topics on blurry, dark, light, or grainy images in Instant Review. When you follow the suggestions for pictures only). Frame the subject in the Image Display turn solid green when focus is set to ...Video Record. 1. Instant Review After you press the Shutter button halfway down to begin recording video. 5. TIP: If you auto focus: Indicator Green focus brackets Red focus ...
User Guide
Page 18
... is taken. 16 Setting options for taking pictures and recording video clips Press the Shutter button halfway down . to end the panoramic During Instant Review (see "Instant Review" on page 6), you can also stitch panoramas automatically as you are recording a video clip, press the Shutter button to take the second picture. While...
... is taken. 16 Setting options for taking pictures and recording video clips Press the Shutter button halfway down . to end the panoramic During Instant Review (see "Instant Review" on page 6), you can also stitch panoramas automatically as you are recording a video clip, press the Shutter button to take the second picture. While...
User Guide
Page 19
...Adaptive Lighting is useful in situations like these: • Outdoor scenes with a flash, Adaptive Lighting can brighten areas that whites appear white in Instant Review (see "Deleting images" on page 9). For example, the Sun setting produces a warmer look to lock the focus and exposure. Using the Picture ...image appears one at a time in the final image. Adaptive Lighting This setting balances the relationship between bright and dark areas in Instant Review. While in effect until it is changed again, or until you release the Shutter button or the camera runs out of the flash) ...
...Adaptive Lighting is useful in situations like these: • Outdoor scenes with a flash, Adaptive Lighting can brighten areas that whites appear white in Instant Review (see "Deleting images" on page 9). For example, the Sun setting produces a warmer look to lock the focus and exposure. Using the Picture ...image appears one at a time in the final image. Adaptive Lighting This setting balances the relationship between bright and dark areas in Instant Review. While in effect until it is changed again, or until you release the Shutter button or the camera runs out of the flash) ...

User Guide
Page 20
...Image Display also indicates additional information about enhancing images, see "Transferring and printing images" 3 on page 25). 18 Reviewing images and video clips Use to print (see "Using the Design Gallery Menu" on page 22. 1. When paused, use ...review and manipulate images and video clips in a panoramic sequence. 6 Image tagged as Favorite (see "Tagging images as Favorites" on page 21). 7 Image marked for printing via an online printing service (see "Buying prints online" on page 30). 8 Number of electronic Photosmart Share destinations (see "Using 1 HP Photosmart...
...Image Display also indicates additional information about enhancing images, see "Transferring and printing images" 3 on page 25). 18 Reviewing images and video clips Use to print (see "Using the Design Gallery Menu" on page 22. 1. When paused, use ...review and manipulate images and video clips in a panoramic sequence. 6 Image tagged as Favorite (see "Tagging images as Favorites" on page 21). 7 Image marked for printing via an online printing service (see "Buying prints online" on page 30). 8 Number of electronic Photosmart Share destinations (see "Using 1 HP Photosmart...
User Guide
Page 22
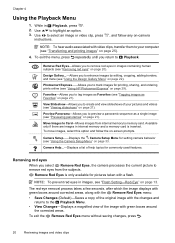
... saving changes, press . 20 Reviewing images and video clips Removing red eyes When you to memory card. Photosmart Express...-Allows you select Remove Red Eyes, the camera processes the current picture to remove red eyes from internal memory to mark images for setting camera behavior (see "Using HP Photosmart Express" on page 22). Camera...
... saving changes, press . 20 Reviewing images and video clips Removing red eyes When you to memory card. Photosmart Express...-Allows you select Remove Red Eyes, the camera processes the current picture to remove red eyes from internal memory to mark images for setting camera behavior (see "Using HP Photosmart Express" on page 22). Camera...
User Guide
Page 27
... Internet, the selected images are automatically sent to their destinations. • If you have installed the HP Photosmart Software (see the documentation that came with HP Photosmart Software If you have marked images to buy prints of high-resolution images from your computer until your ...and deleting them . However, the HP Photosmart Software has several features for sharing, printing, or buying prints online (see "Using Panorama mode" on your images and also guides you have marked images for transferring and managing your camera, to review images, and to your computer. ...
... Internet, the selected images are automatically sent to their destinations. • If you have installed the HP Photosmart Software (see the documentation that came with HP Photosmart Software If you have marked images to buy prints of high-resolution images from your computer until your ...and deleting them . However, the HP Photosmart Software has several features for sharing, printing, or buying prints online (see "Using Panorama mode" on your images and also guides you have marked images for transferring and managing your camera, to review images, and to your computer. ...
User Guide
Page 37
... (4GB or larger) memory card inserted. • Having a large number of tagged images on your computer (see "Transferring and printing images" on page 25) and review them . • For tips on conserving battery life, see "Extending battery life" on page 41. I have to turn on if you have a large number of... memory may have timed out. Transfer images from the camera to your computer, then format the memory card. • Power-on time in an optional HP Photosmart dock does not work, replace the batteries.
... (4GB or larger) memory card inserted. • Having a large number of tagged images on your computer (see "Transferring and printing images" on page 25) and review them . • For tips on conserving battery life, see "Extending battery life" on page 41. I have to turn on if you have a large number of... memory may have timed out. Transfer images from the camera to your computer, then format the memory card. • Power-on time in an optional HP Photosmart dock does not work, replace the batteries.
User Guide
Page 39
The camera responds sluggishly when trying to your computer (see "Transferring and printing images" on page 25) and review them there. • See "Storage" on page 44 and "Memory capacity" on your memory card. I have two memory cards that are not images or videos ... the Image Quality setting. Instead of tagged images on page 45 for cards marked High Performance, Pro, Ultra, or High Speed. Transfer the images to review images. • Power-on time in Playback is slow if you have a large number of deleting them . The video is saved successfully, but the Image...
The camera responds sluggishly when trying to your computer (see "Transferring and printing images" on page 25) and review them there. • See "Storage" on page 44 and "Memory capacity" on your memory card. I have two memory cards that are not images or videos ... the Image Quality setting. Instead of tagged images on page 45 for cards marked High Performance, Pro, Ultra, or High Speed. Transfer the images to review images. • Power-on time in Playback is slow if you have a large number of deleting them . The video is saved successfully, but the Image...
User Guide
Page 42
...for technical issues. • Proactive product updates, support alerts, and HP newsletters (available when you register your camera). 3. For a list of the support process. Consult the product documentation. • Review "Troubleshooting" on your camera's warranty, please contact the store where you... to extend or upgrade your contract. 40 Product support Extending or upgrading your HP product, consult the following standard HP support offerings: 1. If you purchased this document. • Review the electronic Help section within the software. • Refer to helpful websites ...
...for technical issues. • Proactive product updates, support alerts, and HP newsletters (available when you register your camera). 3. For a list of the support process. Consult the product documentation. • Review "Troubleshooting" on your camera's warranty, please contact the store where you... to extend or upgrade your contract. 40 Product support Extending or upgrading your HP product, consult the following standard HP support offerings: 1. If you purchased this document. • Review the electronic Help section within the software. • Refer to helpful websites ...

User Guide
Page 48
... 3 focal length 44 focus auto focus 9 brackets 9 focus lock 11 optimizing 10 format memory card 6 G getting assistance 40 H HP Photosmart Express 29 HP Photosmart Software 6 I Image Display 3 Image Quality 15, 45 images Date & Time Imprint 15 Image Quality 15 magnifying 19 number remaining 8... Panorama mode 15 sending 31 transfer to computer 25 install memory card 6 install software 6 Instant Review 9, 16, 17 interfaces 45 internal memory 8, 45 ...
... 3 focal length 44 focus auto focus 9 brackets 9 focus lock 11 optimizing 10 format memory card 6 G getting assistance 40 H HP Photosmart Express 29 HP Photosmart Software 6 I Image Display 3 Image Quality 15, 45 images Date & Time Imprint 15 Image Quality 15 magnifying 19 number remaining 8... Panorama mode 15 sending 31 transfer to computer 25 install memory card 6 install software 6 Instant Review 9, 16, 17 interfaces 45 internal memory 8, 45 ...
User Guide
Page 49
... 27, 29 prints, buy online 30 problems and solutions 34 R record video clips 9 red-eye removal 20 Region 5 remaining pictures count 8 removing red eyes 20 reviewing images 18 S safety precautions for batteries 41 selecting images for destinations 31 selecting images for printing 29 Self-Timer light 4 Self-Timer setting 14, 16...
... 27, 29 prints, buy online 30 problems and solutions 34 R record video clips 9 red-eye removal 20 Region 5 remaining pictures count 8 removing red eyes 20 reviewing images 18 S safety precautions for batteries 41 selecting images for destinations 31 selecting images for printing 29 Self-Timer light 4 Self-Timer setting 14, 16...
Quick Start Guide
Page 3
..............10 Install the software 11 Windows 11 Macintosh 12 3 Taking pictures and recording video clips Take a picture 13 Record a video clip 13 4 Reviewing and deleting images and video clips Review images and video clips 15 Delete an image 15 5 Transferring and printing images Transfer images 16 Print images from the camera 16...
..............10 Install the software 11 Windows 11 Macintosh 12 3 Taking pictures and recording video clips Take a picture 13 Record a video clip 13 4 Reviewing and deleting images and video clips Review images and video clips 15 Delete an image 15 5 Transferring and printing images Transfer images 16 Print images from the camera 16...

Quick Start Guide
Page 15
... deleting images and video clips 15 Delete an image You can review images and video clips in Playback. 1. Press . 4. Use to . 2. To play a video clip, press once the first screen of the clip appears on page 16). ... image or video clip. 3. To hear audio associated with the video clip, transfer the video clip to . 2. Slide to your images and video clips. English 4 Reviewing and deleting images and video clips Review images and video clips You can delete individual images during Playback: 1.
... deleting images and video clips 15 Delete an image You can review images and video clips in Playback. 1. Press . 4. Use to . 2. To play a video clip, press once the first screen of the clip appears on page 16). ... image or video clip. 3. To hear audio associated with the video clip, transfer the video clip to . 2. Slide to your images and video clips. English 4 Reviewing and deleting images and video clips Review images and video clips You can delete individual images during Playback: 1.
Quick Start Guide
Page 18
..., Panorama Left, Landscape, Portrait, Action, Night Portrait, Beach, Snow, Sunset) 18 HP Photosmart M730 series Digital Camera To learn more about these camera features, refer to . • Playback allows you to . Picture Capture, Video Record, and Playback • Picture Capture allows you review and delete images and video clips. To activate Playback, slide to...
..., Panorama Left, Landscape, Portrait, Action, Night Portrait, Beach, Snow, Sunset) 18 HP Photosmart M730 series Digital Camera To learn more about these camera features, refer to . • Playback allows you to . Picture Capture, Video Record, and Playback • Picture Capture allows you review and delete images and video clips. To activate Playback, slide to...
Quick Start Guide
Page 20
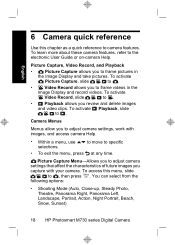
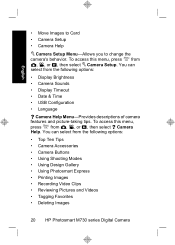
...; Camera Accessories • Camera Buttons • Using Shooting Modes • Using Design Gallery • Using Photosmart Express • Printing Images • Recording Video Clips • Reviewing Pictures and Videos • Tagging Favorites • Deleting Images 20 HP Photosmart M730 series Digital Camera To access this menu, press from , , or , then select Camera Help. To access...
...; Camera Accessories • Camera Buttons • Using Shooting Modes • Using Design Gallery • Using Photosmart Express • Printing Images • Recording Video Clips • Reviewing Pictures and Videos • Tagging Favorites • Deleting Images 20 HP Photosmart M730 series Digital Camera To access this menu, press from , , or , then select Camera Help. To access...
