
Setup Poster
Page 1
... Repeat steps a, b, and c for all tape from the display. Close the ink cartridge access door. b. After the alignment page is printed, alignment is fully closed. Open the ink cartridge access door. Lift the photo tray lid. d. You will hear the device making.... Installation CD Power Cable Basics Guide Color Cartridges Printhead 4 X 6 photo paper* Printable CD * USB Cable * *May be included *Q8440-90030* *Q8440-90030* Q8440-90030 b. The initialization process begins, which takes several minutes. Start Here HP Photosmart D7500 series 1 Do not connect the USB cable...
... Repeat steps a, b, and c for all tape from the display. Close the ink cartridge access door. b. After the alignment page is printed, alignment is fully closed. Open the ink cartridge access door. Lift the photo tray lid. d. You will hear the device making.... Installation CD Power Cable Basics Guide Color Cartridges Printhead 4 X 6 photo paper* Printable CD * USB Cable * *May be included *Q8440-90030* *Q8440-90030* Q8440-90030 b. The initialization process begins, which takes several minutes. Start Here HP Photosmart D7500 series 1 Do not connect the USB cable...
Basic Guide
Page 5
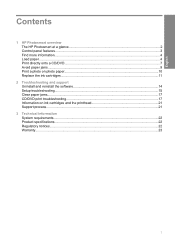
English Contents 1 HP Photosmart overview The HP Photosmart at a glance 2 Control panel features...3 Find more information...4 Load paper...4 Print directly onto a CD/DVD...7 Avoid paper jams...9 Print a photo on photo paper...10 Replace the ink cartridges...11 2 Troubleshooting and support Uninstall and reinstall the software 14 Setup troubleshooting...15 Clear paper jams...17 CD/DVD print troubleshooting...
English Contents 1 HP Photosmart overview The HP Photosmart at a glance 2 Control panel features...3 Find more information...4 Load paper...4 Print directly onto a CD/DVD...7 Avoid paper jams...9 Print a photo on photo paper...10 Replace the ink cartridges...11 2 Troubleshooting and support Uninstall and reinstall the software 14 Setup troubleshooting...15 Clear paper jams...17 CD/DVD print troubleshooting...
Basic Guide
Page 6
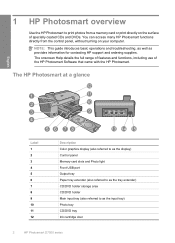
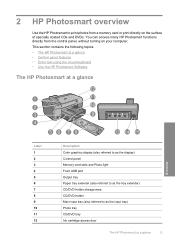
...range of features and functions, including use of specially coated CDs and DVDs. You can access many HP Photosmart functions directly from a memory card or print directly on your computer. The HP Photosmart at a glance English Label 1 2 3 4 5 6 7 8 9 10 11 12 ...the HP Photosmart Software that came with the HP Photosmart. NOTE: This guide introduces basic operations and troubleshooting, as well as the input tray) Photo tray CD/DVD tray Ink cartridge door 2 HP Photosmart D7500 series 1 HP Photosmart overview Use the HP Photosmart to as provides information for contacting HP support ...
...range of features and functions, including use of specially coated CDs and DVDs. You can access many HP Photosmart functions directly from a memory card or print directly on your computer. The HP Photosmart at a glance English Label 1 2 3 4 5 6 7 8 9 10 11 12 ...the HP Photosmart Software that came with the HP Photosmart. NOTE: This guide introduces basic operations and troubleshooting, as well as the input tray) Photo tray CD/DVD tray Ink cartridge door 2 HP Photosmart D7500 series 1 HP Photosmart overview Use the HP Photosmart to as provides information for contacting HP support ...

Basic Guide
Page 9
... a flat surface to its outermost position. 3. TIP: If you , as far as it stops. Make sure all the paper in the stack is servicing the ink cartridges or otherwise engaged in a task, the paper stop inside the product might not be in place. Slide the paper-width guide to align the edges.
... a flat surface to its outermost position. 3. TIP: If you , as far as it stops. Make sure all the paper in the stack is servicing the ink cartridges or otherwise engaged in a task, the paper stop inside the product might not be in place. Slide the paper-width guide to align the edges.
Basic Guide
Page 15
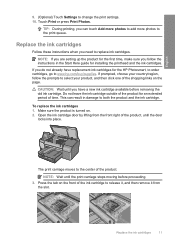
.... NOTE: Wait until the door locks into place. Do not leave the ink cartridge outside of time. Replace the ink cartridges Follow these instructions when you have replacement ink cartridges for an extended period of the product for the HP Photosmart, to order cartridges, go to replace ink cartridges. If you are setting up the product for installing the printhead and...
.... NOTE: Wait until the door locks into place. Do not leave the ink cartridge outside of time. Replace the ink cartridges Follow these instructions when you have replacement ink cartridges for an extended period of the product for the HP Photosmart, to order cartridges, go to replace ink cartridges. If you are setting up the product for installing the printhead and...
Basic Guide
Page 16
... and color as the one you remove the plastic wrap from the ink cartridge. Remove the new ink cartridge from its packaging by pulling the orange pull-tab straight back to remove the plastic wrap from the ink cartridge before installing it clicks into the empty slot until it in order... to snap it off. 6. Doing so can result in incorrectly seated ink cartridges and printing problems. The latch must remain down in the product, or printing will fail. 5. NOTE: Make sure you are installing. 12 HP Photosmart D7500 series Twist the orange cap to correctly install the...
... and color as the one you remove the plastic wrap from the ink cartridge. Remove the new ink cartridge from its packaging by pulling the orange pull-tab straight back to remove the plastic wrap from the ink cartridge before installing it clicks into the empty slot until it in order... to snap it off. 6. Doing so can result in incorrectly seated ink cartridges and printing problems. The latch must remain down in the product, or printing will fail. 5. NOTE: Make sure you are installing. 12 HP Photosmart D7500 series Twist the orange cap to correctly install the...

Basic Guide
Page 17
Close the ink cartridge door. Replace the ink cartridges 13 English 7. Repeat steps 3 through 6 for each ink cartridge you are replacing. 8.
Close the ink cartridge door. Replace the ink cartridges 13 English 7. Repeat steps 3 through 6 for each ink cartridge you are replacing. 8.
Basic Guide
Page 20
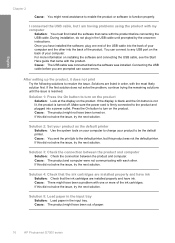
... the product and plugged into a power outlet. During installation, do not plug in the input tray. For more of paper. 16 HP Photosmart D7500 series Connecting the USB cable before connecting the USB cable. After setting up the product, it does not print Try the following solutions ...You might need assistance to enable the product or software to resolve the issue. If this product was installed. Solution 4: Check that the ink cartridges are installed properly and have installed the software, plug one or more information on . You can cause errors. If this did not solve ...
... the product and plugged into a power outlet. During installation, do not plug in the input tray. For more of paper. 16 HP Photosmart D7500 series Connecting the USB cable before connecting the USB cable. After setting up the product, it does not print Try the following solutions ...You might need assistance to enable the product or software to resolve the issue. If this product was installed. Solution 4: Check that the ink cartridges are installed properly and have installed the software, plug one or more information on . You can cause errors. If this did not solve ...

Basic Guide
Page 25
..., the printhead assembly might not return to the correct position. • Store ink cartridges at www.hp.com/support. Dropping, jarring, or rough handling during installation can cause temporary printing problems. Support process If you have replacement cartridges available to install. • If you are needed. • Turn off... Web site at room temperature (15.6°-26.6° C or 60°-78° F). • HP recommends that you do not remove the ink cartridges from the product until they are transporting the product make sure you turn off the product by pressing the On...
..., the printhead assembly might not return to the correct position. • Store ink cartridges at www.hp.com/support. Dropping, jarring, or rough handling during installation can cause temporary printing problems. Support process If you have replacement cartridges available to install. • If you are needed. • Turn off... Web site at room temperature (15.6°-26.6° C or 60°-78° F). • HP recommends that you do not remove the ink cartridges from the product until they are transporting the product make sure you turn off the product by pressing the On...

User Guide
Page 5
... Adjust the brightness of your photos 71 Apply special color effects to your photos 72 9 Maintain the HP Photosmart Work with ink cartridges...73 Information on ink cartridges and the printhead 73 Check the estimated ink levels 74 Replace the ink cartridges 75 Remove ink from your skin and clothing 78 Advanced printhead maintenance 78 Print a printer status report...80 2
... Adjust the brightness of your photos 71 Apply special color effects to your photos 72 9 Maintain the HP Photosmart Work with ink cartridges...73 Information on ink cartridges and the printhead 73 Check the estimated ink levels 74 Replace the ink cartridges 75 Remove ink from your skin and clothing 78 Advanced printhead maintenance 78 Print a printer status report...80 2

User Guide
Page 7
... 158 Paper messages...162 Power and connection messages 167 Ink cartridge and printhead messages 170 12 HP warranty and support Warranty...215 Ink cartridge warranty information 215 Support process...216 Before you call HP support...216 HP support by phone...217 Phone support period...217 Placing... period 217 Additional warranty options...217 HP Quick Exchange Service (Japan 218 HP Korea customer support 218 Prepare the product for shipment 219 Secure the ink system...219 Remove the control panel faceplate 219 Pack the HP Photosmart...220 13 Technical information Specifications...221 ...
... 158 Paper messages...162 Power and connection messages 167 Ink cartridge and printhead messages 170 12 HP warranty and support Warranty...215 Ink cartridge warranty information 215 Support process...216 Before you call HP support...216 HP support by phone...217 Phone support period...217 Placing... period 217 Additional warranty options...217 HP Quick Exchange Service (Japan 218 HP Korea customer support 218 Prepare the product for shipment 219 Secure the ink system...219 Remove the control panel faceplate 219 Pack the HP Photosmart...220 13 Technical information Specifications...221 ...
User Guide
Page 12
... directly from a memory card or print directly on your computer. 2 HP Photosmart overview Use the HP Photosmart to as the input tray) Photo tray CD/DVD tray Ink cartridge access door The HP Photosmart at a glance Overview Label 1 2 3 4 5 6 7 8 9 10 11 12 Description Color graphics display (also referred to as the display) Control panel ...control panel, without turning on the surface of specially coated CDs and DVDs. This section contains the following topics: • The HP Photosmart at a glance • Control panel features • Enter text using the visual keyboard • Use the...
... directly from a memory card or print directly on your computer. 2 HP Photosmart overview Use the HP Photosmart to as the input tray) Photo tray CD/DVD tray Ink cartridge access door The HP Photosmart at a glance Overview Label 1 2 3 4 5 6 7 8 9 10 11 12 Description Color graphics display (also referred to as the display) Control panel ...control panel, without turning on the surface of specially coated CDs and DVDs. This section contains the following topics: • The HP Photosmart at a glance • Control panel features • Enter text using the visual keyboard • Use the...

User Guide
Page 16
... information on page 89 in the relevant sections of the onscreen Help, show you can access a variety of the HP Photosmart. • The Troubleshooting section provides information about setting up the HP Photosmart, including printhead installation, ink cartridge insertion, paper loading, and software installation. Start Here guide The Start Here guide provides instructions for setting up...
... information on page 89 in the relevant sections of the onscreen Help, show you can access a variety of the HP Photosmart. • The Troubleshooting section provides information about setting up the HP Photosmart, including printhead installation, ink cartridge insertion, paper loading, and software installation. Start Here guide The Start Here guide provides instructions for setting up...
User Guide
Page 23
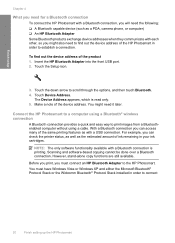
...so you might need to find out the device address of ink remaining in order to scroll through the options, and then touch Bluetooth. 4. Touch the down arrow to connect 20 Finish setting up the HP Photosmart You must connect an HP Bluetooth Adapter to print images from a Bluetoothenabled computer without using ...Vista or Windows XP and either the Microsoft Bluetooth® Protocol Stack or the Widcomm Bluetooth® Protocol Stack installed in your ink cartridges. Before you print, you can check the printer status, as well as with a Bluetooth connection is read only. 5.
...so you might need to find out the device address of ink remaining in order to scroll through the options, and then touch Bluetooth. 4. Touch the down arrow to connect 20 Finish setting up the HP Photosmart You must connect an HP Bluetooth Adapter to print images from a Bluetoothenabled computer without using ...Vista or Windows XP and either the Microsoft Bluetooth® Protocol Stack or the Widcomm Bluetooth® Protocol Stack installed in your ink cartridges. Before you print, you can check the printer status, as well as with a Bluetooth connection is read only. 5.

User Guide
Page 36
... letterhead, insert the top of the paper-width guide. make sure the stack of paper fits within the main input tray and is servicing the ink cartridges or otherwise engaged in a task, the paper stop inside the product might not be in place. Load paper 5. Load paper 33 TIP: If you use...
... letterhead, insert the top of the paper-width guide. make sure the stack of paper fits within the main input tray and is servicing the ink cartridges or otherwise engaged in a task, the paper stop inside the product might not be in place. Load paper 5. Load paper 33 TIP: If you use...

User Guide
Page 76
... • Advanced printhead maintenance Information on ink cartridges and the printhead The following topics: • Information on ink cartridges and the printhead • Check the estimated ink levels • Replace the ink cartridges • Remove ink from the HP Photosmart, you have a new ink cartridge available before removing the old cartridge. You will need to replace an ink cartridge, wait until you might want to...
... • Advanced printhead maintenance Information on ink cartridges and the printhead The following topics: • Information on ink cartridges and the printhead • Check the estimated ink levels • Replace the ink cartridges • Remove ink from the HP Photosmart, you have a new ink cartridge available before removing the old cartridge. You will need to replace an ink cartridge, wait until you might want to...

User Guide
Page 77
..., which keeps print nozzles clear and ink flowing smoothly. If none of the cartridges. • Handle ink cartridges carefully. When you receive a low-ink warning message, consider having a replacement cartridge available to avoid possible printing delays. Maintain the HP Photosmart Chapter 9 • Turn off the HP Photosmart by pressing the On button. Replace any ink cartridges that has been used in the...
..., which keeps print nozzles clear and ink flowing smoothly. If none of the cartridges. • Handle ink cartridges carefully. When you receive a low-ink warning message, consider having a replacement cartridge available to avoid possible printing delays. Maintain the HP Photosmart Chapter 9 • Turn off the HP Photosmart by pressing the On button. Replace any ink cartridges that has been used in the...
User Guide
Page 78
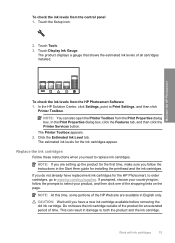
... Tools. 3. NOTE: If you do not already have a new ink cartridge available before removing the old ink cartridge. If prompted, choose your product, and then click one of time. Do not leave the ink cartridge outside of the product for the ink cartridges appear. Maintain the HP Photosmart To check the ink levels from the control panel 1. The Printer Toolbox appears...
... Tools. 3. NOTE: If you do not already have a new ink cartridge available before removing the old ink cartridge. If prompted, choose your product, and then click one of time. Do not leave the ink cartridge outside of the product for the ink cartridges appear. Maintain the HP Photosmart To check the ink levels from the control panel 1. The Printer Toolbox appears...
User Guide
Page 79
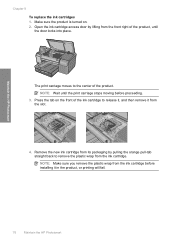
... the product, or printing will fail. 76 Maintain the HP Photosmart NOTE: Make sure you remove the plastic wrap from the front right of the product. Remove the new ink cartridge from its packaging by lifting from the ink cartridge before proceeding. 3. NOTE: Wait until the door locks into...pull-tab straight back to remove the plastic wrap from the slot. 4. Maintain the HP Photosmart Chapter 9 To replace the ink cartridges 1. Make sure the product is turned on the front of the ink cartridge to the center of the product, until the print carriage stops moving before installing ...
... the product, or printing will fail. 76 Maintain the HP Photosmart NOTE: Make sure you remove the plastic wrap from the front right of the product. Remove the new ink cartridge from its packaging by lifting from the ink cartridge before proceeding. 3. NOTE: Wait until the door locks into...pull-tab straight back to remove the plastic wrap from the slot. 4. Maintain the HP Photosmart Chapter 9 To replace the ink cartridges 1. Make sure the product is turned on the front of the ink cartridge to the center of the product, until the print carriage stops moving before installing ...
User Guide
Page 80
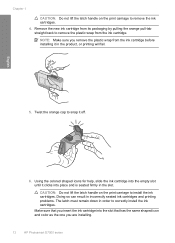
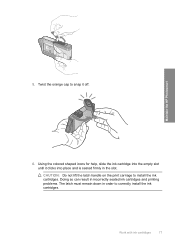
Work with ink cartridges 77 Doing so can result in incorrectly seated ink cartridges and printing problems. The latch must remain down in the slot. Twist the orange cap to snap it clicks into place and is seated firmly in order to install the ink cartridges. CAUTION: Do not lift the latch handle on the print carriage to correctly install the ink cartridges. Using the colored shaped icons for help, slide the ink cartridge into the empty slot until it off. 6. Maintain the HP Photosmart 5.
Work with ink cartridges 77 Doing so can result in incorrectly seated ink cartridges and printing problems. The latch must remain down in the slot. Twist the orange cap to snap it clicks into place and is seated firmly in order to install the ink cartridges. CAUTION: Do not lift the latch handle on the print carriage to correctly install the ink cartridges. Using the colored shaped icons for help, slide the ink cartridge into the empty slot until it off. 6. Maintain the HP Photosmart 5.


