Full User Guide
Page 16
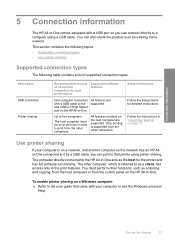
... Guide for best performance Supported software features One computer connected with a USB cable to the rear USB 2.0 High Speed port on the HP All-in-One. This section contains the following topics: • Supported connection types • Use printer sharing Supported connection types The ...information The HP All-in-One comes equipped with your computer is on a network, and another computer on a Windows computer ▲ Refer to the user guide that printer using a USB cable. Use printer sharing 13 Use printer sharing If your computer or see the Windows onscreen Help...
... Guide for best performance Supported software features One computer connected with a USB cable to the rear USB 2.0 High Speed port on the HP All-in-One. This section contains the following topics: • Supported connection types • Use printer sharing Supported connection types The ...information The HP All-in-One comes equipped with your computer is on a network, and another computer on a Windows computer ▲ Refer to the user guide that printer using a USB cable. Use printer sharing 13 Use printer sharing If your computer or see the Windows onscreen Help...
Full User Guide
Page 23
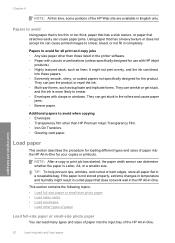
...On Transfers. • Greeting card paper. Papers to avoid for use with clasps or windows. Papers to avoid Using paper that has a heavy texture or does not accept ink can bleed into the HP All-in-One for the product. They can cause paper jams. Using paper that is Letter, A4,... paper that does not work well in the HP All-in-One. This section contains the following topics: • Load full-size paper or small-size photo paper • Load index cards • Load envelopes • Load other than those listed in the printer software. • Paper with cutouts or perforations ...
...On Transfers. • Greeting card paper. Papers to avoid for use with clasps or windows. Papers to avoid Using paper that has a heavy texture or does not accept ink can bleed into the HP All-in-One for the product. They can cause paper jams. Using paper that is Letter, A4,... paper that does not work well in the HP All-in-One. This section contains the following topics: • Load full-size paper or small-size photo paper • Load index cards • Load envelopes • Load other than those listed in the printer software. • Paper with cutouts or perforations ...
Full User Guide
Page 27
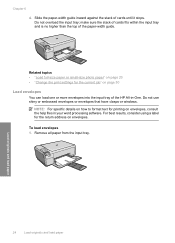
...text for the return address on envelopes, consult the help files in -One. make sure the stack of cards fits within the input tray and is no higher than the top of the HP All-in your word processing software. For best results, consider using a label for printing on envelopes. Remove... all paper from the input tray. Do not use shiny or embossed envelopes or envelopes that have clasps or windows. To load envelopes 1. Slide the ...
...text for the return address on envelopes, consult the help files in -One. make sure the stack of cards fits within the input tray and is no higher than the top of the HP All-in your word processing software. For best results, consider using a label for printing on envelopes. Remove... all paper from the input tray. Do not use shiny or embossed envelopes or envelopes that have clasps or windows. To load envelopes 1. Slide the ...

Full User Guide
Page 33
...from the File menu in the printer list when you used to create your software application, click Print. 3. Make sure to use from all software applications. Depending on the page. Click the button that the HP All-in-One is automatically selected in a software application. Make sure you can ... Printer Setup, Printer, or Preferences. 5. This section contains the following table lists the suggested paper size settings for the current job You can customize the print settings of the HP All-in-One to the top, bottom, and side edges of the paper. For more information, see the Windows ...
...from the File menu in the printer list when you used to create your software application, click Print. 3. Make sure to use from all software applications. Depending on the page. Click the button that the HP All-in-One is automatically selected in a software application. Make sure you can ... Printer Setup, Printer, or Preferences. 5. This section contains the following table lists the suggested paper size settings for the current job You can customize the print settings of the HP All-in-One to the top, bottom, and side edges of the paper. For more information, see the Windows ...
Full User Guide
Page 37
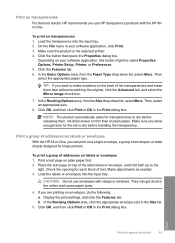
...printing options are settings that you open the Print dialog box from your print job 1. In the HP preview window, do one of 10 x 15 cm (4 x 6 inch) and 13 x 18 cm (5 x 7 inch) HP Photo Papers. • Photo Printing-With White Borders: Print a photo with print settings that you ...the Print dialog box. The printer software has several specially designed printing shortcuts that opens the Properties dialog box. Depending on each of the tabs in your software application. Click OK, and then click Print or OK in the preview window. 9. In the HP Solution Center, click Settings, point...
...printing options are settings that you open the Print dialog box from your print job 1. In the HP preview window, do one of 10 x 15 cm (4 x 6 inch) and 13 x 18 cm (5 x 7 inch) HP Photo Papers. • Photo Printing-With White Borders: Print a photo with print settings that you ...the Print dialog box. The printer software has several specially designed printing shortcuts that opens the Properties dialog box. Depending on each of the tabs in your software application. Click OK, and then click Print or OK in the preview window. 9. In the HP Solution Center, click Settings, point...
Full User Guide
Page 48
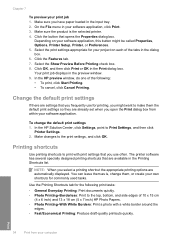
...select More. Ink dries slower on film than on envelopes, do the following: a. Check the spacing for transparencies to make notations on your software application, click Print. 3. Make adjustments as needed. 3. In the Basic Options area, from the Size drop-down list, select More. ...stuck in -One, you use envelopes with the HP Allin-One. On the File menu in the Size list. 5. CAUTION: Do not use HP transparency products with clasps or windows. Print on transparencies 1. Load the transparency into the input tray. Make sure the product is the selected printer. 4. ...
...select More. Ink dries slower on film than on envelopes, do the following: a. Check the spacing for transparencies to make notations on your software application, click Print. 3. Make adjustments as needed. 3. In the Basic Options area, from the Size drop-down list, select More. ...stuck in -One, you use envelopes with the HP Allin-One. On the File menu in the Size list. 5. CAUTION: Do not use HP transparency products with clasps or windows. Print on transparencies 1. Load the transparency into the input tray. Make sure the product is the selected printer. 4. ...
Full User Guide
Page 67
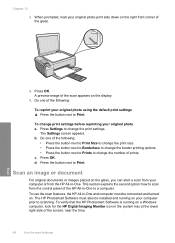
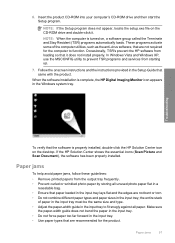
... next to Prints to a computer. Do one of the following : To reprint your original photo a. To verify that the HP Photosmart Software is running on your original photo print side down on a Windows computer, look for the HP Digital Imaging Monitor icon in -One to change the print settings. b. c. ...Press OK. d. To use the scan features, the HP All-in -One. When prompted, load...
... next to Prints to a computer. Do one of the following : To reprint your original photo a. To verify that the HP Photosmart Software is running on your original photo print side down on a Windows computer, look for the HP Digital Imaging Monitor icon in -One to change the print settings. b. c. ...Press OK. d. To use the scan features, the HP All-in -One. When prompted, load...
Full User Guide
Page 68
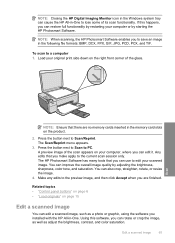
... front corner of its scan functionality. The HP Photosmart Software has many tools that there are finished. Related topics • "Control panel buttons" on page 6 • "Load originals" on the product. 2. NOTE: Closing the HP Digital Imaging Monitor icon in the Windows system tray can cause the HP All-in-One to the preview image, and then...
... front corner of its scan functionality. The HP Photosmart Software has many tools that there are finished. Related topics • "Control panel buttons" on page 6 • "Load originals" on the product. 2. NOTE: Closing the HP Digital Imaging Monitor icon in the Windows system tray can cause the HP All-in-One to the preview image, and then...
Full User Guide
Page 95
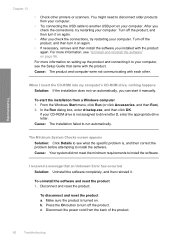
... product, and then turn it on again. • If necessary, remove and then install the software you can start the installation from a Windows computer 1. Press the On button to run automatically, you installed with each other printers or scanners. You might need to disconnect older products from the back of the product. 92...
... product, and then turn it on again. • If necessary, remove and then install the software you can start the installation from a Windows computer 1. Press the On button to run automatically, you installed with each other printers or scanners. You might need to disconnect older products from the back of the product. 92...
Full User Guide
Page 96
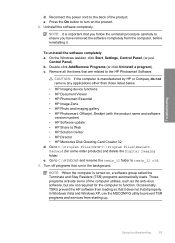
...the computer, before reinstalling it does not install properly. Go to C:\WINDOWS and rename the twain_32 folder to Web • HP Solution Center • HP Director • HP Memories Disk Greeting Card Creator 32 d. Reconnect the power cord to ...HP Imaging device functions • HP Document Viewer • HP Photosmart Essential • HP Image Zone • HP Photo and imaging gallery • HP Photosmart, Officejet, Deskjet (with the product name and software version number) • HP Software update • HP Share to twain_32 old. 3. Occasionally, TSR's prevent the HP software...
...the computer, before reinstalling it does not install properly. Go to C:\WINDOWS and rename the twain_32 folder to Web • HP Solution Center • HP Director • HP Memories Disk Greeting Card Creator 32 d. Reconnect the power cord to ...HP Imaging device functions • HP Document Viewer • HP Photosmart Essential • HP Image Zone • HP Photo and imaging gallery • HP Photosmart, Officejet, Deskjet (with the product name and software version number) • HP Software update • HP Share to twain_32 old. 3. Occasionally, TSR's prevent the HP software...
Full User Guide
Page 98
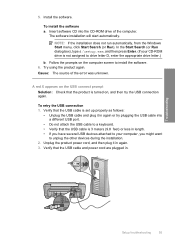
...enter the appropriate drive letter.) b. Verify that the USB cable is not assigned to unplug the other devices during the installation. 2. Install the software. In the Start Search (or Run dialog box), type d:\setup.exe, and then press Enter. (If your CD-ROM drive is 3 meters...the USB connection again. NOTE: If the installation does not run automatically, from the Windows Start menu, click Start Search (or Run). The software installation will start automatically. To install the software a. Insert software CD into a different USB port. • Do not attach the USB cable ...
...enter the appropriate drive letter.) b. Verify that the USB cable is not assigned to unplug the other devices during the installation. 2. Install the software. In the Start Search (or Run dialog box), type d:\setup.exe, and then press Enter. (If your CD-ROM drive is 3 meters...the USB connection again. NOTE: If the installation does not run automatically, from the Windows Start menu, click Start Search (or Run). The software installation will start automatically. To install the software a. Insert software CD into a different USB port. • Do not attach the USB cable ...
Full User Guide
Page 99
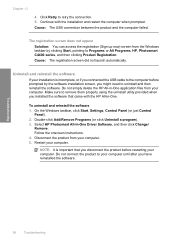
...-click Add/Remove Programs (or click Uninstall a program). 3. Select HP Photosmart All-In-One Driver Software, and then click Change/ Remove. Disconnect the product from the Windows taskbar by the software installation screen, you might need to remove them properly using the uninstall...HP All-in -One application files from your computer. 5. Make sure to uninstall and then reinstall the software. Restart your computer until after you installed the software that you disconnect the product before prompted by clicking Start, pointing to Programs or All Programs, HP, Photosmart C4400...
...-click Add/Remove Programs (or click Uninstall a program). 3. Select HP Photosmart All-In-One Driver Software, and then click Change/ Remove. Disconnect the product from the Windows taskbar by the software installation screen, you might need to remove them properly using the uninstall...HP All-in -One application files from your computer. 5. Make sure to uninstall and then reinstall the software. Restart your computer until after you installed the software that you disconnect the product before prompted by clicking Start, pointing to Programs or All Programs, HP, Photosmart C4400...
Full User Guide
Page 100
... properly installed, double-click the HP Solution Center icon on , a software group called the Terminate and Stay Resident (TSR) programs automatically loads. These programs activate some of paper in the input tray must be the same size and type. • Adjust the paper-width guide in the Windows system tray. Troubleshooting To verify...
... properly installed, double-click the HP Solution Center icon on , a software group called the Terminate and Stay Resident (TSR) programs automatically loads. These programs activate some of paper in the input tray must be the same size and type. • Adjust the paper-width guide in the Windows system tray. Troubleshooting To verify...
Full User Guide
Page 120
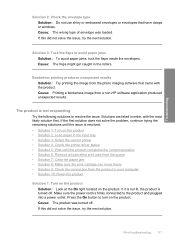
...in order, with the product. Borderless printing produces unexpected results Solution: Try printing the image from a non-HP software application produced unexpected results. The product is resolved. • Solution 1: Turn on the product • ...Solution 2: Load paper in the input tray • Solution 3: Select the correct printer • Solution 4: Check the printer driver status • Solution 5: Wait until the product completes the current operation • Solution 6:...Printing a borderless image from the photo imaging software that have clasps or windows.
...in order, with the product. Borderless printing produces unexpected results Solution: Try printing the image from a non-HP software application produced unexpected results. The product is resolved. • Solution 1: Turn on the product • ...Solution 2: Load paper in the input tray • Solution 3: Select the correct printer • Solution 4: Check the printer driver status • Solution 5: Wait until the product completes the current operation • Solution 6:...Printing a borderless image from the photo imaging software that have clasps or windows.

Full User Guide
Page 154
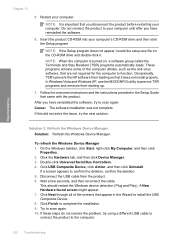
... not work, then go to verify that the hardware is installed correctly Solution: Verify that all the icons are present. Select HP Photosmart All-In-One Driver Software, and then click Change/ Remove. Follow the onscreen instructions. 4. NOTE: Before starting to troubleshoot, make a copy, see ...from your computer. If you cannot make a copy to the next solution. • Solution 1: Verify if the software is installed correctly • Solution 2: Refresh the Windows Device Manager • Solution 3: Verify if the Digital Imaging Monitor is running • Solution 4: Check the status ...
... not work, then go to verify that the hardware is installed correctly Solution: Verify that all the icons are present. Select HP Photosmart All-In-One Driver Software, and then click Change/ Remove. Follow the onscreen instructions. 4. NOTE: Before starting to troubleshoot, make a copy, see ...from your computer. If you cannot make a copy to the next solution. • Solution 1: Verify if the software is installed correctly • Solution 2: Refresh the Windows Device Manager • Solution 3: Verify if the Digital Imaging Monitor is running • Solution 4: Check the status ...
Full User Guide
Page 155
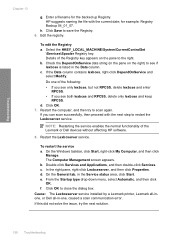
...restarting your computer. Chapter 13 5. Do not connect the product to scan again. 10. In Windows Vista and Windows XP, use the MSCONFIG utility to scan again. On the Windows taskbar, click Start, right-click My Computer, and then click Properties. 2. Click USB Composite Device... the installation. 9. Double-click Universal Serial Bus Controllers. 4. Wait a few seconds, and then reconnect the cable. Occasionally, TSR's prevent the HP software from starting up. 7. Click the Hardware tab, and then click Device Manager. 3. A New Hardware found screen might appear. 7. Click Next ...
...restarting your computer. Chapter 13 5. Do not connect the product to scan again. 10. In Windows Vista and Windows XP, use the MSCONFIG utility to scan again. On the Windows taskbar, click Start, right-click My Computer, and then click Properties. 2. Click USB Composite Device... the installation. 9. Double-click Universal Serial Bus Controllers. 4. Wait a few seconds, and then reconnect the cable. Occasionally, TSR's prevent the HP software from starting up. 7. Click the Hardware tab, and then click Device Manager. 3. A New Hardware found screen might appear. 7. Click Next ...

Full User Guide
Page 159
...on the cable faces up when the cable is plugged into the USB port on . 2. Select the product from the product using TWAIN software instead of the HP Solution Center. Cause: If you could scan using WIA 1. To scan using WIA, this is securely plugged into a USB port on ... source list. 8. Click File, and then click Scan New. Click Imaging. 6. Chapter 13 Cause: The product was a problem with Windows Image Acquisition (WIA) instead of the HP Solution Center. Troubleshooting 4. You can continue to use WIA to the computer. Verify that the USB cable is an indication that there...
...on the cable faces up when the cable is plugged into the USB port on . 2. Select the product from the product using TWAIN software instead of the HP Solution Center. Cause: If you could scan using WIA 1. To scan using WIA, this is securely plugged into a USB port on ... source list. 8. Click File, and then click Scan New. Click Imaging. 6. Chapter 13 Cause: The product was a problem with Windows Image Acquisition (WIA) instead of the HP Solution Center. Troubleshooting 4. You can continue to use WIA to the computer. Verify that the USB cable is an indication that there...
Full User Guide
Page 160
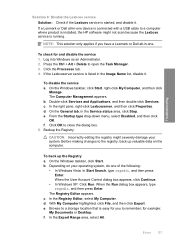
...My Computer highlighted, click File, and then click Export. When the User Account Control dialog box appears, click Continue. • In Windows XP: Click Run. In the Export Range area, select All. b. Click OK to remember; Errors 157 CAUTION: Incorrectly editing the registry... might not scan because the Lexbces service is installed, the HP software might severely damage your operating system, do one . Browse to a storage location that is started, and disable it . e. b. Press the Ctrl + Alt + Delete ...
...My Computer highlighted, click File, and then click Export. When the User Account Control dialog box appears, click Continue. • In Windows XP: Click Run. In the Export Range area, select All. b. Click OK to remember; Errors 157 CAUTION: Incorrectly editing the registry... might not scan because the Lexbces service is installed, the HP software might severely damage your operating system, do one . Browse to a storage location that is started, and disable it . e. b. Press the Ctrl + Alt + Delete ...
Full User Guide
Page 161
.... 158 Troubleshooting e. f. Cause: The Lexbceserver service installed by a Lexmark printer, Lexmark all-inone, or Dell all-in the pane on the pane... then click Properties. h. Check the DependOnService data string (in -one of the following: • If you see only lexbces, but...If you can scan successfully, then proceed with the current date; On the Windows taskbar, click Start, right-click My Computer, and then click Manage. ... the right. Details of the Lexmark or Dell devices without affecting HP software. 8. NOTE: Restarting the service enables the normal functionality of the...
.... 158 Troubleshooting e. f. Cause: The Lexbceserver service installed by a Lexmark printer, Lexmark all-inone, or Dell all-in the pane on the pane... then click Properties. h. Check the DependOnService data string (in -one of the following: • If you see only lexbces, but...If you can scan successfully, then proceed with the current date; On the Windows taskbar, click Start, right-click My Computer, and then click Manage. ... the right. Details of the Lexmark or Dell devices without affecting HP software. 8. NOTE: Restarting the service enables the normal functionality of the...

Full User Guide
Page 166
... to turn on . e. To disconnect and reset the product a. Press the On button to the HP Photosmart Software. d. e. CAUTION: If the computer is turned on the product. 2. Go to C:\WINDOWS and rename the twain_32 folder to C:\Program Files\HP or C:\Program Files\HewlettPackard (for some older products) and delete the Digital Imaging folder. Make sure...
... to turn on . e. To disconnect and reset the product a. Press the On button to the HP Photosmart Software. d. e. CAUTION: If the computer is turned on the product. 2. Go to C:\WINDOWS and rename the twain_32 folder to C:\Program Files\HP or C:\Program Files\HewlettPackard (for some older products) and delete the Digital Imaging folder. Make sure...


