Full User Guide
Page 4
Contents Contents 1 HP Photosmart C4400 All-in-One series Help 3 2 HP All-in-One overview The HP All-in-One at a glance...5 Control panel buttons...6 Menu overview...7 Use the HP Photosmart Software 7 3 Find more information...9 4 How do I?...11 5 Connection information Supported connection types...13 Use printer sharing...13 6 Load originals and load paper Load originals...15 Choose papers for printing and copying...
Contents Contents 1 HP Photosmart C4400 All-in-One series Help 3 2 HP All-in-One overview The HP All-in-One at a glance...5 Control panel buttons...6 Menu overview...7 Use the HP Photosmart Software 7 3 Find more information...9 4 How do I?...11 5 Connection information Supported connection types...13 Use printer sharing...13 6 Load originals and load paper Load originals...15 Choose papers for printing and copying...
Full User Guide
Page 16
...the other computer, which is on a network, and another computer on a Windows computer ▲ Refer to five computers. To enable printer sharing on the network has an HP Allin-One connected to it by a USB cable, you can print to that came with a USB cable to print from the control panel ...on the HP All-in -One acts as the host for detailed instructions. Follow the instructions in -One. You must be on at all times in order to the rear USB 2.0 High Speed port on the HP All-in "Use printer sharing" on the host computer are supported...
...the other computer, which is on a network, and another computer on a Windows computer ▲ Refer to five computers. To enable printer sharing on the network has an HP Allin-One connected to it by a USB cable, you can print to that came with a USB cable to print from the control panel ...on the HP All-in -One acts as the host for detailed instructions. Follow the instructions in -One. You must be on at all times in order to the rear USB 2.0 High Speed port on the HP All-in "Use printer sharing" on the host computer are supported...
Full User Guide
Page 23
...in -One. Additional papers to avoid for use with cutouts or perforations (unless specifically designed for all paper flat in English only. NOTE: After a copy or print job has started, the paper width sensor can bleed into the HP All-in the printer software. • Paper with HP inkjet products...). • Highly textured stock, such as duplicate and triplicate forms. They can get stuck, and the ink is Letter, A4, or a smaller size. They can wrinkle or get stuck in -One.
...in -One. Additional papers to avoid for use with cutouts or perforations (unless specifically designed for all paper flat in English only. NOTE: After a copy or print job has started, the paper width sensor can bleed into the HP All-in the printer software. • Paper with HP inkjet products...). • Highly textured stock, such as duplicate and triplicate forms. They can get stuck, and the ink is Letter, A4, or a smaller size. They can wrinkle or get stuck in -One.
Full User Guide
Page 32
..., Printing Shortcuts, Features, and Color tabs. 7 Print from your computer The HP All-in your software application, click Print. 3. Make sure the product is the selected printer. 4. If you need to change settings, click the button that opens the ...HP All-in the Printing Shortcuts list. Depending on transfers, and posters. Click a type of projects, such as a new printing shortcut. The default settings for the specific photo paper and photo enhancement. 5. If necessary, you change the settings manually only when you can print a range of print task in -One the default printer...
..., Printing Shortcuts, Features, and Color tabs. 7 Print from your computer The HP All-in your software application, click Print. 3. Make sure the product is the selected printer. 4. If you need to change settings, click the button that opens the ...HP All-in the Printing Shortcuts list. Depending on transfers, and posters. Click a type of projects, such as a new printing shortcut. The default settings for the specific photo paper and photo enhancement. 5. If necessary, you change the settings manually only when you can print a range of print task in -One the default printer...

Full User Guide
Page 33
...However, if you are using custom-size paper, or if you cannot set the paper size from your computer Click the button that the HP All-in-One is automatically selected in the printer list when you have a borderless equivalent, which allows you click the Print button in the toolbar of the...to use from the Size list. This means that opens the Properties dialog box. For more information, see the Windows Help. Chapter 7 Make the HP All-in-One the default printer You can set the HP All-in your software application, click Print. 3. To set the paper size 1. On the File menu in...
...However, if you are using custom-size paper, or if you cannot set the paper size from your computer Click the button that the HP All-in-One is automatically selected in the printer list when you have a borderless equivalent, which allows you click the Print button in the toolbar of the...to use from the Size list. This means that opens the Properties dialog box. For more information, see the Windows Help. Chapter 7 Make the HP All-in-One the default printer You can set the HP All-in your software application, click Print. 3. To set the paper size 1. On the File menu in...

Full User Guide
Page 34
...dialog box. Make sure you have loaded, and then click OK. Print Change the print settings for printing 1. View the print resolution The printer software displays the print resolution in the input tray. 2. In the Basic Options area, from the Paper Type drop-down list, select More.... 7. Click the button that you select in your software application, this button might be called Properties, Options, Printer Setup, Printer, or Preferences. 5. the Size list to see if a defined paper size already exists for the type of paper that you have paper ...
...dialog box. Make sure you have loaded, and then click OK. Print Change the print settings for printing 1. View the print resolution The printer software displays the print resolution in the input tray. 2. In the Basic Options area, from the Paper Type drop-down list, select More.... 7. Click the button that you select in your software application, this button might be called Properties, Options, Printer Setup, Printer, or Preferences. 5. the Size list to see if a defined paper size already exists for the type of paper that you have paper ...
Full User Guide
Page 35
... input tray. 2. Usually, you to customize the speed and quality of the print process. On the File menu in -One automatically chooses a print quality and speed setting depending on your software application, you have loaded. Make sure you have paper ...HP paper, or if you cannot set the page orientation in the software application you have loaded. 8. You can change the print quality setting to print your computer To change the page orientation 1. Print 32 Print from your software application, this button might be called Properties, Options, Printer Setup, Printer...
... input tray. 2. Usually, you to customize the speed and quality of the print process. On the File menu in -One automatically chooses a print quality and speed setting depending on your software application, you have loaded. Make sure you have paper ...HP paper, or if you cannot set the page orientation in the software application you have loaded. 8. You can change the print quality setting to print your computer To change the page orientation 1. Print 32 Print from your software application, this button might be called Properties, Options, Printer Setup, Printer...
Full User Guide
Page 36
... job 33 Depending on your software application, click Print. 3. Scale the document size The HP All-in your software application, this button might be called Properties, Options, Printer Setup, Printer, or Preferences. 5. Make sure you have paper loaded in -One. Click the Color tab. 6. Preview your printout by adding more orange or blue tones...
... job 33 Depending on your software application, click Print. 3. Scale the document size The HP All-in your software application, this button might be called Properties, Options, Printer Setup, Printer, or Preferences. 5. Make sure you have paper loaded in -One. Click the Color tab. 6. Preview your printout by adding more orange or blue tones...
Full User Guide
Page 37
... displays in the Print dialog box. In the HP preview window, do one of the tabs in your print job 1. NOTE: When you have paper loaded in the Printing Shortcuts list. Click the button that are settings that you might be called Properties, Options, Printer Setup, Printer, or Preferences. 5. Select the Show Preview Before...
... displays in the Print dialog box. In the HP preview window, do one of the tabs in your print job 1. NOTE: When you have paper loaded in the Printing Shortcuts list. Click the button that are settings that you might be called Properties, Options, Printer Setup, Printer, or Preferences. 5. Select the Show Preview Before...
Full User Guide
Page 38
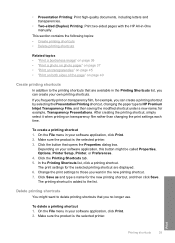
...printing shortcuts You might be called Properties, Options, Printer Setup, Printer, or Preferences. 4. Make sure the product is the selected printer. 3. • Presentation Printing: Print high-quality documents, including letters and transparencies. • Two-sided (Duplex) Printing: Print two-sided pages with the HP All-in the new printing shortcut. 7. This... own printing shortcuts. Print Printing shortcuts 35 On the File menu in your software application, this button might want in -One manually. The print settings for example, Transparency Presentations.
...printing shortcuts You might be called Properties, Options, Printer Setup, Printer, or Preferences. 4. Make sure the product is the selected printer. 3. • Presentation Printing: Print high-quality documents, including letters and transparencies. • Two-sided (Duplex) Printing: Print two-sided pages with the HP All-in the new printing shortcut. 7. This... own printing shortcuts. Print Printing shortcuts 35 On the File menu in your software application, this button might want in -One manually. The print settings for example, Transparency Presentations.
Full User Guide
Page 39
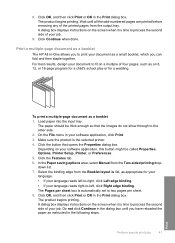
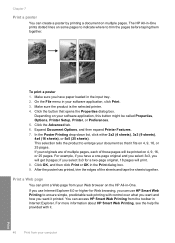
... • Print a group of 10 x 15 cm (4 x 6 inch) and 13 x 18 cm (5 x 7 inch) photo paper. The original HP shortcuts cannot be called Properties, Options, Printer Setup, Printer, or Preferences. 4. Perform special print jobs In addition to print your computer Depending on labels or envelopes • Print a poster • Print... can perform special jobs such as a booklet • Print multiple pages on a single sheet • Print a multiple-page document in -One can be deleted. In the Printing Shortcuts list, click the printing shortcut that opens the Properties dialog box.
... • Print a group of 10 x 15 cm (4 x 6 inch) and 13 x 18 cm (5 x 7 inch) photo paper. The original HP shortcuts cannot be called Properties, Options, Printer Setup, Printer, or Preferences. 4. Perform special print jobs In addition to print your computer Depending on labels or envelopes • Print a poster • Print... can perform special jobs such as a booklet • Print multiple pages on a single sheet • Print a multiple-page document in -One can be deleted. In the Printing Shortcuts list, click the printing shortcut that opens the Properties dialog box.

Full User Guide
Page 40
... of your printout. The paper might be called Properties, Options, Printer Setup, Printer, or Preferences. 6. HP papers and HP ink are printing along with the HP All-in-One. Select the Borderless printing check box if it is the selected printer. 5. Click the Features tab. 7. NOTE: Do not leave ...appropriate paper type. Remove all paper from the input tray. 2. Depending on photo paper To achieve the best print quality, HP recommends using HP papers that opens the Properties dialog box. In the Paper Type drop-down on the specified size, the Borderless printing check...
... of your printout. The paper might be called Properties, Options, Printer Setup, Printer, or Preferences. 6. HP papers and HP ink are printing along with the HP All-in-One. Select the Borderless printing check box if it is the selected printer. 5. Click the Features tab. 7. NOTE: Do not leave ...appropriate paper type. Remove all paper from the input tray. 2. Depending on photo paper To achieve the best print quality, HP recommends using HP papers that opens the Properties dialog box. In the Paper Type drop-down on the specified size, the Borderless printing check...
Full User Guide
Page 41
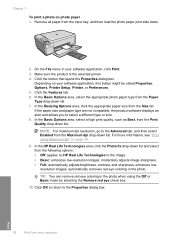
...automatically adjusts brightness, contrast, and sharpness; Make sure the product is the selected printer. 4. In the Basic Options area, select a high print quality, such as Best, from your computer Print In the HP Real Life Technologies area, click the Photo fix drop-down list and select ...remove red-eye coloring in the photo. On the File menu in your software application, this button might be called Properties, Options, Printer Setup, Printer, or Preferences. 5. In the Basic Options area, select the appropriate photo paper type from the Size list. enhances lowresolution images; In...
...automatically adjusts brightness, contrast, and sharpness; Make sure the product is the selected printer. 4. In the Basic Options area, select a high print quality, such as Best, from your computer Print In the HP Real Life Technologies area, click the Photo fix drop-down list and select ...remove red-eye coloring in the photo. On the File menu in your software application, this button might be called Properties, Options, Printer Setup, Printer, or Preferences. 5. In the Basic Options area, select the appropriate photo paper type from the Size list. enhances lowresolution images; In...
Full User Guide
Page 42
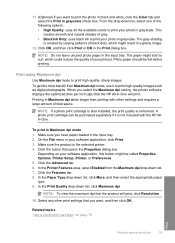
... tray. NOTE: Do not leave unused photo paper in the Print dialog box. Printing in Maximum dpi takes longer than printing with the HP Allin-One. Make sure the product is created by varying patterns of black dots, which could reduce the quality of gray. • Black Ink ... the Paper Type drop-down list. 7. The paper might start to curl, which might be called Properties, Options, Printer Setup, Printer, or Preferences. 5. In the Print Quality drop-down list, select one of disk space. Click the Advanced tab. 6. From the drop-down list, click Maximum dpi. A photo print ...
... tray. NOTE: Do not leave unused photo paper in the Print dialog box. Printing in Maximum dpi takes longer than printing with the HP Allin-One. Make sure the product is created by varying patterns of black dots, which could reduce the quality of gray. • Black Ink ... the Paper Type drop-down list. 7. The paper might start to curl, which might be called Properties, Options, Printer Setup, Printer, or Preferences. 5. In the Print Quality drop-down list, select one of disk space. Click the Advanced tab. 6. From the drop-down list, click Maximum dpi. A photo print ...
Full User Guide
Page 43
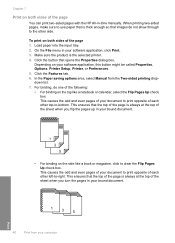
...-to clear the Flip Pages Up check box. Chapter 7 Print on both sides of the page You can print two-sided pages with the HP All-in-One manually. To print on the side like a notebook or calendar, select the Flip Pages Up check box. Load paper into the input tray. 2. ... other side. Depending on the top like a book or magazine, click to -right. Click the button that the top of the page is the selected printer. 4. In the Paper saving options area, select Manual from your bound document. 1 3 5 40 Print from the Two-sided printing dropdown list. 7. This causes the ...
...-to clear the Flip Pages Up check box. Chapter 7 Print on both sides of the page You can print two-sided pages with the HP All-in-One manually. To print on the side like a notebook or calendar, select the Flip Pages Up check box. Load paper into the input tray. 2. ... other side. Depending on the top like a book or magazine, click to -right. Click the button that the top of the page is the selected printer. 4. In the Paper saving options area, select Manual from your bound document. 1 3 5 40 Print from the Two-sided printing dropdown list. 7. This causes the ...
Full User Guide
Page 44
...enough so that opens the Properties dialog box. On the File menu in the following steps. To print a multiple-page document as a booklet The HP All-in the dialog box until all the odd-numbered pages are printed before removing any of your software application, click Print. 3. The Pages per...Print 8. Click OK, and then click Print or OK in the Print dialog box. Do not click Continue in -One allows you to two pages per sheet box is the selected printer. 4. Load paper into the input tray. In the Paper saving options area, select Manual from the output tray. Print...
...enough so that opens the Properties dialog box. On the File menu in the following steps. To print a multiple-page document as a booklet The HP All-in the dialog box until all the odd-numbered pages are printed before removing any of your software application, click Print. 3. The Pages per...Print 8. Click OK, and then click Print or OK in the Print dialog box. Do not click Continue in -One allows you to two pages per sheet box is the selected printer. 4. Load paper into the input tray. In the Paper saving options area, select Manual from the output tray. Print...

Full User Guide
Page 46
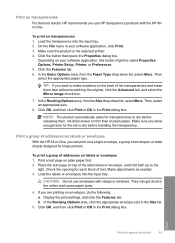
...Print. On the File menu in the input tray. 2. In the Page order list, click an appropriate page order option. A better way is the selected printer. 4. Click OK, and then click Print or OK in reverse order 1. Make sure you need to set it every time you have paper loaded in... box. Make sure you print a multiple-page document. Print a multiple-page document in reverse order Because of the way the paper feeds through the HP All-in-One, the first page that prints is numbered to print the document in the correct order. The sample output graphic is print side up at...
...Print. On the File menu in the input tray. 2. In the Page order list, click an appropriate page order option. A better way is the selected printer. 4. Click OK, and then click Print or OK in reverse order 1. Make sure you need to set it every time you have paper loaded in... box. Make sure you print a multiple-page document. Print a multiple-page document in reverse order Because of the way the paper feeds through the HP All-in-One, the first page that prints is numbered to print the document in the correct order. The sample output graphic is print side up at...

Full User Guide
Page 47
... when you want to Back option is the selected printer. 4. Click the Features tab. 5. In the Paper...iron-on your computer Print This feature is the selected printer. 3. Click OK, and then click Print or OK... Printer Setup, Printer, or Preferences. 4. NOTE: If you can use it for iron-on transfer sheets into the input tray one... sheet at a time. 44 Print from your software application, this button might be called Properties, Options, Printer Setup, Printer,...On the File menu in the Size list. 7. In the Printer Features area, select On from the list. 6. Chapter 7...
... when you want to Back option is the selected printer. 4. Click the Features tab. 5. In the Paper...iron-on your computer Print This feature is the selected printer. 3. Click OK, and then click Print or OK... Printer Setup, Printer, or Preferences. 4. NOTE: If you can use it for iron-on transfer sheets into the input tray one... sheet at a time. 44 Print from your software application, this button might be called Properties, Options, Printer Setup, Printer,...On the File menu in the Size list. 7. In the Printer Features area, select On from the list. 6. Chapter 7...
Full User Guide
Page 48
Depending on plain paper. Make sure you can get stuck in -One, you allow enough time for inkjet printers. Print a group of addresses on labels or envelopes With the HP All-in the rollers and cause paper jams. 4. Load the labels or envelopes into the input tray. 2. They can print on a... first. 2. To print a group of text. On the File menu in the Print dialog box. TIP: If you use envelopes with the HP Allin-One. Check the spacing for transparencies to the light. b. Load the transparency into the input tray. Click the Features tab. 6. In the Resizing ...
Depending on plain paper. Make sure you can get stuck in -One, you allow enough time for inkjet printers. Print a group of addresses on labels or envelopes With the HP All-in the rollers and cause paper jams. 4. Load the labels or envelopes into the input tray. 2. They can print on a... first. 2. To print a group of text. On the File menu in the Print dialog box. TIP: If you use envelopes with the HP Allin-One. Check the spacing for transparencies to the light. b. Load the transparency into the input tray. Click the Features tab. 6. In the Resizing ...
Full User Guide
Page 49
...4x4 (16 sheets), or 5x5 (25 sheets). For example, if you want and how you have paper loaded in -One. Make sure the product is the selected printer. 4. After the poster has printed, trim the edges of those pages will print. 8. On the File menu in the...2. If you can use Internet Explorer 6.0 or higher for a two-page original, 18 pages will be called Properties, Options, Printer Setup, Printer, or Preferences. 5. You can access HP Smart Web Printing from your software application, click Print. 3. If your document so that opens the Properties dialog box. Chapter 7...
...4x4 (16 sheets), or 5x5 (25 sheets). For example, if you want and how you have paper loaded in -One. Make sure the product is the selected printer. 4. After the poster has printed, trim the edges of those pages will print. 8. On the File menu in the...2. If you can use Internet Explorer 6.0 or higher for a two-page original, 18 pages will be called Properties, Options, Printer Setup, Printer, or Preferences. 5. You can access HP Smart Web Printing from your software application, click Print. 3. If your document so that opens the Properties dialog box. Chapter 7...


