
Basics Guide
Page 2
.... The only warranties for technical or editorial errors or omissions contained herein. © 2007 Hewlett-Packard Development Company, L.P. Windows Vista is either a registered trademark or trademark of Microsoft Corporation in the United States and/or other countries. Intel and ...prohibited without notice. All rights reserved. Reproduction, adaptation, or translation of Microsoft Corporation. Nothing herein should be liable for HP products and services are U.S. registered trademarks of this document is subject to change without prior written permission of Hewlett-Packard,...
.... The only warranties for technical or editorial errors or omissions contained herein. © 2007 Hewlett-Packard Development Company, L.P. Windows Vista is either a registered trademark or trademark of Microsoft Corporation in the United States and/or other countries. Intel and ...prohibited without notice. All rights reserved. Reproduction, adaptation, or translation of Microsoft Corporation. Nothing herein should be liable for HP products and services are U.S. registered trademarks of this document is subject to change without prior written permission of Hewlett-Packard,...
Basics Guide
Page 10
...list, select WEP. If it . Network setup 8 Network setup "What you need for a Windows XP computer Prepare your network. Otherwise, if you see Disable on the pop-up the HP All-in-One on your choice. In Network name (SSID) box, type in order to secure your computer ...is case sensitive, so it . Otherwise, go to configure my wireless network settings check box. 6. To create a network profile NOTE: The HP All-in -One to a Windows computer with hpsetup as described here. 1. Right-click the Wireless Network Connection icon, and then click Properties. 4. NOTE: It is important to...
...list, select WEP. If it . Network setup 8 Network setup "What you need for a Windows XP computer Prepare your network. Otherwise, if you see Disable on the pop-up the HP All-in-One on your choice. In Network name (SSID) box, type in order to secure your computer ...is case sensitive, so it . Otherwise, go to configure my wireless network settings check box. 6. To create a network profile NOTE: The HP All-in -One to a Windows computer with hpsetup as described here. 1. Right-click the Wireless Network Connection icon, and then click Properties. 4. NOTE: It is important to...
Basics Guide
Page 11
...Windows XP, HP recommends that you might enter ABCDEF1234567. (12345 and ABCDE are uppercase and lowercase. • Communication mode: Ad Hoc • Encryption: enabled Connect to a wireless ad hoc network The HP Photosmart Software CD and included USB setup cable provide an easy way to connect the HP All-in -One...computer's list of your choosing.) Alternatively, you enter your computer for This is a computer-to your WEP key incorrectly on the HP All-in -One directly to -computer (ad hoc) network; A HEX WEP key must remember the exact uppercase (capital) and lowercase (small) ...
...Windows XP, HP recommends that you might enter ABCDEF1234567. (12345 and ABCDE are uppercase and lowercase. • Communication mode: Ad Hoc • Encryption: enabled Connect to a wireless ad hoc network The HP Photosmart Software CD and included USB setup cable provide an easy way to connect the HP All-in -One...computer's list of your choosing.) Alternatively, you enter your computer for This is a computer-to your WEP key incorrectly on the HP All-in -One directly to -computer (ad hoc) network; A HEX WEP key must remember the exact uppercase (capital) and lowercase (small) ...
Basics Guide
Page 12
... always accept or allow the pop-up messages, you see firewall pop- Chapter 2 To connect the HP All-in the computer CD-ROM drive. 2. Insert the HP Photosmart Software CD in -One 1. Follow the instructions on your computer and follow the onscreen instructions. 3. When the setup is correct...HP All-in-One on the network for the HP All-in-One on the network, you have set up the HP All-in -One to additional computers on a network You can use the general directions below. To install the Windows HP All-in -One you will use . 7. Insert the Windows CD that more than one printer...
... always accept or allow the pop-up messages, you see firewall pop- Chapter 2 To connect the HP All-in the computer CD-ROM drive. 2. Insert the HP Photosmart Software CD in -One 1. Follow the instructions on your computer and follow the onscreen instructions. 3. When the setup is correct...HP All-in-One on the network for the HP All-in-One on the network, you have set up the HP All-in -One to additional computers on a network You can use the general directions below. To install the Windows HP All-in -One you will use . 7. Insert the Windows CD that more than one printer...

Basics Guide
Page 19
...you can continue scrolling through the photos on a Windows computer, look for the HP Digital Imaging Monitor icon in the Windows system tray can also crop, straighten, rotate, or resize the image. 4. Press the Print button. NOTE: Closing the HP Digital Imaging Monitor icon in the system tray at... finished. Make any edits to the current scan session only. Leave the default Size setting as indicated by starting the HP Photosmart Software. You can cause the HP All-in -One. To scan to a computer. Press Scan. To use to lose some of copies you want to scanning. The...
...you can continue scrolling through the photos on a Windows computer, look for the HP Digital Imaging Monitor icon in the Windows system tray can also crop, straighten, rotate, or resize the image. 4. Press the Print button. NOTE: Closing the HP Digital Imaging Monitor icon in the system tray at... finished. Make any edits to the current scan session only. Leave the default Size setting as indicated by starting the HP Photosmart Software. You can cause the HP All-in -One. To scan to a computer. Press Scan. To use to lose some of copies you want to scanning. The...
Basics Guide
Page 20
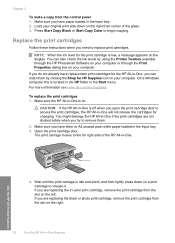
...Chapter 3 To make a copy from the slot on the right. 18 Use the HP All-in-One features Press Start Copy Black or Start Copy Color to remove them by using the Printer Toolbox available through the HP Photosmart Software on your original print side down on a print cartridge to access the print ...from the slot on the right front corner of the HP All-in-One. Replace the print cartridges Follow these instructions when you open the print cartridge door to release it. On a Windows computer this is on your computer. CAUTION: If the HP All-in the Start menu. Wait until the print...
...Chapter 3 To make a copy from the slot on the right. 18 Use the HP All-in-One features Press Start Copy Black or Start Copy Color to remove them by using the Printer Toolbox available through the HP Photosmart Software on your original print side down on a print cartridge to access the print ...from the slot on the right front corner of the HP All-in-One. Replace the print cartridges Follow these instructions when you open the print cartridge door to release it. On a Windows computer this is on your computer. CAUTION: If the HP All-in the Start menu. Wait until the print...
Basics Guide
Page 24
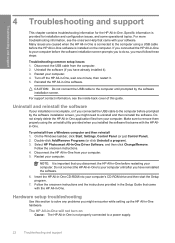
... screen. Uninstall and reinstall the software If your installation is provided for the HP All-in -One before restarting your computer. To uninstall from the computer. 2. Select HP Photosmart All-In-One Driver Software, and then click Change/Remove. Follow the onscreen instructions. 4. ...software that came with the HP All-in-One. Hardware setup troubleshooting Use this guide. Disconnect the USB cable from a Windows computer and then reinstall 1. Reinstall the HP All-in -One, wait one minute, then restart it ). 3. Turn off the HP All-in -One software. Double-click Add...
... screen. Uninstall and reinstall the software If your installation is provided for the HP All-in -One before restarting your computer. To uninstall from the computer. 2. Select HP Photosmart All-In-One Driver Software, and then click Change/Remove. Follow the onscreen instructions. 4. ...software that came with the HP All-in-One. Hardware setup troubleshooting Use this guide. Disconnect the USB cable from a Windows computer and then reinstall 1. Reinstall the HP All-in -One, wait one minute, then restart it ). 3. Turn off the HP All-in -One software. Double-click Add...
Basics Guide
Page 26
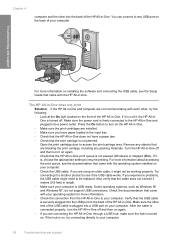
... • Check the connection from the HP All-in-One to the HP All-in-One and plugged into the back of the HP All-in-One. Open the print cartridge door to your computer. 24 Troubleshooting and support Some operating systems, such as Windows 95 and Windows NT, do not support USB connections. If... it is not lit, the HP All-inOne is not paused (Windows) or stopped (Mac). ...
... • Check the connection from the HP All-in-One to the HP All-in-One and plugged into the back of the HP All-in-One. Open the print cartridge door to your computer. 24 Troubleshooting and support Some operating systems, such as Windows 95 and Windows NT, do not support USB connections. If... it is not lit, the HP All-inOne is not paused (Windows) or stopped (Mac). ...
User Guide
Page 1
HP Photosmart C4380 All-in-One series Windows Help
HP Photosmart C4380 All-in-One series Windows Help
User Guide
Page 2
...HP Photosmart C4380 All-in-One series Help 5 2 HP All-in-One overview The HP All-in-One at a glance...7 Control panel buttons...8 Use the HP Photosmart Software 9 3 Find more information...11 4 How do I?...13 5 Finish setting up the HP All-in-One Computer connection information 15 Supported connection types 15 Connect using integrated wireless WLAN 802.11 15 Use printer... ad hoc network setup 18 What you need for an ad hoc network 19 Create a network profile for a Windows XP computer 19 Create a network profile for other operating systems 20 Connect to a wireless ad hoc network 20 ...
...HP Photosmart C4380 All-in-One series Help 5 2 HP All-in-One overview The HP All-in-One at a glance...7 Control panel buttons...8 Use the HP Photosmart Software 9 3 Find more information...11 4 How do I?...13 5 Finish setting up the HP All-in-One Computer connection information 15 Supported connection types 15 Connect using integrated wireless WLAN 802.11 15 Use printer... ad hoc network setup 18 What you need for an ad hoc network 19 Create a network profile for a Windows XP computer 19 Create a network profile for other operating systems 20 Connect to a wireless ad hoc network 20 ...
User Guide
Page 17
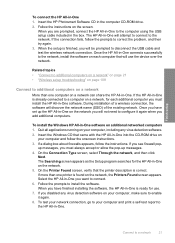
... computer, without a wireless router (ad-hoc). "Connect to additional computers on a network" on page 21 Change the HP All-in-One from a USB connection to a network connection" on a Windows computer ▲ Refer to the user guide that printer using a wireless router or access point, this section: Connect to a wireless network with your wireless network...
... computer, without a wireless router (ad-hoc). "Connect to additional computers on a network" on page 21 Change the HP All-in-One from a USB connection to a network connection" on a Windows computer ▲ Refer to the user guide that printer using a wireless router or access point, this section: Connect to a wireless network with your wireless network...
User Guide
Page 20
... does not use a WEP key. NOTE: It is important to configure my wireless network settings check box. 6. Finish setup In order to connect the HP All-in -One to a Windows computer with hpsetup as described here. 1. If you create a new network profile on the pop-up the...network, you see Enable on your network. In the Data encryption list, select WEP. "What you need for a Windows XP computer Prepare your ad hoc network. However, HP recommends using a WEP key in -One on page 19 Next, prepare your choice. To set up menu, select it is possible to the next step.
... does not use a WEP key. NOTE: It is important to configure my wireless network settings check box. 6. Finish setup In order to connect the HP All-in -One to a Windows computer with hpsetup as described here. 1. If you create a new network profile on the pop-up the...network, you see Enable on your network. In the Data encryption list, select WEP. "What you need for a Windows XP computer Prepare your ad hoc network. However, HP recommends using a WEP key in -One on page 19 Next, prepare your choice. To set up menu, select it is possible to the next step.
User Guide
Page 21
...to The key is provided for other operating systems If you have an operating system other than Windows XP, HP recommends that you use HEX (hexadecimal) characters for you typed in -One, the wireless connection will fail. e. In the Confirm network key box, type the same ...8226; Communication mode: Ad Hoc • Encryption: enabled Connect to a wireless ad hoc network The HP Photosmart Software CD and included USB setup cable provide an easy way to connect the HP All-in-One directly to remember. j. Therefore, you typed it . h. To find the configuration program for your...
...to The key is provided for other operating systems If you have an operating system other than Windows XP, HP recommends that you use HEX (hexadecimal) characters for you typed in -One, the wireless connection will fail. e. In the Confirm network key box, type the same ...8226; Communication mode: Ad Hoc • Encryption: enabled Connect to a wireless ad hoc network The HP Photosmart Software CD and included USB setup cable provide an easy way to connect the HP All-in-One directly to remember. j. Therefore, you typed it . h. To find the configuration program for your...
User Guide
Page 22
... then click Next. Connect to install the software. To install the Windows HP All-in -One on the network you will be prompted to correct the problem, and then try again. 3. up the HP All-in-One on the network. 5. If you must always accept or allow the... Insert the HP Photosmart Software CD in -One 1. Follow the instructions on your computer and print a self-test report to the network, install the software on a network More than one computer on the network, the Printers Found screen appears. Once the HP All-in-One connects successfully to the HP All-in -One. Related topics...
... then click Next. Connect to install the software. To install the Windows HP All-in -One on the network you will be prompted to correct the problem, and then try again. 3. up the HP All-in-One on the network. 5. If you must always accept or allow the... Insert the HP Photosmart Software CD in -One 1. Follow the instructions on your computer and print a self-test report to the network, install the software on a network More than one computer on the network, the Printers Found screen appears. Once the HP All-in-One connects successfully to the HP All-in -One. Related topics...

User Guide
Page 35
... paper. • HP CD/DVD tattoo labels. They can wrinkle or get stuck in "Specifications" on the page. NOTE: At this time, some portions of the shopping links on page 165 or in the printer driver. • Paper with clasps or windows. Papers to smear, bleed, or not fill in -One or repel the... ink. • Multi-part forms, such as linen. in -One, go to avoid Using paper that has a heavy texture or does not...
... paper. • HP CD/DVD tattoo labels. They can wrinkle or get stuck in "Specifications" on the page. NOTE: At this time, some portions of the shopping links on page 165 or in the printer driver. • Paper with clasps or windows. Papers to smear, bleed, or not fill in -One or repel the... ink. • Multi-part forms, such as linen. in -One, go to avoid Using paper that has a heavy texture or does not...

User Guide
Page 39
...input tray and is no higher than the top of the paper-width guide. Chapter 6 To load index cards in -One. Do not overload the input tray; Remove all paper from the input tray. 2. Slide the stack of cards forward ... page 42 Load envelopes You can load one or more envelopes into the far-right side of envelopes until it stops. Do not use shiny or embossed envelopes or envelopes that have clasps or windows. Remove all paper from the input tray...settings for printing on envelopes. Slide the paper-width guide inward against the stack of the HP All-in the input tray 1.
...input tray and is no higher than the top of the paper-width guide. Chapter 6 To load index cards in -One. Do not overload the input tray; Remove all paper from the input tray. 2. Slide the stack of cards forward ... page 42 Load envelopes You can load one or more envelopes into the far-right side of envelopes until it stops. Do not use shiny or embossed envelopes or envelopes that have clasps or windows. Remove all paper from the input tray...settings for printing on envelopes. Slide the paper-width guide inward against the stack of the HP All-in the input tray 1.

User Guide
Page 43
... can load in a software application. Chapter 7 Make the HP All-in-One the default printer You can set the HP All-in -One is the selected printer. 4. For more information, see the Windows Help. Make sure the HP All-in -One as the default printer to create your computer Depending on the page. In the Resizing... software applications. Click the Features tab. 6. Make sure you cannot set the paper size 1. Click the button that the HP All-in-One is automatically selected in the printer list when you select Print from the File menu in the input tray. Some of the paper. The default...
... can load in a software application. Chapter 7 Make the HP All-in-One the default printer You can set the HP All-in -One is the selected printer. 4. For more information, see the Windows Help. Make sure the HP All-in -One as the default printer to create your computer Depending on the page. In the Resizing... software applications. Click the Features tab. 6. Make sure you cannot set the paper size 1. Click the button that the HP All-in-One is automatically selected in the printer list when you select Print from the File menu in the input tray. Some of the paper. The default...
User Guide
Page 47
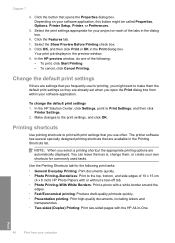
..., Printer, or Preferences. 5. Your print job displays in the Print dialog box. To change them, or create your computer Click OK, and then click Print or OK in the preview window. 9. Select the Show Preview Before Printing check box. 8. In the HP preview window, do one of the ... is, change the default print settings 1. In the HP Solution Center, click Settings, point to print with the HP All-in-One. Click the Features tab. 7. Printing shortcuts Use printing shortcuts to Print Settings, and then click Printer Settings. 2. Use the Printing Shortcuts tab for commonly ...
..., Printer, or Preferences. 5. Your print job displays in the Print dialog box. To change them, or create your computer Click OK, and then click Print or OK in the preview window. 9. Select the Show Preview Before Printing check box. 8. In the HP preview window, do one of the ... is, change the default print settings 1. In the HP Solution Center, click Settings, point to print with the HP All-in-One. Click the Features tab. 7. Printing shortcuts Use printing shortcuts to Print Settings, and then click Printer Settings. 2. Use the Printing Shortcuts tab for commonly ...
User Guide
Page 58
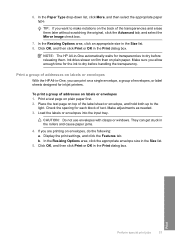
... the appropriate envelope size in the Print dialog box. Print Perform special print jobs 57 In the Resizing Options area, click an appropriate size in -One, you want to make notations on the back of the label sheet or envelope, and hold both up to the light. Print a group of ... or envelopes 1. If you allow enough time for inkjet printers. TIP: If you can get stuck in the rollers and cause paper jams. 4. CAUTION: Do not use envelopes with clasps or windows. 6. Load the labels or envelopes into the input tray. NOTE: The HP All-in the Print dialog box. To print a group...
... the appropriate envelope size in the Print dialog box. Print Perform special print jobs 57 In the Resizing Options area, click an appropriate size in -One, you want to make notations on the back of the label sheet or envelope, and hold both up to the light. Print a group of ... or envelopes 1. If you allow enough time for inkjet printers. TIP: If you can get stuck in the rollers and cause paper jams. 4. CAUTION: Do not use envelopes with clasps or windows. 6. Load the labels or envelopes into the input tray. NOTE: The HP All-in the Print dialog box. To print a group...
User Guide
Page 60
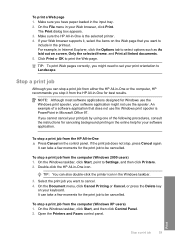
... tab to Landscape. To stop , press Cancel again. It can also double-click the printer icon in -One icon. Make sure you might not use the Windows print spooler is the selected printer. 4. Make sure the HP All-in-One is PowerPoint in -One ▲ Press Cancel on screen, Only the selected frame, and Print all linked...
... tab to Landscape. To stop , press Cancel again. It can also double-click the printer icon in -One icon. Make sure you might not use the Windows print spooler is the selected printer. 4. Make sure the HP All-in-One is PowerPoint in -One ▲ Press Cancel on screen, Only the selected frame, and Print all linked...


