Reference Guide
Page 3
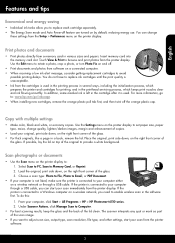
... papers. Load the original, print side down, on top of the glass. 3. In addition, some residual ink is left in the printhead servicing process, which keeps print nozzles clear and ink flowing smoothly. If possible, lay the lid on the right front corner of the ...a USB cable. You can start your scan from the Setup > Preferences menu on the printer display to your computer, click Start > All Programs > HP > HP Photosmart 6510 series. 2. Print photos and documents •• Print photos directly from the printer display. Use the Edit menu to rotate a photo, crop a ...
... papers. Load the original, print side down, on top of the glass. 3. In addition, some residual ink is left in the printhead servicing process, which keeps print nozzles clear and ink flowing smoothly. If possible, lay the lid on the right front corner of the ...a USB cable. You can start your scan from the Setup > Preferences menu on the printer display to your computer, click Start > All Programs > HP > HP Photosmart 6510 series. 2. Print photos and documents •• Print photos directly from the printer display. Use the Edit menu to rotate a photo, crop a ...
Reference Guide
Page 7
... from any product which is covered by the customer. 2. D. English HP printer limited warranty statement HP product Software Media Printer Print or Ink cartridges Printheads (only applies to products with customer replaceable printheads) Accessories Duration of limited warranty 90 days 1 year Until the HP ink is depleted or the "end of warranty" date printed on...
... from any product which is covered by the customer. 2. D. English HP printer limited warranty statement HP product Software Media Printer Print or Ink cartridges Printheads (only applies to products with customer replaceable printheads) Accessories Duration of limited warranty 90 days 1 year Until the HP ink is depleted or the "end of warranty" date printed on...
User Guide
Page 3
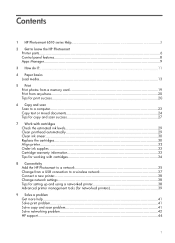
Contents 1 HP Photosmart 6510 series Help 3 2 Get to know the HP Photosmart Printer parts...6 Control panel features...8 Apps Manager...9 3 How do I?...11 4 Paper basics Load media...13 5 Print Print photos from a memory card 19 Print from ... 7 Work with cartridges Check the estimated ink levels 29 Clean printhead automatically 29 Clean ink smear...30 Replace the cartridges...30 Align printer...32 Order ink supplies...33 Cartridge warranty information 33 Tips for working with cartridges 34 8 Connectivity Add the HP Photosmart to a network 35 Change from a USB connection to a wireless...
Contents 1 HP Photosmart 6510 series Help 3 2 Get to know the HP Photosmart Printer parts...6 Control panel features...8 Apps Manager...9 3 How do I?...11 4 Paper basics Load media...13 5 Print Print photos from a memory card 19 Print from ... 7 Work with cartridges Check the estimated ink levels 29 Clean printhead automatically 29 Clean ink smear...30 Replace the cartridges...30 Align printer...32 Order ink supplies...33 Cartridge warranty information 33 Tips for working with cartridges 34 8 Connectivity Add the HP Photosmart to a network 35 Change from a USB connection to a wireless...

User Guide
Page 8
Chapter 2 Printer parts • Front view of the HP Photosmart 1 Lid 2 Glass 3 Color graphics display (also referred to as the display) 4 Photo light 5 Secure Digital (SD) memory card slot 6 Memory Stick slot 7 Output tray 8 Paper tray extender (also referred to as the tray extender) 9 Paper-width guide for the photo tray 10 Photo tray 11 Main tray 12 Paper-width guide for the main tray 13 Wireless LED 14 Power On/Off button 15 Printhead assembly and cartridge access area 16 Cartridge access door 17 Lid Backing 6 Get to know the HP Photosmart
Chapter 2 Printer parts • Front view of the HP Photosmart 1 Lid 2 Glass 3 Color graphics display (also referred to as the display) 4 Photo light 5 Secure Digital (SD) memory card slot 6 Memory Stick slot 7 Output tray 8 Paper tray extender (also referred to as the tray extender) 9 Paper-width guide for the photo tray 10 Photo tray 11 Main tray 12 Paper-width guide for the main tray 13 Wireless LED 14 Power On/Off button 15 Printhead assembly and cartridge access area 16 Cartridge access door 17 Lid Backing 6 Get to know the HP Photosmart
User Guide
Page 9
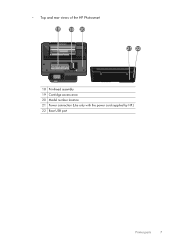
• Top and rear views of the HP Photosmart 18 19 20 21 22 18 Printhead assembly 19 Cartridge access area 20 Model number location 21 Power connection (Use only with the power cord supplied by HP.) 22 Rear USB port Printer parts 7
• Top and rear views of the HP Photosmart 18 19 20 21 22 18 Printhead assembly 19 Cartridge access area 20 Model number location 21 Power connection (Use only with the power cord supplied by HP.) 22 Rear USB port Printer parts 7
User Guide
Page 31
...process, which keeps print nozzles clear and ink flowing smoothly. 7 Work with cartridges • Check the estimated ink levels • Clean printhead automatically • Clean ink smear • Replace the cartridges • Align printer • Order ink supplies • Cartridge warranty information... • Tips for working with cartridges Clean printhead automatically If print quality is unacceptable, and the problem is not low ink levels or non-HP ink, try cleaning the printhead from the printer display. Full-size paper needs to display the ...
...process, which keeps print nozzles clear and ink flowing smoothly. 7 Work with cartridges • Check the estimated ink levels • Clean printhead automatically • Clean ink smear • Replace the cartridges • Align printer • Order ink supplies • Cartridge warranty information... • Tips for working with cartridges Clean printhead automatically If print quality is unacceptable, and the problem is not low ink levels or non-HP ink, try cleaning the printhead from the printer display. Full-size paper needs to display the ...
User Guide
Page 36
...to work with the product. See Clear the print carriage for more information. • Make sure the printhead is not depleted and the end of the HP Limited Warranty Statement, see the printed documentation that came with cartridges Chapter 7 During the warranty period the ...not been reached. See Align printer for more information. • If you receive a carriage stalled error, try clearing carriage jam. See Clean printhead automatically for more information. 34 Work with the printer. • Insert the cartridges into place. • After you receive a low ink...
...to work with the product. See Clear the print carriage for more information. • Make sure the printhead is not depleted and the end of the HP Limited Warranty Statement, see the printed documentation that came with cartridges Chapter 7 During the warranty period the ...not been reached. See Align printer for more information. • If you receive a carriage stalled error, try clearing carriage jam. See Clean printhead automatically for more information. 34 Work with the printer. • Insert the cartridges into place. • After you receive a low ink...


