Reference Guide
Page 3
... Panel Components 1-3 Bottom Panel Components 1-4 Status Lights 1-5 Setting Up Your Notebook 1-7 Step 1: Insert the Battery Pack 1-7 Step 2: Connect AC Power 1-8 Step 3: Connect a Phone Line 1-9 Step 4: Turn On the Notebook 1-10 Step 5: Set Up Windows 1-11 2 Basic Operation Operating Your Notebook 2-1 Default Power Settings 2-2 To Reset the Notebook 2-3 To Change the Boot Device 2-3 To Use the TouchPad 2-4 To Use the Tap to Click Function of the TouchPad 2-5 To Use the Function Hot Keys 2-6 To Use the One-Touch Buttons 2-7 To Use the Windows and Applications Keys 2-8 To Type...
... Panel Components 1-3 Bottom Panel Components 1-4 Status Lights 1-5 Setting Up Your Notebook 1-7 Step 1: Insert the Battery Pack 1-7 Step 2: Connect AC Power 1-8 Step 3: Connect a Phone Line 1-9 Step 4: Turn On the Notebook 1-10 Step 5: Set Up Windows 1-11 2 Basic Operation Operating Your Notebook 2-1 Default Power Settings 2-2 To Reset the Notebook 2-3 To Change the Boot Device 2-3 To Use the TouchPad 2-4 To Use the Tap to Click Function of the TouchPad 2-5 To Use the Function Hot Keys 2-6 To Use the One-Touch Buttons 2-7 To Use the Windows and Applications Keys 2-8 To Type...
Reference Guide
Page 5
... Network Connections (Select Models Only 4-6 To Turn Wireless Communication On and Off . . . . . 4-7 5 Add-On Devices Connecting External Devices 5-1 To Insert or Remove a PC Card 5-1 To Connect an Audio Device 5-3 To Connect a TV to Your Notebook (Select Models Only 5-4 Switching the Display to the External Monitor (Select Models Only 5-5 To Connect a 1394 Device (Select Models Only 5-7 To Connect an Infrared Device (Select Models Only 5-7 Installing Additional RAM (Memory 5-9 To Install a RAM Expansion Module 5-9 To Remove a RAM Expansion Module 5-10 Replacing the Hard Drive...
... Network Connections (Select Models Only 4-6 To Turn Wireless Communication On and Off . . . . . 4-7 5 Add-On Devices Connecting External Devices 5-1 To Insert or Remove a PC Card 5-1 To Connect an Audio Device 5-3 To Connect a TV to Your Notebook (Select Models Only 5-4 Switching the Display to the External Monitor (Select Models Only 5-5 To Connect a 1394 Device (Select Models Only 5-7 To Connect an Infrared Device (Select Models Only 5-7 Installing Additional RAM (Memory 5-9 To Install a RAM Expansion Module 5-9 To Remove a RAM Expansion Module 5-10 Replacing the Hard Drive...
Reference Guide
Page 6
... 6-4 Hard Drive Problems 6-5 Heat Problems 6-6 Infrared Problems 6-7 Keyboard and Pointing Device Problems 6-7 Local Area Network (LAN) Problems 6-8 Memory Problems 6-9 Modem Problems 6-10 PC Card (PCMCIA) Problems 6-13 Performance Problems 6-14 Power and Battery Pack Problems 6-15 Printing Problems 6-18 Serial, Parallel and USB Problems 6-19 Startup Problems 6-20 Wireless Problems 6-22 Configuring Your Notebook 6-24 To Run the BIOS Setup Utility 6-24 Updating Software and Drivers from the Web 6-29 Using System Recovery Features 6-29 Safeguarding Your Data 6-30 Operating...
... 6-4 Hard Drive Problems 6-5 Heat Problems 6-6 Infrared Problems 6-7 Keyboard and Pointing Device Problems 6-7 Local Area Network (LAN) Problems 6-8 Memory Problems 6-9 Modem Problems 6-10 PC Card (PCMCIA) Problems 6-13 Performance Problems 6-14 Power and Battery Pack Problems 6-15 Printing Problems 6-18 Serial, Parallel and USB Problems 6-19 Startup Problems 6-20 Wireless Problems 6-22 Configuring Your Notebook 6-24 To Run the BIOS Setup Utility 6-24 Updating Software and Drivers from the Web 6-29 Using System Recovery Features 6-29 Safeguarding Your Data 6-30 Operating...
Reference Guide
Page 9
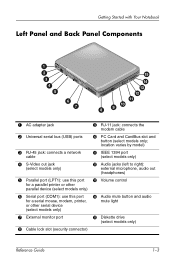
...) ports 3 RJ-45 jack: connects a network cable 4 S-Video out jack (select models only) 5 Parallel port (LPT1): use this port for a parallel printer or other parallel device (select models only) 6 Serial port (COM1): use this port for a serial mouse, modem, printer, or other serial device (select models only) 7 External monitor port 8 Cable lock slot (security connector) 9 RJ-11 jack: connects the modem cable - location varies by model) q IEEE 1394 port (select models only) w Audio jacks (left to right): external microphone, audio out (headphones) e Volume control r Audio mute button and audio...
...) ports 3 RJ-45 jack: connects a network cable 4 S-Video out jack (select models only) 5 Parallel port (LPT1): use this port for a parallel printer or other parallel device (select models only) 6 Serial port (COM1): use this port for a serial mouse, modem, printer, or other serial device (select models only) 7 External monitor port 8 Cable lock slot (security connector) 9 RJ-11 jack: connects the modem cable - location varies by model) q IEEE 1394 port (select models only) w Audio jacks (left to right): external microphone, audio out (headphones) e Volume control r Audio mute button and audio...
Reference Guide
Page 11
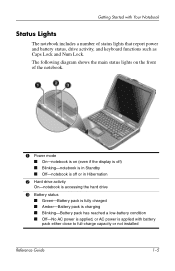
... Hibernation 2 Hard drive activity On-notebook is accessing the hard drive 3 Battery status ■ Green-Battery pack is fully charged ■ Amber-Battery pack is charging ■ Blinking-Battery pack has reached a low-battery condition ■ Off-No AC power is applied, or AC power is applied with Your Notebook Status Lights The notebook includes a number of status lights that report power and battery status, drive activity, and keyboard functions such as Caps Lock and Num Lock. Getting Started with battery pack...
... Hibernation 2 Hard drive activity On-notebook is accessing the hard drive 3 Battery status ■ Green-Battery pack is fully charged ■ Amber-Battery pack is charging ■ Blinking-Battery pack has reached a low-battery condition ■ Off-No AC power is applied, or AC power is applied with Your Notebook Status Lights The notebook includes a number of status lights that report power and battery status, drive activity, and keyboard functions such as Caps Lock and Num Lock. Getting Started with battery pack...
Reference Guide
Page 20
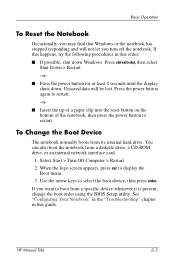
...; Press the power button for at least 4 seconds until the display shuts down Windows. To Change the Boot Device The notebook normally boots from a diskette drive, a CD-ROM drive, or an internal network interface card. 1. If you want to select the boot device, then press enter. HP Manual Title 2-3 Use the arrow keys to boot from a specific device whenever it is present, change the boot order using the BIOS Setup utility. See "Configuring Your Notebook" in the "Troubleshooting" chapter in this guide. Select Start > Turn Off Computer > Restart...
...; Press the power button for at least 4 seconds until the display shuts down Windows. To Change the Boot Device The notebook normally boots from a diskette drive, a CD-ROM drive, or an internal network interface card. 1. If you want to select the boot device, then press enter. HP Manual Title 2-3 Use the arrow keys to boot from a specific device whenever it is present, change the boot order using the BIOS Setup utility. See "Configuring Your Notebook" in the "Troubleshooting" chapter in this guide. Select Start > Turn Off Computer > Restart...
Reference Guide
Page 34
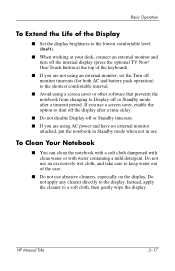
... operation) to the shortest comfortable interval. ■ Avoid using AC power and have no external monitor attached, put the notebook in Standby mode when not in use abrasive cleaners, especially on the display. One-Touch button at the top of the Display ■ Set the display brightness to the lowest comfortable level (Fn+F1). ■ When working at your desk, connect an external monitor and turn off the internal display (press the optional...
... operation) to the shortest comfortable interval. ■ Avoid using AC power and have no external monitor attached, put the notebook in Standby mode when not in use abrasive cleaners, especially on the display. One-Touch button at the top of the Display ■ Set the display brightness to the lowest comfortable level (Fn+F1). ■ When working at your desk, connect an external monitor and turn off the internal display (press the optional...
Reference Guide
Page 36
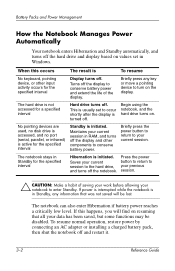
... interval Standby is initiated. To resume normal operation, restore power by connecting an AC adapter or installing a charged battery pack, then shut the notebook off and restart it. 3-2 Reference Guide The notebook can also enter Hibernation if battery power reaches a critically low level. Battery Packs and Power Management How the Notebook Manages Power Automatically Your notebook enters Hibernation and Standby automatically, and turns off the hard drive and display based on values set to your current session.
... interval Standby is initiated. To resume normal operation, restore power by connecting an AC adapter or installing a charged battery pack, then shut the notebook off and restart it. 3-2 Reference Guide The notebook can also enter Hibernation if battery power reaches a critically low level. Battery Packs and Power Management How the Notebook Manages Power Automatically Your notebook enters Hibernation and Standby automatically, and turns off the hard drive and display based on values set to your current session.
Reference Guide
Page 37
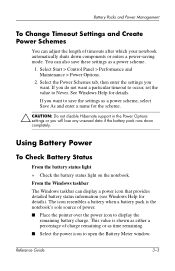
... and Power Management To Change Timeout Settings and Create Power Schemes You can adjust the length of charge remaining or as time remaining. ■ Select the power icon to open the Battery Meter window. Select the Power Schemes tab, then enter the settings you want to save these settings as a power scheme, select Save As and enter a name for the scheme. Ä CAUTION: Do not disable Hibernate support in the Power Options settings...
... and Power Management To Change Timeout Settings and Create Power Schemes You can adjust the length of charge remaining or as time remaining. ■ Select the power icon to open the Battery Meter window. Select the Power Schemes tab, then enter the settings you want to save these settings as a power scheme, select Save As and enter a name for the scheme. Ä CAUTION: Do not disable Hibernate support in the Power Options settings...

Reference Guide
Page 38
... Power Management From the Windows Control Panel » Select Start > Control Panel > Performance and Maintenance > Power Options, then select the Power Meter tab to a Low-Battery Warning The notebook automatically alerts you do not restore power within a short time, the notebook goes into Hibernation. Press the contact pad on the side of a full charge). Then, if you when the battery power drops to a critically low level. The number of lights that turn it on indicates...
... Power Management From the Windows Control Panel » Select Start > Control Panel > Performance and Maintenance > Power Options, then select the Power Meter tab to a Low-Battery Warning The notebook automatically alerts you do not restore power within a short time, the notebook goes into Hibernation. Press the contact pad on the side of a full charge). Then, if you when the battery power drops to a critically low level. The number of lights that turn it on indicates...
Reference Guide
Page 56
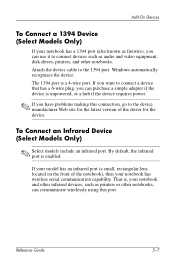
... the notebook), then your notebook has wireless serial communication capability. If your model has an infrared port (a small, rectangular lens located on the front of the driver for the device. To Connect an Infrared Device (Select Models Only) ✎ Select models include an infrared port. That is, your notebook and other infrared devices, such as audio and video equipment, disk drives, printers, and other notebooks, can purchase a simple adapter if the device is...
... the notebook), then your notebook has wireless serial communication capability. If your model has an infrared port (a small, rectangular lens located on the front of the driver for the device. To Connect an Infrared Device (Select Models Only) ✎ Select models include an infrared port. That is, your notebook and other infrared devices, such as audio and video equipment, disk drives, printers, and other notebooks, can purchase a simple adapter if the device is...
Reference Guide
Page 67
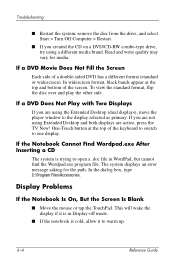
... displays an error message asking for media. In widescreen format, black bands appear at the top of the screen. If you created the CD on a DVD/CD-RW combo-type drive, try using the Extended Desktop (dual displays), move the player window to open a .doc file in Display-off mode. ■ If the notebook is trying to the display selected as primary. Display Problems If the Notebook Is On, But the Screen...
... displays an error message asking for media. In widescreen format, black bands appear at the top of the screen. If you created the CD on a DVD/CD-RW combo-type drive, try using the Extended Desktop (dual displays), move the player window to open a .doc file in Display-off mode. ■ If the notebook is trying to the display selected as primary. Display Problems If the Notebook Is On, But the Screen...
Reference Guide
Page 68
... Guide 6-5 In the BIOS Setup utility, try setting Video Display Device to Both in the System Devices menu. ■ If you must activate the TV. Select Start > Control Panel > Appearance and Themes > Display. ■ Try adjusting the size of the notebook. ■ Remove and reinsert the hard drive. If necessary, connect the AC adapter, and make sure it is coming from elsewhere, such as from the fan or a PC Card drive. ■ Back up the drive immediately. Troubleshooting If...
... Guide 6-5 In the BIOS Setup utility, try setting Video Display Device to Both in the System Devices menu. ■ If you must activate the TV. Select Start > Control Panel > Appearance and Themes > Display. ■ Try adjusting the size of the notebook. ■ Remove and reinsert the hard drive. If necessary, connect the AC adapter, and make sure it is coming from elsewhere, such as from the fan or a PC Card drive. ■ Back up the drive immediately. Troubleshooting If...
Reference Guide
Page 70
... application is enabled, so you must enable it before you can use it. If the Pointer Is Difficult to Control Adjust the pointer controls. Select Start > Control Panel > Performance and Maintenance > System. 2. Select Start > Control Panel > Printers and Other Hardware > Mouse. Keyboard and Pointing Device Problems ✎ Use these suggestions for built-in the Device Manager: 1. Reference Guide 6-7 On the Hardware tab, select Device Manager and expand the infrared devices. Select the infrared port and make sure that...
... application is enabled, so you must enable it before you can use it. If the Pointer Is Difficult to Control Adjust the pointer controls. Select Start > Control Panel > Performance and Maintenance > System. 2. Select Start > Control Panel > Printers and Other Hardware > Mouse. Keyboard and Pointing Device Problems ✎ Use these suggestions for built-in the Device Manager: 1. Reference Guide 6-7 On the Hardware tab, select Device Manager and expand the infrared devices. Select the infrared port and make sure that...
Reference Guide
Page 71
... is disabled, try disabling another device. 6-8 Reference Guide If the TouchPad Moves the Pointer or Cursor While You Type Press the TouchPad on the keyboard to restore normal operation. ■ If an external mouse is rebooting or resuming from Standby mode. Try connecting at a different network station, if available. ■ Make sure the LAN cable is 330 feet (100 meters). ■ Select Start > Help and Support > and use the Networking troubleshooter. ■ Open the hardware Device Manager. Maximum cable...
... is disabled, try disabling another device. 6-8 Reference Guide If the TouchPad Moves the Pointer or Cursor While You Type Press the TouchPad on the keyboard to restore normal operation. ■ If an external mouse is rebooting or resuming from Standby mode. Try connecting at a different network station, if available. ■ Make sure the LAN cable is 330 feet (100 meters). ■ Select Start > Help and Support > and use the Networking troubleshooter. ■ Open the hardware Device Manager. Maximum cable...
Reference Guide
Page 82
...> System. 2. Open the hardware Device Manager, then select Ports (COM & LPT). Select Start > Help and Support. ■ In Control Panel, open Phone and Modem Options, and check the modem settings. ■ Disable the internal modem: 1. Select Modem to disable the modem. ■ Check the port settings in Windows Help. Troubleshooting Serial, Parallel and USB Problems If a Serial Mouse Does Not Work ■ Make sure you followed the manufacturer's installation instructions completely and have installed the mouse properly. Open the hardware Device Manager. Reference Guide 6-19...
...> System. 2. Open the hardware Device Manager, then select Ports (COM & LPT). Select Start > Help and Support. ■ In Control Panel, open Phone and Modem Options, and check the modem settings. ■ Disable the internal modem: 1. Select Modem to disable the modem. ■ Check the port settings in Windows Help. Troubleshooting Serial, Parallel and USB Problems If a Serial Mouse Does Not Work ■ Make sure you followed the manufacturer's installation instructions completely and have installed the mouse properly. Open the hardware Device Manager. Reference Guide 6-19...
Reference Guide
Page 83
... reset the notebook using the reset button. The lights show the charge level. ■ If available, try another battery pack. 6-20 Reference Guide Then press the power button to turn it and pressing the pad on the side of the notebook. Startup Problems If the Notebook Does Not Respond When You Turn It On ■ Connect the AC adapter. ■ Reset the notebook by removing it on the bottom of the battery pack. Open the hardware Device Manager...
... reset the notebook using the reset button. The lights show the charge level. ■ If available, try another battery pack. 6-20 Reference Guide Then press the power button to turn it and pressing the pad on the side of the notebook. Startup Problems If the Notebook Does Not Respond When You Turn It On ■ Connect the AC adapter. ■ Reset the notebook by removing it on the bottom of the battery pack. Open the hardware Device Manager...
Reference Guide
Page 98
... power 1-2, 1-10 reset 1-4 TV Now! One-Touch 5-5 wireless on-off 1-2 C cable lock slot 1-3 CardBus slot location 1-3 CD-ROM drive copying/creating CDs 2-12 inserting CD 2-10 location 1-2 removing CD 2-10 troubleshooting 6-3 changing the boot device 2-3 cleaning the notebook 2-17 Click buttons 1-2 components back panel 1-3 bottom panel 1-4 front panel 1-2 keyboard status lights 1-2 left panel 1-3 right panel 1-2 status lights 1-1 configuring modem 4-4 notebook 6-24 connecting 1394 device 5-7 AC power 1-8 audio device 5-3 external devices 5-1 local area network (LAN) 4-5 phone line 1-9 wireless...
... power 1-2, 1-10 reset 1-4 TV Now! One-Touch 5-5 wireless on-off 1-2 C cable lock slot 1-3 CardBus slot location 1-3 CD-ROM drive copying/creating CDs 2-12 inserting CD 2-10 location 1-2 removing CD 2-10 troubleshooting 6-3 changing the boot device 2-3 cleaning the notebook 2-17 Click buttons 1-2 components back panel 1-3 bottom panel 1-4 front panel 1-2 keyboard status lights 1-2 left panel 1-3 right panel 1-2 status lights 1-1 configuring modem 4-4 notebook 6-24 connecting 1394 device 5-7 AC power 1-8 audio device 5-3 external devices 5-1 local area network (LAN) 4-5 phone line 1-9 wireless...

Reference Guide
Page 99
...troubleshooting 6-7 using the port 5-8 inserting battery pack 1-7 CD 2-10 DVD 2-10 PC Card 5-1 RAM (memory) 5-9 K keyboard status lights 1-2, 1-6 troubleshooting 6-7 keys ALT GR 2-9 Applications 2-8 Fn (Function) 2-6 Windows 2-8 L LAN connection 4-5 troubleshooting 6-8 left panel components 1-3 locking the hard drive 2-15 low-battery warning 3-4 M maintenance and care 2-15, 2-16, 2-17 mini PCI cover 1-4 modem AT commands 4-4 blackout periods 4-3 settings 4-4 troubleshooting 6-10 monitor resolution 5-5 N network jack, location 1-3 O One-Touch buttons 1-2, 2-7 on-off button 1-2 Reference Guide...
...troubleshooting 6-7 using the port 5-8 inserting battery pack 1-7 CD 2-10 DVD 2-10 PC Card 5-1 RAM (memory) 5-9 K keyboard status lights 1-2, 1-6 troubleshooting 6-7 keys ALT GR 2-9 Applications 2-8 Fn (Function) 2-6 Windows 2-8 L LAN connection 4-5 troubleshooting 6-8 left panel components 1-3 locking the hard drive 2-15 low-battery warning 3-4 M maintenance and care 2-15, 2-16, 2-17 mini PCI cover 1-4 modem AT commands 4-4 blackout periods 4-3 settings 4-4 troubleshooting 6-10 monitor resolution 5-5 N network jack, location 1-3 O One-Touch buttons 1-2, 2-7 on-off button 1-2 Reference Guide...

Reference Guide
Page 101
..., BIOS 6-24 setup utility 6-24 slot location cable lock 1-3 PC Card and CardBus 1-3 software, restoring 6-33 software, updating 6-29 Standby mode 2-2 status lights battery charge 1-5 hard drive 1-5 keyboard 1-2, 1-6 location 1-2 main 1-2, 1-5 meanings 1-5 wireless indicator 1-2 S-Video out jack location 1-3 using 5-4 switching the display, external monitor 5-5 system recovery 6-29 T telephone line connection 1-9 1394 port connecting 5-7 location 1-3 toggling built-in keypad 2-6 TouchPad 1-2, 2-4 functions 2-5 troubleshooting audio 6-2 battery packs 6-15 CD-ROM drive 6-3 display 6-4 DVD drive...
..., BIOS 6-24 setup utility 6-24 slot location cable lock 1-3 PC Card and CardBus 1-3 software, restoring 6-33 software, updating 6-29 Standby mode 2-2 status lights battery charge 1-5 hard drive 1-5 keyboard 1-2, 1-6 location 1-2 main 1-2, 1-5 meanings 1-5 wireless indicator 1-2 S-Video out jack location 1-3 using 5-4 switching the display, external monitor 5-5 system recovery 6-29 T telephone line connection 1-9 1394 port connecting 5-7 location 1-3 toggling built-in keypad 2-6 TouchPad 1-2, 2-4 functions 2-5 troubleshooting audio 6-2 battery packs 6-15 CD-ROM drive 6-3 display 6-4 DVD drive...


