Reference Guide
Page 18
At other times, power considerations, types of active connections, and startup time may cause you to use alternative methods to start and stop your notebook by using the power button. HP Manual Title 2-1 This chapter describes several methods. 2 Basic Operation Operating Your Notebook You can start or stop your notebook.
At other times, power considerations, types of active connections, and startup time may cause you to use alternative methods to start and stop your notebook by using the power button. HP Manual Title 2-1 This chapter describes several methods. 2 Basic Operation Operating Your Notebook You can start or stop your notebook.
Reference Guide
Page 19
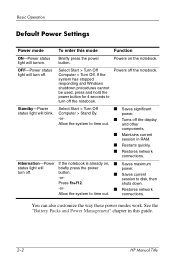
... components. ■ Maintains current session in this mode Function ON-Power status light will turn off the notebook. shuts down. -or- ■ Restores network Allow the system to disk, then Press Fn+F12...power. -or- ■ Turns off the display Allow the system to turn off the notebook. turn off . If the system has stopped responding and Windows shutdown procedures cannot be used,...hold the power button for 4 seconds to time out. Hibernation-Power If the notebook is already on the notebook. OFF-Power status light will turnon. Powers on , ■ Saves maximum...
... components. ■ Maintains current session in this mode Function ON-Power status light will turn off the notebook. shuts down. -or- ■ Restores network Allow the system to disk, then Press Fn+F12...power. -or- ■ Turns off the display Allow the system to turn off the notebook. turn off . If the system has stopped responding and Windows shutdown procedures cannot be used,...hold the power button for 4 seconds to time out. Hibernation-Power If the notebook is already on the notebook. OFF-Power status light will turnon. Powers on , ■ Saves maximum...
Reference Guide
Page 20
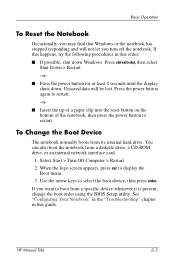
...; Insert the tip of a paper clip into the reset button on the bottom of the notebook, then press the power button to display the Boot menu. 3. Select Start > Turn Off Computer > Restart. 2. HP Manual Title 2-3 See "Configuring Your Notebook" in the "Troubleshooting" chapter in this guide. Unsaved data will not let you want to...
...; Insert the tip of a paper clip into the reset button on the bottom of the notebook, then press the power button to display the Boot menu. 3. Select Start > Turn Off Computer > Restart. 2. HP Manual Title 2-3 See "Configuring Your Notebook" in the "Troubleshooting" chapter in this guide. Unsaved data will not let you want to...
Reference Guide
Page 21
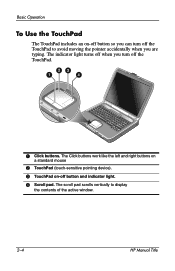
The indicator light turns off when you turn off the TouchPad to display the contents of the active window. 2-4 HP Manual Title Basic Operation To Use the TouchPad The TouchPad includes an on -off button and indicator light. 4 Scroll pad. The Click buttons work like the left and right buttons on a standard mouse 2 TouchPad (touch-sensitive pointing device). 3 TouchPad on -off button so you can turn off the TouchPad. 1 Click buttons. The scroll pad scrolls vertically to avoid moving the pointer accidentally when you are typing.
The indicator light turns off when you turn off the TouchPad to display the contents of the active window. 2-4 HP Manual Title Basic Operation To Use the TouchPad The TouchPad includes an on -off button and indicator light. 4 Scroll pad. The Click buttons work like the left and right buttons on a standard mouse 2 TouchPad (touch-sensitive pointing device). 3 TouchPad on -off button so you can turn off the TouchPad. 1 Click buttons. The scroll pad scrolls vertically to avoid moving the pointer accidentally when you are typing.
Reference Guide
Page 22
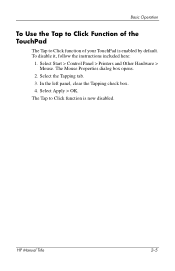
Select the Tapping tab. 3. Select Start > Control Panel > Printers and Other Hardware > Mouse. Select Apply > OK. The Tap to Click function of the TouchPad The Tap to Click function is enabled by default. To disable it, follow the instructions included here: 1. In the left panel, clear the Tapping check box. 4. The Mouse Properties dialog box opens. 2. Basic Operation To Use the Tap to Click Function of your TouchPad is now disabled. HP Manual Title 2-5
Select the Tapping tab. 3. Select Start > Control Panel > Printers and Other Hardware > Mouse. Select Apply > OK. The Tap to Click function of the TouchPad The Tap to Click function is enabled by default. To disable it, follow the instructions included here: 1. In the left panel, clear the Tapping check box. 4. The Mouse Properties dialog box opens. 2. Basic Operation To Use the Tap to Click Function of your TouchPad is now disabled. HP Manual Title 2-5
Reference Guide
Page 23
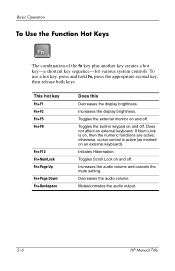
... numeric functions are active; Decreases the audio volume. Increases the display brightness. Toggles the built-in keypad on and off . Mutes/unmutes the audio output. 2-6 HP Manual Title Basic Operation To Use the Function Hot Keys Fn The combination of the Fn key plus another key creates a hot key-a shortcut key sequence...
... numeric functions are active; Decreases the audio volume. Increases the display brightness. Toggles the built-in keypad on and off . Mutes/unmutes the audio output. 2-6 HP Manual Title Basic Operation To Use the Function Hot Keys Fn The combination of the Fn key plus another key creates a hot key-a shortcut key sequence...
Reference Guide
Page 24
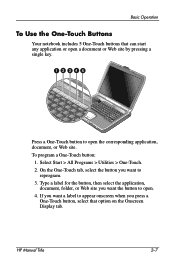
..., folder, or Web site you press a One-Touch button, select that can start any application or open a document or Web site by pressing a single key. HP Manual Title 2-7 Basic Operation To Use the One-Touch Buttons Your notebook includes 5 One-Touch buttons that option on the Onscreen Display tab.
..., folder, or Web site you press a One-Touch button, select that can start any application or open a document or Web site by pressing a single key. HP Manual Title 2-7 Basic Operation To Use the One-Touch Buttons Your notebook includes 5 One-Touch buttons that option on the Onscreen Display tab.
Reference Guide
Page 25
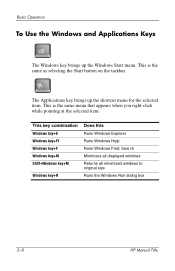
... Explorer Runs Windows Help Runs Windows Find: Search Minimizes all displayed windows Returns all minimized windows to original size Runs the Windows Run dialog box 2-8 HP Manual Title The Applications key brings up the Windows Start menu. This is the same menu that appears when you right-click while pointing at the...
... Explorer Runs Windows Help Runs Windows Find: Search Minimizes all displayed windows Returns all minimized windows to original size Runs the Windows Run dialog box 2-8 HP Manual Title The Applications key brings up the Windows Start menu. This is the same menu that appears when you right-click while pointing at the...
Reference Guide
Page 26
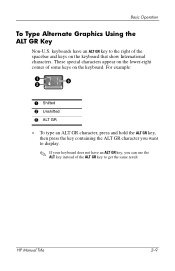
... keys on the keyboard that show International characters. These special characters appear on the lower-right corner of the spacebar and keys on the keyboard. HP Manual Title 2-9 Basic Operation To Type Alternate Graphics Using the ALT GR Key Non-U.S. keyboards have an ALT GR key, you want to display. ✎ If...
... keys on the keyboard that show International characters. These special characters appear on the lower-right corner of the spacebar and keys on the keyboard. HP Manual Title 2-9 Basic Operation To Type Alternate Graphics Using the ALT GR Key Non-U.S. keyboards have an ALT GR key, you want to display. ✎ If...
Reference Guide
Page 27
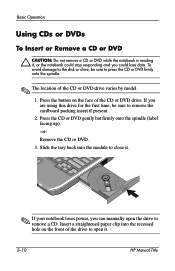
... (label facing up). -orRemove the CD or DVD. 3. Insert a straightened paper clip into the module to close it. ✎ If your notebook loses power, you can manually open it , or the notebook could stop responding and you are using this drive for the first time, be sure to remove a CD. Press the button... if present. 2. Basic Operation Using CDs or DVDs To Insert or Remove a CD or DVD Ä CAUTION: Do not remove a CD or DVD while the notebook is reading it . 2-10 HP Manual Title
... (label facing up). -orRemove the CD or DVD. 3. Insert a straightened paper clip into the module to close it. ✎ If your notebook loses power, you can manually open it , or the notebook could stop responding and you are using this drive for the first time, be sure to remove a CD. Press the button... if present. 2. Basic Operation Using CDs or DVDs To Insert or Remove a CD or DVD Ä CAUTION: Do not remove a CD or DVD while the notebook is reading it . 2-10 HP Manual Title
Reference Guide
Page 28
...> DVD Player > InterVideo WinDVD. ✎ For best performance while playing movies on the DVD drive and will be permanent. When you reach this situation. HP Manual Title 2-11 Basic Operation To Play DVD Movies If your DVD player software for details about setting region codes. Your warranty does not cover the... in the disc data. Most DVD drives let you are sold. If you get a region code error, you change to the Help for your notebook is equipped with a DVD or other DVD readable drive, it also includes DVD player software that lets you play a DVD intended for a different ...
...> DVD Player > InterVideo WinDVD. ✎ For best performance while playing movies on the DVD drive and will be permanent. When you reach this situation. HP Manual Title 2-11 Basic Operation To Play DVD Movies If your DVD player software for details about setting region codes. Your warranty does not cover the... in the disc data. Most DVD drives let you are sold. If you get a region code error, you change to the Help for your notebook is equipped with a DVD or other DVD readable drive, it also includes DVD player software that lets you play a DVD intended for a different ...
Reference Guide
Page 29
.... ■ Ensure that are included with the software. Read and write quality may vary by media. 2-12 HP Manual Title Basic Operation To Write to DVD Media (Select Models Only) If your notebook is equipped with a DVD+RW/R and CD-RW Combo Drive, you must install your DVD burning software from... the CDs included with your notebook is connected to the notebook and an AC electrical outlet. ■ Close and exit all other software applications, except the CD burning software (when writing a data disc)...
.... ■ Ensure that are included with the software. Read and write quality may vary by media. 2-12 HP Manual Title Basic Operation To Write to DVD Media (Select Models Only) If your notebook is equipped with a DVD+RW/R and CD-RW Combo Drive, you must install your DVD burning software from... the CDs included with your notebook is connected to the notebook and an AC electrical outlet. ■ Close and exit all other software applications, except the CD burning software (when writing a data disc)...
Reference Guide
Page 30
...is assigned to prompt for a password when the notebook leaves Standby. To Lock Your Notebook To protect against unauthorized access while your notebook from access by another user when you set passwords in the "Troubleshooting" chapter. HP Manual Title 2-13 For complete protection, set up ...a screen saver with a Windows password. Select Start > Control Panel > User Accounts, then select your normal logon steps. To unlock the notebook, follow your account. 2. On the...
...is assigned to prompt for a password when the notebook leaves Standby. To Lock Your Notebook To protect against unauthorized access while your notebook from access by another user when you set passwords in the "Troubleshooting" chapter. HP Manual Title 2-13 For complete protection, set up ...a screen saver with a Windows password. Select Start > Control Panel > User Accounts, then select your normal logon steps. To unlock the notebook, follow your account. 2. On the...
Reference Guide
Page 31
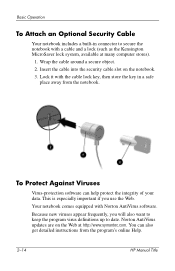
... and a lock (such as the Kensington MicroSaver lock system, available at http://www.symantec.com. Norton AntiVirus updates are on the notebook. 3. You can help protect the integrity of your data. Lock it with Norton AntiVirus software. Because new viruses appear frequently, you... 1. Your notebook comes equipped with the cable lock key, then store the key in connector to date. Wrap the cable around a secure object. 2. Basic Operation To Attach an Optional Security Cable Your notebook includes a built-in a safe place away from the program's online Help. 2-14 HP Manual Title
... and a lock (such as the Kensington MicroSaver lock system, available at http://www.symantec.com. Norton AntiVirus updates are on the notebook. 3. You can help protect the integrity of your data. Lock it with Norton AntiVirus software. Because new viruses appear frequently, you... 1. Your notebook comes equipped with the cable lock key, then store the key in connector to date. Wrap the cable around a secure object. 2. Basic Operation To Attach an Optional Security Cable Your notebook includes a built-in a safe place away from the program's online Help. 2-14 HP Manual Title
Reference Guide
Page 32
Select Start > Turn Off Computer > Restart. 2. HP Manual Title 2-15 If you move the hard drive to another notebook, you cannot access the drive until you cannot recover your data. 1. From the Security menu, enable Internal hard drive lock. 5. If you forget the password... password (or administrator password if that is the only password set the user (or administrator) password to match the drive password. Taking Care of Your Notebook Follow these recommendations to save and exit BIOS Setup. When the logo screen appears, press F2 to Boot. 4. From the Security menu, enable Password...
Select Start > Turn Off Computer > Restart. 2. HP Manual Title 2-15 If you move the hard drive to another notebook, you cannot access the drive until you cannot recover your data. 1. From the Security menu, enable Internal hard drive lock. 5. If you forget the password... password (or administrator password if that is the only password set the user (or administrator) password to match the drive password. Taking Care of Your Notebook Follow these recommendations to save and exit BIOS Setup. When the logo screen appears, press F2 to Boot. 4. From the Security menu, enable Password...

Reference Guide
Page 33
... (such as the Norton AntiVirus program included with your notebook) to check your files and operating system. ■ Check your disk using the Tools tab in the disk Properties window. 2-16 HP Manual Title To Maintain Your Notebook ■ Provide adequate ventilation around and underneath it. ...■ Always shut down the notebook or put it in Hibernation mode before transporting it. Copy files to diskettes, ...
... (such as the Norton AntiVirus program included with your notebook) to check your files and operating system. ■ Check your disk using the Tools tab in the disk Properties window. 2-16 HP Manual Title To Maintain Your Notebook ■ Provide adequate ventilation around and underneath it. ...■ Always shut down the notebook or put it in Hibernation mode before transporting it. Copy files to diskettes, ...
Reference Guide
Page 34
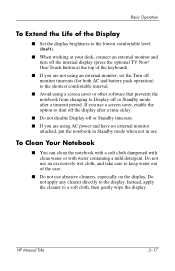
...enable the option to shut off the display after a timeout period. To Clean Your Notebook ■ You can clean the notebook with a soft cloth dampened with clean water or with water containing a mild detergent. HP Manual Title 2-17 Do not apply any cleaner directly to a soft cloth, then gently wipe... ■ Do not disable Display-off or Standby timeouts. ■ If you are using a screen saver or other software that prevents the notebook from changing to the lowest comfortable level (Fn+F1). ■ When working at your desk, connect an external monitor and turn off monitor timeouts...
...enable the option to shut off the display after a timeout period. To Clean Your Notebook ■ You can clean the notebook with a soft cloth dampened with clean water or with water containing a mild detergent. HP Manual Title 2-17 Do not apply any cleaner directly to a soft cloth, then gently wipe... ■ Do not disable Display-off or Standby timeouts. ■ If you are using a screen saver or other software that prevents the notebook from changing to the lowest comfortable level (Fn+F1). ■ When working at your desk, connect an external monitor and turn off monitor timeouts...
Reference Guide
Page 64
Try the solutions one at the top of the keyboard. ■ See the Microsoft Windows manual shipped with your notebook. Here are presented. Select Start > Help and Support. ■ Select the question mark One-Touch key located at a time, in the order... in which they are some other sources of information for help and support. 6 Troubleshooting Troubleshooting Your Notebook This chapter contains solutions to many types of problems you might have with the notebook. ■ Refer to the Worldwide Telephone Numbers booklet to contact a Customer Care Center for troubleshooting: &#...
Try the solutions one at the top of the keyboard. ■ See the Microsoft Windows manual shipped with your notebook. Here are presented. Select Start > Help and Support. ■ Select the question mark One-Touch key located at a time, in the order... in which they are some other sources of information for help and support. 6 Troubleshooting Troubleshooting Your Notebook This chapter contains solutions to many types of problems you might have with the notebook. ■ Refer to the Worldwide Telephone Numbers booklet to contact a Customer Care Center for troubleshooting: &#...
Reference Guide
Page 97
... status 1-5, 3-3 creating power schemes 3-3 disposal and recycling 3-7 disposing of 3-7 extending life of 3-5 installing 1-7 location 1-2 low-battery warning 3-4 recharging 3-5 release latch 1-4 saving power automatically 3-2 saving power manually 3-3 status lights 1-5 troubleshooting 6-15 battery power check status 3-3 low-battery warning 3-4 battery status lights 3-3 BIOS Setup Utility 6-24 blackout periods, modem 4-3 bottom panel components 1-4 brightness...
... status 1-5, 3-3 creating power schemes 3-3 disposal and recycling 3-7 disposing of 3-7 extending life of 3-5 installing 1-7 location 1-2 low-battery warning 3-4 recharging 3-5 release latch 1-4 saving power automatically 3-2 saving power manually 3-3 status lights 1-5 troubleshooting 6-15 battery power check status 3-3 low-battery warning 3-4 battery status lights 3-3 BIOS Setup Utility 6-24 blackout periods, modem 4-3 bottom panel components 1-4 brightness...
Reference Guide
Page 100
...connection, troubleshooting 6-20 parallel port (LPT1) 1-3 parts of the notebook back panel 1-3 bottom panel 1-4 front panel 1-2 left panel 1-3 right panel 1-2 status lights 1-5 password protection 2-13 PC Cards installing 5-1 removing 5-2 slot location 1-3 troubleshooting 6-13 ports ...1394 1-3 external monitor 1-3 infrared 1-2 LPT1 (parallel) 1-3 serial port (COM1) 1-3 USB 1-3 power button 1-2, 1-10 manage consumption automatically 3-2 manage consumption manually 3-3 mode status light ...
...connection, troubleshooting 6-20 parallel port (LPT1) 1-3 parts of the notebook back panel 1-3 bottom panel 1-4 front panel 1-2 left panel 1-3 right panel 1-2 status lights 1-5 password protection 2-13 PC Cards installing 5-1 removing 5-2 slot location 1-3 troubleshooting 6-13 ports ...1394 1-3 external monitor 1-3 infrared 1-2 LPT1 (parallel) 1-3 serial port (COM1) 1-3 USB 1-3 power button 1-2, 1-10 manage consumption automatically 3-2 manage consumption manually 3-3 mode status light ...


