
End User License Agreement
Page 1
...more than one computer, you may make archival or back-up purposes. d. BY purposes of this EULA: a. You may not separate component parts of the Software Product for back-up copies of the Software Product, provided the copy contains all of the original Software Product's proprietary notices... A REFUND SUBJECT TO THE REFUND POLICY OF YOUR PLACE OF PURCHASE. 1. The term "Software Product" means computer software and may accompany the HP Product. Storage. You do not have Software Product into Your Computer's AGREE TO ALL TERMS AND temporary memory (RAM) for use on or ...
...more than one computer, you may make archival or back-up purposes. d. BY purposes of this EULA: a. You may not separate component parts of the Software Product for back-up copies of the Software Product, provided the copy contains all of the original Software Product's proprietary notices... A REFUND SUBJECT TO THE REFUND POLICY OF YOUR PLACE OF PURCHASE. 1. The term "Software Product" means computer software and may accompany the HP Product. Storage. You do not have Software Product into Your Computer's AGREE TO ALL TERMS AND temporary memory (RAM) for use on or ...

End User License Agreement
Page 2
...provided with/for your HP Product, whether in the form of the HP Product with/for which the recovery solution was originally purchased. The initial user of the Software Product may make a one-time transfer of the Software Product to all component parts, media, printed ... 4. Recovery Solution. After upgrading, you provide in this limitation or it is expressly provided for the original Software Product identified by HP as a consignment. Restrictions. This EULA applies to updates or supplements to comply with the update or supplement. All intellectual property rights...
...provided with/for your HP Product, whether in the form of the HP Product with/for which the recovery solution was originally purchased. The initial user of the Software Product may make a one-time transfer of the Software Product to all component parts, media, printed ... 4. Recovery Solution. After upgrading, you provide in this limitation or it is expressly provided for the original Software Product identified by HP as a consignment. Restrictions. This EULA applies to updates or supplements to comply with the update or supplement. All intellectual property rights...
Reference Guide
Page 1
Reference Guide HP Notebook Series Document Part Number: 370697-002 April 2005 This guide explains how to set up, operate, maintain, and troubleshoot your notebook. The last chapter provides additional reference material on battery pack and power management, external device connections, and modem and network connections. It also provides information on modem commands, safety, and regulatory information.
Reference Guide HP Notebook Series Document Part Number: 370697-002 April 2005 This guide explains how to set up, operate, maintain, and troubleshoot your notebook. The last chapter provides additional reference material on battery pack and power management, external device connections, and modem and network connections. It also provides information on modem commands, safety, and regulatory information.
Reference Guide
Page 2
The information contained herein is subject to change without notice. Reference Guide HP Notebook Series Second Edition April 2005 First Edition June 2004 Document Part Number: 370697-002 Microsoft and Windows are set forth in the express warranty statements accompanying such products and services. © Copyright 2004, 2005 Hewlett-Packard ...
The information contained herein is subject to change without notice. Reference Guide HP Notebook Series Second Edition April 2005 First Edition June 2004 Document Part Number: 370697-002 Microsoft and Windows are set forth in the express warranty statements accompanying such products and services. © Copyright 2004, 2005 Hewlett-Packard ...
Reference Guide
Page 3
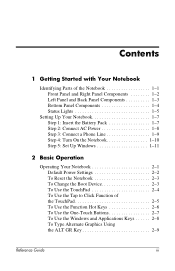
Contents 1 Getting Started with Your Notebook Identifying Parts of the Notebook 1-1 Front Panel and Right Panel Components 1-2 Left Panel and Back Panel Components 1-3 Bottom Panel Components 1-4 Status Lights 1-5 Setting Up Your Notebook 1-7 Step 1: Insert the Battery Pack 1-7 Step 2: Connect AC Power 1-8 Step 3: Connect a Phone Line 1-9 Step 4: Turn On the Notebook 1-10 Step 5: Set Up Windows 1-11...
Contents 1 Getting Started with Your Notebook Identifying Parts of the Notebook 1-1 Front Panel and Right Panel Components 1-2 Left Panel and Back Panel Components 1-3 Bottom Panel Components 1-4 Status Lights 1-5 Setting Up Your Notebook 1-7 Step 1: Insert the Battery Pack 1-7 Step 2: Connect AC Power 1-8 Step 3: Connect a Phone Line 1-9 Step 4: Turn On the Notebook 1-10 Step 5: Set Up Windows 1-11...
Reference Guide
Page 7
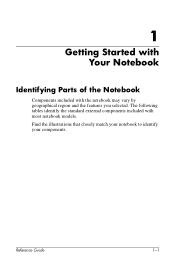
Reference Guide 1-1 1 Getting Started with Your Notebook Identifying Parts of the Notebook Components included with most notebook models. The following tables identify the standard external components included with the notebook may vary by geographical region and the features you selected. Find the illustrations that closely match your notebook to identify your components.
Reference Guide 1-1 1 Getting Started with Your Notebook Identifying Parts of the Notebook Components included with most notebook models. The following tables identify the standard external components included with the notebook may vary by geographical region and the features you selected. Find the illustrations that closely match your notebook to identify your components.
Reference Guide
Page 10
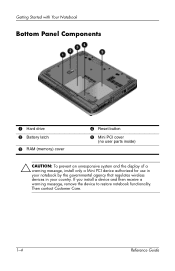
Getting Started with Your Notebook Bottom Panel Components 1 Hard drive 2 Battery latch 3 RAM (memory) cover 4 Reset button 5 Mini PCI cover (no user parts inside) Ä CAUTION: To prevent an unresponsive system and the display of a warning message, install only a Mini PCI device authorized for use in your notebook by the governmental agency that regulates wireless devices in your country. If you install a device and then receive a warning message, remove the device to restore notebook functionality. Then contact Customer Care. 1-4 Reference Guide
Getting Started with Your Notebook Bottom Panel Components 1 Hard drive 2 Battery latch 3 RAM (memory) cover 4 Reset button 5 Mini PCI cover (no user parts inside) Ä CAUTION: To prevent an unresponsive system and the display of a warning message, install only a Mini PCI device authorized for use in your notebook by the governmental agency that regulates wireless devices in your country. If you install a device and then receive a warning message, remove the device to restore notebook functionality. Then contact Customer Care. 1-4 Reference Guide
Reference Guide
Page 62
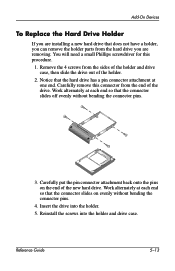
... hard drive. Notice that the hard drive has a pin connector attachment at each end so that does not have a holder, you can remove the holder parts from the sides of the holder and drive case, then slide the drive out of the holder. 2. Work alternately at each end so that the...
... hard drive. Notice that the hard drive has a pin connector attachment at each end so that does not have a holder, you can remove the holder parts from the sides of the holder and drive case, then slide the drive out of the holder. 2. Work alternately at each end so that the...
Reference Guide
Page 100
... repair 6-31 P parallel connection, troubleshooting 6-20 parallel port (LPT1) 1-3 parts of the notebook back panel 1-3 bottom panel 1-4 front panel 1-2 left panel 1-3 right panel 1-2 status lights 1-5 password protection 2-13 PC Cards installing 5-1 removing 5-2 slot location 1-3 troubleshooting 6-13 ports 1394 1-3... 6-9 recharging the battery pack 3-5 reinstalling operating system 6-32 software 6-33 reinstalling software 6-29 removing CD 2-10 DVD 2-10 PC Cards 5-2 RAM (memory) 5-10 repairing the operating system 6-31 reset button location 1-4 using 2-3 restoring software 6-33 right ...
... repair 6-31 P parallel connection, troubleshooting 6-20 parallel port (LPT1) 1-3 parts of the notebook back panel 1-3 bottom panel 1-4 front panel 1-2 left panel 1-3 right panel 1-2 status lights 1-5 password protection 2-13 PC Cards installing 5-1 removing 5-2 slot location 1-3 troubleshooting 6-13 ports 1394 1-3... 6-9 recharging the battery pack 3-5 reinstalling operating system 6-32 software 6-33 reinstalling software 6-29 removing CD 2-10 DVD 2-10 PC Cards 5-2 RAM (memory) 5-10 repairing the operating system 6-31 reset button location 1-4 using 2-3 restoring software 6-33 right ...


