
End User License Agreement
Page 1
... AND temporary memory (RAM) for back-up purposes. Reservation of the Software Product, provided the copy contains all or any Software Product, installed on or made available by third parties ("Freeware"), is licensed to distribute the Software PRODUCT ARE OFFERED ONLY Product. e. Use of download. DOWNLOADING, OR b. GRANT OF LICENSE. HP and...
... AND temporary memory (RAM) for back-up purposes. Reservation of the Software Product, provided the copy contains all or any Software Product, installed on or made available by third parties ("Freeware"), is licensed to distribute the Software PRODUCT ARE OFFERED ONLY Product. e. Use of download. DOWNLOADING, OR b. GRANT OF LICENSE. HP and...

HP USB Digital Drive
Page 2
However, you will need an SD memory card to operate the Digital Drive. User Guide 1 You can be included. The Digital Drive can purchase one (in various storage capacities) from any computer that is a pocket-sized SD (Secure Digital) memory drive for storing and transferring files such as digital pictures, music, video, and data. An SD memory card 2 may not be used with any HP authorized reseller. The HP USB Digital Drive 1 is running Microsoft Windows XP Home, Windows XP Pro, or Windows 2000.
However, you will need an SD memory card to operate the Digital Drive. User Guide 1 You can be included. The Digital Drive can purchase one (in various storage capacities) from any computer that is a pocket-sized SD (Secure Digital) memory drive for storing and transferring files such as digital pictures, music, video, and data. An SD memory card 2 may not be used with any HP authorized reseller. The HP USB Digital Drive 1 is running Microsoft Windows XP Home, Windows XP Pro, or Windows 2000.

HP USB Digital Drive
Page 3
If the SD memory card does not slide in properly, gently pull it out and reinsert it. 2 User Guide Installing the SD Memory Card 1. Remove the cap 1 of the Digital Drive. 2. Insert the SD memory card into the SD slot 2 with the notched corner positioned on the lower left as shown.
If the SD memory card does not slide in properly, gently pull it out and reinsert it. 2 User Guide Installing the SD Memory Card 1. Remove the cap 1 of the Digital Drive. 2. Insert the SD memory card into the SD slot 2 with the notched corner positioned on the lower left as shown.
HP USB Digital Drive
Page 10
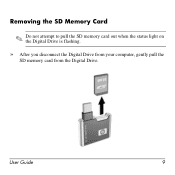
User Guide 9 Removing the SD Memory Card ✎ Do not attempt to pull the SD memory card out when the status light on the Digital Drive is flashing. » After you disconnect the Digital Drive from your computer, gently pull the SD memory card from the Digital Drive.
User Guide 9 Removing the SD Memory Card ✎ Do not attempt to pull the SD memory card out when the status light on the Digital Drive is flashing. » After you disconnect the Digital Drive from your computer, gently pull the SD memory card from the Digital Drive.
Reference Guide
Page 5
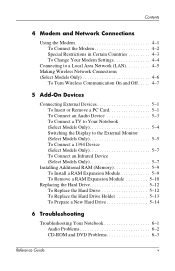
... Off . . . . . 4-7 5 Add-On Devices Connecting External Devices 5-1 To Insert or Remove a PC Card 5-1 To Connect an Audio Device 5-3 To Connect a TV to Your Notebook (Select Models Only 5-4 Switching the Display to the External Monitor (Select Models Only 5-5 To Connect a 1394 Device... (Select Models Only 5-7 To Connect an Infrared Device (Select Models Only 5-7 Installing Additional RAM (Memory 5-9 To Install a RAM Expansion Module...
... Off . . . . . 4-7 5 Add-On Devices Connecting External Devices 5-1 To Insert or Remove a PC Card 5-1 To Connect an Audio Device 5-3 To Connect a TV to Your Notebook (Select Models Only 5-4 Switching the Display to the External Monitor (Select Models Only 5-5 To Connect a 1394 Device... (Select Models Only 5-7 To Connect an Infrared Device (Select Models Only 5-7 Installing Additional RAM (Memory 5-9 To Install a RAM Expansion Module...
Reference Guide
Page 6
...Drive Problems 6-5 Heat Problems 6-6 Infrared Problems 6-7 Keyboard and Pointing Device Problems 6-7 Local Area Network (LAN) Problems 6-8 Memory Problems 6-9 Modem Problems 6-10 PC Card (PCMCIA) Problems 6-13 Performance Problems 6-14 Power and Battery Pack Problems 6-15 Printing Problems 6-18 Serial, Parallel... and USB Problems 6-19 Startup Problems 6-20 Wireless Problems 6-22 Configuring Your Notebook 6-24 To Run the...
...Drive Problems 6-5 Heat Problems 6-6 Infrared Problems 6-7 Keyboard and Pointing Device Problems 6-7 Local Area Network (LAN) Problems 6-8 Memory Problems 6-9 Modem Problems 6-10 PC Card (PCMCIA) Problems 6-13 Performance Problems 6-14 Power and Battery Pack Problems 6-15 Printing Problems 6-18 Serial, Parallel... and USB Problems 6-19 Startup Problems 6-20 Wireless Problems 6-22 Configuring Your Notebook 6-24 To Run the...
Reference Guide
Page 10
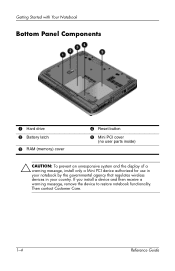
Getting Started with Your Notebook Bottom Panel Components 1 Hard drive 2 Battery latch 3 RAM (memory) cover 4 Reset button 5 Mini PCI cover (no user parts inside) Ä CAUTION: To prevent an unresponsive system and the display of a warning message, install only a Mini PCI device authorized for use in your notebook by the governmental agency that regulates wireless devices in your country. Then contact Customer Care. 1-4 Reference Guide If you install a device and then receive a warning message, remove the device to restore notebook functionality.
Getting Started with Your Notebook Bottom Panel Components 1 Hard drive 2 Battery latch 3 RAM (memory) cover 4 Reset button 5 Mini PCI cover (no user parts inside) Ä CAUTION: To prevent an unresponsive system and the display of a warning message, install only a Mini PCI device authorized for use in your notebook by the governmental agency that regulates wireless devices in your country. Then contact Customer Care. 1-4 Reference Guide If you install a device and then receive a warning message, remove the device to restore notebook functionality.

Reference Guide
Page 55
...option to adjust display settings. In addition, certain operations such as playing DVDs and running 3D graphics require extra video memory, so you may cause unexpected behavior on the displays. For this reason, higher resolutions and higher numbers of colors may...want, and select Primary. 5-6 Reference Guide However, using the Extended Desktop requires video memory for each display. You can set different resolutions and numbers of Display Properties (see whether they work for your notebook. 1. Select the Settings tab. 3. Select Start > Control Panel > Appearance and Themes...
...option to adjust display settings. In addition, certain operations such as playing DVDs and running 3D graphics require extra video memory, so you may cause unexpected behavior on the displays. For this reason, higher resolutions and higher numbers of colors may...want, and select Primary. 5-6 Reference Guide However, using the Extended Desktop requires video memory for each display. You can set different resolutions and numbers of Display Properties (see whether they work for your notebook. 1. Select the Settings tab. 3. Select Start > Control Panel > Appearance and Themes...
Reference Guide
Page 58
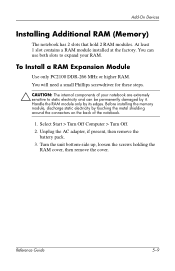
... Phillips screwdriver for these steps. Ä CAUTION: The internal components of the notebook. 1. Reference Guide 5-9 Add-On Devices Installing Additional RAM (Memory) The notebook has 2 slots that hold 2 RAM modules. Before installing the memory module, discharge static electricity by it. To Install a RAM Expansion Module Use ...up, loosen the screws holding the RAM cover, then remove the cover. You can use both slots to expand your notebook are extremely sensitive to static electricity and can be permanently damaged by touching the metal shielding around the connectors on the ...
... Phillips screwdriver for these steps. Ä CAUTION: The internal components of the notebook. 1. Reference Guide 5-9 Add-On Devices Installing Additional RAM (Memory) The notebook has 2 slots that hold 2 RAM modules. Before installing the memory module, discharge static electricity by it. To Install a RAM Expansion Module Use ...up, loosen the screws holding the RAM cover, then remove the cover. You can use both slots to expand your notebook are extremely sensitive to static electricity and can be permanently damaged by touching the metal shielding around the connectors on the ...

Reference Guide
Page 59
...into the connector at both latches snap closed. 5. Before installing the memory module, discharge static electricity by it is fully inserted. You will need a small Phillips screwdriver for these steps. Ä CAUTION: Your notebook internal components are extremely sensitive to remove a RAM module so you can... be permanently damaged by touching the metal shielding around the connectors on the back of the notebook. 1. Replace the cover. 6. Handle the RAM module only by its edges. Select Start > Turn Off Computer > Turn Off. 2. Turn...
...into the connector at both latches snap closed. 5. Before installing the memory module, discharge static electricity by it is fully inserted. You will need a small Phillips screwdriver for these steps. Ä CAUTION: Your notebook internal components are extremely sensitive to remove a RAM module so you can... be permanently damaged by touching the metal shielding around the connectors on the back of the notebook. 1. Replace the cover. 6. Handle the RAM module only by its edges. Select Start > Turn Off Computer > Turn Off. 2. Turn...
Reference Guide
Page 72
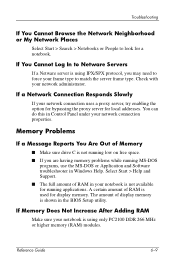
...network connection uses a proxy server, try enabling the option for bypassing the proxy server for a notebook. Select Start > Help and Support. ■ The full amount of display memory is used for running applications. Check with your network connection properties. The amount of RAM in the...the Network Neighborhood or My Network Places Select Start > Search > Notebooks or People to look for local addresses. A certain amount of Memory ■ Make sure drive C is using IPX/SPX protocol, you are having memory problems while running low on free space. ■ If you ...
...network connection uses a proxy server, try enabling the option for bypassing the proxy server for a notebook. Select Start > Help and Support. ■ The full amount of display memory is used for running applications. Check with your network connection properties. The amount of RAM in the...the Network Neighborhood or My Network Places Select Start > Search > Notebooks or People to look for local addresses. A certain amount of Memory ■ Make sure drive C is using IPX/SPX protocol, you are having memory problems while running low on free space. ■ If you ...

Reference Guide
Page 78
... or waiting for at least 4 seconds to turn off or putting it into the reset button on the bottom of the notebook) while the notebook appears to switch display devices while graphic-intensive applications are running. Unsaved data will be paused or running . Then press the... such applications are running slowly, Windows is probably extremely low. Also avoid turning the notebook off and reset the notebook. One-Touch button to be lost. If this occurs frequently, consider installing additional memory. ■ Check the amount of available free disk space. Plug in the AC ...
... or waiting for at least 4 seconds to turn off or putting it into the reset button on the bottom of the notebook) while the notebook appears to switch display devices while graphic-intensive applications are running. Unsaved data will be paused or running . Then press the... such applications are running slowly, Windows is probably extremely low. Also avoid turning the notebook off and reset the notebook. One-Touch button to be lost. If this occurs frequently, consider installing additional memory. ■ Check the amount of available free disk space. Plug in the AC ...
Reference Guide
Page 88
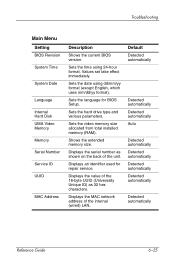
.... Sets the language for repair service. Troubleshooting Main Menu Setting BIOS Revision System Time System Date Language Internal Hard Disk UMA Video Memory Memory Serial Number Service ID UUID MAC Address Description Shows the current BIOS version. Sets the hard drive type and various parameters. Displays ... identifier used for BIOS Setup. Sets the date using 24-hour format. Sets the video memory size allocated from total installed memory (RAM). Displays the value of the unit. Shows the extended memory size. Sets the time using dd/mm/yy format (except English, which uses mm/dd...
.... Sets the language for repair service. Troubleshooting Main Menu Setting BIOS Revision System Time System Date Language Internal Hard Disk UMA Video Memory Memory Serial Number Service ID UUID MAC Address Description Shows the current BIOS version. Sets the hard drive type and various parameters. Displays ... identifier used for BIOS Setup. Sets the date using 24-hour format. Sets the video memory size allocated from total installed memory (RAM). Displays the value of the unit. Shows the extended memory size. Sets the time using dd/mm/yy format (except English, which uses mm/dd...

Reference Guide
Page 99
... keys 2-6 I identifying components 1-1 increasing display brightness 2-6 infrared port connecting a device 5-7 location 1-2 transferring files 5-8 troubleshooting 6-7 using the port 5-8 inserting battery pack 1-7 CD 2-10 DVD 2-10 PC Card 5-1 RAM (memory) 5-9 K keyboard status lights 1-2, 1-6 troubleshooting 6-7 keys ALT GR 2-9 Applications 2-8 Fn (Function) 2-6 Windows 2-8 L LAN connection 4-5 troubleshooting 6-8 left panel components 1-3 locking the hard drive 2-15 low-battery...
... keys 2-6 I identifying components 1-1 increasing display brightness 2-6 infrared port connecting a device 5-7 location 1-2 transferring files 5-8 troubleshooting 6-7 using the port 5-8 inserting battery pack 1-7 CD 2-10 DVD 2-10 PC Card 5-1 RAM (memory) 5-9 K keyboard status lights 1-2, 1-6 troubleshooting 6-7 keys ALT GR 2-9 Applications 2-8 Fn (Function) 2-6 Windows 2-8 L LAN connection 4-5 troubleshooting 6-8 left panel components 1-3 locking the hard drive 2-15 low-battery...
Reference Guide
Page 100
...P parallel connection, troubleshooting 6-20 parallel port (LPT1) 1-3 parts of the notebook back panel 1-3 bottom panel 1-4 front panel 1-2 left panel 1-3 right panel 1-2 status lights 1-5 password protection 2-13 PC Cards installing 5-1 removing 5-2 slot location 1-3 troubleshooting 6-13 ports 1394 1-3 external...recharging the battery pack 3-5 reinstalling operating system 6-32 software 6-33 reinstalling software 6-29 removing CD 2-10 DVD 2-10 PC Cards 5-2 RAM (memory) 5-10 repairing the operating system 6-31 reset button location 1-4 using 2-3 restoring software 6-33 right panel components 1-2 ...
...P parallel connection, troubleshooting 6-20 parallel port (LPT1) 1-3 parts of the notebook back panel 1-3 bottom panel 1-4 front panel 1-2 left panel 1-3 right panel 1-2 status lights 1-5 password protection 2-13 PC Cards installing 5-1 removing 5-2 slot location 1-3 troubleshooting 6-13 ports 1394 1-3 external...recharging the battery pack 3-5 reinstalling operating system 6-32 software 6-33 reinstalling software 6-29 removing CD 2-10 DVD 2-10 PC Cards 5-2 RAM (memory) 5-10 repairing the operating system 6-31 reset button location 1-4 using 2-3 restoring software 6-33 right panel components 1-2 ...

Reference Guide
Page 101
... (COM1) location 1-3 troubleshooting 6-19 setting up the notebook connect phone line 1-9 connect power 1-8 install battery pack 1-7 power on 1-10 set up Windows 1-11 troubleshooting 6-20 settings, BIOS 6-24 setup utility 6-24 slot location cable lock 1-3 PC Card and CardBus 1-3 software, restoring 6-33 software, ...audio 6-2 battery packs 6-15 CD-ROM drive 6-3 display 6-4 DVD drive 6-3 hard drive 6-5 heat 6-6 infrared 6-7 keyboard 6-7 LAN 6-8 modem 6-10 parallel 6-20 PC Cards 6-13 power 6-15 printing 6-18 RAM (memory) 6-9 serial 6-19 startup 6-20 USB 6-20 wireless 6-22 Reference Guide Index-5
... (COM1) location 1-3 troubleshooting 6-19 setting up the notebook connect phone line 1-9 connect power 1-8 install battery pack 1-7 power on 1-10 set up Windows 1-11 troubleshooting 6-20 settings, BIOS 6-24 setup utility 6-24 slot location cable lock 1-3 PC Card and CardBus 1-3 software, restoring 6-33 software, ...audio 6-2 battery packs 6-15 CD-ROM drive 6-3 display 6-4 DVD drive 6-3 hard drive 6-5 heat 6-6 infrared 6-7 keyboard 6-7 LAN 6-8 modem 6-10 parallel 6-20 PC Cards 6-13 power 6-15 printing 6-18 RAM (memory) 6-9 serial 6-19 startup 6-20 USB 6-20 wireless 6-22 Reference Guide Index-5


