Reference Guide
Page 3
... the Battery Pack 1-7 Step 2: Connect AC Power 1-8 Step 3: Connect a Phone Line 1-9 Step 4: Turn On the Notebook 1-10 Step 5: Set Up Windows 1-11 2 Basic Operation Operating Your Notebook 2-1 Default Power Settings 2-2 To Reset the Notebook 2-3 To Change the Boot Device 2-3 To Use the TouchPad 2-4 To Use the Tap to Click Function of the TouchPad 2-5 To...
... the Battery Pack 1-7 Step 2: Connect AC Power 1-8 Step 3: Connect a Phone Line 1-9 Step 4: Turn On the Notebook 1-10 Step 5: Set Up Windows 1-11 2 Basic Operation Operating Your Notebook 2-1 Default Power Settings 2-2 To Reset the Notebook 2-3 To Change the Boot Device 2-3 To Use the TouchPad 2-4 To Use the Tap to Click Function of the TouchPad 2-5 To...
Reference Guide
Page 16
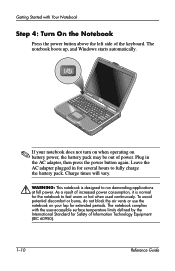
...notebook boots up, and Windows starts automatically. ✎ If your lap for extended periods. Charge times will vary. Å WARNING: This notebook is normal for the notebook to feel warm or hot when used continuously. To avoid potential discomfort or burns, do not block the air vents or use the notebook on your notebook... surface temperature limits defined by the International Standard for Safety of the keyboard. The notebook complies with Your Notebook Step 4: Turn On the Notebook Press the power button above the left side of Information Technology Equipment (IEC 60950). 1-...
...notebook boots up, and Windows starts automatically. ✎ If your lap for extended periods. Charge times will vary. Å WARNING: This notebook is normal for the notebook to feel warm or hot when used continuously. To avoid potential discomfort or burns, do not block the air vents or use the notebook on your notebook... surface temperature limits defined by the International Standard for Safety of the keyboard. The notebook complies with Your Notebook Step 4: Turn On the Notebook Press the power button above the left side of Information Technology Equipment (IEC 60950). 1-...
Reference Guide
Page 20
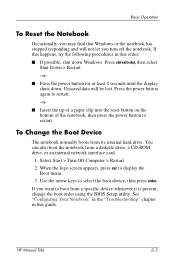
... down Windows. HP Manual Title 2-3 Use the arrow keys to restart. Press the power button again to restart. -or- ■ Insert the tip of a paper clip into the reset button on the bottom of the notebook, then press the power button to select the boot device, then press... enter. See "Configuring Your Notebook" in the "Troubleshooting" chapter in this guide. To Change the Boot Device The notebook normally boots from a diskette drive, a CD-ROM drive, or ...
... down Windows. HP Manual Title 2-3 Use the arrow keys to restart. Press the power button again to restart. -or- ■ Insert the tip of a paper clip into the reset button on the bottom of the notebook, then press the power button to select the boot device, then press... enter. See "Configuring Your Notebook" in the "Troubleshooting" chapter in this guide. To Change the Boot Device The notebook normally boots from a diskette drive, a CD-ROM drive, or ...
Reference Guide
Page 32
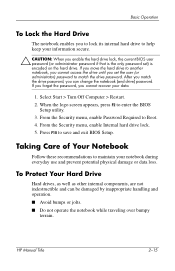
... everyday use and prevent potential physical damage or data loss. Taking Care of Your Notebook Follow these recommendations to Boot. 4. HP Manual Title 2-15 If you move the hard drive to another notebook, you cannot access the drive until you can be damaged by inappropriate handling and ...operation. ■ Avoid bumps or jolts. ■ Do not operate the notebook while traveling over...
... everyday use and prevent potential physical damage or data loss. Taking Care of Your Notebook Follow these recommendations to Boot. 4. HP Manual Title 2-15 If you move the hard drive to another notebook, you cannot access the drive until you can be damaged by inappropriate handling and ...operation. ■ Avoid bumps or jolts. ■ Do not operate the notebook while traveling over...

Reference Guide
Page 66
Select Start > Turn Off Computer > Restart. If the Notebook Cannot Read a CD or DVD ■ For a single-sided CD or DVD, make sure the disc...the label facing up. ■ Clean the disc. ■ Wait 5 to 10 seconds after closing the tray to give the notebook time to skip. If You Get a Region Code Error When Playing a DVD Movie DVDs can cause a disc to recognize the disc... to play a DVD intended for a different region. Troubleshooting CD-ROM and DVD Problems If You Cannot Boot from being played outside the region of the world in which they are sold. If the disc is selected as the...
Select Start > Turn Off Computer > Restart. If the Notebook Cannot Read a CD or DVD ■ For a single-sided CD or DVD, make sure the disc...the label facing up. ■ Clean the disc. ■ Wait 5 to 10 seconds after closing the tray to give the notebook time to skip. If You Get a Region Code Error When Playing a DVD Movie DVDs can cause a disc to recognize the disc... to play a DVD intended for a different region. Troubleshooting CD-ROM and DVD Problems If You Cannot Boot from being played outside the region of the world in which they are sold. If the disc is selected as the...
Reference Guide
Page 83
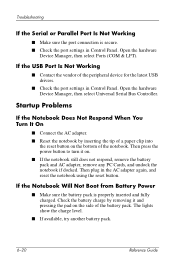
... ■ If available, try another battery pack. 6-20 Reference Guide Open the hardware Device Manager, then select Ports (COM & LPT). If the Notebook Will Not Boot from Battery Power ■ Make sure the battery pack is secure. ■ Check the port settings in Control Panel. Open the hardware Device Manager... on the side of a paper clip into the reset button on . ■ If the notebook still does not respond, remove the battery pack and AC adapter, remove any PC Cards, and undock the notebook if docked. Then plug in Control Panel. Check the battery charge by inserting the tip of...
... ■ If available, try another battery pack. 6-20 Reference Guide Open the hardware Device Manager, then select Ports (COM & LPT). If the Notebook Will Not Boot from Battery Power ■ Make sure the battery pack is secure. ■ Check the port settings in Control Panel. Open the hardware Device Manager... on the side of a paper clip into the reset button on . ■ If the notebook still does not respond, remove the battery pack and AC adapter, remove any PC Cards, and undock the notebook if docked. Then plug in Control Panel. Check the battery charge by inserting the tip of...

Reference Guide
Page 84
...directions. ■ If you are connected to resume if it has a network card installed. Reference Guide 6-21 Troubleshooting If the Notebook Will Not Boot from the Diskette Drive ■ Make sure the diskette drive is selected as the hardware has been reinitialized, the Windows desktop ... network with no DHCP server. If the Notebook Takes a Long Time to Resume After Entering Standby The notebook can cause a long delay at startup because DHCP is the first device under Removable Drive. If the Notebook Stops Responding After Booting Check whether you will appear. Contact your...
...directions. ■ If you are connected to resume if it has a network card installed. Reference Guide 6-21 Troubleshooting If the Notebook Will Not Boot from the Diskette Drive ■ Make sure the diskette drive is selected as the hardware has been reinitialized, the Windows desktop ... network with no DHCP server. If the Notebook Takes a Long Time to Resume After Entering Standby The notebook can cause a long delay at startup because DHCP is the first device under Removable Drive. If the Notebook Stops Responding After Booting Check whether you will appear. Contact your...
Reference Guide
Page 90
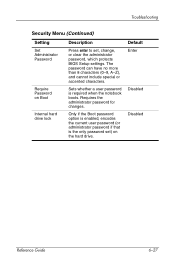
... and cannot include special or accented characters. Only if the Boot password option is enabled, encodes the current user password (or administrator password if that is required when the notebook boots. Default Enter Disabled Disabled Reference Guide 6-27 Troubleshooting Security Menu ...(Continued) Setting Set Administrator Password Require Password on Boot Internal hard drive lock Description Press enter to set )...
... and cannot include special or accented characters. Only if the Boot password option is enabled, encodes the current user password (or administrator password if that is required when the notebook boots. Default Enter Disabled Disabled Reference Guide 6-27 Troubleshooting Security Menu ...(Continued) Setting Set Administrator Password Require Password on Boot Internal hard drive lock Description Press enter to set )...
Reference Guide
Page 91
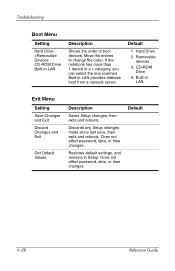
Default 1. Removable devices 3. Does not affect password, date, or time changes. Restores default settings, and remains in LAN provides diskless boot from a network server. Discards any Setup changes made since last save, then exits and reboots. Does not affect password, date, or...order. Built-in Setup. Default 6-28 Reference Guide Hard Drive 2. Built-in a + category, you can select the one scanned. If the notebook has more than 1 device in LAN Exit Menu Setting Save Changes and Exit Discard Changes and Exit Get Default Values Description Saves Setup changes, ...
Default 1. Removable devices 3. Does not affect password, date, or time changes. Restores default settings, and remains in LAN provides diskless boot from a network server. Discards any Setup changes made since last save, then exits and reboots. Does not affect password, date, or...order. Built-in Setup. Default 6-28 Reference Guide Hard Drive 2. Built-in a + category, you can select the one scanned. If the notebook has more than 1 device in LAN Exit Menu Setting Save Changes and Exit Discard Changes and Exit Get Default Values Description Saves Setup changes, ...

Reference Guide
Page 94
...; Microsoft Windows XP Home or Pro (depending on the notebook. 2. Press R to start the notebook. 5. The repair process begins. The notebook restarts in Windows after the process is displayed. 6. Immediately insert the OS CD into the notebook. 3. When prompted, press any key to continue. The... Setup window opens. 8. After a few minutes, the Welcome to external power and turn off the notebook. 4. A Licensing Agreement screen is displayed. 7. Press enter to boot from CD. Connect the notebook to Setup screen...
...; Microsoft Windows XP Home or Pro (depending on the notebook. 2. Press R to start the notebook. 5. The repair process begins. The notebook restarts in Windows after the process is displayed. 6. Immediately insert the OS CD into the notebook. 3. When prompted, press any key to continue. The... Setup window opens. 8. After a few minutes, the Welcome to external power and turn off the notebook. 4. A Licensing Agreement screen is displayed. 7. Press enter to boot from CD. Connect the notebook to Setup screen...
Reference Guide
Page 95
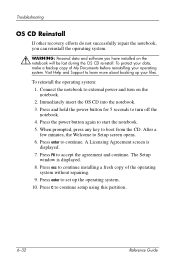
... to set up your operating system. Press the power button again to boot from the CD. When prompted, press any key to start the notebook. 5. A Licensing Agreement screen is displayed. 8. Immediately insert the OS CD into the notebook. 3. Press and hold the power button for 5 seconds to continue ... your files. The Setup window is displayed. 7. Press esc to turn on the notebook will be lost during the OS CD reinstall. Visit Help and Support to external power and turn off the notebook. 4. After a few minutes, the Welcome to continue setup using this partition. 6-...
... to set up your operating system. Press the power button again to boot from the CD. When prompted, press any key to start the notebook. 5. A Licensing Agreement screen is displayed. 8. Immediately insert the OS CD into the notebook. 3. Press and hold the power button for 5 seconds to continue ... your files. The Setup window is displayed. 7. Press esc to turn on the notebook will be lost during the OS CD reinstall. Visit Help and Support to external power and turn off the notebook. 4. After a few minutes, the Welcome to continue setup using this partition. 6-...
Reference Guide
Page 98
... 1-3 CD-ROM drive copying/creating CDs 2-12 inserting CD 2-10 location 1-2 removing CD 2-10 troubleshooting 6-3 changing the boot device 2-3 cleaning the notebook 2-17 Click buttons 1-2 components back panel 1-3 bottom panel 1-4 front panel 1-2 keyboard status lights 1-2 left panel 1-3 right panel ...1-2 status lights 1-1 configuring modem 4-4 notebook 6-24 connecting 1394 device 5-7 AC power 1-8 audio device 5-3 external devices 5-1 local area network (LAN) 4-5 phone line 1-9 wireless ...
... 1-3 CD-ROM drive copying/creating CDs 2-12 inserting CD 2-10 location 1-2 removing CD 2-10 troubleshooting 6-3 changing the boot device 2-3 cleaning the notebook 2-17 Click buttons 1-2 components back panel 1-3 bottom panel 1-4 front panel 1-2 keyboard status lights 1-2 left panel 1-3 right panel ...1-2 status lights 1-1 configuring modem 4-4 notebook 6-24 connecting 1394 device 5-7 AC power 1-8 audio device 5-3 external devices 5-1 local area network (LAN) 4-5 phone line 1-9 wireless ...


