Reference Guide
Page 5
... . . . 4-7 5 Add-On Devices Connecting External Devices 5-1 To Insert or Remove a PC Card 5-1 To Connect an Audio Device 5-3 To Connect a TV to Your Notebook (Select Models Only 5-4 Switching the Display to the External Monitor (Select Models Only 5-5 To ...To Install a RAM Expansion Module 5-9 To Remove a RAM Expansion Module 5-10 Replacing the Hard Drive 5-12 To Replace the Hard Drive 5-12 To Replace the Hard Drive Holder 5-13 To Prepare a New Hard Drive 5-14 6 Troubleshooting Troubleshooting Your Notebook 6-1 Audio Problems 6-2 CD-ROM and DVD Problems 6-3 Reference Guide v
... . . . 4-7 5 Add-On Devices Connecting External Devices 5-1 To Insert or Remove a PC Card 5-1 To Connect an Audio Device 5-3 To Connect a TV to Your Notebook (Select Models Only 5-4 Switching the Display to the External Monitor (Select Models Only 5-5 To ...To Install a RAM Expansion Module 5-9 To Remove a RAM Expansion Module 5-10 Replacing the Hard Drive 5-12 To Replace the Hard Drive 5-12 To Replace the Hard Drive Holder 5-13 To Prepare a New Hard Drive 5-14 6 Troubleshooting Troubleshooting Your Notebook 6-1 Audio Problems 6-2 CD-ROM and DVD Problems 6-3 Reference Guide v
Reference Guide
Page 61
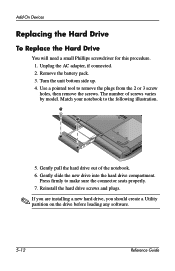
.... 2. Match your notebook to remove the plugs from the 2 or 3 screw holes, then remove the screws. Remove the battery pack. 3. Use a pointed tool to the following illustration. 5. Gently pull the hard drive out of screws varies by model. Gently slide the new drive into the hard drive compartment. Add-On Devices Replacing the Hard Drive To Replace the Hard Drive You will...
.... 2. Match your notebook to remove the plugs from the 2 or 3 screw holes, then remove the screws. Remove the battery pack. 3. Use a pointed tool to the following illustration. 5. Gently pull the hard drive out of screws varies by model. Gently slide the new drive into the hard drive compartment. Add-On Devices Replacing the Hard Drive To Replace the Hard Drive You will...
Reference Guide
Page 62
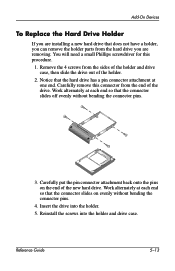
... put the pin connector attachment back onto the pins on evenly without bending the connector pins. 3. Add-On Devices To Replace the Hard Drive Holder If you are removing. Work alternately at each end so that the connector slides off evenly without bending the connector .... 5. Remove the 4 screws from the hard drive you can remove the holder parts from the sides of the holder and drive case, then slide the drive out of the holder. 2. Notice that does not have a holder, you are installing a new hard drive that the hard drive has a pin connector attachment at one end...
... put the pin connector attachment back onto the pins on evenly without bending the connector pins. 3. Add-On Devices To Replace the Hard Drive Holder If you are removing. Work alternately at each end so that the connector slides off evenly without bending the connector .... 5. Remove the 4 screws from the hard drive you can remove the holder parts from the sides of the holder and drive case, then slide the drive out of the holder. 2. Notice that does not have a holder, you are installing a new hard drive that the hard drive has a pin connector attachment at one end...

Reference Guide
Page 99
... 1-2 function hot keys 2-6 H hard drive activity status light 1-5 holder replacement 5-13 location 1-2, 1-4 locking 2-15 preparing a new drive 5-14 protecting 2-15 replacing 5-12 troubleshooting 6-5 Hibernation mode 2-2 holder, hard drive 5-13 hot keys 2-6 I identifying components 1-1 increasing display brightness 2-6 infrared port connecting a device 5-7 location 1-2 transferring files 5-8 troubleshooting 6-7 using the port 5-8 inserting battery pack 1-7 CD 2-10 DVD 2-10 PC Card 5-1 RAM (memory...
... 1-2 function hot keys 2-6 H hard drive activity status light 1-5 holder replacement 5-13 location 1-2, 1-4 locking 2-15 preparing a new drive 5-14 protecting 2-15 replacing 5-12 troubleshooting 6-5 Hibernation mode 2-2 holder, hard drive 5-13 hot keys 2-6 I identifying components 1-1 increasing display brightness 2-6 infrared port connecting a device 5-7 location 1-2 transferring files 5-8 troubleshooting 6-7 using the port 5-8 inserting battery pack 1-7 CD 2-10 DVD 2-10 PC Card 5-1 RAM (memory...


