User Guide
Page 4
... images with HP Photosmart Software 23 Transferring images without HP Photosmart Software 24 Connecting to the computer 24 Using a memory card reader 25 Printing images directly to a printer 25 7 Using HP Photosmart Express Using the Photosmart Express Menu 27 Marking images for printing...27 Buying prints online...29 Sharing images...29 Setting up online destinations in the camera 29...
... images with HP Photosmart Software 23 Transferring images without HP Photosmart Software 24 Connecting to the computer 24 Using a memory card reader 25 Printing images directly to a printer 25 7 Using HP Photosmart Express Using the Photosmart Express Menu 27 Marking images for printing...27 Buying prints online...29 Sharing images...29 Setting up online destinations in the camera 29...

User Guide
Page 9
...on setting picture capture and See "Setting options for more information). Insert the HP Photosmart Software CD into the CD drive and follow the on the HP Photosmart Camera settings dialog for taking pictures and video record settings recording video clips" on ... may change settings so the HP Photosmart Software starts automatically when you connect your camera to your camera to a computer See "Transferring images with HP Photosmart Software" on page 23 For information on printing images See "Printing images directly to the HP Photosmart Camera settings. Double-click the CD...
...on setting picture capture and See "Setting options for more information). Insert the HP Photosmart Software CD into the CD drive and follow the on the HP Photosmart Camera settings dialog for taking pictures and video record settings recording video clips" on ... may change settings so the HP Photosmart Software starts automatically when you connect your camera to your camera to a computer See "Transferring images with HP Photosmart Software" on page 23 For information on printing images See "Printing images directly to the HP Photosmart Camera settings. Double-click the CD...
User Guide
Page 25
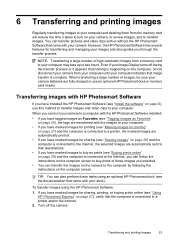
...during the transfer process or it takes to turn on your camera, to review images, and to transfer images. However, the HP Photosmart Software has several features for sharing (see "Sharing images" on page 29) and the computer is connected to the Internet, the selected images are automatically sent to...on the computer screen to the computer by following the instructions on the camera to buy as Favorites" on page 20), the tags are transferred with or without the HP Photosmart Software that image transfer is connected to a printer, the marked images are fully charged or use this ...
...during the transfer process or it takes to turn on your camera, to review images, and to transfer images. However, the HP Photosmart Software has several features for sharing (see "Sharing images" on page 29) and the computer is connected to the Internet, the selected images are automatically sent to...on the computer screen to the computer by following the instructions on the camera to buy as Favorites" on page 20), the tags are transferred with or without the HP Photosmart Software that image transfer is connected to a printer, the marked images are fully charged or use this ...
User Guide
Page 26
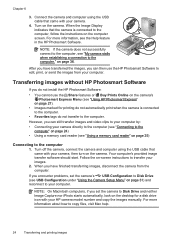
...computers, if you have transferred the images, you do not install the HP Photosmart Software: • You cannot use the HP Photosmart Software to the computer." When the Image Display indicates that the camera is connected to the computer. • Favorites tags do not transfer to the...or Buy Prints Online on the camera's Photosmart Express Menu (see "Using HP Photosmart Express" on -screen instructions to copy files, visit Mac help. 24 Transferring and printing images Chapter 6 3. on the camera. Turn off the camera, connect the camera and computer using the USB cable ...
...computers, if you have transferred the images, you do not install the HP Photosmart Software: • You cannot use the HP Photosmart Software to the computer." When the Image Display indicates that the camera is connected to the computer. • Favorites tags do not transfer to the...or Buy Prints Online on the camera's Photosmart Express Menu (see "Using HP Photosmart Express" on -screen instructions to copy files, visit Mac help. 24 Transferring and printing images Chapter 6 3. on the camera. Turn off the camera, connect the camera and computer using the USB cable ...
User Guide
Page 27
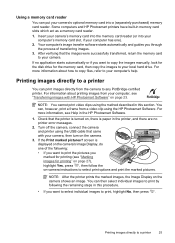
...card reader. For more information, see "Transferring images with your camera. You can then select individual images to print, highlight No, then press . Printing images directly to any PictBridge-certified printer. Some computers and HP Photosmart printers have built-in this procedure. • If you ...? NOTE: You cannot print video clips using the USB cable that came with HP Photosmart Software" on the camera shows an image. If no printer error messages. 2. Turn off the camera, connect the camera and printer using the method described in memory card slots which act as a ...
...card reader. For more information, see "Transferring images with your camera. You can then select individual images to print, highlight No, then press . Printing images directly to any PictBridge-certified printer. Some computers and HP Photosmart printers have built-in this procedure. • If you ...? NOTE: You cannot print video clips using the USB cable that came with HP Photosmart Software" on the camera shows an image. If no printer error messages. 2. Turn off the camera, connect the camera and printer using the method described in memory card slots which act as a ...

User Guide
Page 29
... installed. You can select pictures in the Photosmart Express Menu. See "Buying prints online" on page 6. 7 Using HP Photosmart Express With HP Photosmart Express, you can mark Using HP Photosmart Express 27 For information about installing this software, see "Install the software" on page 29. Slide 2. Share-Allows you connect the camera to print automatically (see "Marking images for...
... installed. You can select pictures in the Photosmart Express Menu. See "Buying prints online" on page 6. 7 Using HP Photosmart Express With HP Photosmart Express, you can mark Using HP Photosmart Express 27 For information about installing this software, see "Install the software" on page 29. Slide 2. Share-Allows you connect the camera to print automatically (see "Marking images for...

User Guide
Page 30
...more than one image as a Favorite (see "Tagging images as Favorites" on page 23. 28 Using HP Photosmart Express This option is available only if you have tagged more than one image in the camera. 3. If you are done marking images for changing the number of copies to display an image, ......-Displays the Print All Favorites entry. In the Print menu for printing, hold down until the menu disappears. 6. To print them from a computer connected to highlight Print, then press . 2. While in the Print menu, pressing , then repeating Step 3. 5.
...more than one image as a Favorite (see "Tagging images as Favorites" on page 23. 28 Using HP Photosmart Express This option is available only if you have tagged more than one image in the camera. 3. If you are done marking images for changing the number of copies to display an image, ......-Displays the Print All Favorites entry. In the Print menu for printing, hold down until the menu disappears. 6. To print them from a computer connected to highlight Print, then press . 2. While in the Print menu, pressing , then repeating Step 3. 5.

User Guide
Page 31
... 5. Buying prints online 29 The next time you connect the camera to include e-mail addresses, group distribution lists, or other online services. Press , then press . Sharing images You can customize the Share menu to a computer with HP Photosmart Software" on page 23. Setting up online destinations ...in the camera. 3. While in the Photosmart Express Menu, use to set up to 34 custom destinations (such as prints. Follow the on...
... 5. Buying prints online 29 The next time you connect the camera to include e-mail addresses, group distribution lists, or other online services. Press , then press . Sharing images You can customize the Share menu to a computer with HP Photosmart Software" on page 23. Setting up online destinations ...in the camera. 3. While in the Photosmart Express Menu, use to set up to 34 custom destinations (such as prints. Follow the on...
User Guide
Page 32
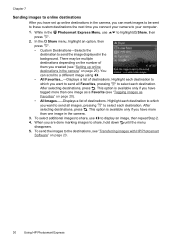
... the camera. 3. Highlight each destination. After selecting destinations, press . To send the images to select each destination to which you want to send all images, pressing to the destinations, see "Transferring images with HP Photosmart Software" on page 23. 30 Using HP Photosmart Express ...display an image, then repeat Step 2. 4. This option is available only if you connect your computer. 1. When you have more than one image as Favorites" on page 29). While in the camera, you can scroll to a different image using . • All Favorites...-Displays ...
... the camera. 3. Highlight each destination. After selecting destinations, press . To send the images to select each destination to which you want to send all images, pressing to the destinations, see "Transferring images with HP Photosmart Software" on page 23. 30 Using HP Photosmart Express ...display an image, then repeat Step 2. 4. This option is available only if you connect your computer. 1. When you have more than one image as Favorites" on page 29). While in the camera, you can scroll to a different image using . • All Favorites...-Displays ...
User Guide
Page 35
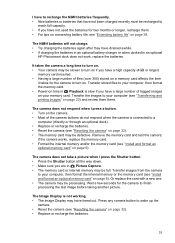
...them there. Or replace the card with a new one. • The camera may be processing. The Image Display is connected to a computer (directly or through an optional dock). • Replace or recharge the batteries. • Reset the camera (see "Extending battery life" on page 32). • Replace or recharge ... on your computer (see "Install and format an optional memory card" on time in Playback is slow if you are in an optional HP Photosmart dock does not work, replace the batteries. Transfer stored files to your computer, then format the internal memory or the memory card (see...
...them there. Or replace the card with a new one. • The camera may be processing. The Image Display is connected to a computer (directly or through an optional dock). • Replace or recharge the batteries. • Reset the camera (see "Extending battery life" on page 32). • Replace or recharge ... on your computer (see "Install and format an optional memory card" on time in Playback is slow if you are in an optional HP Photosmart dock does not work, replace the batteries. Transfer stored files to your computer, then format the internal memory or the memory card (see...

User Guide
Page 38
... see "Transferring images without HP Photosmart Software" on page 24. • Configure your camera preferences so the HP Photosmart software starts automatically when you connect your camera to your camera to your Macintosh. Close the HP Photosmart Software, disconnect the camera from the computer, and reset the camera (see "Resetting the camera" on again. I cannot transfer images from my camera. I connect to my computer. Having...
... see "Transferring images without HP Photosmart Software" on page 24. • Configure your camera preferences so the HP Photosmart software starts automatically when you connect your camera to your camera to your Macintosh. Close the HP Photosmart Software, disconnect the camera from the computer, and reset the camera (see "Resetting the camera" on again. I cannot transfer images from my camera. I connect to my computer. Having...
User Guide
Page 39
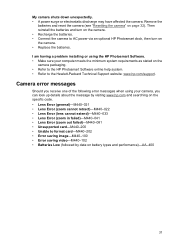
...HP Photosmart Software. • Make sure your computer meets the minimum system requirements as stated on the camera. • Replace the batteries. Camera error messages Should you can look up details about the message by data on page 32). Then reinstall the batteries and turn on the camera. • Recharge the batteries. • Connect the camera... card-M440-200 • Unable to AC power via an optional HP Photosmart dock, then turn on the camera packaging. • Refer to the HP Photosmart Software online help system. • Refer to the Hewlett-Packard Technical Support ...
...HP Photosmart Software. • Make sure your computer meets the minimum system requirements as stated on the camera. • Replace the batteries. Camera error messages Should you can look up details about the message by data on page 32). Then reinstall the batteries and turn on the camera. • Recharge the batteries. • Connect the camera... card-M440-200 • Unable to AC power via an optional HP Photosmart dock, then turn on the camera packaging. • Refer to the HP Photosmart Software online help system. • Refer to the Hewlett-Packard Technical Support ...
User Guide
Page 41
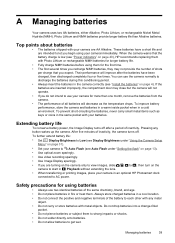
...performance will decrease as keys or coins in an optional HP Photosmart dock connected to AC power. To further extend battery life: • Set Display Brightness to Low (see Auto Flash under "Using the Camera Setup Menu" on the camera to start in Playback without extending the lens. &#... • Always insert the batteries in fire or heat them with metal objects. When the camera warns that the battery charge is low (see "Install the batteries" on page 40), HP recommends replacing them . Safety precautions for longer battery life. • Fully charge NiMH batteries...
...performance will decrease as keys or coins in an optional HP Photosmart dock connected to AC power. To further extend battery life: • Set Display Brightness to Low (see Auto Flash under "Using the Camera Setup Menu" on the camera to start in Playback without extending the lens. &#... • Always insert the batteries in fire or heat them with metal objects. When the camera warns that the battery charge is low (see "Install the batteries" on page 40), HP recommends replacing them . Safety precautions for longer battery life. • Fully charge NiMH batteries...
User Guide
Page 46
... 42 turn on/off 4 weight 43 Camera Setup Menu 31 Camera Sounds 31 Close-up mode 14 Color 15 color depth 42 colors 21 compression format 43 computer, connect to 23, 24 D Date & Time 5, 31 Date & Time Imprint 15 Delete button 3 digital zoom 12 dimensions 43 direct print 25 ...42 Flash button 3 focal length 42 focus auto focus 9 brackets 9 focus lock 11 optimizing 10 format memory card 6 G getting assistance 38 H HP Photosmart Express 27 HP Photosmart Software 6 I Image Display 3 Image Quality 14, 43 images Date & Time Imprint 15 Image Quality 14 magnifying 18 number remaining 8 sending 30...
... 42 turn on/off 4 weight 43 Camera Setup Menu 31 Camera Sounds 31 Close-up mode 14 Color 15 color depth 42 colors 21 compression format 43 computer, connect to 23, 24 D Date & Time 5, 31 Date & Time Imprint 15 Delete button 3 digital zoom 12 dimensions 43 direct print 25 ...42 Flash button 3 focal length 42 focus auto focus 9 brackets 9 focus lock 11 optimizing 10 format memory card 6 G getting assistance 38 H HP Photosmart Express 27 HP Photosmart Software 6 I Image Display 3 Image Quality 14, 43 images Date & Time Imprint 15 Image Quality 14 magnifying 18 number remaining 8 sending 30...

User Guide
Page 48
..., contact: Manager of Corporate Product Regulations Hewlett-Packard Company 3000 Hanover Street Palo Alto, Ca 94304 (650) 857-1501 HP Photosmart M440/M540/M630 series Digital Camera Declaration of Conformity (European Economic Area) According to ISO/IEC 17050-1 and EN 17050-1 Supplier's name: Supplier's address:...following measures: • Reorient or relocate the receiving antenna. • Increase the separation between the equipment and receiver. • Connect the equipment into an outlet on , the user is encouraged to try to radio communications. If this product. Cet appareil num&#...
..., contact: Manager of Corporate Product Regulations Hewlett-Packard Company 3000 Hanover Street Palo Alto, Ca 94304 (650) 857-1501 HP Photosmart M440/M540/M630 series Digital Camera Declaration of Conformity (European Economic Area) According to ISO/IEC 17050-1 and EN 17050-1 Supplier's name: Supplier's address:...following measures: • Reorient or relocate the receiving antenna. • Increase the separation between the equipment and receiver. • Connect the equipment into an outlet on , the user is encouraged to try to radio communications. If this product. Cet appareil num&#...
Quick Start Guide
Page 12
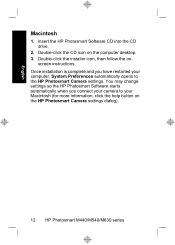
... drive. 2. Once installation is complete and you connect your Macintosh (for more information, click the help button on the HP Photosmart Camera settings dialog). 12 HP Photosmart M440/M540/M630 series Double-click the installer icon, then follow the on the computer desktop. 3. You may change settings so the HP Photosmart Software starts automatically when you have restarted...
... drive. 2. Once installation is complete and you connect your Macintosh (for more information, click the help button on the HP Photosmart Camera settings dialog). 12 HP Photosmart M440/M540/M630 series Double-click the installer icon, then follow the on the computer desktop. 3. You may change settings so the HP Photosmart Software starts automatically when you have restarted...
Quick Start Guide
Page 16
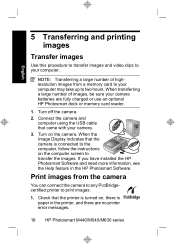
... using the USB cable that the camera is paper in the HP Photosmart Software. Check that the printer is turned on, there is connected to the computer, follow the instructions on the camera. NOTE: Transferring a large number of images, be sure your camera batteries are no printer error messages. 16 HP Photosmart M440/M540/M630 series When transferring...
... using the USB cable that the camera is paper in the HP Photosmart Software. Check that the printer is turned on, there is connected to the computer, follow the instructions on the camera. NOTE: Transferring a large number of images, be sure your camera batteries are no printer error messages. 16 HP Photosmart M440/M540/M630 series When transferring...
Quick Start Guide
Page 21
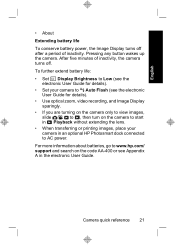
... view images, slide to , then turn on the camera to start in Playback without extending the lens. • When transferring or printing images, place your camera to Auto Flash (see Appendix A in an optional HP Photosmart dock connected to www.hp.com/ support and search on the code AA-400... or see the electronic User Guide for details). • Set your camera in the electronic User Guide.
... view images, slide to , then turn on the camera to start in Playback without extending the lens. • When transferring or printing images, place your camera to Auto Flash (see Appendix A in an optional HP Photosmart dock connected to www.hp.com/ support and search on the code AA-400... or see the electronic User Guide for details). • Set your camera in the electronic User Guide.


