
User Guide
Page 9
... icon, then follow the on-screen instructions. You may change settings so the HP Photosmart Software starts automatically when you have restarted your camera to the desired option. Using your camera Now that you've completed setup, you can take and review pictures and video clips. When the software has finished installing, re-enable virus...
... icon, then follow the on-screen instructions. You may change settings so the HP Photosmart Software starts automatically when you have restarted your camera to the desired option. Using your camera Now that you've completed setup, you can take and review pictures and video clips. When the software has finished installing, re-enable virus...
User Guide
Page 19
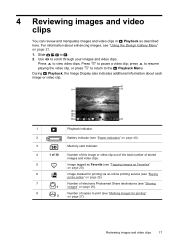
...Image Display also indicates additional information about enhancing images, see "Marking images for printing" 3 on page 21. 1. 4 Reviewing images and video clips You can review and manipulate images and video clips in Playback as Favorites" on page 20). 6 Image marked for printing via an ...online printing service (see "Buying prints online" on page 29). 7 Number of electronic Photosmart Share destinations (see "Sharing 1 images"...
...Image Display also indicates additional information about enhancing images, see "Marking images for printing" 3 on page 21. 1. 4 Reviewing images and video clips You can review and manipulate images and video clips in Playback as Favorites" on page 20). 6 Image marked for printing via an ...online printing service (see "Buying prints online" on page 29). 7 Number of electronic Photosmart Share destinations (see "Sharing 1 images"...
User Guide
Page 22
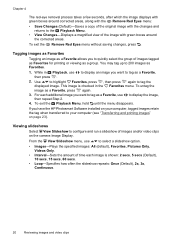
... Favorites Tagging an image as a Favorite allows you have the HP Photosmart Software installed on your computer, tagged images retain the tag when transferred to your computer (see "Transferring and printing images" on the camera Image Display. For each image is checked in Playback, use to...Default), 10 secs, 15 secs, 60 secs. • Loop-Specifies how often the slideshow repeats: Once (Default), 2x, 3x, Continuous. 20 Reviewing images and video clips Chapter 4 The red-eye removal process takes a few seconds, after which the image displays with green boxes around corrected areas,...
... Favorites Tagging an image as a Favorite allows you have the HP Photosmart Software installed on your computer, tagged images retain the tag when transferred to your computer (see "Transferring and printing images" on the camera Image Display. For each image is checked in Playback, use to...Default), 10 secs, 15 secs, 60 secs. • Loop-Specifies how often the slideshow repeats: Once (Default), 2x, 3x, Continuous. 20 Reviewing images and video clips Chapter 4 The red-eye removal process takes a few seconds, after which the image displays with green boxes around corrected areas,...
User Guide
Page 25
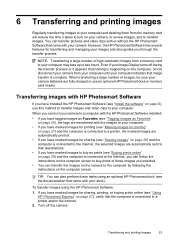
... up to two hours. When you connect your camera. Even if your Image Display turns off the camera. TIP: You can transfer pictures and video clips with or without the HP Photosmart Software that image transfer is happening on page 27), verify that came with your camera, to review images, and to transfer images. Turn off...
... up to two hours. When you connect your camera. Even if your Image Display turns off the camera. TIP: You can transfer pictures and video clips with or without the HP Photosmart Software that image transfer is happening on page 27), verify that came with your camera, to review images, and to transfer images. Turn off...
User Guide
Page 35
...memory card. • Format the internal memory and/or the memory card (see "Install and format an optional memory card" on page 23) and review them . • For tips on conserving battery life, see "Extending battery life" on page 6). The Image Display is connected to a computer ...Wait a few seconds for the camera to wake up the camera. • Reset the camera (see "Resetting the camera" on your computer, then format the memory card. • Power-on time in an optional HP Photosmart dock does not work, replace the batteries. Press any camera button to finish processing the last ...
...memory card. • Format the internal memory and/or the memory card (see "Install and format an optional memory card" on page 23) and review them . • For tips on conserving battery life, see "Extending battery life" on page 6). The Image Display is connected to a computer ...Wait a few seconds for the camera to wake up the camera. • Reset the camera (see "Resetting the camera" on your computer, then format the memory card. • Power-on time in an optional HP Photosmart dock does not work, replace the batteries. Press any camera button to finish processing the last ...
User Guide
Page 46
...digital zoom 12 dimensions 43 direct print 25 Display Brightness 31 E e-mail images 29 exposure 11 44 F F-number 42 Favorites 20 flash red-eye reduction 13 setting 13 working range 42 Flash button 3 focal length 42 focus auto focus 9 brackets 9 focus lock 11 optimizing 10 format memory card 6 G getting assistance 38 H HP Photosmart... 6 Instant Review 9, 16 interfaces 43 internal memory 8, 43 L Landscape mode 14 Language 5, 31 M Magnify control 3 magnifying images 18 memory capacity 43 card 6, 8, 43 card door 4 Menu/OK button 3 menus Camera Setup 31 Design Gallery 21 Photosmart Express 27 ...
...digital zoom 12 dimensions 43 direct print 25 Display Brightness 31 E e-mail images 29 exposure 11 44 F F-number 42 Favorites 20 flash red-eye reduction 13 setting 13 working range 42 Flash button 3 focal length 42 focus auto focus 9 brackets 9 focus lock 11 optimizing 10 format memory card 6 G getting assistance 38 H HP Photosmart... 6 Instant Review 9, 16 interfaces 43 internal memory 8, 43 L Landscape mode 14 Language 5, 31 M Magnify control 3 magnifying images 18 memory capacity 43 card 6, 8, 43 card door 4 Menu/OK button 3 menus Camera Setup 31 Design Gallery 21 Photosmart Express 27 ...

Quick Start Guide
Page 18
...Photo, Theatre, Landscape, Portrait, Action, Night Portrait, Sunset) • Self-Timer 18 HP Photosmart M440/M540/M630 series Picture Capture Menu-Allows you to adjust camera settings, work with your camera. English 6 Camera quick reference Use this menu, slide to , then press . To activate Picture Capture, slide...to specific • To exit the menu, press at any time. Camera Menus Menus allow you review and delete images and video clips. To access this chapter as a quick reference to camera features. To activate Video Record, slide to the electronic User Guide or...
...Photo, Theatre, Landscape, Portrait, Action, Night Portrait, Sunset) • Self-Timer 18 HP Photosmart M440/M540/M630 series Picture Capture Menu-Allows you to adjust camera settings, work with your camera. English 6 Camera quick reference Use this menu, slide to , then press . To activate Picture Capture, slide...to specific • To exit the menu, press at any time. Camera Menus Menus allow you review and delete images and video clips. To access this chapter as a quick reference to camera features. To activate Video Record, slide to the electronic User Guide or...
Quick Start Guide
Page 20
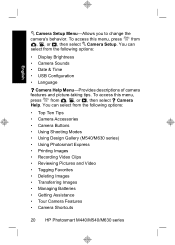
... Gallery (M540/M630 series) • Using Photosmart Express • Printing Images • Recording Video Clips • Reviewing Pictures and Video • Tagging Favorites • Deleting Images • Transferring Images • Managing Batteries • Getting Assistance • Tour Camera Features • Camera Shortcuts 20 HP Photosmart M440/M540/M630 series English Camera Setup Menu-Allows you to change...
... Gallery (M540/M630 series) • Using Photosmart Express • Printing Images • Recording Video Clips • Reviewing Pictures and Video • Tagging Favorites • Deleting Images • Transferring Images • Managing Batteries • Getting Assistance • Tour Camera Features • Camera Shortcuts 20 HP Photosmart M440/M540/M630 series English Camera Setup Menu-Allows you to change...


