Wireless Getting Started Guide
Page 5
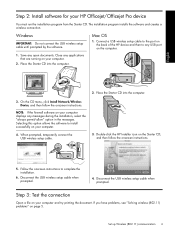
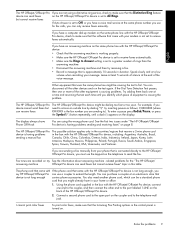
... USB wireless setup cable. 3. Place the Starter CD into the computer. 2. Step 3: Test the connection Open a file on your HP Officejet/Officejet Pro device You must run the installation program from the Starter CD. Place the Starter CD into the computer. 3. Double-click the... HP Installer icon on the Starter CD, and then follow the onscreen instructions. English Step 2: Install software for your computer displays any messages during the installation, select the "always permit/allow" option in...
... USB wireless setup cable. 3. Place the Starter CD into the computer. 2. Step 3: Test the connection Open a file on your HP Officejet/Officejet Pro device You must run the installation program from the Starter CD. Place the Starter CD into the computer. 3. Double-click the... HP Installer icon on the Starter CD, and then follow the onscreen instructions. English Step 2: Install software for your computer displays any messages during the installation, select the "always permit/allow" option in...
Wireless Getting Started Guide
Page 9
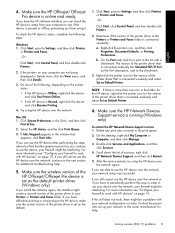
... perform this still does not work, there might be interfering. English 4. Make sure the HP Officejet/Officejet Pro device is connected wirelessly has Standard TCP/IP Port as Default Printer. To check the HP device's status, complete the following , depending on your firewall might be a problem with ... . 5. After the service restarts, try using the HP device over the network, your network configuration or router. For more than one of the printer driver that is online and ready If you are not being displayed in your Printers or Printers and Faxes folder. If...
... perform this still does not work, there might be interfering. English 4. Make sure the HP Officejet/Officejet Pro device is connected wirelessly has Standard TCP/IP Port as Default Printer. To check the HP device's status, complete the following , depending on your firewall might be a problem with ... . 5. After the service restarts, try using the HP device over the network, your network configuration or router. For more than one of the printer driver that is online and ready If you are not being displayed in your Printers or Printers and Faxes folder. If...
Fax Getting Started Guide
Page 6
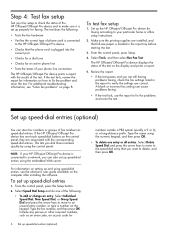
...make sure it is plugged into the correct port • Checks for a dial tone • Checks for information on page 8. If the HP Officejet/Officejet Pro device has one of the following : • Tests the fax hardware • Verifies the correct type of phone cord is connected to the speed-dial ... "Solve fax problems" on how to delete, and then press OK. To set up speed-dial entries using the control panel. The HP Officejet/Officejet Pro device displays the status of the test. This lets you want to fix the problem and rerun the test. If the test fails, review the ...
...make sure it is plugged into the correct port • Checks for a dial tone • Checks for information on page 8. If the HP Officejet/Officejet Pro device has one of the following : • Tests the fax hardware • Verifies the correct type of phone cord is connected to the speed-dial ... "Solve fax problems" on how to delete, and then press OK. To set up speed-dial entries using the control panel. The HP Officejet/Officejet Pro device displays the status of the test. This lets you want to fix the problem and rerun the test. If the test fails, review the ...
Fax Getting Started Guide
Page 9
... the box with the HP Officejet/Officejet Pro device: • Check that is causing problems. Try adding them back one end to the telephone wall jack. Speak slowly and at the same phone number you use the keypad on the display. Using the phone cord supplied in the box with the HP Officejet/Officejet Pro device is not...
... the box with the HP Officejet/Officejet Pro device: • Check that is causing problems. Try adding them back one end to the telephone wall jack. Speak slowly and at the same phone number you use the keypad on the display. Using the phone cord supplied in the box with the HP Officejet/Officejet Pro device is not...
User Guide
Page 9
... document feeder 131 General troubleshooting tips and resources 134 Solve printing problems ...135 The device shuts down unexpectedly 135 Error message appears on control-panel display 136 The device is not responding (nothing prints 136 Device takes a long time to print 136 Blank or partial page printed 137 Something on the...
... document feeder 131 General troubleshooting tips and resources 134 Solve printing problems ...135 The device shuts down unexpectedly 135 Error message appears on control-panel display 136 The device is not responding (nothing prints 136 Device takes a long time to print 136 Blank or partial page printed 137 Something on the...
User Guide
Page 16
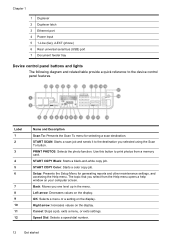
...a scan job and sends it to the destination you one level up in the menu. PRINT PHOTOS: Selects the photo function. Setup: Presents the Setup Menu for selecting a scan destination. Left arrow: Decreases values on the display. Right arrow: Increases values on the display. Chapter 1 1 Duplexer 2 Duplexer latch 3 Ethernet ... Presents the Scan To menu for generating reports and other maintenance settings, and accessing the Help menu. START COPY Color: Starts a color copy job. The topic that you select from a memory card. Cancel: Stops a job, exits a menu, or exits settings.
...a scan job and sends it to the destination you one level up in the menu. PRINT PHOTOS: Selects the photo function. Setup: Presents the Setup Menu for selecting a scan destination. Left arrow: Decreases values on the display. Right arrow: Increases values on the display. Chapter 1 1 Duplexer 2 Duplexer latch 3 Ethernet ... Presents the Scan To menu for generating reports and other maintenance settings, and accessing the Help menu. START COPY Color: Starts a color copy job. The topic that you select from a memory card. Cancel: Stops a job, exits a menu, or exits settings.
User Guide
Page 17
...five computers connected to use this button is lit, the device automatically answers incoming phone calls. Display: View menus and messages. Quality: Selects Best, Normal, or Fast quality for selecting fax ... a job. Junk Fax Blocker: Presents the Junk Fax Blocker Set Up menu for best performance One computer connected with a USB cable to the rear USB 2.0 high-speed port on . Supported ...minimal amount of connected computers for managing unwanted fax calls. START FAX Color: Starts a color fax job. When the device is on the device. When off , and then unplug the...
...five computers connected to use this button is lit, the device automatically answers incoming phone calls. Display: View menus and messages. Quality: Selects Best, Normal, or Fast quality for selecting fax ... a job. Junk Fax Blocker: Presents the Junk Fax Blocker Set Up menu for best performance One computer connected with a USB cable to the rear USB 2.0 high-speed port on . Supported ...minimal amount of connected computers for managing unwanted fax calls. START FAX Color: Starts a color fax job. When the device is on the device. When off , and then unplug the...
User Guide
Page 19
...types • Change device settings • Use the HP Solution Center (Windows) • Use the HP photo and imaging software • Load originals • Select print media • Load media • Print on the control-panel display. To display a menu, press the menu button for the function... you to use. • Scan menu: Presents a list of destinations. Some destinations require the HP Photosmart Software to be loaded. • Copy menu: Menu options include...
...types • Change device settings • Use the HP Solution Center (Windows) • Use the HP photo and imaging software • Load originals • Select print media • Load media • Print on the control-panel display. To display a menu, press the menu button for the function... you to use. • Scan menu: Presents a list of destinations. Some destinations require the HP Photosmart Software to be loaded. • Copy menu: Menu options include...

User Guide
Page 21
...the onscreen Help that came with the device. The software is the HP Photosmart Studio window. The features available in the HP Solution Center vary depending on the control-panel display. 3. To correct this, use the HP photo and imaging software to access many features that feature does not ...setup. Select the value that you want , and then press OK. Click the HP Device Manager icon in the Devices drop-down menu. 3. The HP Solution Center is the HP Photosmart Software window. To change , use one of the following methods: • Press a control-panel button, and then use...
...the onscreen Help that came with the device. The software is the HP Photosmart Studio window. The features available in the HP Solution Center vary depending on the control-panel display. 3. To correct this, use the HP photo and imaging software to access many features that feature does not ...setup. Select the value that you want , and then press OK. Click the HP Device Manager icon in the Devices drop-down menu. 3. The HP Solution Center is the HP Photosmart Software window. To change , use one of the following methods: • Press a control-panel button, and then use...
User Guide
Page 24
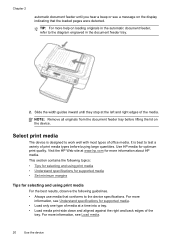
...specifications. TIP: For more help on loading originals in the document feeder tray. 2. Visit the HP Web site at a time into a tray. • Load media print-side down and aligned...Understand specifications for supported media. • Load only one type of media at www.hp.com for optimum print quality. For more information about HP media. Chapter 2 automatic document feeder until they stop...media. NOTE: Remove all originals from the document feeder tray before buying large quantities. Use HP media for more information, see Load media. 20 Use the device Slide the width guides ...
...specifications. TIP: For more help on loading originals in the document feeder tray. 2. Visit the HP Web site at a time into a tray. • Load media print-side down and aligned...Understand specifications for supported media. • Load only one type of media at www.hp.com for optimum print quality. For more information about HP media. Chapter 2 automatic document feeder until they stop...media. NOTE: Remove all originals from the document feeder tray before buying large quantities. Use HP media for more information, see Load media. 20 Use the device Slide the width guides ...

User Guide
Page 43
...In the Copy area, press the Reduce/Enlarge button. 4. Press START COPY Black or START COPY Color. See the software's Help for more information. Make sure you have paper loaded in the display. Press until Full Page 91% appears. 5. In order to a size that appears in the ...-size page. NOTE: Copy functions can also be performed using the HP Photosmart Software (Windows) or HP Photosmart Studio Software (Mac OS). NOTE: Copy functions can also be performed using the HP Photosmart Software (Windows) or HP Photosmart Studio Software (Mac OS). Copy a legal-size document onto ...
...In the Copy area, press the Reduce/Enlarge button. 4. Press START COPY Black or START COPY Color. See the software's Help for more information. Make sure you have paper loaded in the display. Press until Full Page 91% appears. 5. In order to a size that appears in the ...-size page. NOTE: Copy functions can also be performed using the HP Photosmart Software (Windows) or HP Photosmart Studio Software (Mac OS). NOTE: Copy functions can also be performed using the HP Photosmart Software (Windows) or HP Photosmart Studio Software (Mac OS). Copy a legal-size document onto ...

User Guide
Page 47
...direct connect) 1. Press the arrow keys to a memory device 1. For more information, see Embedded Web server. For more information on a computer from the HP photo and imaging software 1. Scan from a TWAIN-compliant or a WIA-compliant program 43 Insert the memory device. 3. Press Scan To. 4. This feature .... To send a scan to the memory card. When the scan is complete, the program that you have selected opens and displays the document that you have scanned. On the computer, open the HP photo and imaging software. Load the original on the scanner glass.
...direct connect) 1. Press the arrow keys to a memory device 1. For more information, see Embedded Web server. For more information on a computer from the HP photo and imaging software 1. Scan from a TWAIN-compliant or a WIA-compliant program 43 Insert the memory device. 3. Press Scan To. 4. This feature .... To send a scan to the memory card. When the scan is complete, the program that you have selected opens and displays the document that you have scanned. On the computer, open the HP photo and imaging software. Load the original on the scanner glass.

User Guide
Page 54
... fax You can also send a fax manually from a phone or by using monitor dialing. Dial the number by using the keypad, press Speed Dial or a one-touch speed dial button to select a speed dial, or press Redial/Pause to tone prompts while dialing. NOTE: If you to use a calling card to... the phone, you are going to inform the recipient that your dialing. or multiple-page black-and-white fax by using the keypad on the display. 3. They are entering, press Redial/Pause, or press the Symbols (*) button repeatedly, until a dash (-) appears on the phone that is useful if you want to...
... fax You can also send a fax manually from a phone or by using monitor dialing. Dial the number by using the keypad, press Speed Dial or a one-touch speed dial button to select a speed dial, or press Redial/Pause to tone prompts while dialing. NOTE: If you to use a calling card to... the phone, you are going to inform the recipient that your dialing. or multiple-page black-and-white fax by using the keypad on the display. 3. They are entering, press Redial/Pause, or press the Symbols (*) button repeatedly, until a dash (-) appears on the phone that is useful if you want to...

User Guide
Page 56
... appears. 5. The device automatically sends your originals. Enter the send time by using the keypad, press Speed Dial or a one-touch speed dial button to select a speed dial, or press Redial/Pause to redial the last number dialed. 6. If prompted... FAX Black. Press until How to Fax appears. 3. Enter the fax number by using the keypad, press Speed Dial or a one fax to memory limitations. For additional information, see Load originals. 2. This enables you are lower, for PM. 5. The fax ... 4. The device scans all pages and the scheduled time appears on the display.
... appears. 5. The device automatically sends your originals. Enter the send time by using the keypad, press Speed Dial or a one-touch speed dial button to select a speed dial, or press Redial/Pause to redial the last number dialed. 6. If prompted... FAX Black. Press until How to Fax appears. 3. Enter the fax number by using the keypad, press Speed Dial or a one fax to memory limitations. For additional information, see Load originals. 2. This enables you are lower, for PM. 5. The fax ... 4. The device scans all pages and the scheduled time appears on the display.

User Guide
Page 57
... 1. When a connection is made , the next number is dialed and an error report is a fax already scheduled, the Cancel prompt appears on the display. In the Fax area, press Fax Menu repeatedly until How to select Yes. For additional information, see Load originals. 2. If the device detects an...fax and dials the next number. The device scans the fax into group speed dial entries. If a number is visible on the display. 3. Select the HP Device Manager from the device control panel You can select a speed dial entry by grouping individual speed dial entries into memory then dials...
... 1. When a connection is made , the next number is dialed and an error report is a fax already scheduled, the Cancel prompt appears on the display. In the Fax area, press Fax Menu repeatedly until How to select Yes. For additional information, see Load originals. 2. If the device detects an...fax and dials the next number. The device scans the fax into group speed dial entries. If a number is visible on the display. 3. Select the HP Device Manager from the device control panel You can select a speed dial entry by grouping individual speed dial entries into memory then dials...

User Guide
Page 65
...number of the incoming fax is still On. When an incoming fax call should match what the HP All-in the input tray. If the number matches a number in your phone provider, you ... the device control panel 1. If this feature is turned off, information that is loaded in -One does if it saves the Fax Forwarding setting and phone number. Faxes can be blocked. Press ... 4. Set automatic reduction for incoming faxes The Automatic Reduction setting determines what is printed on the display. Block junk fax numbers If you receive a legal-size fax and letter-size paper is too...
...number of the incoming fax is still On. When an incoming fax call should match what the HP All-in the input tray. If the number matches a number in your phone provider, you ... the device control panel 1. If this feature is turned off, information that is loaded in -One does if it saves the Fax Forwarding setting and phone number. Faxes can be blocked. Press ... 4. Set automatic reduction for incoming faxes The Automatic Reduction setting determines what is printed on the display. Block junk fax numbers If you receive a legal-size fax and letter-size paper is too...

User Guide
Page 67
... it . 5. When the Enter Another? prompt appears, do one of the following : • If you want to remove appears, press OK to add another number from Junk List. 4. Once the fax is received, you want to select it appears on the control-panel display, and not the fax number that the fax... was received. Press Remove Number from the list of junk fax numbers, press Yes, and then repeat step 4 for each number you want to block. • If you want to remove another number to the computer. Color faxes are done...
... it . 5. When the Enter Another? prompt appears, do one of the following : • If you want to remove appears, press OK to add another number from Junk List. 4. Once the fax is received, you want to select it appears on the control-panel display, and not the fax number that the fax... was received. Press Remove Number from the list of junk fax numbers, press Yes, and then repeat step 4 for each number you want to block. • If you want to remove another number to the computer. Color faxes are done...

User Guide
Page 73
...fax setup 1. Select Tools, and then select Run Fax Test. Use reports You can set up properly for more information on the control-panel display after you send and receive. The test does the following topics: • Print fax confirmation reports • Print fax error reports •... your particular home or office setup instructions. 2. Set up the device to print error reports and confirmation reports automatically for information on the display and prints a report. 5. Perform this test after each fax you have completed setting up the device for faxing according to fix any ...
...fax setup 1. Select Tools, and then select Run Fax Test. Use reports You can set up properly for more information on the control-panel display after you send and receive. The test does the following topics: • Print fax confirmation reports • Print fax error reports •... your particular home or office setup instructions. 2. Set up the device to print error reports and confirmation reports automatically for information on the display and prints a report. 5. Perform this test after each fax you have completed setting up the device for faxing according to fix any ...

User Guide
Page 74
This means that your fax to send from the Image on the control-panel display after each fax sent or received. Press the right arrow button to enable fax confirmation before sending any fax error reports. Prints a fax confirmation report ... choose On Fax Send or Send & Receive, and scan your faxes were successfully sent, follow these instructions to select one of the following , and then press OK. To set the device to select one of the following , and then press OK. Press Print Report, and then press Fax Error Report. 3. Does not...
This means that your fax to send from the Image on the control-panel display after each fax sent or received. Press the right arrow button to enable fax confirmation before sending any fax error reports. Prints a fax confirmation report ... choose On Fax Send or Send & Receive, and scan your faxes were successfully sent, follow these instructions to select one of the following , and then press OK. To set the device to select one of the following , and then press OK. Press Print Report, and then press Fax Error Report. 3. Does not...
User Guide
Page 77
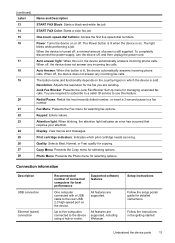
...and modifying settings. Use this tool... Perform device maintenance tasks: Click the Services tab. Use this tool... Device control panel Toolbox (Windows) HP Printer Utility (Mac OS) to view information about replacement print cartridges and expiration dates.* Ink cartridge information: Open the Information and Support panel .... • Set the date and time: Press Setup, press Tools, and then press Date and Time. When you do not need to display the Cartridge Details button. You do not see your country/region, press 99, and then find your country/region in the list. •...
...and modifying settings. Use this tool... Perform device maintenance tasks: Click the Services tab. Use this tool... Device control panel Toolbox (Windows) HP Printer Utility (Mac OS) to view information about replacement print cartridges and expiration dates.* Ink cartridge information: Open the Information and Support panel .... • Set the date and time: Press Setup, press Tools, and then press Date and Time. When you do not need to display the Cartridge Details button. You do not see your country/region, press 99, and then find your country/region in the list. •...


