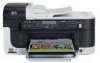
Wireless Getting Started Guide
Page 6
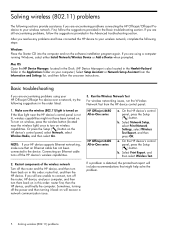
... listed: 1. Run the Wireless Network Test For wireless networking issues, run the software installation program again. Select Network Setup, select Print Network Settings, select Wireless Test Report, and then press OK. NOTE: If your HP device supports Ethernet networking, make sure that might not have connected the HP device to connect, turn off the power and then turning it back on . To turn on wireless, press the wireless button (located near the HP device's control panel is not lit, wireless capabilities might help solve the problem. 5 Solving wireless (802.11) problems...
... listed: 1. Run the Wireless Network Test For wireless networking issues, run the software installation program again. Select Network Setup, select Print Network Settings, select Wireless Test Report, and then press OK. NOTE: If your HP device supports Ethernet networking, make sure that might not have connected the HP device to connect, turn off the power and then turning it back on . To turn on wireless, press the wireless button (located near the HP device's control panel is not lit, wireless capabilities might help solve the problem. 5 Solving wireless (802.11) problems...
Wireless Getting Started Guide
Page 10
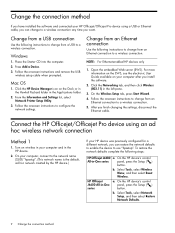
... electronic User Guide available on your computer after you finish changing the settings, disconnect the Ethernet cable. On the Wireless Setup tab, press Start Wizard. 4. Turn on the Dock or in the Hewlett Packard folder in -One series panel, press the Setup ( ) button. b. Select Tools, select Network Setup, and then select Restore Network Defaults. 9 Change the connection method Mac OS 1. Open the embedded Web server (EWS). b. Press Add a Device. 3. Select Tools, select Wireless Menu, and then select Reset Wireless. On the HP device's control...
... electronic User Guide available on your computer after you finish changing the settings, disconnect the Ethernet cable. On the Wireless Setup tab, press Start Wizard. 4. Turn on the Dock or in the Hewlett Packard folder in -One series panel, press the Setup ( ) button. b. Select Tools, select Network Setup, and then select Restore Network Defaults. 9 Change the connection method Mac OS 1. Open the embedded Web server (EWS). b. Press Add a Device. 3. Select Tools, select Wireless Menu, and then select Reset Wireless. On the HP device's control...
Wireless Getting Started Guide
Page 13
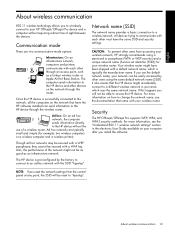
... mode options: Infrastructure: On an infrastructure network, computers and printers communicate with a default network name, which uses the same network name. CAUTION: To prevent other users from the control panel at any point, the SSID will not be reset to "hpsetup". If you use of a wireless router. English About wireless communication 802.11 wireless technology allows you to wirelessly connect to your HP Officejet/Officejet Pro device and a computer without the use the default network...
... mode options: Infrastructure: On an infrastructure network, computers and printers communicate with a default network name, which uses the same network name. CAUTION: To prevent other users from the control panel at any point, the SSID will not be reset to "hpsetup". If you use of a wireless router. English About wireless communication 802.11 wireless technology allows you to wirelessly connect to your HP Officejet/Officejet Pro device and a computer without the use the default network...
Fax Getting Started Guide
Page 4
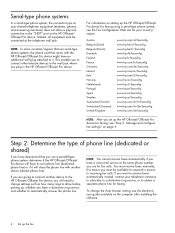
... the HP Officejet/Officejet Pro device for faxing using a serial-type phone system, see the Fax Configuration Web site for fax calls. If you are going to connect another device (shared phone line). To change settings such as how many rings to allow a physical connection to obtain a separate phone line for faxing, see "Step 3: Manage and configure fax settings" on page 5. This enables you have a voice mail service at the same phone number you set up the HP Officejet/Officejet Pro device for faxing. NOTE: You cannot receive faxes...
... the HP Officejet/Officejet Pro device for faxing using a serial-type phone system, see the Fax Configuration Web site for fax calls. If you are going to connect another device (shared phone line). To change settings such as how many rings to allow a physical connection to obtain a separate phone line for faxing, see "Step 3: Manage and configure fax settings" on page 5. This enables you have a voice mail service at the same phone number you set up the HP Officejet/Officejet Pro device for faxing. NOTE: You cannot receive faxes...
Fax Getting Started Guide
Page 5
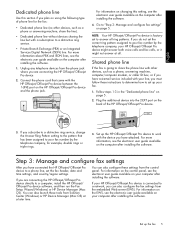
... embedded Web server (EWS). If your computer after installing the software. For more information, see the electronic user guide available on your HP Officejet/Officejet Pro device is connected to work with the HP Officejet/Officejet Pro device between the 1-LINE port on the HP Officejet/Officejet Pro device and the phone jack. Go to a computer, install the HP Officejet/ Officejet Pro device software, and then run the Fax Setup Wizard (Windows) or HP Device Manager (Mac OS). Follow steps 1-3 in the "Dedicated phone line" on page 5. 2. If...
... embedded Web server (EWS). If your computer after installing the software. For more information, see the electronic user guide available on your HP Officejet/Officejet Pro device is connected to work with the HP Officejet/Officejet Pro device between the 1-LINE port on the HP Officejet/Officejet Pro device and the phone jack. Go to a computer, install the HP Officejet/ Officejet Pro device software, and then run the Fax Setup Wizard (Windows) or HP Device Manager (Mac OS). Follow steps 1-3 in the "Dedicated phone line" on page 5. 2. If...
Fax Getting Started Guide
Page 6
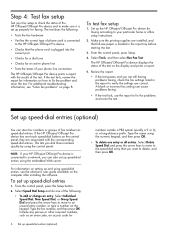
...; Tests the status of your phone line connection The HP Officejet/Officejet Pro device prints a report with the corresponding speed-dial entries. Step 4: Test fax setup Test your fax setup to check the status of the HP Officejet/Officejet Pro device and to your particular home or office setup instructions. 2. The test does the following : • To add or change an entry: Select Individual Speed Dial, New Speed Dial, or Group Speed Dial and press the arrow keys to move to the speed-dial entry that full-size paper is set up speed-dial entries (optional) numbers...
...; Tests the status of your phone line connection The HP Officejet/Officejet Pro device prints a report with the corresponding speed-dial entries. Step 4: Test fax setup Test your fax setup to check the status of the HP Officejet/Officejet Pro device and to your particular home or office setup instructions. 2. The test does the following : • To add or change an entry: Select Individual Speed Dial, New Speed Dial, or Group Speed Dial and press the arrow keys to move to the speed-dial entry that full-size paper is set up speed-dial entries (optional) numbers...
Fax Getting Started Guide
Page 8
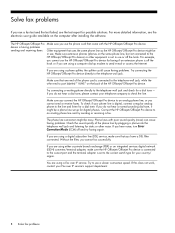
... using a digital subscriber line (DSL) service, make sure the HP Officejet/Officejet Pro device is connected to the correct port and the terminal adapter is off the hook or if you hear noise, turn Error Correction Mode (ECM) off the hook. Other equipment that you are using a Fax over IP service's support department. 8 Solve fax problems If this does not work, contact your phone line is having problems sending and receiving faxes Make sure you use a slower connection speed. Solve fax problems...
... using a digital subscriber line (DSL) service, make sure the HP Officejet/Officejet Pro device is connected to the correct port and the terminal adapter is off the hook or if you hear noise, turn Error Correction Mode (ECM) off the hook. Other equipment that you are using a Fax over IP service's support department. 8 Solve fax problems If this does not work, contact your phone line is having problems sending and receiving faxes Make sure you use a slower connection speed. Solve fax problems...
User Guide
Page 3
... users who are wet. 6. Mobility For users with disabilities. Reproduction, adaptation, or translation of this product to change without prior written permission of features that comes with the device. 2. Acknowledgements Windows and Windows XP are no one can be damaged. 8. If you are color blind, colored buttons and tabs used in the documentation that make it accessible for users with a qualified electrician. 3. There are U.S. The software also supports Windows accessibility options...
... users who are wet. 6. Mobility For users with disabilities. Reproduction, adaptation, or translation of this product to change without prior written permission of features that comes with the device. 2. Acknowledgements Windows and Windows XP are no one can be damaged. 8. If you are color blind, colored buttons and tabs used in the documentation that make it accessible for users with a qualified electrician. 3. There are U.S. The software also supports Windows accessibility options...
User Guide
Page 9
... device control panel with wireless setup wizard ...114 To set up wireless communication using the installer (Windows 114 To set up the device on a wireless network (Mac OS 115 To turn off wireless communication 115 Guidelines for reducing interference on a wireless network 116 Guidelines for ensuring wireless network security 116 To add hardware addresses to a WAP 116 Other guidelines ...116 Uninstall and reinstall the software 117 9 Maintain and troubleshoot Work with print cartridges ...120 Supported print cartridges 120 Handle the print cartridges 121 Replace...
... device control panel with wireless setup wizard ...114 To set up wireless communication using the installer (Windows 114 To set up the device on a wireless network (Mac OS 115 To turn off wireless communication 115 Guidelines for reducing interference on a wireless network 116 Guidelines for ensuring wireless network security 116 To add hardware addresses to a WAP 116 Other guidelines ...116 Uninstall and reinstall the software 117 9 Maintain and troubleshoot Work with print cartridges ...120 Supported print cartridges 120 Handle the print cartridges 121 Replace...
User Guide
Page 20
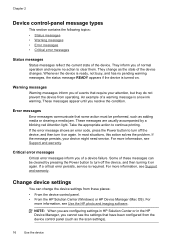
... Power button to clear them. An example of the device changes. Take the appropriate action to turn off the device, and then turn off the device, and then turning it on . Critical error messages Critical error messages inform you resolve the condition. They change the device settings from the device control panel (such as the scan settings). 16 Use the device Some of these places: • From the device control panel. • From the HP Solution Center (Windows) or HP Device Manager (Mac...
... Power button to clear them. An example of the device changes. Take the appropriate action to turn off the device, and then turn off the device, and then turning it on . Critical error messages Critical error messages inform you resolve the condition. They change the device settings from the device control panel (such as the scan settings). 16 Use the device Some of these places: • From the device control panel. • From the HP Solution Center (Windows) or HP Device Manager (Mac...

User Guide
Page 37
... online help for the driver. 3 Print This section contains the following topics: • Change settings from an application for current jobs (Windows) • Change default settings for all print jobs, make the changes in the driver. Print 33 However, after the application is closed, the settings return to Settings, and then click Printers or Printers and Faxes. - On the File menu, click Print, and then click Setup, Properties, or Preferences. (Specific options may vary depending on both sides (duplexing) • Cancel a print job Change print settings...
... online help for the driver. 3 Print This section contains the following topics: • Change settings from an application for current jobs (Windows) • Change default settings for all print jobs, make the changes in the driver. Print 33 However, after the application is closed, the settings return to Settings, and then click Printers or Printers and Faxes. - On the File menu, click Print, and then click Setup, Properties, or Preferences. (Specific options may vary depending on both sides (duplexing) • Cancel a print job Change print settings...

User Guide
Page 72
... faxing services support department. 68 Fax NOTE: You can do not work properly when the device is called Fax over Internet Protocol (FoIP) • An integrated services digital network (ISDN) service If you experience problems sending and receiving faxes, you to the port labeled "1-LINE" on changing this by changing the Fax Speed setting from the device control panel 1. Some Internet faxing services do this setting, see Set the fax speed. Fax over the Internet You may subscribe to a low cost phone service that connects...
... faxing services support department. 68 Fax NOTE: You can do not work properly when the device is called Fax over Internet Protocol (FoIP) • An integrated services digital network (ISDN) service If you experience problems sending and receiving faxes, you to the port labeled "1-LINE" on changing this by changing the Fax Speed setting from the device control panel 1. Some Internet faxing services do this setting, see Set the fax speed. Fax over the Internet You may subscribe to a low cost phone service that connects...
User Guide
Page 86
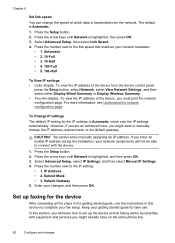
... getting started guide, use . Press the number next to connect with the device. 1. Default Gateway 5. Keep your changes, and then press OK. Select Advanced Setup, then select Link Speed. 4. Automatic • 2. 10-Full • 3. 10-Half • 4. 100-Full • 5. 100-Half To View IP settings • Color display: To view the IP address of the device from the device control panel, press the Setup button, select Network, select View Network Settings, and...
... getting started guide, use . Press the number next to connect with the device. 1. Default Gateway 5. Keep your changes, and then press OK. Select Advanced Setup, then select Link Speed. 4. Automatic • 2. 10-Full • 3. 10-Half • 4. 100-Full • 5. 100-Half To View IP settings • Color display: To view the IP address of the device from the device control panel, press the Setup button, select Network, select View Network Settings, and...

User Guide
Page 114
... to use the device with a single Macintosh computer using a USB cable, or you can locate the Installer folder on a network. Do one of the following: Type in the root directory of the CD. Click Next and follow the onscreen instructions. 4. Connect the device to Settings, and then click Printers or Printers and Faxes. - Click Start, point to your computer with the other users on the Starter CD. 3. Click Next. 5. Double-click...
... to use the device with a single Macintosh computer using a USB cable, or you can locate the Installer folder on a network. Do one of the following: Type in the root directory of the CD. Click Next and follow the onscreen instructions. 4. Connect the device to Settings, and then click Printers or Printers and Faxes. - Click Start, point to your computer with the other users on the Starter CD. 3. Click Next. 5. Double-click...
User Guide
Page 139
... paper-feed problems • Solve copy problems • Solve scan problems • Solve fax problems • Solve network problems • Solve wireless problems • Solve photo (memory card) problems • Troubleshoot installation issues Solve printing problems This section contains the following topics: • The device shuts down unexpectedly • Error message appears on control-panel display • The device is not responding (nothing prints) • Device takes a long time to a functioning alternating current (AC) power outlet. • Power cord and other cables...
... paper-feed problems • Solve copy problems • Solve scan problems • Solve fax problems • Solve network problems • Solve wireless problems • Solve photo (memory card) problems • Troubleshoot installation issues Solve printing problems This section contains the following topics: • The device shuts down unexpectedly • Error message appears on control-panel display • The device is not responding (nothing prints) • Device takes a long time to a functioning alternating current (AC) power outlet. • Power cord and other cables...
User Guide
Page 142
..., see Load media. Check the device location and length of the electromagnetic fields. Also, it is recommended that you use a USB cable that you are using. • Make sure the media size selected in the printer driver match the size of the application to printouts. The device prints half a page, then ejects the paper Check the print cartridges Make sure the correct print cartridges are installed and the print cartridges are cut off if the document size is...
..., see Load media. Check the device location and length of the electromagnetic fields. Also, it is recommended that you use a USB cable that you are using. • Make sure the media size selected in the printer driver match the size of the application to printouts. The device prints half a page, then ejects the paper Check the print cartridges Make sure the correct print cartridges are installed and the print cartridges are cut off if the document size is...
User Guide
Page 210
... setup test 152 header, fax 65 help 173 see also customer support Help button 12 Hewlett-Packard Company notices 3 HP Photosmart Software send scans to programs 43 HP Photosmart Studio send scans to programs 43 HP Printer Utility (Mac OS) administrator settings 74 opening 76 panels 77 HP Solution Center 17 humidity specifications 188 I index sheets print 48 ink smearing, troubleshoot 140 installation Add Printer, Windows 110 duplexer 32 software for Mac OS 110 software for Windows 106 troubleshoot 167 Windows network software 108 Internet fax, using 68 IP settings 82 ISDN line, set up with fax...
... setup test 152 header, fax 65 help 173 see also customer support Help button 12 Hewlett-Packard Company notices 3 HP Photosmart Software send scans to programs 43 HP Photosmart Studio send scans to programs 43 HP Printer Utility (Mac OS) administrator settings 74 opening 76 panels 77 HP Solution Center 17 humidity specifications 188 I index sheets print 48 ink smearing, troubleshoot 140 installation Add Printer, Windows 110 duplexer 32 software for Mac OS 110 software for Windows 106 troubleshoot 167 Windows network software 108 Internet fax, using 68 IP settings 82 ISDN line, set up with fax...
User Guide
Page 211
... 118 wireless communication setup 115 maintenance align print cartridges 124 clean print cartridges 125 replace print cartridges 121 manual faxing receive 57 send 50, 51 margins setting, specifications 25 media ADF capacity 19 borderless printing 28 clear jams 169 duplexing 34 HP, order 172 load tray 26 print on custom-sized 27 selecting 20 skewed pages 144 specifications 21 supported sizes 22 troubleshoot feeding 143 types and weights supported 24 memory deleting faxes 59 reprint faxes 59 save faxes 58 specifications 185 memory cards index sheets 48 insert 46 print DPOF files 47 save photos...
... 118 wireless communication setup 115 maintenance align print cartridges 124 clean print cartridges 125 replace print cartridges 121 manual faxing receive 57 send 50, 51 margins setting, specifications 25 media ADF capacity 19 borderless printing 28 clear jams 169 duplexing 34 HP, order 172 load tray 26 print on custom-sized 27 selecting 20 skewed pages 144 specifications 21 supported sizes 22 troubleshoot feeding 143 types and weights supported 24 memory deleting faxes 59 reprint faxes 59 save faxes 58 specifications 185 memory cards index sheets 48 insert 46 print DPOF files 47 save photos...

User Guide
Page 212
... phone, fax from receive 57 send, 50 photo media guidelines 21 sizes supported 23 Photo Menu button 13 photo paper copy 37 photos borderless printing 28 edit scans 44 enhance copies 41 fax 54 index sheets 48 insert memory cards 46 print from DPOF files 47 save to computer 48 troubleshoot memory cards 167 view 47 Photosmart Software send scans to programs 43 Photosmart Studio send scans to programs 43 poll to receive fax 59 ports, specifications 184 power specifications 188 troubleshoot 135 power input, locating 11 power on button 13 print cancel 35 double-sided 34 fax logs 71 fax reports...
... phone, fax from receive 57 send, 50 photo media guidelines 21 sizes supported 23 Photo Menu button 13 photo paper copy 37 photos borderless printing 28 edit scans 44 enhance copies 41 fax 54 index sheets 48 insert memory cards 46 print from DPOF files 47 save to computer 48 troubleshoot memory cards 167 view 47 Photosmart Software send scans to programs 43 Photosmart Studio send scans to programs 43 poll to receive fax 59 ports, specifications 184 power specifications 188 troubleshoot 135 power input, locating 11 power on button 13 print cancel 35 double-sided 34 fax logs 71 fax reports...
User Guide
Page 213
... model number 199 release notes 9 remove print cartridges 180 replace print cartridges 121 reports confirmation, fax 70 error, fax 70 fax test failed 151 reprint faxes from memory 59 resolution fax 13 Resolution button 13 resolution, fax 55 Right arrow 12 rings to answer 66 S save default settings 16 faxes in memory 58 photos to a program 43 troubleshoot 147 serial number 78 serial phone systems countries/regions with 83 setup types 84 Services tab, Toolbox (Windows) 75 settings administrator 73 control panel 16 copy 36 driver 33 fax 54 network 80 scan 45 speed, fax 67 setup answering machine...
... model number 199 release notes 9 remove print cartridges 180 replace print cartridges 121 reports confirmation, fax 70 error, fax 70 fax test failed 151 reprint faxes from memory 59 resolution fax 13 Resolution button 13 resolution, fax 55 Right arrow 12 rings to answer 66 S save default settings 16 faxes in memory 58 photos to a program 43 troubleshoot 147 serial number 78 serial phone systems countries/regions with 83 setup types 84 Services tab, Toolbox (Windows) 75 settings administrator 73 control panel 16 copy 36 driver 33 fax 54 network 80 scan 45 speed, fax 67 setup answering machine...


