HP C8180 Support Question
HP C8180 Support Question
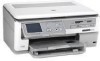
Find answers below for this question about HP C8180 - Photosmart All-in-One Color Inkjet.Need a HP C8180 manual? We have 3 online manuals for this item!
Question posted by yrmhaddad96 on February 4th, 2023
Photosmart C8180 Scanner And Display
How to replace scanner and display data connection repones for photosmart c8180
Current Answers
Answer #1: Posted by SonuKumar on February 4th, 2023 8:34 AM
SonuKumar

Member since:
May 9th, 2021 Points: 16,621,300

Member since:
May 9th, 2021 Points: 16,621,300
To replace the scanner for an HP Photosmart C8180 printer, you may need to follow these steps:
- Turn off the printer and unplug it from the power source.
- Open the printer's lid and locate the scanner glass.
- Remove any documents or other materials from the scanner glass.
- Locate the two screws that secure the scanner assembly to the printer.
- Remove the screws and gently lift the scanner assembly out of the printer.
- Disconnect the ribbon cable and power cable from the back of the scanner assembly.
- Replace the old scanner with a new one, connecting the ribbon and power cables to the new assembly.
- Replace the screws to secure the new scanner assembly in place.
- Close the lid and plug the printer back in.
- Turn on the printer and test the scanner.
To display data connection responses for the HP Photosmart C8180 printer, you can use the control panel or a software tool like HP Print and Scan Doctor. You may also check the printer's network settings to ensure that it is connected to the correct network and that the connection is working properly.
Please respond to my effort to provide you with the best possible solution by using the "Acceptable Solution" and/or the "Helpful" buttons when the answer has proven to be helpful.
Regards,
Sonu
Your search handyman for all e-support needs!!
Answer #2: Posted by OwlHero on February 4th, 2023 8:58 AM
OwlHero

Member since:
January 26th, 2023 Points: 1,200
Member since:
January 26th, 2023 Points: 1,200
To replace the scanner and display data connection cables for a HP Photosmart C8180, you can follow these steps:
- Turn off the printer and unplug it from the power source.
- Locate the scanner assembly on the top of the printer.
- Carefully lift the scanner assembly to access the connections underneath.
- Disconnect the cables connecting the scanner assembly to the printer's mainboard.
- Replace the cables with new ones, making sure to properly connect them to both the scanner assembly and the mainboard.
- Lower the scanner assembly back into place and secure it with any screws or clips that were removed.
- Plug the printer back in and turn it on to test the connections.
It is recommended to consult the printer's manual or contact HP support for more detailed instructions and to ensure that the replacement is done properly.
Related HP C8180 Manual Pages
Windows Help - Page 2
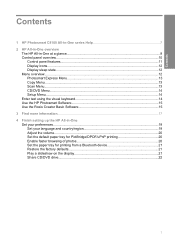
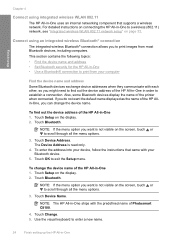
...HP All-in-One at a glance...9 Control panel overview...10
Control panel features...11 Display icons...12 Display sleep state...12 Menu overview...12 Photosmart Express Menu 13 Copy Menu...13 Scan Menu...13 CD/DVD Menu...14 Setup Menu...photos 20 Set the paper tray for printing from a Bluetooth device 21 Restore the factory defaults 21 Play a slideshow on the display 21 Share CD/DVD drive...22
1
Windows Help - Page 4
...78 Change the page orientation 78 Scale the document size...79 Change the saturation, brightness, or color tone 79 Adjust the ink volume and dry time 79 Reduce the amount of overspray 80 ... photos...96 Print your photos...98 Create special projects from your photos 99 Share photos using HP Photosmart Software 101 Save photos to your computer 103 Preserve your photos on a CD or DVD 104 ...
Windows Help - Page 7
...
Environmental product stewardship program 221 Paper use...221 Plastics...221 Material safety data sheets 221 Recycling program...221 HP inkjet supplies recycling program 221 Energy consumption...222 Special handling of materials 222 ... users in Taiwan 227
Declaration of conformity (European Economic Area 228 HP Photosmart C8100 All-in-One series declaration of conformity 228 Index...229
6
Windows Help - Page 13

... color ... not appear on when you touch the display, press a control panel button, insert a memory card or connect a storage device, insert a CD/DVD, lift the ...connection.
Shows that appear on the HP All-in-One display. • Photosmart Express Menu • Copy Menu • Scan Menu
12
HP All-in -One from a connected computer. Indicates the presence of inactivity. Chapter 2
Display...
Windows Help - Page 25
...devices display the name of Photosmart C8100.
4.
Touch Bluetooth. To enter the address into your device, follow the instructions that supports a wireless network. Touch OK to enter a new name.
24
Finish setting up the HP All-in-One Touch Setup on the display... a connection. To change the device name. Touch Change. 5. NOTE: If the menu option you want the default name displayed as ...
Windows Help - Page 71
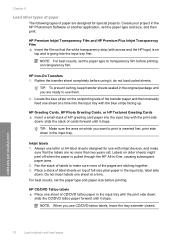
... nonprinting side of full-size plain paper in the input tray with the print side
down in the HP Photosmart Software or another application, set the paper type and size, and then print. Do not insert labels one... a small stack of HP greeting card paper into the input tray with inkjet devices, and make sure none of paper are designed for special projects. Labels on transparency film.
Windows Help - Page 85
...not compatible, the HP All-in-One software displays an alert and allows you want to print the photo in black and white, click the Color tab and select the
Print in grayscale check ...return to select a different type or size. 8.
Print custom CD/DVD labels
You can use the HP Photosmart Software or online templates from the following options: • Off: applies no HP Real Life technologies to...
Windows Help - Page 86
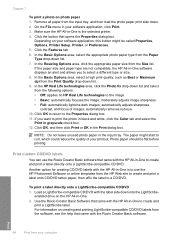
...85 To get the most benefit from the list. 8. Click the Features tab. 6.
Use the HP Photosmart Software, or go to www.hp.com to the other print settings that images do not show through to... sure the HP All-in -One will print. When you select the Maximum dpi setting, the printer software displays the optimized dots per inch (dpi) that the HP All-in -One is the selected printer. 4. In...
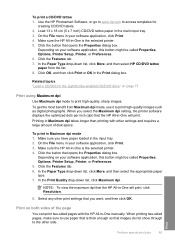
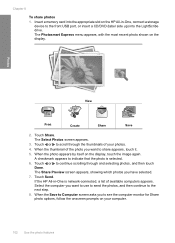
Windows Help - Page 98
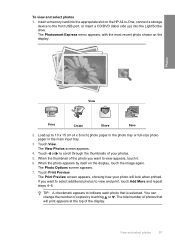
...Photosmart Express menu appears, with the most recent photo shown on the display, touch the image again. When the photo appears by touching or .
Load up to 10 x 15 cm (4 x 6 inch) photo paper in the photo tray or full-size photo paper in -One, connect a storage device... 6. When the thumbnail of copies by itself on the display. Touch or to indicate each photo that will look when...
Windows Help - Page 99
...
A print status screen displays the number of your photos 1.
The Photosmart Express menu appears, with the most recent photo shown on the HP All-in-One, connect a storage
device to the front USB port...print your print settings, touch Settings.
9. Load up ) into the appropriate slot on the display. Photos
Chapter 8
8. (Optional) If you can print the photos on your photos
You ...
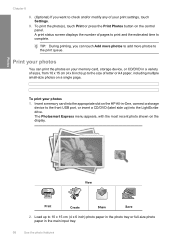
Windows Help - Page 101
...most recent photo shown on the HP All-in-One, connect a storage
device to create a single wide view (or panorama) photo... but is not required for creating and printing text labels. The Photosmart Express menu appears, with the correct paper for the type of ... CD/DVD (label side up) into the appropriate slot on the display. The Create screen appears.
4. Touch or to scroll through the ...
Windows Help - Page 102
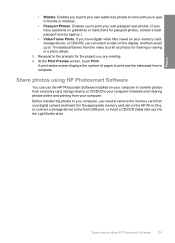
... saved on your memory card, storage device, or CD/DVD, you can use the HP Photosmart Software installed on the HP All-in-One, or connect a storage device to the front USB port, or insert...storage device, or CD/DVD to complete.
Share photos using HP Photosmart Software 101 Before transferring photos to your computer. At the Print Preview screen, touch Print. A print status screen displays the ...
Windows Help - Page 103
... have selected. 7. The Photosmart Express menu appears, with the most recent photo shown on the display, touch the image again. Touch or to the front USB port, or insert a CD/DVD (label side up) into the appropriate slot on your photos. 4. If the HP All-in -One, connect a storage
device to continue scrolling through...
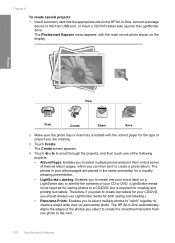
Windows Help - Page 107
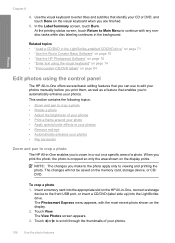
... to viewing and printing the photo. The Photosmart Express menu appears, with any nondisc tasks while... a frame around your photo • Apply special color effects to your photos • Remove red-eye ... on the HP All-in or out on the display prints.
In the Label Summary screen, touch Burn....connect a storage
device to continue with the most recent photo shown on the memory card, ...
Windows Help - Page 110
... screen, then touch
Print. The Photosmart Express menu appears, with the most recent photo shown on the HP All-in-One, connect a storage
device to scroll through the thumbnails of ...device, or CD/ DVD. Touch Edit. Touch or to the front USB port, or insert a CD/DVD (label side up) into the appropriate slot on the display. 2. Print a frame around your photo
You can print a decorative colored...
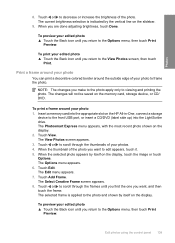
Windows Help - Page 111
... and printing the photo.
The Photosmart Express menu appears, with the most recent photo shown on the memory card, storage device, or CD/ DVD. Touch ...colors to the View Photos screen, then touch Print. Touch Edit. The Edit menu appears. 7. NOTE: If the menu option you want is not visible on the display, touch the image or touch Options. Prints the photo in -One, connect a storage
device...
Windows Help - Page 112
... the display. 2. The Photosmart Express menu appears, with the most recent photo shown on the memory card, storage device, or... the appropriate slot on the display.
Automatically enhance your photos
The HP All-in -One, connect a storage
device to the front USB port,...on a camera (especially on the display.
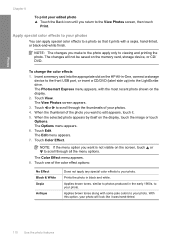
To preview your photos. Photos
The selected color effect is applied to the photo...
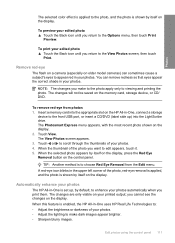
Windows Help - Page 140
...clean the print head from the HP Photosmart Software 1. The Printer Toolbox appears. 3.
Click the Device Services tab. 4. Click Clean the... ink and shortens the life of the ink nozzles on the display. 3.
Load letter, A4, or legal unused plain white paper...the quality of color. In the Print Properties dialog box, click the Services tab, and then click Service this device. In the...
Getting Started Guide - Page 1
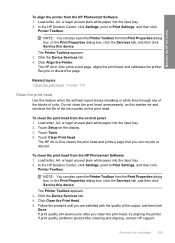
... l'avant et de l'arrière
b. Soulevez l'écran graphique couleur et retirez
of the device.
FR Utilisateurs d'un réseau sans fil (802.11) ou câblé ...connect the USB cable until Section A. Remove all tape, and protective film from the front and back of the display to your network.
Le contenu du carton peut varier.
*Peut être inclus
HP Photosmart...
Getting Started Guide - Page 15
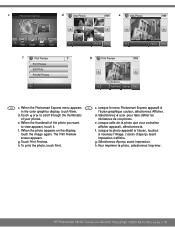
..., touchez
touch the image again. The Print Preview
à nouveau l'image. g.
c
Photosmart Express
d
View Photos
1/999
e
View Photos
1/999
View
Print Create Share Save
f
Print...Pour imprimer la photo, sélectionnez Imprimer.
HP Photosmart C8100 Tout-en-un série/HP Photosmart C8100 All-in the color graphics display, touch View.
h. L'écran d'aperçu...
Similar Questions

How To Remove Paper Jam From Hp Photosmart C8180
(Posted by mamit 9 years ago)

My Scanner Won't Connect To My Computer Photosmart 5510d Series
(Posted by Lindwazzer 9 years ago)

How To Remove Hp Photosmart C8180 Printhead
(Posted by fatme 10 years ago)

How To Reset Photosmart C8180
(Posted by jerrysa 10 years ago)

Hp L7590 - Officejet Pro All-in-one Color Inkjet.
how do i chance the header on my printer?
how do i chance the header on my printer?
(Posted by annette98254 11 years ago)