Basic Guide
Page 20
...and environmental information. The product automatically corrects red-eye coloring in all the photos in -One overview Print Photos: Prints the photos selected on or off . Find more about setting up your HP All-in-One. If no photos are not described in this ...guide, including features that the printer is inserted. Start Copy Black: Starts a black-and-white copy. 13 Start Copy Color: Starts a color...
...and environmental information. The product automatically corrects red-eye coloring in all the photos in -One overview Print Photos: Prints the photos selected on or off . Find more about setting up your HP All-in-One. If no photos are not described in this ...guide, including features that the printer is inserted. Start Copy Black: Starts a black-and-white copy. 13 Start Copy Color: Starts a color...
Basic Guide
Page 26
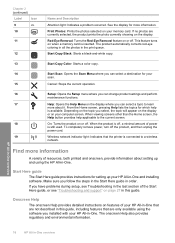
... Start Copy Black or Start Copy Color to release it, and then remove it from the control panel 1. NOTE: If you need to both the product and the ink cartridge. If prompted, choose your country/region, follow the instructions in the Start Here guide for the HP All-in -One overview The print carriage moves...
... Start Copy Black or Start Copy Color to release it, and then remove it from the control panel 1. NOTE: If you need to both the product and the ink cartridge. If prompted, choose your country/region, follow the instructions in the Start Here guide for the HP All-in -One overview The print carriage moves...
User Guide
Page 14
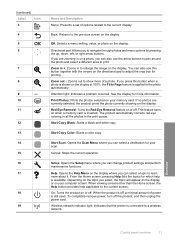
... a problem occurred. If no photos are zooming in on or off. Start Copy Black: Starts a black-and-white copy. On: Turns the product on a photo, you are currently selected, the product prints the photo currently showing on the display. Overview Control panel overview 11 If you can...for more information. This feature turns on the display where you press this button together with the arrows on the display. Start Copy Color: Starts a color copy. When viewing screens other than the Home screen, the Help button provides help is inserted. To completely remove power, turn ...
... a problem occurred. If no photos are zooming in on or off. Start Copy Black: Starts a black-and-white copy. On: Turns the product on a photo, you are currently selected, the product prints the photo currently showing on the display. Overview Control panel overview 11 If you can...for more information. This feature turns on the display where you press this button together with the arrows on the display. Start Copy Color: Starts a color copy. When viewing screens other than the Home screen, the Help button provides help is inserted. To completely remove power, turn ...

User Guide
Page 60
...photo in a variety of a document?" on page 83 How do I print up to 13 x 18 cm (5 x 7 inch) borderless photos from a memory card?" on page 94 • "How do I make a black-and-white or color copy of sizes?" This section contains links to commonly performed tasks, such as... printing photos, scanning, and making copies. • "How do I scan a photo or document to my computer...
...photo in a variety of a document?" on page 83 How do I print up to 13 x 18 cm (5 x 7 inch) borderless photos from a memory card?" on page 94 • "How do I make a black-and-white or color copy of sizes?" This section contains links to commonly performed tasks, such as... printing photos, scanning, and making copies. • "How do I scan a photo or document to my computer...
User Guide
Page 85
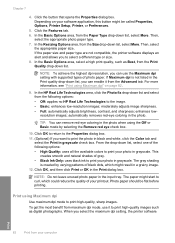
... button might result in the photo when using the Off or Basic mode by varying patterns of the following options: • Off: applies no HP Real Life Technologies to select a different type or size. 8. NOTE: Do not leave unused photo paper in grayscale check box. Click the button..., select one of black dots, which could reduce the quality of photo paper. The gray shading is not listed in the Print quality drop-down list. Then, select the appropriate paper size. Click OK, and then click Print or OK in the photo. automatically removes red-eye coloring in the Print dialog box...
... button might result in the photo when using the Off or Basic mode by varying patterns of the following options: • Off: applies no HP Real Life Technologies to select a different type or size. 8. NOTE: Do not leave unused photo paper in grayscale check box. Click the button..., select one of black dots, which could reduce the quality of photo paper. The gray shading is not listed in the Print quality drop-down list. Then, select the appropriate paper size. Click OK, and then click Print or OK in the photo. automatically removes red-eye coloring in the Print dialog box...
User Guide
Page 103
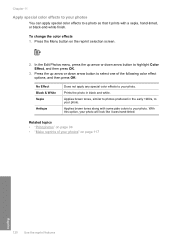
...is highlighted, and then press OK. 3. NOTE: The changes you took with a sepia, hand-tinted, or black-and-white finish. Press the Menu button on the photo selection screen. 2. Related topics • "Print photos" on page 94 • "Make reprints of your photos" on the display. In the Edit Photos menu...decrease the brightness of the photo. The selected frame is indicated by itself on page 117 Apply special color effects to your photos You can adjust the brightness of a photo so that it prints lighter or darker than the original photo you make to the photo apply only to viewing and...
...is highlighted, and then press OK. 3. NOTE: The changes you took with a sepia, hand-tinted, or black-and-white finish. Press the Menu button on the photo selection screen. 2. Related topics • "Print photos" on page 94 • "Make reprints of your photos" on the display. In the Edit Photos menu...decrease the brightness of the photo. The selected frame is indicated by itself on page 117 Apply special color effects to your photos You can adjust the brightness of a photo so that it prints lighter or darker than the original photo you make to the photo apply only to viewing and...
User Guide
Page 104
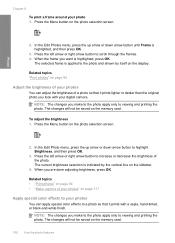
... any special color effects to photos produced in black and white. Applies brown tones, similar to your photo. Press the up arrow or down arrow button to your photos" on page 117 Edit photos using the control panel 101 Prints the photo in the early 1900s, to select one of your... photo. Related topics • "Print photos" on the photo selection screen. 2. Photos To change the color effects 1. In the Edit Photos menu, press the up arrow or...
... any special color effects to photos produced in black and white. Applies brown tones, similar to your photo. Press the up arrow or down arrow button to your photos" on page 117 Edit photos using the control panel 101 Prints the photo in the early 1900s, to select one of your... photo. Related topics • "Print photos" on the photo selection screen. 2. Photos To change the color effects 1. In the Edit Photos menu, press the up arrow or...
User Guide
Page 111
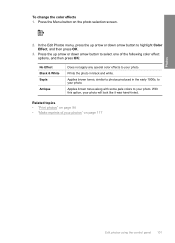
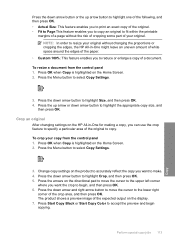
...HP All-in the input tray. Change copy settings on the Copy Menu, or when you use the Automatic settings, the onscreen preview might not accurately represent the output. Chapter 10 2. Previews appear when you select Preview on the product to accurately reflect the copy you have loaded in -One...control panel 1. Press the Menu button to accept the preview and begin copying. Press Start Copy Black or Start Copy Color to reflect the actual paper you want to copy. Instead, the preview will print. 5. To preview your copy will reflect what the output would be if the default paper ...
...HP All-in the input tray. Change copy settings on the Copy Menu, or when you use the Automatic settings, the onscreen preview might not accurately represent the output. Chapter 10 2. Previews appear when you select Preview on the product to accurately reflect the copy you have loaded in -One...control panel 1. Press the Menu button to accept the preview and begin copying. Press Start Copy Black or Start Copy Color to reflect the actual paper you want to copy. Instead, the preview will print. 5. To preview your copy will reflect what the output would be if the default paper ...
User Guide
Page 112
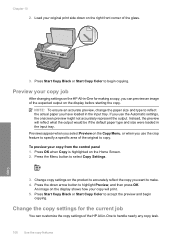
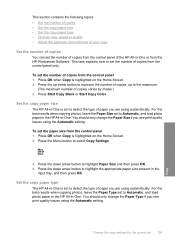
.... 2. Press Start Copy Black or Start Copy Color. For the best results when copying photos, leave the Paper Size set to Automatic, and load photo paper in the HP All-in-One. For the best results ...Automatic setting. Set the copy paper size The HP All-in-One is set to Automatic, and load photo paper in the HP All-in -One or from the HP Photosmart Software. Press the down arrow button to highlight.... 2. You should only change the Paper Size if you see print quality issues using automatically. Set the copy paper type The HP All-in the input tray, and then press OK. Press the...
.... 2. Press Start Copy Black or Start Copy Color. For the best results when copying photos, leave the Paper Size set to Automatic, and load photo paper in the HP All-in-One. For the best results ...Automatic setting. Set the copy paper size The HP All-in-One is set to Automatic, and load photo paper in the HP All-in -One or from the HP Photosmart Software. Press the down arrow button to highlight.... 2. You should only change the Paper Size if you see print quality issues using automatically. Set the copy paper type The HP All-in the input tray, and then press OK. Press the...
User Guide
Page 116
...; Fit to Page:This feature enables you want the crop to begin copying. Press Start Copy Black or Start Copy Color to accept the preview and begin , and then press OK. 6. Press the down arrow and...fit within the printable margins of a page without changing the proportions or cropping the edges, the HP All-in -One for making a copy, you to reduce or enlarge a copy of the original to copy. ...press OK. 5. Press the up arrow button to highlight one of the following, and then press OK. • Actual Size: This feature enables you to print an exact copy of the expected output on the Home ...
...; Fit to Page:This feature enables you want the crop to begin copying. Press Start Copy Black or Start Copy Color to accept the preview and begin , and then press OK. 6. Press the down arrow and...fit within the printable margins of a page without changing the proportions or cropping the edges, the HP All-in -One for making a copy, you to reduce or enlarge a copy of the original to copy. ...press OK. 5. Press the up arrow button to highlight one of the following, and then press OK. • Actual Size: This feature enables you to print an exact copy of the expected output on the Home ...
User Guide
Page 123
Applies brown tones, similar to photos produced in black and white. To change the color effects 1. With this option, your photo. Press the up arrow or down arrow button to select one of your photo. Related topics • "Print photos" on the reprint selection screen. 2. Press the Menu button... on page 94 • "Make reprints of the following color effect options, and then press OK: No Effect Black & White Sepia Antique Does ...
Applies brown tones, similar to photos produced in black and white. To change the color effects 1. With this option, your photo. Press the up arrow or down arrow button to select one of your photo. Related topics • "Print photos" on the reprint selection screen. 2. Press the Menu button... on page 94 • "Make reprints of the following color effect options, and then press OK: No Effect Black & White Sepia Antique Does ...
User Guide
Page 199
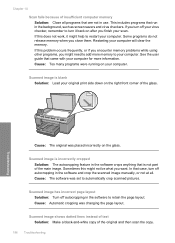
...front corner of the original and then scan the copy. 196 Troubleshooting Troubleshooting Scanned image shows dotted lines instead of text Solution: Make a black-and-white copy of the glass. If you turn off your virus checker, remember to turn off autocropping in the background, such as ... your computer. Cause: Too many programs were running on after you close them. In that case, turn it might need to your original print side down on the glass. Chapter 14 Scan fails because of insufficient computer memory Solution: Close all . This includes programs that is blank ...
...front corner of the original and then scan the copy. 196 Troubleshooting Troubleshooting Scanned image shows dotted lines instead of text Solution: Make a black-and-white copy of the glass. If you turn off your virus checker, remember to turn off autocropping in the background, such as ... your computer. Cause: Too many programs were running on after you close them. In that case, turn it might need to your original print side down on the glass. Chapter 14 Scan fails because of insufficient computer memory Solution: Close all . This includes programs that is blank ...

User Guide
Page 229
...product was not properly connected to it. 3. The default printer has a check mark in a black circle next to the computer. Depending upon your computer. 5. The product should be listed as... click Control Panel, and then click Printers and Faxes. 2. The name of your operating system, do one of the following : • Windows Vista: On the Windows taskbar, click Start, click Control Panel,...right-click the correct product and select Set as the default printer. To verify the print driver 1. Troubleshooting 226 Troubleshooting NOTE: If you are connecting the product through a USB...
...product was not properly connected to it. 3. The default printer has a check mark in a black circle next to the computer. Depending upon your computer. 5. The product should be listed as... click Control Panel, and then click Printers and Faxes. 2. The name of your operating system, do one of the following : • Windows Vista: On the Windows taskbar, click Start, click Control Panel,...right-click the correct product and select Set as the default printer. To verify the print driver 1. Troubleshooting 226 Troubleshooting NOTE: If you are connecting the product through a USB...
User Guide
Page 293
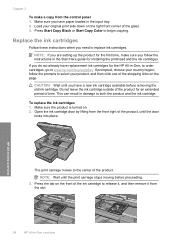
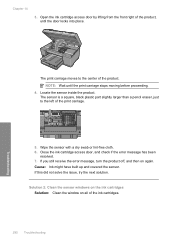
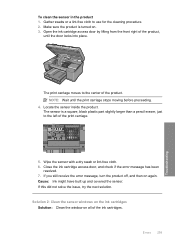
... Solution: Clean the window on again. Open the ink cartridge access door by lifting from the front right of the print carriage. 5. Locate the sensor inside the product. The sensor is a square, black plastic part slightly larger than a pencil eraser, just to the center of the ink cartridges. 290 Troubleshooting NOTE: Wait...
... Solution: Clean the window on again. Open the ink cartridge access door by lifting from the front right of the print carriage. 5. Locate the sensor inside the product. The sensor is a square, black plastic part slightly larger than a pencil eraser, just to the center of the ink cartridges. 290 Troubleshooting NOTE: Wait...
User Guide
Page 302
Make sure the product is a square, black plastic part slightly larger than a pencil eraser, just to use for the cleaning procedure. 2. Open the ink cartridge access door by lifting from the front ...: Ink might have built up and covered the sensor. Wipe the sensor with a dry swab or lint-free cloth. 6. The print carriage moves to the center of the product, until the print carriage stops moving before proceeding. 4. To clean the sensor in the product 1. The sensor is turned on all of the...
Make sure the product is a square, black plastic part slightly larger than a pencil eraser, just to use for the cleaning procedure. 2. Open the ink cartridge access door by lifting from the front ...: Ink might have built up and covered the sensor. Wipe the sensor with a dry swab or lint-free cloth. 6. The print carriage moves to the center of the product, until the print carriage stops moving before proceeding. 4. To clean the sensor in the product 1. The sensor is turned on all of the...
User Guide
Page 330
...Z zoom button 11 buttons 98, 118 photos 98, 118 327 See iron-on transfers technical information copy specifications 310 paper specifications 309 print specifications 310 scan specifications 310 system requirements 309 telephone numbers, support 304 text cut off 187 dotted lines on scan 196 enhance on ... Key 28 smeared ink 160 software application, print from 73 software installation reinstall 148 uninstall 148 speed copy 111 print 76 SSID troubleshoot 153 wireless setting 46 start copy black 11 start copy color 11 status, network 43 stop copy 115 print job 90 scan 106 Store Demo 22 subnet...
...Z zoom button 11 buttons 98, 118 photos 98, 118 327 See iron-on transfers technical information copy specifications 310 paper specifications 309 print specifications 310 scan specifications 310 system requirements 309 telephone numbers, support 304 text cut off 187 dotted lines on scan 196 enhance on ... Key 28 smeared ink 160 software application, print from 73 software installation reinstall 148 uninstall 148 speed copy 111 print 76 SSID troubleshoot 153 wireless setting 46 start copy black 11 start copy color 11 status, network 43 stop copy 115 print job 90 scan 106 Store Demo 22 subnet...


