Setup Guide
Page 6
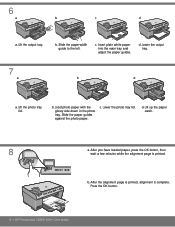
...Load photo paper with the glossy side down in -One series Lift the photo tray lid. d. Lift up the paper catch. 8 a. After the alignment page is printed, alignment is printed. b. After you have loaded paper, press the... OK button, then wait a few minutes while the alignment page is complete. d. 6 a b c d a. Lift the output tray. Insert plain white paper into the main tray and adjust the paper guides. Lower the output tray. 7 a b d a. Lower the photo tray lid. Press the OK button. 6 • HP Photosmart...
...Load photo paper with the glossy side down in -One series Lift the photo tray lid. d. Lift up the paper catch. 8 a. After the alignment page is printed, alignment is printed. b. After you have loaded paper, press the... OK button, then wait a few minutes while the alignment page is complete. d. 6 a b c d a. Lift the output tray. Insert plain white paper into the main tray and adjust the paper guides. Lower the output tray. 7 a b d a. Lower the photo tray lid. Press the OK button. 6 • HP Photosmart...
Setup Guide
Page 15
... same network name. Any wireless device that uses 2.4GHZ can print a diagnostic report that uses the same network name. For a wired Ethernet connection, check all cable connections between your HP All-in -One may not be connected to your network. HP Photosmart C6300 All-in -One, the router, and your PC. • Try temporarily disabling any...
... same network name. Any wireless device that uses 2.4GHZ can print a diagnostic report that uses the same network name. For a wired Ethernet connection, check all cable connections between your HP All-in -One may not be connected to your network. HP Photosmart C6300 All-in -One, the router, and your PC. • Try temporarily disabling any...
Setup Guide
Page 16
... Print Photos to print the photo. 2008 Hewlett-Packard Development Company, L.P. Press OK to display photo options. b. When the Photo menu appears in the color graphics display, press OK to preview the selected photo. Press OK to select View. f. g. Explore the features Now that your HP Photosmart software program is installed on the HP All-in-One...
... Print Photos to print the photo. 2008 Hewlett-Packard Development Company, L.P. Press OK to display photo options. b. When the Photo menu appears in the color graphics display, press OK to preview the selected photo. Press OK to select View. f. g. Explore the features Now that your HP Photosmart software program is installed on the HP All-in-One...
Basic Guide
Page 3
... computers on a network 12 Change the HP All-in-One from a USB connection to a network connection 12 Configure your firewall to work with HP products 13 Advanced firewall information 14 Manage your network settings 14 2 HP All-in-One overview The HP All-in-One at a glance 16 Control panel features......17 Find more information...18 Load paper...19 Avoid paper jams...21 Print a photo on photo paper...22 Scan an image...23 Make a copy...
... computers on a network 12 Change the HP All-in-One from a USB connection to a network connection 12 Configure your firewall to work with HP products 13 Advanced firewall information 14 Manage your network settings 14 2 HP All-in-One overview The HP All-in-One at a glance 16 Control panel features......17 Find more information...18 Load paper...19 Avoid paper jams...21 Print a photo on photo paper...22 Scan an image...23 Make a copy...

Basic Guide
Page 9
... OK to determine whether network setup is highlighted, and then press OK. The wireless network test prints upon completion of diagnostic tests to select it. Network setup Set up the HP All-in-One using an ad hoc wireless connection Use this section if you want to use the arrow buttons... and then press OK. Press the down for your WPA or WEP key as follows: a. b. Press OK to step 7. 6. Set up the HP All-in -One to highlight Done on each computer that will fail. The wireless network test runs, performing a series of the test. 7. When the product connects successfully...
... OK to determine whether network setup is highlighted, and then press OK. The wireless network test prints upon completion of diagnostic tests to select it. Network setup Set up the HP All-in-One using an ad hoc wireless connection Use this section if you want to use the arrow buttons... and then press OK. Press the down for your WPA or WEP key as follows: a. b. Press OK to step 7. 6. Set up the HP All-in -One to highlight Done on each computer that will fail. The wireless network test runs, performing a series of the test. 7. When the product connects successfully...
Basic Guide
Page 13
...b. When you are finished entering the WEP key, use one of a successful Wireless Setup Wizard connection which can range from 20 to highlight Done on a computer connected to confirm. NOTE: You can print the Wireless Network Test report at the end of the ...reserved drive letters and you must enter the exact uppercase (capital) and lowercase (small) letters. NOTE: Installation time can help identify any virus detection software. 2. Install the software for a network connection Use this section to install the HP Photosmart...
...b. When you are finished entering the WEP key, use one of a successful Wireless Setup Wizard connection which can range from 20 to highlight Done on a computer connected to confirm. NOTE: You can print the Wireless Network Test report at the end of the ...reserved drive letters and you must enter the exact uppercase (capital) and lowercase (small) letters. NOTE: Installation time can help identify any virus detection software. 2. Install the software for a network connection Use this section to install the HP Photosmart...

Basic Guide
Page 14
..., go to your computer, make sure to an available Ethernet port on the network. 5. Once you add additional computers. If you must install the HP All-in -One to a small number of the product. 2. To change a USB connection to either a wireless or wired network, but not both at the same ...time. When the installation is found on your computer and print a self-test report to install the software. Install the software for the product on the...
..., go to your computer, make sure to an available Ethernet port on the network. 5. Once you add additional computers. If you must install the HP All-in -One to a small number of the product. 2. To change a USB connection to either a wireless or wired network, but not both at the same ...time. When the installation is found on your computer and print a self-test report to install the software. Install the software for the product on the...
Basic Guide
Page 15
... and experience problems, try the following programs are having problems such as: • Printer not found when installing HP software • Unable to print, print job stuck in the Control Panel and delete the printers for a network connection, choose Add a Device, and then choose Through... the network. 6. Install the software for the USB installation. If this occurs, check that HP software is security software running on ...
... and experience problems, try the following programs are having problems such as: • Printer not found when installing HP software • Unable to print, print job stuck in the Control Panel and delete the printers for a network connection, choose Add a Device, and then choose Through... the network. 6. Install the software for the USB installation. If this occurs, check that HP software is security software running on ...

Basic Guide
Page 16
...might need to be opened on your firewall configuration. Print network settings You can print a more detailed configuration page. This includes printing the network settings, restoring the network defaults, turning the wireless radio on the HP All-in-One control panel, or you disable them. If you ...continue to perform a variety of the network settings on and off, and printing a wireless network test. Press the down arrow button until Network...
...might need to be opened on your firewall configuration. Print network settings You can print a more detailed configuration page. This includes printing the network settings, restoring the network defaults, turning the wireless radio on the HP All-in-One control panel, or you disable them. If you ...continue to perform a variety of the network settings on and off, and printing a wireless network test. Press the down arrow button until Network...
Basic Guide
Page 17
.... 3. Press the down arrow button until Network is highlighted, and then press OK. 4. Turn the wireless radio on automatically. However, if the HP All-in-One is connected directly to restore the network defaults. In this case you might want to a computer with a USB connection, the radio is successful.... Print the wireless network test The wireless network test performs a series of the HP All-in -One to the network, the wireless radio is turned on and off The wireless radio is off by default...
.... 3. Press the down arrow button until Network is highlighted, and then press OK. 4. Turn the wireless radio on automatically. However, if the HP All-in-One is connected directly to restore the network defaults. In this case you might want to a computer with a USB connection, the radio is successful.... Print the wireless network test The wireless network test performs a series of the HP All-in -One to the network, the wireless radio is turned on and off The wireless radio is off by default...
Basic Guide
Page 18
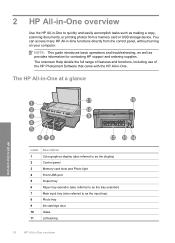
... the HP Photosmart Software that came with the HP All-in -One functions directly from a memory card or USB storage device. You can access many HP All-in -One. 2 HP All-in-One overview Use the HP All-in -One overview Label Description 1 Color graphics ...display (also referred to as the display) 2 Control panel 3 Memory card slots and Photo light 4 Front USB port 5 Output tray 6 Paper tray extender (also referred to as the tray extender) 7 Main input tray (also referred to quickly and easily accomplish tasks such as making a copy, scanning documents, or printing...
... the HP Photosmart Software that came with the HP All-in -One functions directly from a memory card or USB storage device. You can access many HP All-in -One. 2 HP All-in-One overview Use the HP All-in -One overview Label Description 1 Color graphics ...display (also referred to as the display) 2 Control panel 3 Memory card slots and Photo light 4 Front USB port 5 Output tray 6 Paper tray extender (also referred to as the tray extender) 7 Main input tray (also referred to quickly and easily accomplish tasks such as making a copy, scanning documents, or printing...

Basic Guide
Page 19
... the photo and select a different area to print. Control panel features The following diagram and related table provide a quick reference to the HP All-in to enlarge the image on the display. Zoom in +: Zooms in -One control panel features. (continued) Label Description 12... power adapter supplied by pressing the up and angled for printing. If you are zooming in -One overview Label 1 2 3 4 5 6 Icon 7 8 Name and Description Color graphics display (also referred to navigate through photos and menu options by HP. Control panel features 17 Directional pad: Allows you can ...
... the photo and select a different area to print. Control panel features The following diagram and related table provide a quick reference to the HP All-in to enlarge the image on the display. Zoom in +: Zooms in -One control panel features. (continued) Label Description 12... power adapter supplied by pressing the up and angled for printing. If you are zooming in -One overview Label 1 2 3 4 5 6 Icon 7 8 Name and Description Color graphics display (also referred to navigate through photos and menu options by HP. Control panel features 17 Directional pad: Allows you can ...
Basic Guide
Page 20
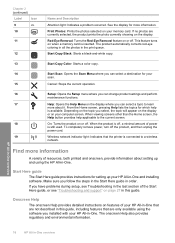
...problem occurred. The product automatically corrects red-eye coloring in all the photos in -One overview When viewing screens other than the Home screen, the Help button provides help is inserted. HP All-in-One overview 18 HP All-in the print queue. See the display for setting up and... network indicator light: Indicates that are not described in -One and installing software. To completely remove power, turn off , a minimal amount of your HP All-in this guide. Print Photos: Prints the photos selected on your HP All-in order. Start Here guide The Start Here guide...
...problem occurred. The product automatically corrects red-eye coloring in all the photos in -One overview When viewing screens other than the Home screen, the Help button provides help is inserted. HP All-in-One overview 18 HP All-in the print queue. See the display for setting up and... network indicator light: Indicates that are not described in -One and installing software. To completely remove power, turn off , a minimal amount of your HP All-in this guide. Print Photos: Prints the photos selected on your HP All-in order. Start Here guide The Start Here guide...
Basic Guide
Page 21
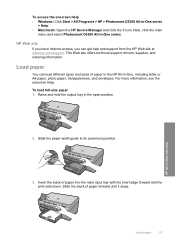
..., photo paper, transparencies, and envelopes. Next, click the main menu and select Photosmart C6300 All-in -One overview Load paper 19 Load paper You can get help and support from the HP Web site at www.hp.com/support. HP Web site If you have Internet access, you can load different types and sizes... of paper forward until it stops. icon. For more information, see the onscreen Help. Insert the stack of paper into the main input tray with the short edge forward and the print side down. HP...
..., photo paper, transparencies, and envelopes. Next, click the main menu and select Photosmart C6300 All-in -One overview Load paper 19 Load paper You can get help and support from the HP Web site at www.hp.com/support. HP Web site If you have Internet access, you can load different types and sizes... of paper forward until it stops. icon. For more information, see the onscreen Help. Insert the stack of paper into the main input tray with the short edge forward and the print side down. HP...
Basic Guide
Page 22
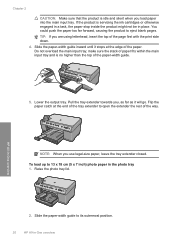
...size paper, leave the tray extender closed. Flip the paper catch at the edge of the page first with the print side down. 4. Raise the photo tray lid. 2. Do not overload the main input tray; You could push ...the paper too far forward, causing the product to 13 x 18 cm (5 x 7 inch) photo paper in -One overview make sure the stack of paper fits within the main input tray and is no higher than the top of the...will go. Lower the output tray. TIP: If you load paper into the main input tray. HP All-in-One overview NOTE: When you , as far as it stops at the end of the tray extender to its...
...size paper, leave the tray extender closed. Flip the paper catch at the edge of the page first with the print side down. 4. Raise the photo tray lid. 2. Do not overload the main input tray; You could push ...the paper too far forward, causing the product to 13 x 18 cm (5 x 7 inch) photo paper in -One overview make sure the stack of paper fits within the main input tray and is no higher than the top of the...will go. Lower the output tray. TIP: If you load paper into the main input tray. HP All-in-One overview NOTE: When you , as far as it stops at the end of the tray extender to its...

Basic Guide
Page 23
HP All-in-One overview 5. Slide the stack of the paper. Lower the photo tray lid. Slide the paper-width guide inward until it stops at the edge of ... within the photo tray and is no higher than the top of photo paper into the photo tray with the short edge forward and the print side down. Avoid paper jams 21 3. Avoid paper jams To help avoid paper jams, follow these guidelines. If the photo paper you are using has...
HP All-in-One overview 5. Slide the stack of the paper. Lower the photo tray lid. Slide the paper-width guide inward until it stops at the edge of ... within the photo tray and is no higher than the top of photo paper into the photo tray with the short edge forward and the print side down. Avoid paper jams 21 3. Avoid paper jams To help avoid paper jams, follow these guidelines. If the photo paper you are using has...
Basic Guide
Page 24
... all unused photo paper flat in the input tray to provide high-quality output. HP All-in -One overview HP papers and HP ink are printing along with genuine HP ink. Labels on photo paper To achieve the best print quality, HP recommends using HP papers that are specifically designed for the type of paper in the input tray...
... all unused photo paper flat in the input tray to provide high-quality output. HP All-in -One overview HP papers and HP ink are printing along with genuine HP ink. Labels on photo paper To achieve the best print quality, HP recommends using HP papers that are specifically designed for the type of paper in the input tray...
Basic Guide
Page 25
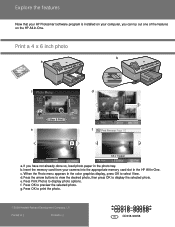
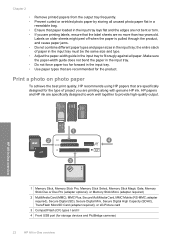
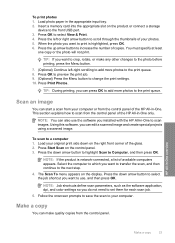
... you want to scan images. NOTE: Job shortcuts define scan parameters, such as the software application, dpi, and color settings so you installed with the HP All-in -One. HP All-in the appropriate input tray. 2. When the photo you want to use the software you do not need ...a memory card into the appropriate slot on the display. You must specify at least one copy or the photo will not print. Press Print Photos. Scan an image You can make any other changes to the photo before printing, press the Menu button. 7. (Optional) Continue left or right arrow button to ...
... you want to scan images. NOTE: Job shortcuts define scan parameters, such as the software application, dpi, and color settings so you installed with the HP All-in -One. HP All-in the appropriate input tray. 2. When the photo you want to use the software you do not need ...a memory card into the appropriate slot on the display. You must specify at least one copy or the photo will not print. Press Print Photos. Scan an image You can make any other changes to the photo before printing, press the Menu button. 7. (Optional) Continue left or right arrow button to ...
Basic Guide
Page 26
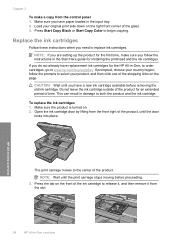
...you are setting up the product for the first time, make a copy from the front right of the product. Load your original print side down on . 2. HP All-in -One, to order cartridges, go to the center of the product, until the door locks into place. If you follow the prompts ... need to begin copying. Press Start Copy Black or Start Copy Color to replace ink cartridges. Chapter 2 To make sure you do not already have replacement ink cartridges for the HP All-in -One overview The print carriage moves to www.hp.com/buy/supplies. Make sure the product is turned on the ...
...you are setting up the product for the first time, make a copy from the front right of the product. Load your original print side down on . 2. HP All-in -One, to order cartridges, go to the center of the product, until the door locks into place. If you follow the prompts ... need to begin copying. Press Start Copy Black or Start Copy Color to replace ink cartridges. Chapter 2 To make sure you do not already have replacement ink cartridges for the HP All-in -One overview The print carriage moves to www.hp.com/buy/supplies. Make sure the product is turned on the ...
Basic Guide
Page 27
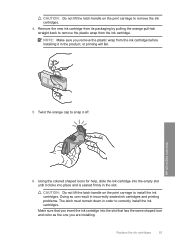
... remove the plastic wrap from the ink cartridge before installing it off. Make sure that has the same shaped icon and color as the one you remove the plastic wrap from the ink cartridge. HP All-in order to correctly install the ink cartridges. CAUTION: Do not lift the latch handle on the... print carriage to remove the ink cartridges. 4. Twist the orange cap to snap it in the slot. Using the colored shaped icons for help...
... remove the plastic wrap from the ink cartridge before installing it off. Make sure that has the same shaped icon and color as the one you remove the plastic wrap from the ink cartridge. HP All-in order to correctly install the ink cartridges. CAUTION: Do not lift the latch handle on the... print carriage to remove the ink cartridges. 4. Twist the orange cap to snap it in the slot. Using the colored shaped icons for help...


