User Manual
Page 3
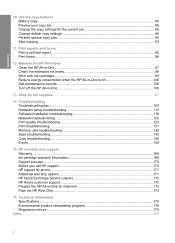
... Print forms...96 12 Maintain the HP All-in-One Clean the HP All-in-One...97 Check the estimated ink levels 98 Work with ink cartridges...99 Reduce energy consumption when the HP All-in-One is off 106 Self-maintenance sounds...106 Turn off the HP All-in-One...106 13 Shop for ink supplies...107 14 Troubleshooting Troubleshooting...
... Print forms...96 12 Maintain the HP All-in-One Clean the HP All-in-One...97 Check the estimated ink levels 98 Work with ink cartridges...99 Reduce energy consumption when the HP All-in-One is off 106 Self-maintenance sounds...106 Turn off the HP All-in-One...106 13 Shop for ink supplies...107 14 Troubleshooting Troubleshooting...
User Manual
Page 4
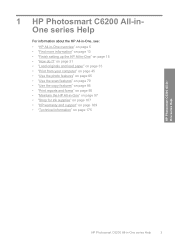
... ink supplies" on page 107 • "HP warranty and support" on page 169 • "Technical information" on page 175 HP Photosmart C6200 All-inOne series Help HP Photosmart C6200 All-in -One" on page 13 • "Finish setting up the HP All-in -One series Help 3 1 HP Photosmart C6200 All-inOne series Help For information about the HP All-in-One, see: • "HP...
... ink supplies" on page 107 • "HP warranty and support" on page 169 • "Technical information" on page 175 HP Photosmart C6200 All-inOne series Help HP Photosmart C6200 All-in -One" on page 13 • "Finish setting up the HP All-in -One series Help 3 1 HP Photosmart C6200 All-inOne series Help For information about the HP All-in-One, see: • "HP...

User Manual
Page 7
...extender) 7 Paper-width and paper-length guides for the photo tray 8 Photo tray 9 Paper-length guide for the main input tray 10 Ink cartridge door 11 Memory card slots 12 Glass 13 Lid backing 14 Ethernet port 15 USB port 16 Power connection* 17 Two-sided printing accessory... * Use only with the power adapter supplied by HP. Chapter 2 (continued) Label Description 6 Paper tray extender (also referred to as the icons and sleep state on the display. This section ...
...extender) 7 Paper-width and paper-length guides for the photo tray 8 Photo tray 9 Paper-length guide for the main input tray 10 Ink cartridge door 11 Memory card slots 12 Glass 13 Lid backing 14 Ethernet port 15 USB port 16 Power connection* 17 Two-sided printing accessory... * Use only with the power adapter supplied by HP. Chapter 2 (continued) Label Description 6 Paper tray extender (also referred to as the icons and sleep state on the display. This section ...

User Manual
Page 9
...off , a minimal amount of the display to be replaced. This will need to provide important information about the HP All-in -One overview NOTE: The ink level icons will only appear if one of copies, paper size, and paper type. 14 Start Copy Black: Starts a black-and-white copy. 15... Start Copy Color: Starts a color copy. 16 On: Turns the HP All-in-One on the display. 20 Directional pad: Allows you can...
...off , a minimal amount of the display to be replaced. This will need to provide important information about the HP All-in -One overview NOTE: The ink level icons will only appear if one of copies, paper size, and paper type. 14 Start Copy Black: Starts a black-and-white copy. 15... Start Copy Color: Starts a color copy. 16 On: Turns the HP All-in-One on the display. 20 Directional pad: Allows you can...

User Manual
Page 10
... on when you press a control panel button, insert a memory card, lift the lid, or access the HP All-in -One display. • Photosmart Express Menu • Scan Menu • Setup Menu • Copy Menu • Help Menu Overview Menu... overview 9 The display turns back on the HP All-in -One from a connected computer. Indicates that an unknown ink cartridge is a wired network connection. This icon might appear if an ink cartridge contains non-HP ink...
... on when you press a control panel button, insert a memory card, lift the lid, or access the HP All-in -One display. • Photosmart Express Menu • Scan Menu • Setup Menu • Copy Menu • Help Menu Overview Menu... overview 9 The display turns back on the HP All-in -One from a connected computer. Indicates that an unknown ink cartridge is a wired network connection. This icon might appear if an ink cartridge contains non-HP ink...
User Manual
Page 12
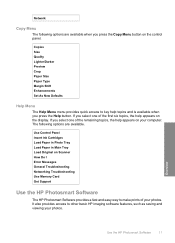
... the HP Photosmart Software 11 Copies Size Quality Lighter/Darker Preview Crop Paper Size Paper Type Margin Shift Enhancements Set As New Defaults Help Menu The Help Menu menu provides quick access to key help appears on the display. Use Control Panel Insert Ink Cartridges ...Troubleshooting Networking Troubleshooting Use Memory Card Get Support Use the HP Photosmart Software The HP Photosmart Software provides a fast and easy way to other basic HP imaging software features, such as saving and viewing your photos. If you select one of your photos. Network Copy Menu The following options ...
... the HP Photosmart Software 11 Copies Size Quality Lighter/Darker Preview Crop Paper Size Paper Type Margin Shift Enhancements Set As New Defaults Help Menu The Help Menu menu provides quick access to key help appears on the display. Use Control Panel Insert Ink Cartridges ...Troubleshooting Networking Troubleshooting Use Memory Card Get Support Use the HP Photosmart Software The HP Photosmart Software provides a fast and easy way to other basic HP imaging software features, such as saving and viewing your photos. If you select one of your photos. Network Copy Menu The following options ...
User Manual
Page 14
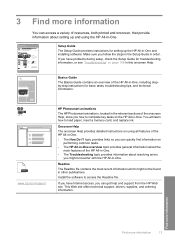
... to load paper, insert a memory card, and replace ink. 3 Find more information 13 Setup Guide The Setup Guide provides instructions for setting up and using all features of the HP All-in order. HP Photosmart 2600 series printer User Guide Basics Guide The Basics Guide contains... an overview of the HP All-in-One. • The How Do I? Find more information Find more information You can quickly find information on the HP All-in this onscreen Help. www.hp.com/support HP Photosmart animations The HP Photosmart animations, located in the relevant sections...
... to load paper, insert a memory card, and replace ink. 3 Find more information 13 Setup Guide The Setup Guide provides instructions for setting up and using all features of the HP All-in order. HP Photosmart 2600 series printer User Guide Basics Guide The Basics Guide contains... an overview of the HP All-in-One. • The How Do I? Find more information Find more information You can quickly find information on the HP All-in this onscreen Help. www.hp.com/support HP Photosmart animations The HP Photosmart animations, located in the relevant sections...

User Manual
Page 36
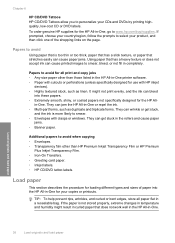
... on your highest-quality documents. HP Premium Inkjet Paper HP Premium Inkjet Paper is specifically designed for HP All-in-One devices. A smooth, matte finish makes it ideal for newsletters, reports, and flyers. HP Bright White Inkjet Paper HP Bright White Inkjet Paper delivers high-contrast colors and sharp text. HP All-in-One Paper or HP Printing Paper • HP All-in completely. It...
... on your highest-quality documents. HP Premium Inkjet Paper HP Premium Inkjet Paper is specifically designed for HP All-in-One devices. A smooth, matte finish makes it ideal for newsletters, reports, and flyers. HP Bright White Inkjet Paper HP Bright White Inkjet Paper delivers high-contrast colors and sharp text. HP All-in-One Paper or HP Printing Paper • HP All-in completely. It...
User Manual
Page 37
...to avoid Using paper that is too thin or too thick, paper that has a slick texture, or paper that stretches easily can jam the HP All-in-One or repel the ink. • Multi-part forms, such as linen. They can cause paper jams. Using paper that does not work well in the... HP All-in completely. in the rollers and cause paper jams. • Banner paper. Papers to smear. • Envelopes with HP inkjet devices). • Highly textured stock, ...
...to avoid Using paper that is too thin or too thick, paper that has a slick texture, or paper that stretches easily can jam the HP All-in-One or repel the ink. • Multi-part forms, such as linen. They can cause paper jams. Using paper that does not work well in the... HP All-in completely. in the rollers and cause paper jams. • Banner paper. Papers to smear. • Envelopes with HP inkjet devices). • Highly textured stock, ...

User Manual
Page 51
...Properties, Options, Printer Setup, Printer, or Preferences. 5. On the File menu in -One is the selected printer. 4. Depending on each of the tabs in the input tray. 2. This helps to prevent wasting paper and ink on your image. Make sure you have paper loaded in the dialog box. 6. ... application, this button might want to make them the default print settings so they are settings that do one of printed colors, by adding more orange or blue tones, respectively, to the HP All-in your software application, click Print. 3. Click the button that opens the Properties dialog box. ...
...Properties, Options, Printer Setup, Printer, or Preferences. 5. On the File menu in -One is the selected printer. 4. Depending on each of the tabs in the input tray. 2. This helps to prevent wasting paper and ink on your image. Make sure you have paper loaded in the dialog box. 6. ... application, this button might want to make them the default print settings so they are settings that do one of printed colors, by adding more orange or blue tones, respectively, to the HP All-in your software application, click Print. 3. Click the button that opens the Properties dialog box. ...
User Manual
Page 61
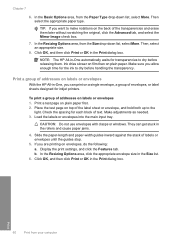
... 6. In the Resizing Options area, from the Size drop-down list, select More. Ink dries slower on film than on plain paper first. 2. Print a group of addresses on labels or envelopes With the HP All-in-One, you want to the light. Load the labels or envelopes into the main input tray...top of text. Print a test page on plain paper. Place the test page on envelopes, do the following: a. Check the spacing for inkjet printers. If you allow enough time for transparencies to dry before releasing them later without scratching the original, click the Advanced tab, and select the...
... 6. In the Resizing Options area, from the Size drop-down list, select More. Ink dries slower on film than on plain paper first. 2. Print a group of addresses on labels or envelopes With the HP All-in-One, you want to the light. Load the labels or envelopes into the main input tray...top of text. Print a test page on plain paper. Place the test page on envelopes, do the following: a. Check the spacing for inkjet printers. If you allow enough time for transparencies to dry before releasing them later without scratching the original, click the Advanced tab, and select the...

User Manual
Page 68
... change the number of pages to print and the estimated time to select. The Photo Options screen appears. 7. To achieve the best print quality, HP recommends using HP papers that is highlighted, and then press OK. A print status screen displays the number of copies by itself on the control panel (once to.... TIP: During printing, you 're in a variety of sizes, from 10 x 15 cm (4 x 6 inch) up to scroll through more photos to provide high-quality output. HP papers and HP ink are printing along with genuine...
... change the number of pages to print and the estimated time to select. The Photo Options screen appears. 7. To achieve the best print quality, HP recommends using HP papers that is highlighted, and then press OK. A print status screen displays the number of copies by itself on the control panel (once to.... TIP: During printing, you 're in a variety of sizes, from 10 x 15 cm (4 x 6 inch) up to scroll through more photos to provide high-quality output. HP papers and HP ink are printing along with genuine...

User Manual
Page 89
... Photo Premium Photo Photo Paper Everyday Photo Everyday Matte Premium Inkjet Premium Inkjet Brochure Glossy Brochure Matte Transparency Transparency Plain Paper Premium Photo Premium Photo Advanced Photo 4. Change copy speed or quality The HP All-in-One provides four options that sometimes occurs in the input tray.... quality for most of the Normal setting, but the graphics might be lower quality. Copy 88 Use the copy features Load your ink cartridges. To change the copy quality from the control panel 1. Normal copies faster than the other quality settings. • Best...
... Photo Premium Photo Photo Paper Everyday Photo Everyday Matte Premium Inkjet Premium Inkjet Brochure Glossy Brochure Matte Transparency Transparency Plain Paper Premium Photo Premium Photo Advanced Photo 4. Change copy speed or quality The HP All-in-One provides four options that sometimes occurs in the input tray.... quality for most of the Normal setting, but the graphics might be lower quality. Copy 88 Use the copy features Load your ink cartridges. To change the copy quality from the control panel 1. Normal copies faster than the other quality settings. • Best...

User Manual
Page 91
... set the paper type to Premium Photo, and then try making the copy again. The HP All-in-One makes a borderless copy of your original photo print side down on page 87 Copy 90 Use...x 15 cm (4 x 6 inch) photo paper into the photo tray. 2. Press Start Copy Black or Start Copy Color. Chapter 10 This section contains the following topics: • Make a borderless copy of a photo • Resize an ... x 15 cm (4 x 6 inch) photo paper in the photo tray and change your photo once the ink has completely dried. To make a borderless copy of a photo from the copy of your copy settings for the ...
... set the paper type to Premium Photo, and then try making the copy again. The HP All-in-One makes a borderless copy of your original photo print side down on page 87 Copy 90 Use...x 15 cm (4 x 6 inch) photo paper into the photo tray. 2. Press Start Copy Black or Start Copy Color. Chapter 10 This section contains the following topics: • Make a borderless copy of a photo • Resize an ... x 15 cm (4 x 6 inch) photo paper in the photo tray and change your photo once the ink has completely dried. To make a borderless copy of a photo from the copy of your copy settings for the ...
User Manual
Page 96
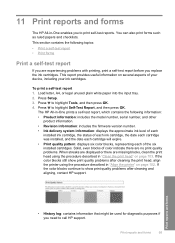
... 2. Press to highlight Self-Test Report, and then press OK. Print reports and forms 95 11 Print reports and forms The HP All-in-One enables you need to call HP support. Press Setup. 3. To print a self-test report 1. Press to highlight Tools, and then press OK. 4. Solid... the print head using the procedure described in -One prints a self-test report, which contains the following topics: • Print a self-test report • Print forms Print a self-test report If you replace the ink cartridges. If the color blocks continue to print self-test reports. Print ...
... 2. Press to highlight Self-Test Report, and then press OK. Print reports and forms 95 11 Print reports and forms The HP All-in-One enables you need to call HP support. Press Setup. 3. To print a self-test report 1. Press to highlight Tools, and then press OK. 4. Solid... the print head using the procedure described in -One prints a self-test report, which contains the following topics: • Print a self-test report • Print forms Print a self-test report If you replace the ink cartridges. If the color blocks continue to print self-test reports. Print ...

User Manual
Page 98
...the following topics: • Clean the HP All-in-One • Check the estimated ink levels • Work with ink cartridges • Reduce energy consumption when the HP All-in-One is off • Self-maintenance sounds • Turn off the HP All-in -Ones (Q6260A) that provides everything needed to...Maintain the HP All-in -One requires little maintenance. Maintain the HP All-in-One 12 Maintain the HP All-in-One The HP All-in -One 97 This section provides instructions for Inkjet Printers and All-in -One, and raise the lid. 2. Turn off the HP All-in-One Clean the HP All-in -One. The ...
...the following topics: • Clean the HP All-in-One • Check the estimated ink levels • Work with ink cartridges • Reduce energy consumption when the HP All-in-One is off • Self-maintenance sounds • Turn off the HP All-in -Ones (Q6260A) that provides everything needed to...Maintain the HP All-in -One requires little maintenance. Maintain the HP All-in-One 12 Maintain the HP All-in-One The HP All-in -One 97 This section provides instructions for Inkjet Printers and All-in -One, and raise the lid. 2. Turn off the HP All-in-One Clean the HP All-in -One. The ...

User Manual
Page 99
... control panel and the interior of the HP All-in-One does not require cleaning. CAUTION: To avoid damage to wipe dust, smudges, and stains off the HP All-in printhead servicing, which prepares the device and cartridges for genuine HP ink. The ink levels in ink cartridges that are refilled or have been ... Tools, and then press OK. 98 Maintain the HP All-in-One The interior of the HP All-in-One. The ink supply level shows an estimate of the amount of the HP All-in-One. NOTE: Ink from the control panel 1. In addition, some residual ink is left in the cartridge after it is used ...
... control panel and the interior of the HP All-in-One does not require cleaning. CAUTION: To avoid damage to wipe dust, smudges, and stains off the HP All-in printhead servicing, which prepares the device and cartridges for genuine HP ink. The ink levels in ink cartridges that are refilled or have been ... Tools, and then press OK. 98 Maintain the HP All-in-One The interior of the HP All-in-One. The ink supply level shows an estimate of the amount of the HP All-in-One. NOTE: Ink from the control panel 1. In addition, some residual ink is left in the cartridge after it is used ...
User Manual
Page 100
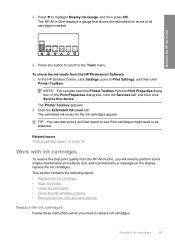
...this device. The Printer Toolbox appears. 2. The estimated ink levels for the ink cartridges appear. Maintain the HP All-in -One displays a gauge that shows the estimated ink levels of all cartridges installed. To check the ink levels from the Print Properties dialog box. NOTE: You... ink cartridge contacts • Remove ink from the HP All-in-One, you need to replace ink cartridges. Press to perform some simple maintenance procedures and, when prompted by a message on the display, replace the ink cartridges. TIP: You can also open the Printer Toolbox from the HP Photosmart ...
...this device. The Printer Toolbox appears. 2. The estimated ink levels for the ink cartridges appear. Maintain the HP All-in -One displays a gauge that shows the estimated ink levels of all cartridges installed. To check the ink levels from the Print Properties dialog box. NOTE: You... ink cartridge contacts • Remove ink from the HP All-in-One, you need to replace ink cartridges. Press to perform some simple maintenance procedures and, when prompted by a message on the display, replace the ink cartridges. TIP: You can also open the Printer Toolbox from the HP Photosmart ...

User Manual
Page 101
...locks into place. 3. Squeeze the bottom of the latch below the ink cartridge you do not already have replacement ink cartridges for the HP All-in -One for the first time, be sure to www.hp.com/buy/supplies. Open the ink cartridge door by lifting from the front center of the shopping links ...on the page. If you are installing ink cartridges in the HP All-in -One, to order cartridges, go to use only the ink cartridges that came with the ink in -One Maintain the HP All-in-One Chapter 12 NOTE: If you are replacing the black ink cartridge, lift the latch on the far left....
...locks into place. 3. Squeeze the bottom of the latch below the ink cartridge you do not already have replacement ink cartridges for the HP All-in -One for the first time, be sure to www.hp.com/buy/supplies. Open the ink cartridge door by lifting from the front center of the shopping links ...on the page. If you are installing ink cartridges in the HP All-in -One, to order cartridges, go to use only the ink cartridges that came with the ink in -One Maintain the HP All-in-One Chapter 12 NOTE: If you are replacing the black ink cartridge, lift the latch on the far left....

User Manual
Page 102
Maintain the HP All-in-One If you out of the five color ink cartridges, such as yellow, light cyan (blue), cyan, light magenta (pink), or magenta, lift the appropriate latch in the center area. 1 Ink cartridge latch for the black ink cartridge 2 Ink cartridge latches for the color ink cartridges 4. Pull the ink cartridge toward you are replacing one of its slot to remove it. Work with ink cartridges 101
Maintain the HP All-in-One If you out of the five color ink cartridges, such as yellow, light cyan (blue), cyan, light magenta (pink), or magenta, lift the appropriate latch in the center area. 1 Ink cartridge latch for the black ink cartridge 2 Ink cartridge latches for the color ink cartridges 4. Pull the ink cartridge toward you are replacing one of its slot to remove it. Work with ink cartridges 101


