Basics Guide
Page 3
......3 Find more information...4 Load originals and load paper...4 Avoid paper jams...7 Print 10 x 15 cm (4 x 6 inch) photos 7 Scan an image...8 Make a copy...9 Replace the print cartridges...9 Clean the HP Photosmart...12 2 Troubleshooting and support Uninstall and reinstall the software 14 Hardware setup troubleshooting 15 Clear paper jams...17 Print...
......3 Find more information...4 Load originals and load paper...4 Avoid paper jams...7 Print 10 x 15 cm (4 x 6 inch) photos 7 Scan an image...8 Make a copy...9 Replace the print cartridges...9 Clean the HP Photosmart...12 2 Troubleshooting and support Uninstall and reinstall the software 14 Hardware setup troubleshooting 15 Clear paper jams...17 Print...
Basics Guide
Page 4
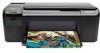
The HP Photosmart at a glance HP Photosmart overview Label 1 2 3 4 5 6 7 8 9 10 11 Description Color graphics display (also referred to as the display) Control panel On button Photo light Memory card slot ...functions, including use of the HP Photosmart Software that came with the HP Photosmart. NOTE: This guide introduces basic operations and troubleshooting, as well as the tray extender) Cartridge door Cartridge access area Print carriage 2 HP Photosmart overview 1 HP Photosmart overview Use the HP Photosmart to as provides information for contacting HP support and ordering supplies.
The HP Photosmart at a glance HP Photosmart overview Label 1 2 3 4 5 6 7 8 9 10 11 Description Color graphics display (also referred to as the display) Control panel On button Photo light Memory card slot ...functions, including use of the HP Photosmart Software that came with the HP Photosmart. NOTE: This guide introduces basic operations and troubleshooting, as well as the tray extender) Cartridge door Cartridge access area Print carriage 2 HP Photosmart overview 1 HP Photosmart overview Use the HP Photosmart to as provides information for contacting HP support and ordering supplies.
Basics Guide
Page 8
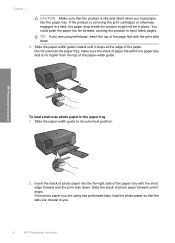
...of the paper tray with the print side down . make sure the stack of paper fits within the paper tray and is servicing the print cartridges or otherwise engaged in a task, the paper stop inside the product might not be in the paper tray 1. Slide the paper-width guide inward... until it stops at the edge of the paper-width guide. HP Photosmart overview To load small-size photo paper in place. TIP: If you . 6 HP Photosmart overview Slide the stack of the page first with the short edge forward and the print side down . 3....
...of the paper tray with the print side down . make sure the stack of paper fits within the paper tray and is servicing the print cartridges or otherwise engaged in a task, the paper stop inside the product might not be in the paper tray 1. Slide the paper-width guide inward... until it stops at the edge of the paper-width guide. HP Photosmart overview To load small-size photo paper in place. TIP: If you . 6 HP Photosmart overview Slide the stack of the page first with the short edge forward and the print side down . 3....

Basics Guide
Page 11
...text or if you can improve the overall image quality by using the software installed with the HP Photosmart. Replace the print cartridges 9 NOTE: Ensure that there are finished. You can use to replace print cartridges. To make sure you make quality copies from the control panel 1. Press the button next ...crop, straighten, rotate, or resize the image. 4. Load your product, and then click one of the scan appears on the right front corner of copies. 6. Press the button next to Black Copy or Color Copy. 5. Make any edits to the current scan session only. Any edits that you ...
...text or if you can improve the overall image quality by using the software installed with the HP Photosmart. Replace the print cartridges 9 NOTE: Ensure that there are finished. You can use to replace print cartridges. To make sure you make quality copies from the control panel 1. Press the button next ...crop, straighten, rotate, or resize the image. 4. Load your product, and then click one of the scan appears on the right front corner of copies. 6. Press the button next to Black Copy or Color Copy. 5. Make any edits to the current scan session only. Any edits that you ...
Basics Guide
Page 12
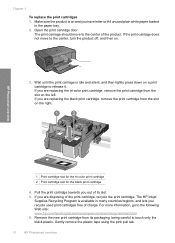
... cartridge, recycle the print cartridge. HP Photosmart overview 1 Print cartridge slot for the tri-color print cartridge 2 Print cartridge slot for the black print cartridge 4. If you are replacing the black print cartridge, remove the print cartridge ...HP Photosmart overview Chapter 1 To replace the print cartridges 1. Pull the print cartridge towards you recycle used print cartridges free of the product. Open the print cartridge door. The print carriage should move to the following Web site: www.hp.com/hpinfo/globalcitizenship/environment/recycle/inkjet.html 6. The HP Inkjet...
... cartridge, recycle the print cartridge. HP Photosmart overview 1 Print cartridge slot for the tri-color print cartridge 2 Print cartridge slot for the black print cartridge 4. If you are replacing the black print cartridge, remove the print cartridge ...HP Photosmart overview Chapter 1 To replace the print cartridges 1. Pull the print cartridge towards you recycle used print cartridges free of the product. Open the print cartridge door. The print carriage should move to the following Web site: www.hp.com/hpinfo/globalcitizenship/environment/recycle/inkjet.html 6. The HP Inkjet...
Basics Guide
Page 13
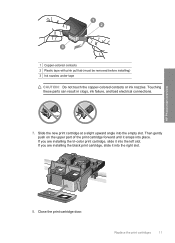
HP Photosmart overview 1 Copper-colored contacts 2 Plastic tape with pink pull tab (must be removed before installing) 3 Ink nozzles under tape CAUTION: Do not touch the copper-colored contacts or ink nozzles. Then gently push on the upper part of the print cartridge forward until it snaps into the empty... slot. If you are installing the black print cartridge, slide it into the right slot. 8. Touching ...
HP Photosmart overview 1 Copper-colored contacts 2 Plastic tape with pink pull tab (must be removed before installing) 3 Ink nozzles under tape CAUTION: Do not touch the copper-colored contacts or ink nozzles. Then gently push on the upper part of the print cartridge forward until it snaps into the empty... slot. If you are installing the black print cartridge, slide it into the right slot. 8. Touching ...
Basics Guide
Page 14
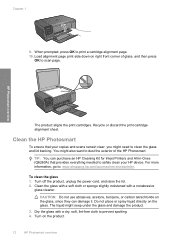
...HP Photosmart overview TIP: You can damage it. Chapter 1 9. Recycle or discard the print cartridge alignment sheet. To clean the glass 1. The liquid might also want to clean the glass and lid backing. Turn on the glass, since they can purchase an HP Cleaning Kit for Inkjet Printers and All-in-Ones... (Q6260A) that your HP device. Dry the glass with a nonabrasive glass cleaner. When prompted, press OK to : www.shopping.hp.com/accessories-store/printer. Clean the HP Photosmart To ensure that provides ...
...HP Photosmart overview TIP: You can damage it. Chapter 1 9. Recycle or discard the print cartridge alignment sheet. To clean the glass 1. The liquid might also want to clean the glass and lid backing. Turn on the glass, since they can purchase an HP Cleaning Kit for Inkjet Printers and All-in-Ones... (Q6260A) that your HP device. Dry the glass with a nonabrasive glass cleaner. When prompted, press OK to : www.shopping.hp.com/accessories-store/printer. Clean the HP Photosmart To ensure that provides ...
Basics Guide
Page 19
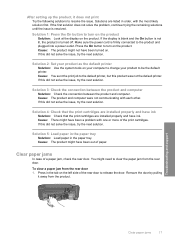
..., with the most likely solution first. To clear a paper jam from the rear door 1. Press in the tab on the left side of the print cartridges. Solution 1: Press the On button to turn on the product Solution: Look at the display on the product. If this did not solve the issue... solutions to the default printer, but this did not solve the issue, try the next solution. Cause: The product and computer were not communicating with one or more of the rear door to the product and plugged into a power outlet. Cause: The product might need to be the default printer. If...
..., with the most likely solution first. To clear a paper jam from the rear door 1. Press in the tab on the left side of the print cartridges. Solution 1: Press the On button to turn on the product Solution: Look at the display on the product. If this did not solve the issue... solutions to the default printer, but this did not solve the issue, try the next solution. Cause: The product and computer were not communicating with one or more of the rear door to the product and plugged into a power outlet. Cause: The product might need to be the default printer. If...
Basics Guide
Page 20
... of the print cartridges. Print cartridge troubleshooting If you are available when you have a problem with the product. 2. Visit the HP online support Web site at www.hp.com/support. Check the documentation that came with one of this guide. Call HP support. Replace the... and troubleshooting information for common problems • Proactive device updates, support alerts, and HP newsgrams that might have a problem, follow these steps: 1. For support contact information, see "Replace the print cartridges" on page 9 in this guide. It is available to occur. 3. Chapter 2...
... of the print cartridges. Print cartridge troubleshooting If you are available when you have a problem with the product. 2. Visit the HP online support Web site at www.hp.com/support. Check the documentation that came with one of this guide. Call HP support. Replace the... and troubleshooting information for common problems • Proactive device updates, support alerts, and HP newsgrams that might have a problem, follow these steps: 1. For support contact information, see "Replace the print cartridges" on page 9 in this guide. It is available to occur. 3. Chapter 2...
Basics Guide
Page 21
...; Depth: 57.6 cm (22.7 inches) with tray extender open; 40.7 cm (16 inches) with tray extender closed • Weight (with cartridges) : 4.70 kg (10.34 pounds) Power specifications • Power consumption: 20 watts maximum (average printing) • Input voltage (0957-2269): AC.... Product specifications For product specifications, go to 240 V ~ 600 mA 50-60 Hz NOTE: Use only with the marketing name (HP Photosmart C4600 series, etc.) or product numbers (Q8418A, etc.). 3 Technical information The technical specifications and international regulatory information for your product is...
...; Depth: 57.6 cm (22.7 inches) with tray extender open; 40.7 cm (16 inches) with tray extender closed • Weight (with cartridges) : 4.70 kg (10.34 pounds) Power specifications • Power consumption: 20 watts maximum (average printing) • Input voltage (0957-2269): AC.... Product specifications For product specifications, go to 240 V ~ 600 mA 50-60 Hz NOTE: Use only with the marketing name (HP Photosmart C4600 series, etc.) or product numbers (Q8418A, etc.). 3 Technical information The technical specifications and international regulatory information for your product is...
Basics Guide
Page 22
... Canada), may: a. If HP receives, during the applicable warranty period, notice of a defect in any product which is attributable to the use of a non-HP or refilled cartridge or an expired ink cartridge, HP will find below the name and address of the HP entity responsible for the particular... failure or damage. 5. HP's Limited Warranty Statement is distributed by local law, the remedies ...
... Canada), may: a. If HP receives, during the applicable warranty period, notice of a defect in any product which is attributable to the use of a non-HP or refilled cartridge or an expired ink cartridge, HP will find below the name and address of the HP entity responsible for the particular... failure or damage. 5. HP's Limited Warranty Statement is distributed by local law, the remedies ...
User Guide
Page 3
...HP Photosmart Printer parts...5 Control panel features...6 4 Print Print documents...13 Print photos...14 Print envelopes...21 Print on specialty media...21 Print a Web page...22 5 Scan Scan to a computer...27 Scan to a memory card...28 6 Copy Copy text or mixed documents 31 7 Reprint photos...35 8 Save photos...37 9 Work with cartridges... Check the estimated ink levels 39 Replace the cartridges...40 Order ink supplies...42 Cartridge warranty information 43 10 Solve a problem HP support...45 Uninstall and reinstall the software 48 Setup ...
...HP Photosmart Printer parts...5 Control panel features...6 4 Print Print documents...13 Print photos...14 Print envelopes...21 Print on specialty media...21 Print a Web page...22 5 Scan Scan to a computer...27 Scan to a memory card...28 6 Copy Copy text or mixed documents 31 7 Reprint photos...35 8 Save photos...37 9 Work with cartridges... Check the estimated ink levels 39 Replace the cartridges...40 Order ink supplies...42 Cartridge warranty information 43 10 Solve a problem HP support...45 Uninstall and reinstall the software 48 Setup ...

User Guide
Page 5
1 HP Photosmart C4600 series Help For information about the HP Photosmart, see: • "Get to know the HP Photosmart" on page 5 • "Print" on page 13 • "Scan" on page 27 • "Copy" on page 31 • "Reprint photos" on page 35 • "Save photos" on page 37 • "Work with cartridges" on page 39 • "Technical information" on page 123 HP Photosmart C4600 series Help HP Photosmart C4600 series Help 3
1 HP Photosmart C4600 series Help For information about the HP Photosmart, see: • "Get to know the HP Photosmart" on page 5 • "Print" on page 13 • "Scan" on page 27 • "Copy" on page 31 • "Reprint photos" on page 35 • "Save photos" on page 37 • "Work with cartridges" on page 39 • "Technical information" on page 123 HP Photosmart C4600 series Help HP Photosmart C4600 series Help 3
User Guide
Page 7
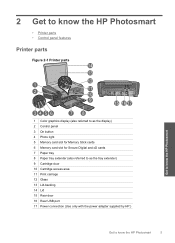
... HP Photosmart 1 Color graphics display (also referred to as the display) 2 Control panel 3 On button 4 Photo light 5 Memory card slot for Memory Stick cards 6 Memory card slot for Secure Digital and xD cards 7 Paper tray 8 Paper tray extender (also referred to as the tray extender) 9 Cartridge door 10 Cartridge ...access area 11 Print carriage 12 Glass 13 Lid-backing 14 Lid 15 Rear door 16 Rear USB port 17 Power connection (Use only with the power adapter supplied by HP.) Get to know the HP Photosmart 5
... HP Photosmart 1 Color graphics display (also referred to as the display) 2 Control panel 3 On button 4 Photo light 5 Memory card slot for Memory Stick cards 6 Memory card slot for Secure Digital and xD cards 7 Paper tray 8 Paper tray extender (also referred to as the tray extender) 9 Cartridge door 10 Cartridge ...access area 11 Print carriage 12 Glass 13 Lid-backing 14 Lid 15 Rear door 16 Rear USB port 17 Power connection (Use only with the power adapter supplied by HP.) Get to know the HP Photosmart 5
User Guide
Page 10
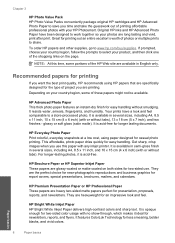
... x 15 cm (4 x 6 inch) (with your product, and then click one of printing affordable professional photos with or without smudging. HP Premium Presentation Paper or HP Professional Paper These papers are heavyweight for casual photo printing. HP Bright White Inkjet Paper HP Bright White Inkjet Paper delivers high-contrast colors and sharp text. It is acid-free for newsletters...
... x 15 cm (4 x 6 inch) (with your product, and then click one of printing affordable professional photos with or without smudging. HP Premium Presentation Paper or HP Professional Paper These papers are heavyweight for casual photo printing. HP Bright White Inkjet Paper HP Bright White Inkjet Paper delivers high-contrast colors and sharp text. It is acid-free for newsletters...
User Guide
Page 11
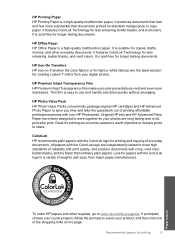
...HP Iron-On Transfers HP Iron-on Transfers (for color fabrics or for light or white fabrics) are the ideal solution for printing 9 HP Photo Value Pack HP Photo Value Packs conveniently package original HP cartridges and HP... to share. HP Premium Inkjet Transparency Film HP Premium Inkjet Transparency Film make your product, and then click one of the shopping...HP recommends plain papers with crisp, vivid color, bolder blacks, and dry faster than documents printed on the page. HP Office Paper HP Office Paper is easy to work together so your HP Photosmart. Original HP inks and HP...
...HP Iron-On Transfers HP Iron-on Transfers (for color fabrics or for light or white fabrics) are the ideal solution for printing 9 HP Photo Value Pack HP Photo Value Packs conveniently package original HP cartridges and HP... to share. HP Premium Inkjet Transparency Film HP Premium Inkjet Transparency Film make your product, and then click one of the shopping...HP recommends plain papers with crisp, vivid color, bolder blacks, and dry faster than documents printed on the page. HP Office Paper HP Office Paper is easy to work together so your HP Photosmart. Original HP inks and HP...
User Guide
Page 41
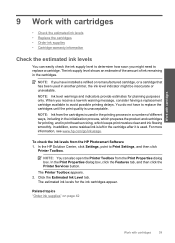
.... NOTE: Ink level warnings and indicators provide estimates for the ink cartridges appear. Click the Estimated Ink Level tab. NOTE: If you have to replace a cartridge. To check the ink levels from the HP Photosmart Software 1. The Printer Toolbox appears. 2. The estimated ink levels for... planning purposes only. When you might be inaccurate or unavailable. NOTE: Ink from the cartridges is used in the printing process ...
.... NOTE: Ink level warnings and indicators provide estimates for the ink cartridges appear. Click the Estimated Ink Level tab. NOTE: If you have to replace a cartridge. To check the ink levels from the HP Photosmart Software 1. The Printer Toolbox appears. 2. The estimated ink levels for... planning purposes only. When you might be inaccurate or unavailable. NOTE: Ink from the cartridges is used in the printing process ...

User Guide
Page 42
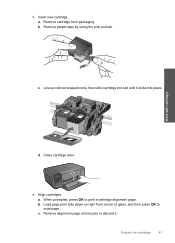
Remove cartridge. Work with cartridges 1 Cartridge slot for tri-color cartridge 2 Cartridge slot for print carriage to move to release it, then remove it from slot. Wait for black cartridge 40 Work with cartridges Lightly press down on . 2. b. Open cartridge access door. Check that power is on the cartridge to center of the product. Chapter 9 Replace the cartridges To replace the cartridges 1. a.
Remove cartridge. Work with cartridges 1 Cartridge slot for tri-color cartridge 2 Cartridge slot for print carriage to move to release it, then remove it from slot. Wait for black cartridge 40 Work with cartridges Lightly press down on . 2. b. Open cartridge access door. Check that power is on the cartridge to center of the product. Chapter 9 Replace the cartridges To replace the cartridges 1. a.
User Guide
Page 43
Remove cartridge from packaging. Work with cartridges d. When prompted, press OK to scan page. Align cartridges. Close cartridge door. 4. 3. Remove plastic tape by using the pink pull tab. a. Load page print side down on right front corner of glass, and then press OK to print a cartridge alignment page. b. Remove alignment page and recycle or discard it clicks into place. b. Line up colored shaped icons, then slide cartridge into slot until it . c. a. c. Replace the cartridges 41 Insert new cartridge.
Remove cartridge from packaging. Work with cartridges d. When prompted, press OK to scan page. Align cartridges. Close cartridge door. 4. 3. Remove plastic tape by using the pink pull tab. a. Load page print side down on right front corner of glass, and then press OK to print a cartridge alignment page. b. Remove alignment page and recycle or discard it clicks into place. b. Line up colored shaped icons, then slide cartridge into slot until it . c. a. c. Replace the cartridges 41 Insert new cartridge.

User Guide
Page 44
... for ink-backup mode. 42 Work with only one print cartridge. During ink-backup mode, the product can find cartridge information and order online by visiting www.hp.com/buy/ supplies. Installed print cartridge Black print cartridge Tri-color print cartridge Photo print cartridge Result Colors print as grayscale. NOTE: Ordering cartridges online is displayed on screen. The ink-backup mode...
... for ink-backup mode. 42 Work with only one print cartridge. During ink-backup mode, the product can find cartridge information and order online by visiting www.hp.com/buy/ supplies. Installed print cartridge Black print cartridge Tri-color print cartridge Photo print cartridge Result Colors print as grayscale. NOTE: Ordering cartridges online is displayed on screen. The ink-backup mode...


