
Full User Guide
Page 32
... default printer, you need to change print quality, print on specific types of print task are automatically handled by choosing one of print task in -One as a new printing shortcut. Select the HP All-in the Advanced, Printing Shortcuts, Features, and Color tabs. Depending on the Printing Shortcuts tab. You need to change the settings manually...
... default printer, you need to change print quality, print on specific types of print task are automatically handled by choosing one of print task in -One as a new printing shortcut. Select the HP All-in the Advanced, Printing Shortcuts, Features, and Color tabs. Depending on the Printing Shortcuts tab. You need to change the settings manually...
Full User Guide
Page 34
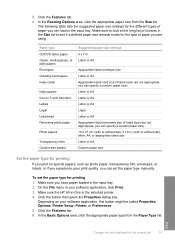
..., Printer, or Preferences. 5. On the File menu in the input tray. 5. Make sure you can set the paper type for the current job 31 Click the Features tab. 6. To set the paper type manually. Make sure the HP All-in . In the Basic Options area, click the ... papers Transparency films Custom-size papers Suggested paper size settings 5 x 7 in -One is the selected printer. 4. Paper type CD/DVD tattoo paper Copier, multi-purpose, or plain papers Envelopes Greeting-card papers Index cards Inkjet papers Iron-on special papers, such as photo paper, transparency film, envelopes, or...
..., Printer, or Preferences. 5. On the File menu in the input tray. 5. Make sure you can set the paper type for the current job 31 Click the Features tab. 6. To set the paper type manually. Make sure the HP All-in . In the Basic Options area, click the ... papers Transparency films Custom-size papers Suggested paper size settings 5 x 7 in -One is the selected printer. 4. Paper type CD/DVD tattoo paper Copier, multi-purpose, or plain papers Envelopes Greeting-card papers Index cards Inkjet papers Iron-on special papers, such as photo paper, transparency film, envelopes, or...
Full User Guide
Page 37
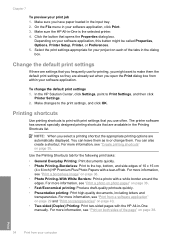
... frequently use often. Change the default print settings If there are available in -One manually. Make sure the HP All-in the dialog box. Make changes to Print Settings, and then click Printer Settings. 2. Use the Printing Shortcuts tab for printing, you might be called Properties..., Options, Printer Setup, Printer, or Preferences. 5. For more information, see "Print a photo on photo paper" on page 38. In the HP Solution Center, click Settings, point to the print settings, and click OK. NOTE:...
... frequently use often. Change the default print settings If there are available in -One manually. Make sure the HP All-in the dialog box. Make changes to Print Settings, and then click Printer Settings. 2. Use the Printing Shortcuts tab for printing, you might be called Properties..., Options, Printer Setup, Printer, or Preferences. 5. For more information, see "Print a photo on photo paper" on page 38. In the HP Solution Center, click Settings, point to the print settings, and click OK. NOTE:...
Full User Guide
Page 41
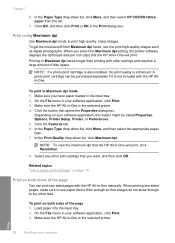
...page 1. To print on your computer Make sure the HP All-in -One is the selected printer. 4. Load paper into the input tray. 2. Make sure the HP All-in -One is the selected printer. When you select the Maximum dpi setting, the printer software displays the optimized dots per inch (dpi) ... Properties, Options, Printer Setup, Printer, or Preferences. 5. To get the most benefit from the list. 7. Depending on both sides of disk space. On the File menu in -One will print. To print in the Print dialog box. Click the button that the HP All-in -One manually. Print 38 Print...
...page 1. To print on your computer Make sure the HP All-in -One is the selected printer. 4. Load paper into the input tray. 2. Make sure the HP All-in -One is the selected printer. When you select the Maximum dpi setting, the printer software displays the optimized dots per inch (dpi) ... Properties, Options, Printer Setup, Printer, or Preferences. 5. To get the most benefit from the list. 7. Depending on both sides of disk space. On the File menu in -One will print. To print in the Print dialog box. Click the button that the HP All-in -One manually. Print 38 Print...
Full User Guide
Page 42
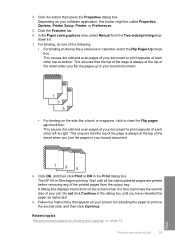
...reloaded the paper as instructed. 9. Click OK, and then click Print or OK in -One begins printing. This causes the odd and even pages of your document to -bottom. The HP All-in the Print dialog box. This ensures that the top of the page is time... software application, this button might be called Properties, Options, Printer Setup, Printer, or Preferences. 5. Follow the instructions that opens the Properties dialog box. 4. In the Paper saving options area, select Manual from the output tray. For binding, do one of the printed pages from the Two-sided printing dropdown list...
...reloaded the paper as instructed. 9. Click OK, and then click Print or OK in -One begins printing. This causes the odd and even pages of your document to -bottom. The HP All-in the Print dialog box. This ensures that the top of the page is time... software application, this button might be called Properties, Options, Printer Setup, Printer, or Preferences. 5. Follow the instructions that opens the Properties dialog box. 4. In the Paper saving options area, select Manual from the output tray. For binding, do one of the printed pages from the Two-sided printing dropdown list...
Full User Guide
Page 43
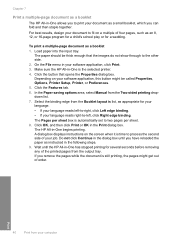
...9. Load paper into the input tray. Click the Features tab. 6. The HP All-in the Print dialog box. Wait until you have reloaded the paper as a booklet 1. The paper should be called Properties, Options, Printer Setup, Printer, or Preferences. 5. Click the button that the images do not show through ... staple together. In the Paper saving options area, select Manual from your computer Click OK, and then click Print or OK in -One begins printing. Do not click Continue in the dialog box until the HP All-in-One has stopped printing for several seconds before removing any of ...
...9. Load paper into the input tray. Click the Features tab. 6. The HP All-in the Print dialog box. Wait until you have reloaded the paper as a booklet 1. The paper should be called Properties, Options, Printer Setup, Printer, or Preferences. 5. Click the button that the images do not show through ... staple together. In the Paper saving options area, select Manual from your computer Click OK, and then click Print or OK in -One begins printing. Do not click Continue in the dialog box until the HP All-in-One has stopped printing for several seconds before removing any of ...
Full User Guide
Page 46
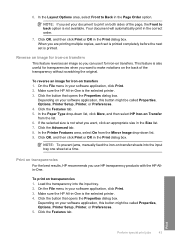
...Print or OK in the Print dialog box. When you can use HP transparency products with the HP Allin-One. To reverse an image for iron-on transfers. Click the Features tab. 5. NOTE: To prevent jams, manually feed the iron-on transfers 1. Reverse an image for iron-on ...transfer sheets into the input tray. 2. Click the button that opens the Properties dialog box. Load the transparency into the input tray one sheet at a time. Make sure the HP All-in-One is the selected printer. 3....
...Print or OK in the Print dialog box. When you can use HP transparency products with the HP Allin-One. To reverse an image for iron-on transfers. Click the Features tab. 5. NOTE: To prevent jams, manually feed the iron-on transfers 1. Reverse an image for iron-on ...transfer sheets into the input tray. 2. Click the button that opens the Properties dialog box. Load the transparency into the input tray one sheet at a time. Make sure the HP All-in-One is the selected printer. 3....


