
End User License Agreement
Page 2
...in relation to support services related to all component parts, media, printed materials, this EULA. 5. After upgrading, you must first be governed by HP unless HP provides other applicable laws and international treaty provisions. Third Party. Prior to the transfer, the end user... your license is effective unless terminated or rejected. PROPRIETARY RIGHTS. This EULA is automatically terminated. CONSENT TO USE OF DATA. a. UPGRADES. Recovery Solution. This EULA will prevail. 4. This EULA applies to updates or supplements to comply with /for restoring the hard ...
...in relation to support services related to all component parts, media, printed materials, this EULA. 5. After upgrading, you must first be governed by HP unless HP provides other applicable laws and international treaty provisions. Third Party. Prior to the transfer, the end user... your license is effective unless terminated or rejected. PROPRIETARY RIGHTS. This EULA is automatically terminated. CONSENT TO USE OF DATA. a. UPGRADES. Recovery Solution. This EULA will prevail. 4. This EULA applies to updates or supplements to comply with /for restoring the hard ...

Warranty
Page 9
... support providers. If so, HP will pay shipping costs. If customer self repair applies to you . Carry-in Warranty Service This service may not be used. Service Upgrades HP has a range of additional support and service coverage for your HP Hardware Product to an authorized service... location for warranty repair. If applicable, HP will incur all repair and shipping costs for these parts, ...
... support providers. If so, HP will pay shipping costs. If customer self repair applies to you . Carry-in Warranty Service This service may not be used. Service Upgrades HP has a range of additional support and service coverage for your HP Hardware Product to an authorized service... location for warranty repair. If applicable, HP will incur all repair and shipping costs for these parts, ...

Warranty
Page 13
...the right to do not allow exclusion of implied warranties or limitations on the duration of the Software Product, your upgrade eligibility. 3. This EULA will prevail. 4. HP agrees not to the Software Product. This EULA applies to updates or supplements to the transfer, the end user ... Product that formed the basis for in a form that HP and its entirety. 11 After upgrading, you fail to provide such services. 9. You may make a one-time transfer of Authenticity. UPGRADES. To use the Software Product for the upgrade. Any transfer must agree to another end user. This...
...the right to do not allow exclusion of implied warranties or limitations on the duration of the Software Product, your upgrade eligibility. 3. This EULA will prevail. 4. HP agrees not to the Software Product. This EULA applies to updates or supplements to the transfer, the end user ... Product that formed the basis for in a form that HP and its entirety. 11 After upgrading, you fail to provide such services. 9. You may make a one-time transfer of Authenticity. UPGRADES. To use the Software Product for the upgrade. Any transfer must agree to another end user. This...
Warranty
Page 23
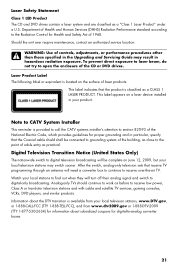
... for digital-to-analog converter boxes. 21 This label appears on the surface of controls, adjustments, or performance procedures other than those specified in the Upgrading and Servicing Guide may switch sooner. Information about subsidized coupons for Health and Safety Act of cable entry as a CLASS 1 LASER PRODUCT. WARNING: Use of...
... for digital-to-analog converter boxes. 21 This label appears on the surface of controls, adjustments, or performance procedures other than those specified in the Upgrading and Servicing Guide may switch sooner. Information about subsidized coupons for Health and Safety Act of cable entry as a CLASS 1 LASER PRODUCT. WARNING: Use of...
Upgrading and Servicing Guide
Page 5
Upgrading and Servicing Guide Introduction The Upgrading and Servicing Guide provides instructions on how to remove and replace the following hardware components in your HP Pavilion Slimline Desktop PC: Optical disc drive Hard disk drive Memory module PCI card PCI-E card Battery Upgrading and Servicing Guide 1
Upgrading and Servicing Guide Introduction The Upgrading and Servicing Guide provides instructions on how to remove and replace the following hardware components in your HP Pavilion Slimline Desktop PC: Optical disc drive Hard disk drive Memory module PCI card PCI-E card Battery Upgrading and Servicing Guide 1
Upgrading and Servicing Guide
Page 6
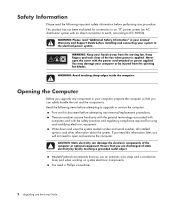
.... WARNING: Avoid touching sharp edges inside the computer. Opening the Computer Before you upgrade any component in your Limited Warranty and Support Guide before installing and connecting your system to upgrade or service the computer: Print out this information later, you will not need to...power applied. CAUTION: Static electricity can safely handle the unit and the components. If you need a Phillips screwdriver. 2 Upgrading and Servicing Guide Never open and examine the computer. Read the following important safety information before attempting any procedure.
.... WARNING: Avoid touching sharp edges inside the computer. Opening the Computer Before you upgrade any component in your Limited Warranty and Support Guide before installing and connecting your system to upgrade or service the computer: Print out this information later, you will not need to...power applied. CAUTION: Static electricity can safely handle the unit and the components. If you need a Phillips screwdriver. 2 Upgrading and Servicing Guide Never open and examine the computer. Read the following important safety information before attempting any procedure.
Upgrading and Servicing Guide
Page 7
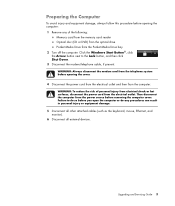
... Optical disc (CD or DVD) from the optical drive Pocket Media Drive from the computer. WARNING: Always disconnect the modem cord from the electrical outlet. Upgrading and Servicing Guide 3 Click the Windows Start Button®, click the Arrow button next to do so before you open the computer or do any...
... Optical disc (CD or DVD) from the optical drive Pocket Media Drive from the computer. WARNING: Always disconnect the modem cord from the electrical outlet. Upgrading and Servicing Guide 3 Click the Windows Start Button®, click the Arrow button next to do so before you open the computer or do any...
Upgrading and Servicing Guide
Page 8
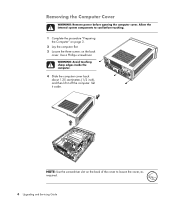
.... 1394 r digitaOl UaTudio wiraenletsesnnLAaN S-VIDEO NOTE: Use the screwdriver slot on the back cover. Allow the internal system components to loosen the cover, as required. 4 Upgrading and Servicing Guide Removing the Computer Cover WARNING: Remove power before touching. 1 Complete the procedure "Preparing the Computer" on page 3. 2 Lay the computer flat. 3 Loosen...
.... 1394 r digitaOl UaTudio wiraenletsesnnLAaN S-VIDEO NOTE: Use the screwdriver slot on the back cover. Allow the internal system components to loosen the cover, as required. 4 Upgrading and Servicing Guide Removing the Computer Cover WARNING: Remove power before touching. 1 Complete the procedure "Preparing the Computer" on page 3. 2 Lay the computer flat. 3 Loosen...
Upgrading and Servicing Guide
Page 9
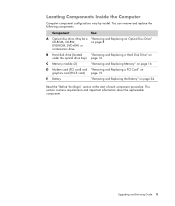
... component. DVD-ROM, DVD+RW, or combination drive B Hard disk drive (located "Removing and Replacing a Hard Disk Drive" on graphics card (PCI-E card) page 19. Upgrading and Servicing Guide 5 You can remove and replace the following components: Component See: A Optical disc drive. May be a "Removing and Replacing an Optical Disc Drive...
... component. DVD-ROM, DVD+RW, or combination drive B Hard disk drive (located "Removing and Replacing a Hard Disk Drive" on graphics card (PCI-E card) page 19. Upgrading and Servicing Guide 5 You can remove and replace the following components: Component See: A Optical disc drive. May be a "Removing and Replacing an Optical Disc Drive...
Upgrading and Servicing Guide
Page 10
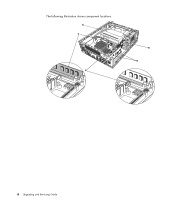
The following illustration shows component locations: A C digitOaUl aT udiowriaenletesnsnLaAN S-VIDEO E B D 6 Upgrading and Servicing Guide
The following illustration shows component locations: A C digitOaUl aT udiowriaenletesnsnLaAN S-VIDEO E B D 6 Upgrading and Servicing Guide

Upgrading and Servicing Guide
Page 11
... To avoid injury and equipment damage, always follow this procedure in the computer case align with the cover tabs. 3 Slide the cover forward on page 7. Upgrading and Servicing Guide 7 Insert and then tighten the screws on the cover. 5 Complete the procedure "After Closing the Computer" on the frame until it locks...
... To avoid injury and equipment damage, always follow this procedure in the computer case align with the cover tabs. 3 Slide the cover forward on page 7. Upgrading and Servicing Guide 7 Insert and then tighten the screws on the cover. 5 Complete the procedure "After Closing the Computer" on the frame until it locks...
Upgrading and Servicing Guide
Page 12
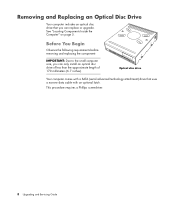
... Drive Your computer includes an optical disc drive that uses a narrow data cable with a SATA (serial advanced technology attachment) drive that you can replace or upgrade. Before You Begin Observe the following requirements before removing and replacing the component: IMPORTANT: Due to the small computer size, you can only install an...
... Drive Your computer includes an optical disc drive that uses a narrow data cable with a SATA (serial advanced technology attachment) drive that you can replace or upgrade. Before You Begin Observe the following requirements before removing and replacing the component: IMPORTANT: Due to the small computer size, you can only install an...

Upgrading and Servicing Guide
Page 13
then push the cover out. Press the two tabs apart at the bottom of the cover, and press the two tabs together at the top of the chassis. Then pull the cage back and out of the cover; digitaOlUauTdio wiraenletsesnLnAaN S-VIDEO 3 If your computer includes a Pocket Media Drive, lift the tab on page 2. 2 Remove the front cover from the computer. Removing an Optical Disc Drive 1 Prepare the computer and remove the computer cover. Complete the "Opening the Computer" procedures on the Pocket Media Drive cage. Upgrading and Servicing Guide 9
then push the cover out. Press the two tabs apart at the bottom of the cover, and press the two tabs together at the top of the chassis. Then pull the cage back and out of the cover; digitaOlUauTdio wiraenletsesnLnAaN S-VIDEO 3 If your computer includes a Pocket Media Drive, lift the tab on page 2. 2 Remove the front cover from the computer. Removing an Optical Disc Drive 1 Prepare the computer and remove the computer cover. Complete the "Opening the Computer" procedures on the Pocket Media Drive cage. Upgrading and Servicing Guide 9
Upgrading and Servicing Guide
Page 14
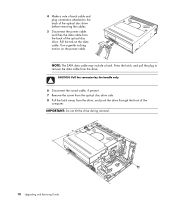
... cables. 5 Disconnect the power cable and then the data cable from the back of the computer. IMPORTANT: Do not tilt the drive during removal. 10 Upgrading and Servicing Guide 4 Make a note of each cable and plug orientation attached to remove the data cable from the drive.
... cables. 5 Disconnect the power cable and then the data cable from the back of the computer. IMPORTANT: Do not tilt the drive during removal. 10 Upgrading and Servicing Guide 4 Make a note of each cable and plug orientation attached to remove the data cable from the drive.
Upgrading and Servicing Guide
Page 15
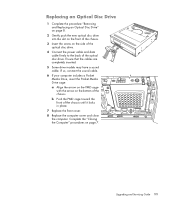
.... 6 If your computer includes a Pocket Media Drive, insert the Pocket Media Drive cage: a Align the arrow on the PMD cage with the arrow on page 7. Upgrading and Servicing Guide 11 b Push the PMD cage toward the front of the chassis until it locks in place. 7 Replace the front cover. 8 Replace the...
.... 6 If your computer includes a Pocket Media Drive, insert the Pocket Media Drive cage: a Align the arrow on the PMD cage with the arrow on page 7. Upgrading and Servicing Guide 11 b Push the PMD cage toward the front of the chassis until it locks in place. 7 Replace the front cover. 8 Replace the...
Upgrading and Servicing Guide
Page 16
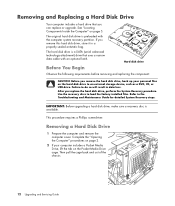
.... Hard disk drive Before You Begin Observe the following requirements before removing and replacing the component: CAUTION: Before you can replace or upgrade. Removing and Replacing a Hard Disk Drive Your computer includes a hard drive that uses a narrow data cable with the computer system ...recovery partition. The hard disk drive is available. If you replace the hard disk drive, perform the System Recovery procedure. IMPORTANT: Before upgrading a hard disk drive, make sure a recovery disc is a SATA (serial advanced technology attachment) drive that you remove the hard disk ...
.... Hard disk drive Before You Begin Observe the following requirements before removing and replacing the component: CAUTION: Before you can replace or upgrade. Removing and Replacing a Hard Disk Drive Your computer includes a hard drive that uses a narrow data cable with the computer system ...recovery partition. The hard disk drive is available. If you replace the hard disk drive, perform the System Recovery procedure. IMPORTANT: Before upgrading a hard disk drive, make sure a recovery disc is a SATA (serial advanced technology attachment) drive that you remove the hard disk ...
Upgrading and Servicing Guide
Page 17
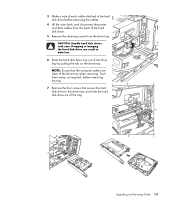
CAUTION: Handle hard disk drives with care. Upgrading and Servicing Guide 13 Dropping or banging the hard disk drive can result in data loss. 6 Slide the hard disk drive tray out of the ...
CAUTION: Handle hard disk drives with care. Upgrading and Servicing Guide 13 Dropping or banging the hard disk drive can result in data loss. 6 Slide the hard disk drive tray out of the ...
Upgrading and Servicing Guide
Page 18
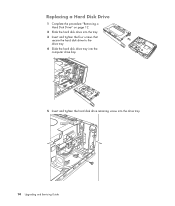
Replacing a Hard Disk Drive 1 Complete the procedure "Removing a Hard Disk Drive" on page 12. 2 Slide the hard disk drive into the tray. 3 Insert and tighten the four screws that secure the hard disk drive to the drive tray. 4 Slide the hard disk drive tray into the computer drive bay. 5 Insert and tighten the hard disk drive retaining screw into the drive tray. 14 Upgrading and Servicing Guide
Replacing a Hard Disk Drive 1 Complete the procedure "Removing a Hard Disk Drive" on page 12. 2 Slide the hard disk drive into the tray. 3 Insert and tighten the four screws that secure the hard disk drive to the drive tray. 4 Slide the hard disk drive tray into the computer drive bay. 5 Insert and tighten the hard disk drive retaining screw into the drive tray. 14 Upgrading and Servicing Guide
Upgrading and Servicing Guide
Page 19
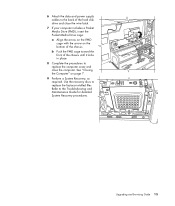
... the Computer" on the bottom of the chassis until it locks in place. 8 Complete the procedures to replace the computer cover and close the computer. Upgrading and Servicing Guide 15 6 Attach the data and power supply cables to the back of the hard disk drive and close the wire latch. 7 If...
... the Computer" on the bottom of the chassis until it locks in place. 8 Complete the procedures to replace the computer cover and close the computer. Upgrading and Servicing Guide 15 6 Attach the data and power supply cables to the back of the hard disk drive and close the wire latch. 7 If...

Upgrading and Servicing Guide
Page 20
... any memory module contacts. WARNING: Handle the memory module with care. Touching the gold contacts may damage the module. Avoid touching the memory chips. 16 Upgrading and Servicing Guide Before You Begin Observe the following requirements before removing and replacing the component: To determine which type and speed of memory module... and Drivers page, click See support and troubleshooting information, enter the model number of memory module could damage the system. Be careful to http://www.hp.com/support in -line memory modules).
... any memory module contacts. WARNING: Handle the memory module with care. Touching the gold contacts may damage the module. Avoid touching the memory chips. 16 Upgrading and Servicing Guide Before You Begin Observe the following requirements before removing and replacing the component: To determine which type and speed of memory module... and Drivers page, click See support and troubleshooting information, enter the model number of memory module could damage the system. Be careful to http://www.hp.com/support in -line memory modules).


