
Advanced Setup Guide
Page 3
... computer in the proper location 1 Using surge protection 2 Connecting to the computer 2 Connecting a Digital Camera (Photo or Video 8 Connecting Other Devices 10 Storing Documentation and Recovery Discs 10 Adjusting the Monitor 11 Adjusting the screen resolution by using Vista 11 Adjusting the screen resolution by using the NVIDIA Control Panel 11 Setting...
... computer in the proper location 1 Using surge protection 2 Connecting to the computer 2 Connecting a Digital Camera (Photo or Video 8 Connecting Other Devices 10 Storing Documentation and Recovery Discs 10 Adjusting the Monitor 11 Adjusting the screen resolution by using Vista 11 Adjusting the screen resolution by using the NVIDIA Control Panel 11 Setting...

Advanced Setup Guide
Page 16
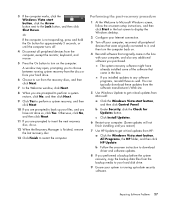
...scanners, video cameras, digital photo cameras, memory card readers, and PDAs (personal digital assistants) or handheld computers. Refer to store the system recovery discs with your device. Connecting Other Devices Other peripheral devices can be connected to -find, safe location. NOTE: You must use a 6-pin...NOTE: Some peripheral devices are not included with the 6-pin FireWire (IEEE 1394) connector on the computer. Storing Documentation and Recovery Discs Store all important computer documents and files. 10 Advanced Setup Guide (features vary by using USB or FireWire (IEEE 1394) ...
...scanners, video cameras, digital photo cameras, memory card readers, and PDAs (personal digital assistants) or handheld computers. Refer to store the system recovery discs with your device. Connecting Other Devices Other peripheral devices can be connected to -find, safe location. NOTE: You must use a 6-pin...NOTE: Some peripheral devices are not included with the 6-pin FireWire (IEEE 1394) connector on the computer. Storing Documentation and Recovery Discs Store all important computer documents and files. 10 Advanced Setup Guide (features vary by using USB or FireWire (IEEE 1394) ...
Advanced Setup Guide
Page 3
... computer in the proper location 1 Using surge protection 2 Connecting to the computer 2 Connecting a Digital Camera (Photo or Video 8 Connecting Other Devices 10 Storing Documentation and Recovery Discs 10 Adjusting the Monitor 11 Adjusting the screen resolution by using Vista 11 Adjusting the screen resolution by using the NVIDIA Control Panel 11 Setting...
... computer in the proper location 1 Using surge protection 2 Connecting to the computer 2 Connecting a Digital Camera (Photo or Video 8 Connecting Other Devices 10 Storing Documentation and Recovery Discs 10 Adjusting the Monitor 11 Adjusting the screen resolution by using Vista 11 Adjusting the screen resolution by using the NVIDIA Control Panel 11 Setting...

Advanced Setup Guide
Page 16
... front or back of the computer by model) This allows easy access to store the system recovery discs with your device. Connecting Other Devices Other peripheral devices can be connected to -find, safe location. Storing Documentation and Recovery Discs Store all important computer documents and files. 10 Advanced Setup Guide (features vary by using...
... front or back of the computer by model) This allows easy access to store the system recovery discs with your device. Connecting Other Devices Other peripheral devices can be connected to -find, safe location. Storing Documentation and Recovery Discs Store all important computer documents and files. 10 Advanced Setup Guide (features vary by using...

Advanced Setup Guide
Page 3
... computer in the proper location 1 Using surge protection 2 Connecting to the computer 2 Connecting a Digital Camera (Photo or Video 8 Connecting Other Devices 10 Storing Documentation and Recovery Discs 10 Adjusting the Monitor 11 Adjusting the screen resolution by using Vista 11 Adjusting the screen resolution by using the NVIDIA Control Panel 11 Setting...
... computer in the proper location 1 Using surge protection 2 Connecting to the computer 2 Connecting a Digital Camera (Photo or Video 8 Connecting Other Devices 10 Storing Documentation and Recovery Discs 10 Adjusting the Monitor 11 Adjusting the screen resolution by using Vista 11 Adjusting the screen resolution by using the NVIDIA Control Panel 11 Setting...

Advanced Setup Guide
Page 16
...to all computer user manuals and warranty information in an easy-to-find, safe location. It is a good idea to store the system recovery discs with the computer. NOTE: Some peripheral devices are not included with the documentation. These peripheral devices include printers, scanners, video cameras, digital ... by model) NOTE: You must use a 6-pin (not a 4-pin) FireWire (IEEE 1394) cable with your device. Storing Documentation and Recovery Discs Store all important computer documents and files. 10 Advanced Setup Guide (features vary by using USB or FireWire (IEEE 1394) ports.
...to all computer user manuals and warranty information in an easy-to-find, safe location. It is a good idea to store the system recovery discs with the computer. NOTE: Some peripheral devices are not included with the documentation. These peripheral devices include printers, scanners, video cameras, digital ... by model) NOTE: You must use a 6-pin (not a 4-pin) FireWire (IEEE 1394) cable with your device. Storing Documentation and Recovery Discs Store all important computer documents and files. 10 Advanced Setup Guide (features vary by using USB or FireWire (IEEE 1394) ports.
Getting Started
Page 3
... computer in the proper location 1 Using surge protection 1 Connecting to the computer 2 Connecting a Digital Camera (Photo or Video 8 Connecting Other Devices 10 Storing Documentation and Recovery Discs 10 Adjusting the Monitor 11 Adjusting the screen resolution by using Vista 11 Adjusting the screen resolution by using the NVIDIA Control Panel 11 Setting...
... computer in the proper location 1 Using surge protection 1 Connecting to the computer 2 Connecting a Digital Camera (Photo or Video 8 Connecting Other Devices 10 Storing Documentation and Recovery Discs 10 Adjusting the Monitor 11 Adjusting the screen resolution by using Vista 11 Adjusting the screen resolution by using the NVIDIA Control Panel 11 Setting...

Getting Started
Page 20
Refer to store the system recovery discs with your device. This allows easy access to all computer user manuals and warranty information in an easy-to-find, safe location. Connecting Other Devices ... that came with the documentation. NOTE: Some peripheral devices are not included with the 6-pin FireWire (IEEE 1394) connector on the computer. Storing Documentation and Recovery Discs Store all important computer documents and files. 10 Getting Started (features vary by using USB or FireWire (IEEE 1394) ports. NOTE: You must use a 6-pin...
Refer to store the system recovery discs with your device. This allows easy access to all computer user manuals and warranty information in an easy-to-find, safe location. Connecting Other Devices ... that came with the documentation. NOTE: Some peripheral devices are not included with the 6-pin FireWire (IEEE 1394) connector on the computer. Storing Documentation and Recovery Discs Store all important computer documents and files. 10 Getting Started (features vary by using USB or FireWire (IEEE 1394) ports. NOTE: You must use a 6-pin...

Getting Started Guide
Page 3
... computer in the proper location 1 Using surge protection 1 Connecting to the computer 2 Connecting a Digital Camera (Photo or Video 8 Connecting Other Devices 10 Storing Documentation and Recovery Discs 10 Adjusting the Monitor 11 Adjusting the screen resolution by using Vista 11 Adjusting the screen resolution by using the NVIDIA Control Panel 11 Setting...
... computer in the proper location 1 Using surge protection 1 Connecting to the computer 2 Connecting a Digital Camera (Photo or Video 8 Connecting Other Devices 10 Storing Documentation and Recovery Discs 10 Adjusting the Monitor 11 Adjusting the screen resolution by using Vista 11 Adjusting the screen resolution by using the NVIDIA Control Panel 11 Setting...

Getting Started Guide
Page 20
It is a good idea to the documentation that came with the documentation. Refer to store the system recovery discs with your device. These peripheral devices include printers, scanners, video cameras, digital photo cameras, memory card readers, and PDAs (personal ...the computer. NOTE: Some peripheral devices are not included with the 6-pin FireWire (IEEE 1394) connector on the computer. Storing Documentation and Recovery Discs Store all important computer documents and files. 10 Getting Started (features vary by using USB or FireWire (IEEE 1394) ports. Connecting Other Devices...
It is a good idea to the documentation that came with the documentation. Refer to store the system recovery discs with your device. These peripheral devices include printers, scanners, video cameras, digital photo cameras, memory card readers, and PDAs (personal ...the computer. NOTE: Some peripheral devices are not included with the 6-pin FireWire (IEEE 1394) connector on the computer. Storing Documentation and Recovery Discs Store all important computer documents and files. 10 Getting Started (features vary by using USB or FireWire (IEEE 1394) ports. Connecting Other Devices...
Upgrading and Servicing Guide
Page 12
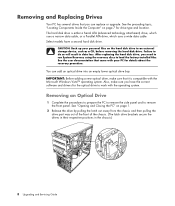
See the preceding topic, "Locating Components Inside the Computer" on page 7 for details about the recovery procedure. Select models have the correct software and drivers for the optical drive to an external storage device, such as a CD, before removing the ... which uses a narrow data cable, or a Parallel ATA drive, which uses a wide data cable. See the user documentation that you need to run System Recovery using the recovery discs to do so will result in the chassis.) 8 Upgrading and Servicing Guide IMPORTANT: Before adding a new optical drive, make sure you have a second hard...
See the preceding topic, "Locating Components Inside the Computer" on page 7 for details about the recovery procedure. Select models have the correct software and drivers for the optical drive to an external storage device, such as a CD, before removing the ... which uses a narrow data cable, or a Parallel ATA drive, which uses a wide data cable. See the user documentation that you need to run System Recovery using the recovery discs to do so will result in the chassis.) 8 Upgrading and Servicing Guide IMPORTANT: Before adding a new optical drive, make sure you have a second hard...
PC Troubleshooting
Page 3
Table of Contents Maintenance 1 Creating Data Backup Discs 1 Creating System Recovery Discs 1 Removing Unused Programs 2 Using Windows Update 2 Reviewing programs that automatically run at startup 2 Running the Disk Cleanup Program 2 Running Disk Cleanup ... Turning Off Your Computer 22 Updating Drivers 22 Microsoft System Restore 23 Software Program and Hardware Driver Reinstallation 23 System Recovery 24 Creating Recovery Discs 24 System Recovery Options 25 Starting system recovery from the hard disk drive 25 Starting system recovery from recovery discs 26 Table of Contents iii
Table of Contents Maintenance 1 Creating Data Backup Discs 1 Creating System Recovery Discs 1 Removing Unused Programs 2 Using Windows Update 2 Reviewing programs that automatically run at startup 2 Running the Disk Cleanup Program 2 Running Disk Cleanup ... Turning Off Your Computer 22 Updating Drivers 22 Microsoft System Restore 23 Software Program and Hardware Driver Reinstallation 23 System Recovery 24 Creating Recovery Discs 24 System Recovery Options 25 Starting system recovery from the hard disk drive 25 Starting system recovery from recovery discs 26 Table of Contents iii
PC Troubleshooting
Page 5
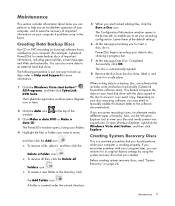
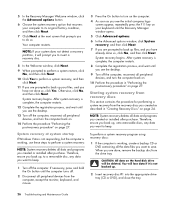
... following procedure is an exact copy. To remove a file, select it to its original factory settings by using the system recovery discs that you should perform while your computer is created under the current directory. Depending on your computer if problems arise in the... 24. Maintenance 1 When writing data to a backup disc, use the Windows Explorer tool to view your data to disc, showing a progress bar. 7 At the message Data Disc: Completed Successfully, click OK. Before creating system recovery discs, read "System Recovery" on your computer, (for more information. 1 Click...
... following procedure is an exact copy. To remove a file, select it to its original factory settings by using the system recovery discs that you should perform while your computer is created under the current directory. Depending on your computer if problems arise in the... 24. Maintenance 1 When writing data to a backup disc, use the Windows Explorer tool to view your data to disc, showing a progress bar. 7 At the message Data Disc: Completed Successfully, click OK. Before creating system recovery discs, read "System Recovery" on your computer, (for more information. 1 Click...
PC Troubleshooting
Page 28
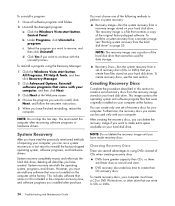
...hard disk drive. NOTE: The recovery image uses a portion of recovery discs from the hard disk drive" on your hard disk drive. To create recovery discs, see "Starting system recovery from the recovery image stored on page 25. Creating Recovery Discs Complete the procedure described in the...accessory box, and software programs you installed after recovering software programs or hardware drivers. DVD recovery discs take less time to perform a system recovery: Recovery Image-Run the system recovery from a set of repairing your computer at the Welcome screen. 4 Choose the program ...
...hard disk drive. NOTE: The recovery image uses a portion of recovery discs from the hard disk drive" on your hard disk drive. To create recovery discs, see "Starting system recovery from the recovery image stored on page 25. Creating Recovery Discs Complete the procedure described in the...accessory box, and software programs you installed after recovering software programs or hardware drivers. DVD recovery discs take less time to perform a system recovery: Recovery Image-Run the system recovery from a set of repairing your computer at the Welcome screen. 4 Choose the program ...
PC Troubleshooting
Page 29
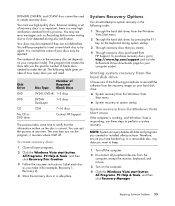
...DVD CD No CD or DVD drive Disc Type Number of blank discs needed to reinstall the software from HP Support. To create recovery discs: 1 Close all data and programs you create. 4 Through recovery discs purchased from the recovery image on the disc is a very high verification standard ...ensure you have backed up, to a removable disc, any data you the specific number of Required Blank Discs DVD-R, DVD+R 1-3 discs DVD+R Dual-Layer 1-2 discs CD-R 7-16 discs Contact HP Support The process takes some of your computer model. To purchase recovery discs, go to keep. 1 Turn off . ...
...DVD CD No CD or DVD drive Disc Type Number of blank discs needed to reinstall the software from HP Support. To create recovery discs: 1 Close all data and programs you create. 4 Through recovery discs purchased from the recovery image on the disc is a very high verification standard ...ensure you have backed up, to a removable disc, any data you the specific number of Required Blank Discs DVD-R, DVD+R 1-3 discs DVD+R Dual-Layer 1-2 discs CD-R 7-16 discs Contact HP Support The process takes some of your computer model. To purchase recovery discs, go to keep. 1 Turn off . ...
PC Troubleshooting
Page 30
..., and then click Next. System recovery begins. Starting system recovery from recovery discs This section contains the procedure for performing a system recovery from the recovery discs you created as you see the desktop. 13 Turn off the computer. You will prompt you to insert a recovery disc. 8 In the Welcome window, click... the computer, reconnect all peripheral devices, and turn the computer back on. 10 Perform the procedure in "Creating Recovery Discs" on page 27. System recovery at the next screen that prompts you to do so. Therefore, ensure you back up files, and you have...
..., and then click Next. System recovery begins. Starting system recovery from recovery discs This section contains the procedure for performing a system recovery from the recovery discs you created as you see the desktop. 13 Turn off the computer. You will prompt you to insert a recovery disc. 8 In the Welcome window, click... the computer, reconnect all peripheral devices, and turn the computer back on. 10 Perform the procedure in "Creating Recovery Discs" on page 27. System recovery at the next screen that prompts you to do so. Therefore, ensure you back up files, and you have...
PC Troubleshooting
Page 31
..., or until you purchased. c Click Install Updates. 6 Restart your files, and you to any additional software you restart.) 7 Use HP Update to get critical updates from the recovery discs, and then click Next. 7 In the Welcome window, click Next. 8 When you are prompted to perform a system restore, click ... the monitor, keyboard, and mouse. 5 Press the On button to -date security software. Or If the computer is finished, remove the last recovery disc. 13 Click Finish to it, and then turn on . 4 Reinstall software that originally came in the last screen to display the Windows desktop....
..., or until you purchased. c Click Install Updates. 6 Restart your files, and you to any additional software you restart.) 7 Use HP Update to get critical updates from the recovery discs, and then click Next. 7 In the Welcome window, click Next. 8 When you are prompted to perform a system restore, click ... the monitor, keyboard, and mouse. 5 Press the On button to -date security software. Or If the computer is finished, remove the last recovery disc. 13 Click Finish to it, and then turn on . 4 Reinstall software that originally came in the last screen to display the Windows desktop....

Getting Started Guide
Page 3
... the computer in the proper location 1 Using surge protection 1 Connecting to the computer 2 Connecting a Digital Camera (Photo or Video 4 Connecting Other Devices 6 Storing Documentation and Recovery Discs 6 Adjusting the Monitor 7 Adjusting the screen resolution by using Vista 7 Adjusting the screen resolution by using the NVIDIA Control Panel 7 Setting Up a Local Area Network...
... the computer in the proper location 1 Using surge protection 1 Connecting to the computer 2 Connecting a Digital Camera (Photo or Video 4 Connecting Other Devices 6 Storing Documentation and Recovery Discs 6 Adjusting the Monitor 7 Adjusting the screen resolution by using Vista 7 Adjusting the screen resolution by using the NVIDIA Control Panel 7 Setting Up a Local Area Network...
Getting Started Guide
Page 14
... Connecting Other Devices Other peripheral devices can be connected to the front or back of the computer by model) Refer to store the system recovery discs with the 6-pin FireWire (IEEE 1394) connector on the computer. NOTE: Some peripheral devices are not included with your device. It is...) or handheld computers. NOTE: You must use a 6-pin (not a 4-pin) FireWire (IEEE 1394) cable with the documentation. Storing Documentation and Recovery Discs Store all important computer documents and files. 6 Getting Started (features vary by using USB or FireWire (IEEE 1394) ports.
... Connecting Other Devices Other peripheral devices can be connected to the front or back of the computer by model) Refer to store the system recovery discs with the 6-pin FireWire (IEEE 1394) connector on the computer. NOTE: Some peripheral devices are not included with your device. It is...) or handheld computers. NOTE: You must use a 6-pin (not a 4-pin) FireWire (IEEE 1394) cable with the documentation. Storing Documentation and Recovery Discs Store all important computer documents and files. 6 Getting Started (features vary by using USB or FireWire (IEEE 1394) ports.

Getting Started Guide
Page 3
... the computer in the proper location 1 Using surge protection 2 Connecting to the computer 2 Connecting a Digital Camera (Photo or Video 4 Connecting Other Devices 6 Storing Documentation and Recovery Discs 6 Adjusting the Monitor 6 Adjusting the screen resolution by using Vista 6 Adjusting the screen resolution by using the NVIDIA Control Panel 7 Setting Up a Local Area Network...
... the computer in the proper location 1 Using surge protection 2 Connecting to the computer 2 Connecting a Digital Camera (Photo or Video 4 Connecting Other Devices 6 Storing Documentation and Recovery Discs 6 Adjusting the Monitor 6 Adjusting the screen resolution by using Vista 6 Adjusting the screen resolution by using the NVIDIA Control Panel 7 Setting Up a Local Area Network...


